Have you recently purchased an M2 SSD and need to format it? Formatting your M2 SSD may seem daunting, but with the right steps, it’s actually a simple process. Just like with any SSD, formatting wipes all your data and starts anew. But there are additional steps you’ll need to take when formatting an M2 SSD.
Don’t worry; we’ve got you covered. In this blog post, we’ll explain everything you need to know about how to format your M2 SSD. We’ll cover the necessary prep work, like backing up your data and creating a bootable USB drive.
We’ll also go over the specific steps you need to take to format your M2 SSD, like initializing it in Disk Management and selecting the right file system. Whether you’re formatting your M2 SSD for the first time or just need a refresher, this guide has everything you need. So let’s get started and make sure your M2 SSD is working at its full potential.
Understanding M2 SSDs
If you’re looking to format your M2 SSD, you’re in luck because the process isn’t as complicated as you might think! First, you’ll need to make sure your M2 SSD is properly connected to your computer. Once that’s done, you can format the drive by going to the “Disk Management” section of your computer’s settings. From there, you can find your M2 SSD, right-click on it, and select “Format.
” Keep in mind that formatting your M2 SSD will erase all of the data on the drive, so be sure to back up any important files before beginning the process. Additionally, you may need to install drivers or firmware updates for your M2 SSD before it can be properly recognized by your computer. With a little bit of know-how, formatting your M2 SSD can be a breeze!
What is M2 SSD?
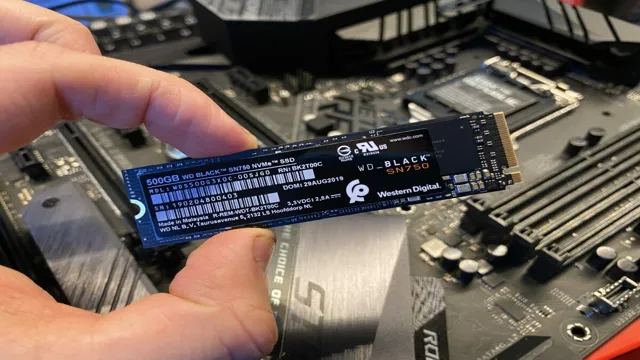
M2 SSDs are a type of solid-state drive that use the M.2 interface for connectivity, which is a small, rectangular slot found on newer motherboards. They typically offer faster speeds and higher capacities than traditional hard drives, making them ideal for use as a primary storage device in desktops, laptops, and even some high-end smartphones.
M2 SSDs come in different sizes, including 2242, 2260, and 2280, with the last being the most common. They also come in different forms, including SATA, NVMe, and PCIe, which determine the interface speed, compatibility, and performance. Overall, M2 SSDs offer several significant advantages over traditional hard drives, including faster boot and load times, lower power consumption, and improved durability.
If you’re looking to upgrade your system’s storage performance, an M2 SSD might be just what you need.
Advantages of M2 SSD
M2 SSDs are the latest and greatest when it comes to improving the storage capabilities of your computer. They are incredibly fast and efficient, with read and write speeds that blow traditional hard drives out of the water. In fact, M2 SSDs can be up to 5 times faster than regular hard drives! This means that you’ll be able to load programs and files almost instantly, which can save you loads of time in the long run.
Another advantage of M2 SSDs is that they take up very little space in your computer. They are much smaller than traditional hard drives, which means that you’ll have more room for other components like graphics cards and cooling systems. Plus, because they are so compact, they are also much easier to install and remove from your computer.
All in all, M2 SSDs are a game-changer for anyone who wants to improve the performance of their computer.
Types of M2 SSD
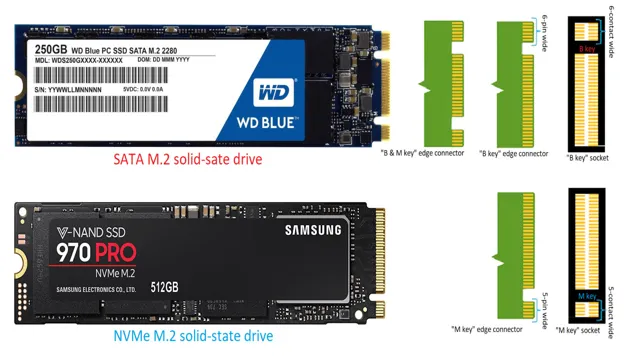
M2 SSD M2 SSDs come in a variety of types, each with its own advantages and disadvantages. One major difference is between SATA and NVMe M2 SSDs. Like regular SATA SSDs, SATA M2 SSDs work via the SATA interface and provide similar speeds.
NVMe M2 SSDs, on the other hand, utilize a PCIe interface and are much faster. Another difference between M2 SSDs is their keying. M2 SSDs can have either a B key or an M key, and some can even have both.
A B key SSD will only fit into a B key slot, while an M key SSD will only fit into an M key slot. If a SSD has both a B and M key, it is known as a B&M key SSD, and can fit into both types of slots. It’s important to make sure that your motherboard has the correct key slot for the M2 SSD you plan to use, as well as the correct type of interface.
By understanding the different types of M2 SSDs, you can choose the one that’s right for your needs and upgrade to lightning-fast storage.
Preparing for Formatting
If you want to format your M.2 SSD drive, it’s worth taking a few steps to prepare beforehand. Start by backing up any data you want to keep, as formatting will erase everything on the drive.
Next, make sure you have the necessary tools and software. Most operating systems have built-in tools for formatting drives, so check in your system settings to see what’s available. If you need more advanced formatting options, consider downloading third-party software designed specifically for formatting SSDs.
Once you have everything you need, it’s time to start the formatting process. Follow the instructions carefully, and be patient – formatting can take some time, especially for larger drives. With a little preparation and care, you can easily format your M.
2 SSD and get it ready for your next project.
Back-up your important data
When it’s time to format your computer, it’s crucial to prepare beforehand. One essential step is to back up your important data. Losing files like family photos, important documents, or work projects can be heartbreaking, so it’s best to create a backup before proceeding.
You can choose to back up your data to an external hard drive, USB drive, or cloud storage service. Each option has its pros and cons, depending on your preferences and the amount of data you need to save. External hard drives offer high storage capacity but can be bulky and vulnerable to physical damage.
USB drives are portable and convenient but may not have enough storage space. Meanwhile, cloud storage services need an internet connection to access your files, but they offer the flexibility and security of saving your data online. Whatever method you choose, make sure to test your backup and verify that all your important files are securely saved.
By doing so, you can have peace of mind when formatting your computer and avoid the risk of losing your valuable data.
Creating a bootable USB drive
Preparing a bootable USB drive is not as complicated as it may seem, but it requires some preparation to avoid any mishaps during the formatting process. First and foremost, ensure that all important files are backed up before proceeding with the formatting process. This is crucial because the formatting of the USB drive will erase all the data stored on it.
Next, make sure that the USB drive is plugged into a compatible device and is recognized by the system. In addition, ensure that the USB drive has enough storage capacity to host the operating system or software you plan on using. Once these preparations are complete, you’re ready to move ahead with formatting the USB drive.
Formatting M2 SSD on Windows
Formatting an M2 SSD on Windows can be a bit daunting, but don’t worry, it’s not as complicated as you might think. First, determine if your M2 SSD is your primary drive or simply a secondary drive for storage. If it’s your primary drive, you’ll want to start by creating a bootable USB drive with Windows installation media.
Once you’ve booted from the USB drive, select the M2 SSD drive and proceed with the installation process. If your M2 SSD is just for storage, the formatting process is relatively simple. First, open Disk Management by right-clicking on the Start menu and selecting “Disk Management.
” Next, locate the M2 SSD drive and right-click on it, then select “Format.” A window will pop up asking for the formatting options, such as file system and allocation unit size. Select your options, then click “OK.
” It’s important to note that formatting your M2 SSD will erase all data on the drive, so be sure to back up any important files beforehand. Additionally, make sure to select the correct drive when formatting to avoid accidentally wiping the wrong one. With these precautions in mind, formatting your M2 SSD should be a breeze.
Using Disk Management tool
If you have recently purchased an M2 SSD and need to format it on Windows, the Disk Management tool is an excellent option to use. It’s a built-in tool in Windows that allows you to manage your computer’s disks, including formatting and partitioning them. To format the M2 SSD, first, you need to connect it to your computer and open Disk Management by right-clicking on the Windows button and selecting “Disk Management.
” Once you’re in Disk Management, find the M2 SSD in the list of drives, right-click on it, and select “Format.” Follow the prompts to choose the file system, allocation unit size, volume label, and other formatting options. Click “OK” to proceed with the formatting, and wait for it to complete.
Remember that formatting your M2 SSD will delete all data on it, so be sure to back up any files you need to keep. With the Disk Management tool, formatting an M2 SSD on Windows is quick and straightforward, so you’ll be up and running in no time.
Using Command Prompt
Formatting an M2 SSD on Windows can be done using Command Prompt. It’s an incredibly useful tool for those who want to do things faster and more efficiently. However, not everyone is familiar with how to use Command Prompt, and it can be intimidating at first.
But fear not, because with just a few simple commands, you can format your M2 SSD in no time. First, you need to open Command Prompt as an administrator. Then, type in “diskpart” and press Enter.
This will bring up the DiskPart command-line utility. Next, you need to type in “list disk” and press Enter. This will show you a list of all the disks connected to your computer.
Once you have identified your M2 SSD, type in “select disk X” (replace X with the number of your M2 SSD) and press Enter. Finally, type in “clean” and press Enter to wipe all data on the disk, followed by “create partition primary” and press Enter to create a new primary partition. And that’s it! You have successfully formatted your M2 SSD using Command Prompt.
Formatting M2 SSD on Mac
If you are wondering how to format M2 SSD on Mac, you have come to the right place. Formatting a drive can be intimidating, especially for those who are not tech-savvy. But don’t worry, it is not as complicated as it may seem.
The first step is to connect your M2 SSD to your Mac using a compatible adapter. Then, open the Disk Utility application, which can be found in your Mac’s Utilities folder. Select the M2 drive from the list of drives on the left side of the screen and click on the “Erase” button.
Choose the file system format you prefer, such as macOS Extended (Journaled), and give your drive a name. Finally, click on “Erase” again to begin the formatting process. You may need to wait a few minutes, depending on the size of your drive.
Once the process is complete, your M2 SSD will be ready to use on your Mac. By following these simple steps, you can format your M2 SSD on Mac without any hassle.
Using Disk Utility
If you’re looking to format your M2 SSD on a Mac, Disk Utility is the tool you need. First, connect the M2 SSD to your Mac using a compatible adapter or enclosure. Then, launch Disk Utility from your Applications folder.
Select the M2 SSD from the list of drives, and click on the Erase button. In the dialog box that appears, choose a name for your drive, select the file system you want to use (e.g.
APFS or Mac OS Extended), and leave the Scheme as GUID Partition Map. Finally, click on Erase and wait for the process to complete. Once done, your M2 SSD will be formatted and ready to use.
Just remember that formatting erases all data on the drive, so be sure to back up any important files beforehand. With Disk Utility, formatting an M2 SSD on a Mac is quick and easy.
Conclusion and Caution
Formatting an M.2 SSD may seem like a daunting task, but with a little bit of knowledge and the right tools, it’s actually quite simple. By following these steps, you’ll be able to give your M.
2 SSD the TLC it deserves and get it up and running in no time. So don’t be afraid to roll up your sleeves and dive in – your M.2 SSD will thank you for it in the long run!”
FAQs
What is an m2 SSD and how does it differ from a traditional SSD?
An m2 SSD is a newer form factor that connects directly to the motherboard, whereas traditional SSDs connect using SATA cables. This allows for faster read and write speeds, and the smaller size makes it ideal for compact devices.
Can any computer use an m2 SSD?
Not all computers are compatible with m2 SSDs. You’ll need to check that your motherboard has an m2 slot and that it supports the type of m2 SSD you want to use.
How do I install an m2 SSD?
Installing an m2 SSD involves opening up your computer and inserting the drive into the appropriate slot on the motherboard. Consult your computer manual or seek assistance from a professional if you’re uncertain.
What kind of performance boost can I expect from using an m2 SSD?
You can expect much faster load times and file transfer speeds compared to a traditional hard drive or even a SATA-based SSD.
Can I use an m2 SSD as a boot drive?
Yes, an m2 SSD can be used as a boot drive, allowing for faster boot times and overall system performance. Just make sure your motherboard supports booting from an m2 drive.