
If you’re a gaming enthusiast, you know how important it is to have a good laptop that can handle all your favorite games. The ASUS Scar 2 is a laptop that was specifically designed with gamers in mind. It has a powerful processor, good graphics, and ample storage space.
However, if you want to take your gaming experience to the next level, you might consider upgrading its SSD. An SSD (Solid State Drive) is a type of storage device that can help your laptop run faster and smoother. By upgrading your Scar 2’s SSD, you can significantly reduce the boot-up time and loading time of your favorite games while also increasing its overall performance.
Whether you’re a casual gamer or a professional one, upgrading your laptop’s SSD is a smart choice to improve your gaming experience. In this blog, we’ll guide you through the process of upgrading your Scar 2’s SSD. We’ll talk about the different types of SSDs, the benefits of upgrading, and the steps you need to follow to upgrade it.
We’ll also provide some tips and tricks that can help you get the most out of your newly upgraded laptop. So, if you’re ready to make your Scar 2 even better, keep on reading!
Check Compatible SSDs
If you’re looking to upgrade the SSD on your ASUS Scar II laptop, one of the first things you need to consider is compatibility. Not all SSDs will work with your laptop, so it’s important to do some research before making a purchase. To make things easier, ASUS provides a list of compatible SSDs on their website.
You can also check with the SSD manufacturer to ensure compatibility. Additionally, make sure to choose an SSD with the right storage capacity for your needs. A larger SSD will give you more space for files and programs, but it may also be more expensive.
It’s important to find the right balance between performance and price when upgrading your SSD. With a little bit of planning and research, you can upgrade your ASUS Scar II with an SSD that will improve your laptop’s performance and give you more storage space.
Asus Scar 2 Compatible SSDs
If you’re looking to upgrade your Asus Scar 2’s storage with an SSD, then it’s essential to choose a compatible one. By doing so, you can maximize the laptop’s performance and take advantage of its fast read and write speeds. There are several SSDs that work well with the Asus Scar
One option is the Samsung 970 EVO Plus, known for its high endurance and reliability. Another great choice is the Western Digital WD Black SN750, which boasts impressive sequential read and write speeds. If you’re looking for something more affordable, you can consider the Crucial MX500, which offers excellent value for its price point.
Whatever your budget may be, make sure to choose an SSD that’s compatible with your Asus Scar 2 to ensure optimal performance.
Back Up Data and Shut Down
If you want to upgrade the SSD on your ASUS Scar 2 laptop, it’s important to back up all of your data and properly shut down the computer before getting started. This will help ensure that you don’t lose any important files or damage your system during the upgrade process. Once you’ve backed up your data, you can open up your laptop and locate the existing SSD.
Remove it carefully, making sure not to damage any other components in the process. Then, install your new SSD and secure it in place before closing up your laptop and restarting it. With your new SSD installed, you’ll likely notice a significant improvement in your computer’s speed and performance.
If you’re not comfortable performing this upgrade on your own, consider seeking the help of a professional to ensure that your laptop is properly upgraded and functioning at its best.
Creating a Backup
Creating a backup of your data is an important step in safeguarding your information. Whether it’s important documents, precious photos, or essential files, backing up your data ensures that you don’t lose them in case of unforeseen events like hardware failure, malware attacks, or accidental deletion. To create a backup, you can use a variety of methods including cloud storage, external hard drives, or specialized backup software.
Once you have decided on the method, it’s essential to shut down all running applications to make sure that you have a complete backup of all your data. It’s also recommended to carry out backups regularly to ensure that all recent changes are saved. So, taking the time to back up your data today can save you from the loss of important information tomorrow.
Open Bottom Cover and Locate SSD
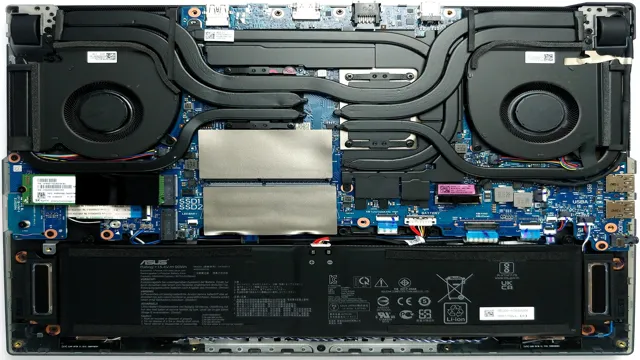
If you’re looking to upgrade the SSD on your Asus Scar 2, the first step is to open the bottom cover of your laptop. This can be done by loosening the screws on the bottom of the laptop and gently lifting the cover off. Once the cover is removed, you’ll need to locate the SSD, which is typically located near the center of the laptop.
It is usually a small, rectangular circuit board with a few screws and connectors. Once you have located the SSD, you can carefully remove it by unscrewing the screws and gently pulling it out. Be sure to handle the SSD carefully to avoid damaging it.
With the SSD removed, you can then replace it with your new, upgraded SSD. Simply connect the new SSD to the connectors and secure it with the screws. Once you’re finished, be sure to replace the bottom cover and tighten the screws back in place.
With your new SSD installed, you’ll have a faster and more efficient laptop that’s ready to handle your favorite applications and programs!
Opening the Bottom Cover Safely
If you’re looking to upgrade your laptop’s storage, the first step is to locate the SSD. To do so, you’ll need to open the bottom cover safely. Before you begin, make sure you have a good understanding of your laptop’s hardware and its components.
The last thing you want is to accidentally damage your laptop while attempting to open the bottom cover! Be sure to wear an anti-static wrist strap to prevent any static electricity from damaging your hardware. Once you’ve taken the necessary precautions, locate the screws on the bottom cover and gently unscrew them. Then, carefully remove the bottom cover and locate the SSD.
It should be easy to identify as it’s usually a small rectangular component. If you’re unsure of what the SSD looks like, refer to your laptop’s manual or do some research online. Remember to be gentle when working inside your laptop and take your time to avoid any accidents!
Replace with New SSD
Looking to upgrade your Asus Scar 2 SSD? Well, it’s easier than you might think. The first step is to find a new SSD that is compatible with your laptop model. Once you have your new SSD, make sure to save any important data from your old drive onto an external hard drive or cloud storage.
Next, power down your laptop and remove the bottom cover to access the old drive. Carefully remove the old SSD by unscrewing it and gently pulling it out. Insert your new SSD in the same manner, screw it in place, and replace the bottom cover.
Finally, power up your laptop and reinstall your operating system. Voila! Your Asus Scar 2 has now been upgraded with a shiny new SSD, providing faster boot and load times for all your programs and files.
Removing Old SSD and Installing New One
If you’re looking to upgrade your computer’s performance, replacing your old SSD with a new one might be a great option. Before getting started, make sure to back up all important data and shut down your computer. Once opened, locate the old SSD and carefully remove it from the slot using a screwdriver or any necessary tools.
Before installing the new SSD, check if it is compatible with your device. If it is, slide it into the slot and screw it into place, making sure it is secure. Finally, close your computer and power it up to start enjoying the benefits of your new SSD.
By replacing your old SSD with a new one, you can experience improved speed, performance, and storage capacity for your device.
Reassemble and Power Up
The final step in upgrading your Asus Scar 2’s SSD is reassembling everything and powering up your laptop. Begin by carefully reattaching the bottom cover and tightening all the screws. Place the battery back into its compartment and reconnect any cables you might have removed during the SSD installation process.
Once everything is securely in place, plug in the power adapter and press the power button to turn on your laptop. If all goes well, your new SSD should now be detected by your operating system. To ensure that everything is working properly, check the SSD’s status and monitor its performance.
For best results, run a few benchmark tests to see how much of an improvement you have achieved over your previous setup. Congratulations! You have successfully upgraded your Asus Scar 2’s SSD and should now notice significant speed and performance improvements while using your laptop.
Replacing Bottom Cover and Turning On PC
Now that you’ve successfully removed the old cover and replaced it with a new one, it’s time to power up your PC and see if everything is working properly. Before you hit the power button, make sure all the screws are tightly secured and the cover is flush against the case. Once you’re confident everything is snug, plug in all necessary peripherals, such as your monitor, mouse, and keyboard.
Then, press the power button and listen for any abnormal sounds, such as whirring, buzzing, or clicking. If everything seems normal, wait patiently as your computer boots up. If you notice any issues, such as error messages or an inability to boot properly, don’t panic – it may just be a simple fix like checking the connections or troubleshooting your BIOS settings.
With a bit of patience and know-how, you’ll have your PC up and running in no time.
Restore Data Backup and Test
Upgrading the SSD on your ASUS Scar 2 laptop is a great way to boost its performance and storage capacity. However, it is important to ensure that all your data is backed up before proceeding with the upgrade process. You can use an external hard drive or cloud storage service to create a backup of your files and documents.
Once the backup is complete, you can proceed with installing the new SSD by opening the laptop casing and removing the old drive and replacing it with the new one. After the new drive is installed, you will need to restore the data backup to the new drive and test its functionality to ensure that everything is working correctly. By following these steps, you can upgrade your ASUS Scar 2 laptop with ease and enjoy faster speeds and increased storage capacity for all your computing needs.
Restoring Backup and Testing the New SSD
Now that we’ve cloned our old hard drive onto the new SSD, it’s time to restore our data backup and test if everything is working properly. The first step is to connect our backup external drive to our computer and transfer all the data onto the new SSD. This can take some time depending on the size of your backup, so be patient.
Once the transfer is complete, we can start testing our new SSD by running various programs and checking the read and write speeds. We can also try booting up our computer to see if everything is working as it should. If any issues arise, it’s important to troubleshoot them immediately to avoid any potential problems.
Overall, restoring the data backup and testing the new SSD is an important step in ensuring a smooth transition to a faster and more efficient storage solution.
Conclusion
And there you have it, folks – upgrading the SSD in your ASUS Scar 2 is no longer a daunting task. With the right tools and a little bit of patience, you can give your gaming laptop the boost it deserves. So, don’t let slow load times hold you back from victory.
Upgrade that SSD and watch your performance soar.”
FAQs
What is the maximum SSD capacity that ASUS Scar 2 supports?
The ASUS Scar 2 supports up to a 2TB M.2 NVMe SSD.
Is it possible to upgrade the SSD in ASUS Scar 2 on your own?
Yes, upgrading the SSD in ASUS Scar 2 is easy and can be done on your own. Just open the back panel and replace the existing SSD with a new one.
Which type of SSD is compatible with the ASUS Scar 2?
The ASUS Scar 2 supports PCIe 3.0 x4 NVMe SSDs. Make sure to choose an SSD with the same specification.
Do I need to reinstall Windows after upgrading the SSD in ASUS Scar 2?
It is not necessary to reinstall Windows after upgrading the SSD. You can clone the existing drive onto the new one using cloning software.
Can I use an external SSD with ASUS Scar 2?
Yes, you can use an external SSD with ASUS Scar 2 via the USB-C port. It can be a great option if you need extra storage capacity without opening up your laptop.