Looking to upgrade to a new SSD but worried about transferring your Windows 11 files and data? Don’t fret – we’ve got you covered. Migrating your Windows 11 to a new SSD can be a daunting task, but it’s essential for boosting your computer’s speed and performance. Imagine having a machine that boots up in seconds and can run multiple programs simultaneously without any lag.
Whether you’re a gamer or a professional, a faster machine can make all the difference. In this blog post, we’ll guide you through the steps required to transfer Windows 11 to a new SSD, hassle-free. So sit back, relax, and let’s get started!
Check System Compatibility
If you are looking to transfer Windows 11 from one SSD to another, it’s important to check the compatibility of your system before proceeding. The first step is to ensure that the new SSD is compatible with your motherboard. Be sure to check the interface of both the old and new SSDs, as well as the available slots on your motherboard.
You may also need to check the size and type of the new SSD to ensure it is compatible with your system. Additionally, you should make sure that your system meets the hardware requirements for Windows 11, as it requires a minimum of 64-bit processor, at least 4GB of RAM, and 64GB of storage. Once you have confirmed compatibility, you can proceed with transferring your Windows 11 operating system by using a cloning software or manually transferring your files.
By following these steps, you can safely transfer your Windows 11 operating system without any compatibility issues.
Determine SSD Specifications
When upgrading to a solid-state drive (SSD), it’s important to determine the specifications that will work best for your system. One crucial factor to consider is system compatibility. Before making any purchases, check your computer’s manual or manufacturer’s website to ensure that the SSD you are considering is compatible with your system’s interface.
Commonly used interfaces include SATA III and PCIe, but it’s essential to confirm which one your system uses to prevent any issues down the line. Additionally, consider the form factor of your SSD, as not all form factors will fit in all computer cases. By making sure that your chosen SSD is compatible with your system’s interface and form factor, you can ensure a smooth upgrade process and optimal performance.
Review Current System Requirements
Before implementing any new system in your organization, it’s important to review the current system requirements and ensure that they are compatible. Compatibility issues can lead to system failures and can have a major impact on the overall productivity of your business. To check the compatibility of your current system, you should examine the hardware and software requirements of the new system and compare them to your existing system.
You may need to upgrade your hardware or software to avoid potential compatibility problems. Additionally, it’s essential to ensure that the new system is capable of integrating with any existing applications or databases to avoid any conflicts or loss of data. By taking the time to review your current system requirements and confirm their compatibility, you can save your organization time and money in the long run and ensure a smooth transition to the new system.
Backup Important Files
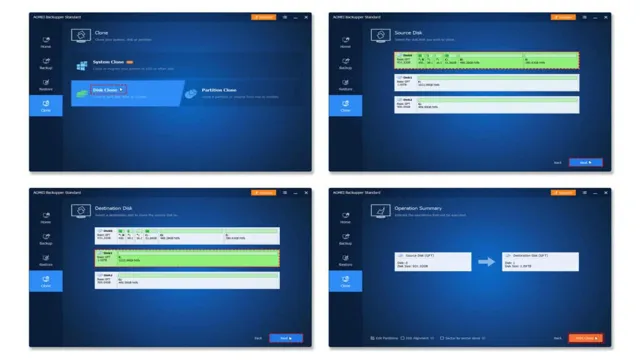
Transferring Windows 11 from one SSD to another can seem like a daunting task, but with the right tools and knowledge, it can be done easily. Before getting started, it’s important to back up all important files to avoid the risk of losing them during the transfer process. This can be done by using an external hard drive or cloud storage service.
Once the files have been backed up, the next step is to clone the original SSD to the new one using specialized software. This will create an exact copy of the original operating system, settings, and files, so that everything can be transferred seamlessly. It’s important to note that cloning may take some time, but once it’s complete, the new SSD can be installed and the computer can boot up as normal.
By following these steps and taking the time to properly backup important files, transferring Windows 11 to a new SSD can be done with ease.
Create a System Backup
Creating a system backup is an essential step to ensure that your important files are safe and secure. Backing up your files not only protects you from data loss, but it also allows you to restore your system and files to their original state if something goes wrong. There are several ways to backup your files, but the most common method is to use an external hard drive or cloud-based service.
An external hard drive is a physical device that connects to your computer via USB, while a cloud-based service allows you to upload your files to a remote server. Both options have their advantages and disadvantages, but they both work to ensure that your files are backed up and easily retrievable in case of an emergency. So don’t wait until it’s too late, take the time to create a system backup today and protect your important files from potential loss.
Backup Essential Files and Documents
In today’s digital age, backing up important files and documents is an essential practice that should not be overlooked. Losing crucial files can result in a lot of stress, wasted time, and sometimes even financial loss. The good news is that with the availability of cloud-based storage and external hard drives, backing up essential files has become much more accessible and convenient.
Whether it’s important work documents, photographs, or personal files, it is crucial to have a backup plan in place. By doing so, you can ensure that your valuable data will be safe even if your device is lost, stolen, or damaged. So, take the time to back up your important files today because the last thing you want is to lose your data due to unforeseen circumstances.
Remember, survival in the digital age is all about being proactive, and taking the necessary steps to prevent potential disasters from occurring.
Create Installation Media
If you’re looking to upgrade your computer’s storage, you might be wondering how to transfer Windows 11 from one SSD to another. Thankfully, the process is fairly straightforward. First, you’ll need to create installation media on a USB drive using Microsoft’s Media Creation Tool.
This tool will download a copy of Windows 11 and create a bootable drive that you can use to install the operating system on your new SSD. Once you’ve created the installation media, you’ll need to open your computer’s BIOS settings and select the USB drive as the primary boot device. From there, you can follow the prompts to install Windows 11 onto your new SSD.
Just be sure to back up any important files before you begin, as the installation process will wipe your old SSD clean. With a little bit of patience and the right tools, transferring Windows 11 to a new SSD can be a quick and easy process that’ll give your computer a new lease on life.
Download and Install Media Creation Tool
If you need to create installation media for your Windows operating system, the Media Creation Tool is a useful software to use. Before downloading and installing this tool, ensure that you have stable internet connectivity. Visit the official Microsoft website to find the Media Creation Tool and select the desired version of Windows to install.
Once the Media Creation Tool finishes downloading, open and launch the software. The software interface provides two options, upgrade this PC or create an installation media. To create installation media, select the latter option and choose the language, edition, and architecture.
Connect your USB or DVD storage media to your computer, and follow the on-screen instructions to complete the installation process. The Media Creation Tool is a useful utility tool that enables Windows users to fix installation errors and create bootable media, allowing them to reinstall Windows when the need arises.
Create Bootable USB
Creating a bootable USB drive is a crucial task when you want to install a new operating system or upgrade your current one. It is a handy tool that can save you a lot of time and hassle. To start, you must have a blank USB drive with at least 4GB of storage available.
Next, download the installation media of the operating system you need from the official website. After that, use software like Rufus or UNetbootin to create a bootable USB drive by selecting the downloaded ISO file and USB drive. This process should take a few minutes, and once it’s finished, you can use the USB drive to install your new operating system.
Just make sure that your computer has the option to boot from a USB drive by checking the BIOS settings. Overall, creating a bootable USB drive is an easy and straightforward process that can save you a lot of time and effort.
Install Windows 11 on New SSD
If you’re looking to upgrade your PC’s storage capacity or improve its overall performance, then transferring your Windows 11 operating system from one SSD to another is definitely worth considering. Fortunately, it’s a relatively straightforward process that you can do in just a few simple steps. First, you need to download and install a free disk cloning software like Clonezilla or EaseUS Todo Backup.
Once you have the software installed, you need to connect the new SSD to your PC and select it as the target drive. Then, run the disk cloning software and select the option to clone your existing SSD to the new one. This will create an exact copy of your Windows 11 operating system, including all your data, settings, and programs, onto the new SSD.
Once the cloning process is complete, shut down your PC, disconnect the old SSD, and boot up your computer using the new SSD. Voila! You now have a faster, more efficient system with all your files, settings, and programs intact. So go ahead and upgrade your SSD with confidence, knowing that transferring your Windows 11 is easier than you thought.
Insert Bootable USB
If you’re looking to install Windows 11 on a new SSD, you’ll need to start by inserting a bootable USB. This process can seem intimidating, but it’s actually quite simple. Begin by purchasing or creating a bootable USB drive that contains the Windows 11 installation files.
Connect the USB drive to your computer, and then restart the system. As your computer boots up, you’ll see a prompt asking you to choose a boot device. Select the USB drive from the list of options, and your computer will boot from it.
From there, you can follow the on-screen instructions to install Windows 11 on your new SSD. It’s essential to ensure that you format the SSD correctly and that you choose the correct drive to install Windows 11 on during the installation process. By taking your time and following the instructions carefully, you can successfully install Windows 11 on your new SSD and enjoy all the benefits of this exciting new operating system.
Follow Windows 11 Installation Step-by-Step
If you’re planning to install Windows 11 on a new SSD, make sure you follow the installation steps carefully to avoid any issues. Firstly, check your system requirements to ensure that the SSD is compatible with Windows 1 Once you have confirmed this, back up all your important data and files to an external drive to prevent any data loss during the installation process.
Then, download and create a bootable USB drive with the Windows 11 installation files. Once you have created the bootable USB, restart your computer and boot from the USB drive to begin the installation process. Follow the on-screen instructions and select your SSD as the destination drive for the installation.
After the installation is complete, set up your Windows 11 account and reinstall your important applications and files. With these simple steps, you can successfully install Windows 11 on a new SSD and enjoy its streamlined interface and improved features.
Activate Windows 11
If you want to transfer Windows 11 from one SSD to another, it’s actually a pretty straightforward process. The first step is to clone your old SSD onto the new one using software like Acronis True Image or Macrium Reflect. Once finished, you can replace the old SSD with the new one and boot up your system.
If you’re using a retail version of Windows 11, you’ll need to activate it on the new SSD. This can be done by going to Settings, then Update & Security, and clicking on Activation. From there, click on “Change product key” and enter the product key you received when you purchased Windows 1
If you’re using an OEM version, the activation should happen automatically. With these steps, you can easily transfer Windows 11 to a new SSD without any hassle.
Check Windows 11 License Status
If you’re using Windows 11 and wondering about the status of your license, it’s easy to check and activate it. Activating your license means that you can enjoy all the features of Windows 11, receive important security updates, and ensure that your operating system is running efficiently. To check your license status, simply go to Settings > System > About.
You’ll see a section labelled “Windows specifications” which will indicate whether your copy of Windows 11 is activated or not. If it’s not activated, don’t worry! You can easily activate it by clicking the “Activate Windows” option and following the prompts. It’s important to note that if you obtained your copy of Windows 11 through unauthorized means, activating your license may not be possible.
Make sure you obtain your copy of Windows 11 through official channels to avoid any issues with activation. By following these simple steps, you can ensure that your Windows 11 license is up to date and that you can enjoy all the benefits of this powerful operating system.
Activate Windows 11 with Product Key
Activating Windows 11 with a product key is a straightforward task. A product key is a unique set of characters that verifies the authenticity of your operating system. You can purchase a product key from Microsoft to activate your Windows 11, or if you upgraded from Windows 10, your product key will be automatically transferred.
To activate your Windows 11, go to the “Settings” menu and click on “Update & Security.” Then click on “Activation” from the sidebar. Click on the “Change product key” button and type in your product key.
Click “Next” and wait for Windows to verify your product key. Once verified, Windows 11 will be activated, and you will have access to all its features. Remember, activating your Windows 11 is essential, as Microsoft will prompt you to activate it after a certain period.
So, don’t forget to activate your Windows 11 to avoid any inconvenience.
Conclusion
In conclusion, transferring Windows 11 from one SSD to another may seem daunting at first, but with the right tools and approach, it can be as smooth as a hot knife through butter. Remember to clone your old SSD, check for any compatibility issues, and ensure that your new SSD is in good working condition. With these steps in mind, you’ll be able to seamlessly transfer your operating system and get back to (digitally) conquering the world in no time.
Happy transferring!
FAQs
What is the best way to transfer Windows 11 from one SSD to another?
The best way to transfer Windows 11 from one SSD to another is to use a cloning software such as EaseUS Todo Backup.
Can I transfer Windows 11 to a new SSD without reinstalling it?
Yes, it is possible to transfer Windows 11 to a new SSD without reinstalling it by using a cloning software.
How much time does it take to transfer Windows 11 from one SSD to another?
The time required to transfer Windows 11 from one SSD to another depends on the size of the data and the speed of the SSD and the cloning software being used.
Can I use the same Windows product key on the new SSD after transfer?
Yes, you can use the same Windows product key on the new SSD after the transfer as long as the hardware configuration remains the same. However, if you change major hardware components such as the motherboard, you may need a new product key.