If you own a solid-state drive (SSD) in your computer, you may want to learn how to unallocate it. This process of unallocating an SSD can help speed up your system or repair any issues you may be experiencing. But what is unallocating an SSD, and how do you go about it? Unallocating an SSD essentially erases all the data on the drive and resets it to its original state, freeing up any previously allocated space.
Think of it like wiping the slate clean. In this blog post, we will guide you through the steps to unallocate an SSD, so you can optimize your computer’s speed and performance.
Understanding SSD Allocation
If you’re looking to unallocate a SSD, it’s important to understand first what allocation means. In simple terms, allocation is the process of assigning storage space on your SSD for certain files and programs. Unallocating, therefore, involves reversing that process and freeing up space on your drive.
One way to do this is by deleting files or programs you no longer need. Another option is to use a disk management tool to view the allocation of all your storage and manually unallocate certain spaces that are no longer needed. Keep in mind, though, that unallocating a SSD can sometimes result in performance issues if not done properly.
Ensure you have a backup before making any significant changes to your SSD’s allocations. With these precautions in mind, unallocating SSD space can be a great way to keep your computer running smoothly and efficiently.
What is SSD Allocation?
SSD Allocation Understanding SSD allocation is crucial for anyone who seeks to maximize their computer’s performance. Simply put, SSD allocation refers to the amount of storage space on an SSD (Solid State Drive) that is reserved for certain activities or functions, such as the operating system itself. This space is set aside during the formatting process so that it remains untouched by other files and processes, ensuring that the system has enough resources to perform critical tasks quickly and efficiently.
By optimizing the SSD allocation, users can enjoy faster boot times, improved application performance, and reduced lag and stuttering when performing intensive tasks like gaming or video editing. It’s important to note that SSD allocation is not a one-size-fits-all solution and will vary depending on the specific needs of the user. A simple analogy would be that of a closet – just as you might reserve certain shelves or drawers for specific items like shoes or t-shirts, optimizing SSD allocation allows you to assign storage space to specific tasks so that everything runs smoothly and efficiently.
How Does it Work?
SSD Allocation When it comes to understanding SSD allocation, we need to break it down into simple terms. SSDs (Solid State Drives) are electronic storage devices that are much faster compared to traditional HDDs. SSDs have a finite number of data blocks they can write to, which means SSDs need to employ a technique called wear-leveling, which is how they process the allocation of data blocks.
Wear-leveling ensures data blocks are allocated evenly throughout the SSD’s memory space, avoiding overuse of any particular block. This technique also ensures maximum utilization of the SSD and increases its lifespan. In addition to wear-leveling, modern SSDs also incorporate TRIM technology.
TRIM helps the SSD to efficiently manage empty storage space, ensuring that new data can be written to the disk at maximum speed. Overall, understanding how the allocation process works in SSDs can help optimize your system’s performance while increasing the longevity of your SSD.
Step-by-Step Guide to Unallocating an SSD
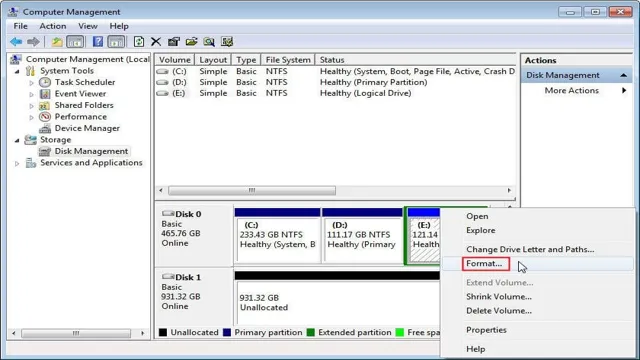
Unallocating an SSD can be essential to improve the overall performance and manage disk space on your computer. Here’s a step-by-step guide on how to unallocate a SSD. Firstly, you need to open the Disk Management tool in Windows by pressing “Windows key + X” and selecting “Disk Management” from the pop-up menu.
Once the Disk Management window opens, find the SSD you want to unallocate, right-click on it, and select “Delete Volume” from the context menu. This will free up all the space allocated to that volume. However, if you want to unallocate only a part of the space, right-click on the unallocated space and select “New Simple Volume.
” Follow the wizard to create a new partition with the desired size. Finally, formatting the unallocated space is necessary to reuse it which can be done by right-clicking on it and selecting “New Simple Volume” again. By following these simple steps, you can easily unallocate an SSD and optimize your computer’s storage usage.
Step 1: Backup Your Data
If you own an SSD and are planning to sell or dispose of it, you need to make sure that your data is safe from prying eyes. Before unallocating an SSD, the first step is to backup your data to another storage device. This ensures that all your important files, photos, videos, and documents are not lost forever.
You can use various backup solutions, such as cloud storage, external hard drives, or USB drives, to create a backup of your data. Once you have successfully completed the backup process, you can proceed to the next step. It is always better to be safe than sorry when it comes to your data.
It not only protects your sensitive information but also gives you peace of mind knowing that your memories and personal information are secure.
Step 2: Securely Erase the SSD
securely erase SSD (or SSD secure erase) When it comes to getting rid of an SSD, it’s important to make sure that all of your data is completely wiped from the drive to avoid potential security breaches. One way to do this is to unallocate the SSD. This involves securely erasing the drive to ensure that all data is permanently deleted.
Here is a step-by-step guide to securely erasing your SSD: Back up all important data stored on your SSD. This will ensure that you still have access to all of your important files after you’ve erased the drive.
Download and install an SSD utility program that is compatible with your SSD. You can find these programs on the SSD manufacturer’s website.
Launch the SSD utility program and locate the option for Secure Erase. This may be labeled differently depending on the program you are using.
Select the SSD that you want to securely erase.
Follow the on-screen prompts to initiate the secure erase process. This may take some time depending on the size of your SSD.
Step 3: Format the SSD
Once you have unallocated the SSD, it is time to format it. This can be achieved in a few straightforward steps, and the good news is that most operating systems already have a built-in tool that allows you to do it. If you are using Windows, you can format the SSD by right-clicking on it in the ‘This PC’ section and selecting the ‘Format’ option.
Then, select the file system you want to use (NTFS is most commonly used for Windows), select the allocation unit size (the default setting is usually fine), and give it a volume label (which is optional). Finally, click ‘Start’ to begin the formatting process. It may take a few minutes to complete, depending on the size of the SSD.
After it’s done, your SSD will be entirely empty and ready for use. Just remember that formatting will erase everything on the drive, so make sure you’ve backed up any important data before doing so.
Alternative Option for Unallocating an SSD
If you’re looking to unallocate an SSD, there is an alternative option to consider. Rather than going through the hassle of wiping and reformatting the drive, you can simply use a partition manager tool to unallocate the space. One popular option is MiniTool Partition Wizard, which allows you to easily adjust the partitions on your drive without losing any data.
All you have to do is select the partition you want to unallocate, click “Delete” and confirm the action. Keep in mind that this will permanently erase any data stored on that partition, so be sure to back up any important files first. With this alternative option, you can quickly and efficiently unallocate space on your SSD without going through the time-consuming process of wiping and reformatting.
Using Parted Magic to Unallocate an SSD
If you’re looking for an alternative way to unallocate an SSD, you might want to consider using Parted Magic. Unlike other methods that require you to reinstall your operating system, Parted Magic allows you to unallocate your SSD without compromising your current setup. This tool works by booting from a USB or CD/DVD drive, and then using its intuitive graphical interface to manage your SSD partitions.
By unallocating your SSD space, you’re essentially removing all data from it, making it available for other tasks. Parted Magic is a great option for those who need to free up SSD space quickly and effectively. Plus, it’s relatively easy to use, making it a popular choice among computer enthusiasts.
If you’re interested in using Parted Magic, you can download it from the official website and follow the instructions to get started.
Conclusion
Unallocating a SSD is like breaking up with a clingy partner who refuses to give back your favorite sweater. It may seem daunting at first, but with a little patience and persistence, you can reclaim your valuable storage space and free yourself from the burden of excess data. Just remember to back up your important files before making any drastic changes, and always practice safe computing habits.
Happy unallocating!”
FAQs
What is SSD (Solid State Drive) unallocation and why is it important?
SSD unallocation is the process of clearing data from a portion of the SSD so that it can be ready to receive new data. It is important because unallocating SSD can help improve its performance and efficiency.
How do I unallocate an SSD?
You can unallocate an SSD by using a disk management tool or formatting the drive. However, formatting will erase all the data stored on the drive, so if you want to unallocate specific files, you should use a disk management tool.
Can I unallocate a specific file on an SSD?
Yes, you can use a disk management tool to unallocate a specific file on an SSD. This will free up space on the drive, allowing you to use it for other purposes.
Is it safe to unallocate an SSD?
Yes, it is safe to unallocate an SSD as long as you use the proper tools and follow safety guidelines. However, if you accidentally unallocate a file that you still need, you may not be able to recover it.
Can SSD unallocation improve my computer’s performance?
Yes, unallocating an SSD can improve your computer’s performance by freeing up space on the drive and making it easier for the operating system to access data. However, the improvement may not be noticeable for all users.