Have you ever needed to upgrade the storage in your computer or replace a malfunctioning SSD? You might be surprised at how simple it is to remove a SATA SSD. SATA (Serial ATA) is a common interface for connecting storage devices like solid-state drives (SSDs), hard disk drives (HDDs), and optical drives to your computer’s motherboard. Whether you’re looking to upgrade your equipment, sell an old SSD, or remove a failing one, this guide will provide you with an easy-to-follow process for safely and efficiently removing your SATA SSD.
So, let’s dive in and give your computer some TLC!
What is a SATA SSD?
So you’ve decided to upgrade your computer’s storage by removing your SATA SSD? Before we dive into the process, let’s first understand what a SATA SSD actually is. SATA, which stands for Serial Advanced Technology Attachment, is a type of interface used by hard drives and solid-state drives to connect to a computer’s motherboard. An SSD, or solid-state drive, is a storage device that uses NAND-based flash memory to store and retrieve data, making it much faster and more reliable than traditional hard drives.
Now that we understand what a SATA SSD is, let’s walk through the steps to remove one from your computer.
Explanation of SATA SSD and how it works
SATA SSD A SATA SSD is a Solid State Drive that utilizes the Serial ATA interface to transfer data between the SSD and the motherboard of a computer system. These types of drives are much faster and more reliable than traditional hard disk drives (HDDs), as they have no moving parts that can break down or wear out over time. Instead, they use NAND flash memory to store and retrieve data, which allows for faster read and write speeds, lower latency, and less power consumption.
SATA SSDs are widely used in laptops, desktops, and other computer systems, as they provide high performance and reliability at an affordable price. Plus, their small form factor makes them ideal for systems with limited space. So, if you’re looking to upgrade your computer’s performance, consider investing in a SATA SSD.
Preparing for Removal
If you’re looking to remove a SATA SSD from your computer, there are a few things you should do to prepare. First, shut down your computer completely and unplug it from the power source. Make sure to also turn off any connected peripherals like printers or external hard drives.
Next, find a suitable workspace with plenty of room to maneuver, and lay down an anti-static mat or wear an anti-static wristband to prevent any static electricity from damaging the drive. Once you’ve done this, locate the SATA SSD within your computer and disconnect any cables attached to it. This may require removing other components like the motherboard or power supply, so be sure to consult your computer’s manual or seek advice from a professional if you’re unsure.
Once you’ve safely disconnected the drive, you can remove it from your computer and replace it with a new one if necessary. Remember to handle the drive carefully and avoid touching any sensitive components to avoid damage. With these steps in mind, you’ll be prepared to safely remove your SATA SSD with ease.
Gathering necessary tools and equipment
Before beginning the process of removing something, it is important to gather all necessary tools and equipment. This ensures that the job can be completed smoothly and efficiently. Depending on the item being removed, the required tools can vary.
For example, if you are removing a piece of furniture, you may need a screwdriver, pliers, and a hammer. On the other hand, if you are removing a tree, you may need a chainsaw, pruning shears, and gloves. By taking the time to gather the appropriate tools and equipment, you can avoid having to stop in the middle of the removal process to search for missing items.
This not only saves time but can also prevent accidents or injuries. Remember, always prioritize safety when preparing for removal.
Backing up data on the SSD
When it comes to preparing an SSD for removal, it’s important to properly backup all of your data beforehand. This can save you from losing important files or documents that you may have stored on your SSD. There are a variety of methods you can use to backup your data, such as cloud storage, external hard drives, or even USB drives.
Once you have determined the best method for you, it’s important to create a backup of all of your data and verify that everything has been properly transferred before proceeding with removal. Remember, taking a few extra minutes to backup your data can save you from a lot of potential headaches and frustration down the road.
Removing the SATA SSD
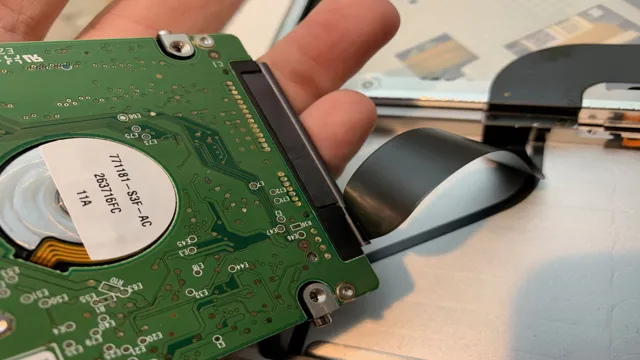
If you’re looking to upgrade or replace your SATA SSD, you’ll need to know how to remove it from your device. Before you begin, make sure to shut down your device and disconnect the power source. Locate your SATA SSD, which is usually a small, rectangular-shaped device that plugs into the motherboard.
Using a screwdriver, carefully unscrew any screws holding the SATA SSD in place. Once the screws are removed, gently lift the SSD out of its slot and disconnect any cables or wires attached to it. Be sure to handle the SATA SSD with care and avoid touching any of the sensitive components.
Once removed, you can install a new or upgraded SATA SSD, or simply leave the slot empty if you don’t need the extra storage. With these simple steps, you can easily remove a SATA SSD from your device and get ready for your next upgrade.
Locating and removing screws holding the SSD in place
When it’s time to upgrade or replace your SATA SSD, the first step is to locate and remove the screws holding it in place. Depending on the computer or laptop model, the SSD may be easily accessible or require some disassembly to reach it. Look for any visible screws on the housing or the bottom of the laptop that are holding the SSD in place.
Once you locate those screws, use a screwdriver to remove them and then gently slide the SSD out of its slot. It’s important to be careful not to damage any other components while removing the SSD. Once removed, you can replace it with a new one, making sure it’s properly secured with the screws.
Remember to back up any important data before removing the old SSD to prevent data loss. Upgrading or replacing an SSD can take some time, but it’s worth it for the improved performance and increased storage capacity.
Disconnecting SATA and power cables
Disconnecting SATA and power cables is an essential step when removing the SATA SSD from your computer. To do this, first, locate the SSD inside your computer and identify the SATA and power cables that connect it to the motherboard and power supply, respectively. To disconnect them, gently pull out the cables from their respective connectors, making sure not to damage the cable or connector.
Avoid using excessive force, as this can damage the cables or the connectors. Once both cables have been disconnected, you can remove the SATA SSD from your computer. Remember to keep the SSD in a safe and clean place to prevent damage, and label it properly to avoid confusion when reinstalling it later on.
With proper care and attention, you can easily remove your SATA SSD and prepare it for future use.
Gently removing SSD from slot
Removing the SATA SSD from its slot requires a gentle touch to avoid any damage. Start by shutting down your computer and unplugging it from the power source. Locate the SSD slot, which can be found on your motherboard.
It should be a rectangular-shaped slot with a small tab on each side. Gently press down on these tabs and slide out the SSD from the slot. If you encounter any resistance, do not force it out.
Instead, check to see if there are any screws or clips holding it in place and remove them accordingly. Once removed, store the SSD in an anti-static bag to prevent any electrostatic discharge. By following these steps, you can safely remove your SSD without causing any damage or harm to your computer.
Post-Removal Steps
Once you have successfully removed your SATA SSD, there are a few post-removal steps you should take to ensure everything goes smoothly. Firstly, you want to carefully place your SSD in a safe place, ideally an anti-static bag or container, to prevent any damages. After that, it’s important to clean the area where your SSD was located to remove any dust or debris that may have accumulated.
Additionally, you may want to reorganize any cables or components that were moved during the removal process to ensure everything is back in its proper place. Finally, you may want to test your computer to make sure everything is functioning properly, especially if you plan on installing a new SSD. With these post-removal steps, you can rest assured that your computer is in good working order and ready for whatever tasks you have in store.
Installing a replacement SSD
Now that you have successfully removed your old SSD, it’s time to begin post-removal steps to prepare for the installation of your new replacement SSD. Firstly, make sure to take precautions to avoid any static electricity that can damage sensitive components during installation. You can achieve this by grounding yourself to a metal object or by wearing anti-static gloves.
Next, clean the area around the SSD bay and check for any loose screws or debris that may be left behind. It is also crucial to examine the connections and cables to ensure that they are functional and compatible with your new SSD. Once you have completed these steps, carefully install your new SSD and securely fasten it with screws.
Remember to take your time and be gentle when handling components to avoid any damages. By following these post-removal steps, you can ensure a smooth and successful installation of your new SSD, providing your computer with improved performance and increased speed.
Reconnecting cables and securing the new SSD
After successfully removing the old hard drive, it’s time to connect the new SSD and secure everything in place. First things first, reconnect all the cables that were disconnected during the removal process. Double-check each connection to make sure they are snug and secure.
Next, insert the new SSD into the slot from which the old hard drive was removed. Ensure that the SSD is securely in place by screwing it into the same spot where the old hard drive was secured. Tighten the screws until the SSD is firmly in place and won’t move around.
This step is crucial as loose components can cause damage to the new SSD and affect its performance. Once everything is connected and the SSD is secured, you can power on your device and start enjoying your new storage solution. With the new SSD in place, you can expect a faster and more reliable performance, making your device feel brand new again.
Restoring data from backup
Restoring data from backup can be a lifesaver when things go wrong with your computer or device. However, it’s important to know what steps to take after restoring from backup to ensure that everything runs smoothly. Once you’ve restored your data, the first thing you should do is go through your files and make sure everything is there and that nothing is missing or corrupted.
Additionally, it’s a good idea to update any software or applications that may have been affected by the data loss. This can help prevent future issues and ensure that your device is running at its best. Lastly, don’t forget to back up your data regularly to prevent the need for data restoration in the first place.
By following these simple post-removal steps, you can restore your data and get back to work with ease.
Conclusion
Getting rid of a SATA SSD is easy as pie. Whether it’s because you’re upgrading or just don’t need it anymore, the process is straightforward. However, before you dive in make sure that this is the choice you want to make, and not just a case of too much “SSD” in your life – a situation we’ve all been in.
With that out of the way, removing a SATA SSD is as simple as unplugging it from the motherboard and taking it out of its slot. If it’s a laptop, you’ll need to locate the disk drive bay and remove it from there. Of course, don’t forget to back up all your important data before you begin this process.
As they say, “You never know when you’ll need some extra storage space”. Alright, no one says that, but you get the point. In conclusion, removing a SATA SSD is no rocket science.
Just be sure to follow the correct steps and keep your important files safe. And remember, it’s always better to have too much storage space than not enough (unless, of course, it’s all filled with cat videos).
FAQs
What is the process of removing a SATA SSD?
Before removing a SATA SSD, ensure that the device is powered off and unplugged. Locate the SATA connector and unplug it from the SSD. Gently and carefully remove the SSD from its bay.
Can I remove a SATA SSD from a laptop?
Yes, you can remove a SATA SSD from a laptop. The process may vary depending on the laptop model, but generally involves removing the back panel, finding the SSD, and unplugging it from the system.
Is it safe to remove a SATA SSD while the computer is running?
No, it is not safe to remove a SATA SSD while the computer is running. Doing so can damage the SSD, the motherboard, or other parts of the computer. Always make sure the device is powered down and unplugged before removing any hardware components.
How do I know if my SATA SSD is removable?
Most SATA SSDs are removable, but it’s always best to check the specifications of your device to be sure. If you’re unsure, consult the manufacturer’s website or user manual for more information.