
When it comes to maximizing your SSD’s performance, there’s one small yet crucial component that often gets overlooked: the thermal pad. A thermal pad is a small piece of material that sits on top of your SSD and helps to dissipate heat more efficiently. Without it, your SSD can overheat and slow down, causing frustrating performance issues.
But if you’re not sure how to apply a thermal pad to your SSD, don’t worry! In this step-by-step guide, we’ll walk you through the entire process so you can achieve optimal SSD performance and keep your system running smoothly. So let’s get started!
What You’ll Need
If you’re looking for a way to improve the cooling performance of your Solid State Drive (SSD), then using a thermal pad is a perfect solution. Before diving into the process, you need to make sure that you have the necessary materials such as the SSD, thermal pad, and isopropyl alcohol. When choosing the thermal pad, it is crucial to note the thickness, size, and thermal conductivity rate.
Make sure to get the exact size of your SSD to avoid any fitment issues. Also, the thicker the pad, the better the performance, and the higher the thermal conductivity, the more effective it will be. Lastly, the isopropyl alcohol is very important in removing any dirt or dust on the SSD’s surface before installation.
Doing so will ensure a stable and long-lasting bond between the SSD and thermal pad.
Thermal Pad
A thermal pad is a critical component when it comes to maintaining optimal temperatures in electronic devices. To use a thermal pad, you’ll need a few things. First, make sure you have a clean work environment.
Dirt and dust particles can reduce the effectiveness of the pad, so you want to avoid any unnecessary buildup. You will need to have an idea of the size of the pad you need. You can find thermal pads in many different sizes, so be sure to do your research before making a purchase.
Finally, you’ll need to have a little patience. Installing a thermal pad may require you to take apart your device, clean off any old thermal paste, and reapply new paste and the pad. It might feel like a lot of work, but taking the time to ensure proper cooling can save you from more costly repairs down the line.
Remember, a thermal pad is an essential component that can significantly prolong the lifespan of your electronic devices by preventing overheating, so make sure to invest in a good one.
Isopropyl Alcohol
Isopropyl alcohol is a versatile substance that is used in various industries and households. To use it effectively, you’ll need a few things. Firstly, you’ll need isopropyl alcohol itself.
Depending on what you need it for, you can choose from a range of concentrations, with the most commonly used being 70% and 99%. Next, you’ll need something to apply it with. Cotton balls, cotton swabs, or microfiber cloths are great options for cleaning and disinfecting surfaces.
You might also want to have a spray bottle on hand if you need to cover larger areas quickly. Lastly, if you plan on using isopropyl alcohol on electronics, it’s important to have a soft brush on hand to remove any debris. Overall, with just a few simple tools, you can make the most out of isopropyl alcohol and its many uses.
Clean Cloth
For cleaning your cloth, there are a few essential things you’ll need. Firstly, you’ll require a clean cloth, one that’s soft and gentle on the fabric. Using a rough or hard cloth can end up damaging the material.
Secondly, you’ll need a cleaning solution that’s safe to use on the type of fabric you’re trying to clean. For example, you could use a mild detergent or fabric softener to remove stubborn stains. Ensure that the solution doesn’t contain any harmful chemicals that could end up ruining the fabric.
Lastly, you’ll require access to running water and a sink or bucket to rinse the cloth. It’s important not to leave any leftover detergent or cleaning solution on the fabric, as it could damage it. By having these items on hand, you’ll be able to effectively clean and maintain the fabric’s quality for years to come.
So the next time you have a dirty cloth, make sure to have these essential items available!
Step 1: Prepare the SSD
One of the crucial steps to learn how to put a thermal pad on SSD is to prepare the SSD first. Before applying the thermal pad, make sure to clean the surface of your SSD thoroughly using a microfiber cloth or isopropyl alcohol. A clean surface will help the thermal pad stick better to the SSD.
Once the surface is clean, you can now proceed to cut the thermal pad to fit the size of your SSD. Make sure to measure the length and width of your SSD and cut the thermal pad accordingly. The thickness of the thermal pad will depend on the brand and model of your SSD, so make sure to read the product specifications before purchasing the thermal pad.
After cutting the thermal pad, you can now peel off the protective film and apply it to the surface of your SSD. Make sure to align it properly to avoid air bubbles and ensure good thermal conductivity. Additionally, make sure that the thermal pad covers the top surface of your SSD completely for optimal efficiency.
By adequately preparing your SSD for the thermal pad, you can ensure that your SSD runs smoothly and efficiently while keeping it cool.
Remove SSD From Computer
Before removing an SSD from a computer, it’s crucial to prepare the SSD first. This means turning off the computer and disconnecting it from any power sources. You should also ground yourself by touching a metal object like a doorknob or radiator before handling the SSD to avoid any potential damage from static electricity.
Next, you’ll want to locate the SSD in your computer’s case. If you’re unsure of its location, consult your computer’s manual or look online for guides specific to your computer model. Once you’ve located the SSD, take note of how it’s connected to the computer.
Most SSDs will be connected using either a SATA cable or an M.2 slot, so make sure you have the appropriate tools and cables to disconnect it properly. Finally, be sure to back up any important data stored on the SSD before removing it from the computer.
By taking these steps to prepare the SSD, you’ll ensure a safe and efficient removal process.
Clean SSD with Isopropyl Alcohol and Cloth
If you want to clean your SSD with isopropyl alcohol and a cloth, the first step is to prepare the SSD for cleaning. You’ll need to turn off your computer and disconnect all cables, including the power cable and any other peripherals. Once you have the SSD out, gently wipe it down with a dry cloth to remove any loose dust or debris.
This will ensure that the isopropyl alcohol can penetrate deeply and effectively clean the SSD. It’s essential to get the SSD completely clean before using the isopropyl alcohol, as any remaining debris or dust could interfere with the cleaning process. Taking the time to properly prep your SSD will ensure that your cleaning efforts are fruitful and that your SSD stays in top shape for years to come.
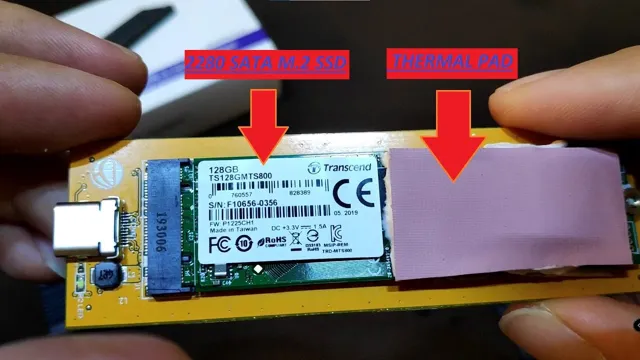
Step 2: Apply the Thermal Pad
When it comes to installing an SSD, applying the thermal pad is an important step that should not be overlooked. To put a thermal pad on an SSD, the process is relatively simple. First, identify the side of the SSD that needs to be covered by the thermal pad.
Most SSDs have a metal top cover that needs to be covered to improve heat dissipation. Take the thermal pad and line it up with the metal top cover, making sure it fits perfectly. Peel off the protective backing, and carefully place the thermal pad onto the metal cover, ensuring there are no air bubbles or wrinkles.
Some thermal pads may come with adhesive on both sides, so make sure to only apply the adhesive side onto the metal cover. Once the thermal pad is applied, you can proceed with attaching the SSD into your device and secure it. This simple step can help improve the performance and longevity of your SSD.
Cut Thermal Pad to Size of SSD
Now that we have our thermal pad ready, it’s time to apply it onto the SSD. The first step is to cut it down to the size of the SSD. You want to ensure that it covers the entire surface area of the drive to ensure maximum heat transfer efficiency.
Don’t worry about being too precise, as the thermal pad is malleable and can conform to the shape of the drive. Once it’s cut, remove the protective film from one side of the pad and carefully align it onto the surface of the SSD. Apply gentle pressure to ensure it adheres properly and covers the entire surface area.
Now, you can remove the protective film from the other side and align your heatsink on top. Press down lightly to secure it in place. Congratulations, your SSD is now equipped with an efficient thermal solution to keep it running cool and performing optimally!
Peel Off Protective Film on Both Sides of Pad
Now that you have your thermal pad ready, it’s time to apply it to your device. The second step in this process is to peel off the protective film on both sides of the pad. Make sure you do this carefully and avoid touching the sticky part of the pad with your fingers.
It’s important to remove all the protective film as any residue left will affect the performance of the thermal pad. Once you’ve removed the film, align the pad with the component you’re cooling, and gently press it down. Apply enough pressure to ensure that the pad sticks properly, but be careful not to apply too much pressure as this can damage the pad.
With this step completed, your device should now be ready for improved thermal performance. Remember, the key to success is in the details, so take your time and make sure you follow these steps carefully for the best results.
Place Pad on Top of SSD
When it comes to building a gaming PC, one of the most important components to consider is the thermal management system, and that’s where the thermal pad comes into play. Once you’ve got your SSD in place, the next step is to apply the thermal pad on top of it, as this will help to regulate the surface temperature and improve the overall cooling performance of the system. The thermal pad is made of a special material that has good thermal conductivity, and it’s designed to transfer the heat generated by the SSD to the heatsink, which will then dissipate it out of the system.
Applying the thermal pad is a straightforward process that involves peeling off the adhesive backing, placing it on the top of the SSD, and smoothing it out to ensure good contact between the pad and the heatsink. Remember, proper thermal management is critical to maintaining the longevity and performance of your gaming PC, so don’t skip this important step.
Step 3: Reinstall the SSD
Once you’ve added the thermal pad to your SSD, the next step is to reinstall it in your computer. Begin by gently sliding the drive back into its slot, making sure that it properly aligns with the connector pins. Then, use the screws you removed earlier to securely fasten the SSD in place.
Tighten the screws just enough to prevent the drive from moving around, but be careful not to overtighten them, as this can damage your hardware. Once you’ve reinserted and secured the SSD, you can reattach any cables or connectors you may have removed, and close up your computer case. Congratulations, you’ve successfully installed a thermal pad on your SSD and reinstalled it without any issues! Remember that using a thermal pad can help prevent overheating and prolong the life of your hardware, so make sure to keep your SSD well-maintained and properly cooled.
Carefully Reinstall SSD in Computer
Now that you have successfully removed the SSD, it’s time to carefully reinstall it back into your computer. Make sure that the computer is turned off and unplugged before proceeding. Take a close look at the SSD and locate the connectors.
They should match up with the corresponding connectors inside the computer. Carefully slide the SSD back into the slot, applying gentle pressure until you feel it lock into place. Secure the SSD with the screws you removed earlier, being careful not to overtighten them.
Once everything is securely in place, reconnect any cables you may have removed and close up the computer case. Turn on your computer and make sure that it recognizes the newly installed SSD. If all goes well, you should be up and running in no time! Remember, it’s important to handle and reinstall your SSD with care to avoid any damage to your computer or data.
Final Thoughts
Putting a thermal pad on your SSD can be a bit daunting, but it’s a crucial step to ensure that your system stays cool and running optimally. Firstly, it’s essential to choose the right size of thermal pad for your SSD and cut it accordingly with a pair of scissors. Before applying the thermal pad, clean the back of your SSD with isopropyl alcohol and let it dry.
Once it’s clean and dry, peel off the protective backing of the thermal pad and attach it to the back of your SSD. Be sure to apply equal pressure to the pad to ensure that it sticks evenly. And that’s it! Your SSD is now ready to be installed in your system.
Remember, a properly installed thermal pad can help to improve your SSD’s cooling and prevent overheating issues that can lead to data loss and other problems.
Conclusion
And that, my friends, is how you give your SSD some extra TLC with a thermal pad. Just remember to take your time, measure twice, cut once, and don’t be afraid to get a little hands-on with your tech. Your SSD will thank you for it with cooler temperatures and more reliable performance.
Plus, you’ll feel like a total DIY pro. So go forth, slap on those thermal pads, and keep those drives chillin’.”
FAQs
What is a thermal pad and what is its importance in an SSD?
A thermal pad is a material used to transfer heat from a component to a heatsink or another surface. It is important in an SSD because it helps to dissipate the heat generated by the components inside the drive.
Can I use any thermal pad on my SSD?
It is recommended to use thermal pads that are specifically designed for SSDs. These pads are usually made of materials that are highly conductive and have the ideal thickness to provide optimum thermal transfer.
How do I apply a thermal pad on my SSD?
To apply a thermal pad on your SSD, you need to clean the surface of the SSD and the heatsink where the pad will be placed, remove the protective film from the pad, align the pad with the SSD, and press it down firmly.
What are the benefits of using a thermal pad on an SSD?
Some benefits of using a thermal pad on an SSD include improved system stability, reduced risk of data loss, increased lifespan of the SSD, and better overall performance. The thermal pad helps to keep the SSD cool, which prevents data corruption and extends its lifespan.