Looking to upgrade your PS5 storage for faster loading times and increased capacity? The WD Black SSD is a great option for gamers looking for lightning-fast speeds and reliable performance. But how do you install it onto your PS5? Don’t worry – it’s easier than you think! In this article, we’ll guide you through the step-by-step process of installing the WD Black SSD onto your PS5, ensuring that you can enjoy all your favorite games without any frustrating loading times. So grab your screwdriver and let’s get started!
Check compatibility and requirements
If you’re planning to upgrade your PS5’s storage with a WD Black SSD, then you should first check if it’s compatible. The WD Black SSD is compatible with the PS5’s PCIe Gen4 expansion slot, which means you need to have the latest system software version installed that supports this slot. To install the WD Black SSD, you’ll also need a few tools like a #1 Phillips screwdriver and a plastic pry tool.
Make sure to take proper precautions when handling the SSD to avoid static electricity that may damage it. Lastly, before you begin the installation process, back up all your data, including game saves and settings. This will ensure that you don’t lose any personal data during the installation process.
By following these steps and ensuring compatibility, you can easily install a WD Black SSD to your PS5 and enjoy faster load times and improved performance.
Ensure SSD is supported by PS5
If you’re considering upgrading your PS5’s storage with a solid-state drive (SSD), it’s important to check that it’s compatible with your console. Not all SSDs will work with the PS5, so you’ll need to ensure that the one you choose meets the console’s requirements. The PS5 supports NVMe SSDs with a capacity of at least 250GB and a read speed of at least
5GB/s. It’s also important to note that not all NVMe drives will work, so be sure to check that it’s supported by the console manufacturer before making your purchase. Upgrading the storage of your PS5 can significantly improve performance and load times, so it’s definitely worth considering if you’re running out of space.
By ensuring that your SSD is supported by the PS5, you can make the most out of your console and enjoy an improved gaming experience.
Confirm SSD form factor fits in PS5
When looking to upgrade the storage on your PS5, it’s essential to ensure that the SSD form factor you choose is compatible with the console. The PS5 requires an M.2 SSD form factor that meets specific requirements for size, speed, and heat dissipation.
To confirm compatibility, you can consult the manufacturer’s website or check with the retailer you’re purchasing from. Additionally, make sure to review the PS5’s storage expansion instructions to ensure you follow the proper installation procedure. Upgrading your PS5’s storage with a compatible SSD will not only increase storage space but also improve load times and overall performance.
So don’t hesitate to upgrade your storage capacity today and enjoy a seamless gaming experience like never before!
Have necessary equipment – screwdriver, mounting bracket, etc.
When it comes to installing any kind of equipment, it’s crucial to have the necessary tools and materials handy. For example, if you’re installing a TV, you’ll need a screwdriver, a mounting bracket, and possibly other components depending on the specific requirements of the TV. Before getting started, make sure you check compatibility and requirements to ensure you have everything you need.
This will save you time and frustration in the long run, and ensure that your installation goes smoothly. If you’re unsure about anything, consult the installation manual or reach out to the manufacturer for guidance. Remember, having the right tools on hand is half the battle!
Prepare PS5 for installation
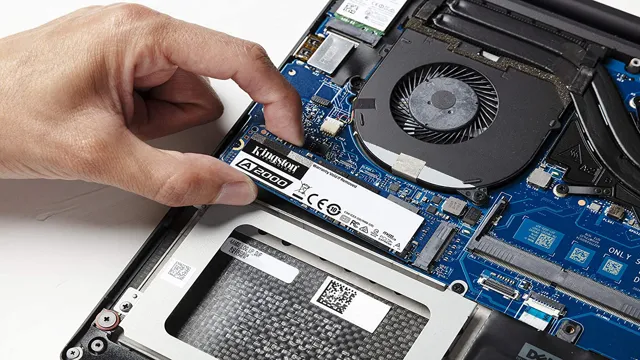
Are you looking to upgrade your PS5 with a WD Black SSD? Before you start, it’s important to prepare your console for installation. First, make sure you have all the necessary tools, including a Phillips head screwdriver and a USB drive with at least 1GB of storage. Next, back up all your important data to the USB drive or cloud storage.
Once you’ve backed up your data, shut down your PS5 and unplug all cables. Carefully remove the stand and then use a Phillips head screwdriver to remove the screw that secures the PS5’s bottom plate. Once the screw is removed, slide the plate off to expose the M.
2 slot on the motherboard. Insert the WD Black SSD into the M.2 slot, making sure it’s seated correctly before screwing it down.
Replace the bottom plate and secure it with the Phillips head screw, then re-attach the stand and plug in all cables. Finally, turn on your PS5, and follow the prompts to format your new drive and restore your saved data. With these simple steps, you can install a WD Black SSD and boost your PS5’s performance for a smoother gaming experience.
Turn off PS5 and unplug from power source
If you’re planning on installing or moving your PS5 console, you’ll want to make sure you prepare it beforehand. The first step in this process is to turn off your PS5 and unplug it from the power source. This ensures that there is no risk of electrical shock or damage to the console during the installation process.
To turn off your PS5, press and hold the power button until the console shuts down. Once the console is powered off, unplug it from the wall outlet or power strip. It’s important to make sure that all cables and connections are removed before attempting to move the console.
Once you’ve completed these steps, your PS5 is ready for safe and secure installation. Keep in mind that even though the PS5 is a powerhouse that can deliver an exceptional gaming experience, it also requires delicate handling, so be sure to take your time and handle it with care.
Remove PS5 cover and locate storage expansion slot
If you want to upgrade your PS5 storage, you first need to prepare your console for the installation process. The first step is to remove the PS5 cover and locate the storage expansion slot. This can be found at the bottom of the console, where you’ll see a removable panel.
Simply slide this panel off to reveal the slot. Once you’ve located the slot, you can then move on to purchasing and installing the required hardware. It’s important to note that you should only use SSDs that meet Sony’s requirements for compatibility and performance.
By taking these steps, you can easily expand your PS5 storage and enjoy more games and content without having to worry about running out of space. Remember to take your time and follow the instructions carefully, and your PS5 storage upgrade should be a breeze!
Install WD Black SSD
Installing a new WD Black SSD in your PS5 is a straightforward process. Start by turning off your console and unplugging all the cables. Then, remove the hard drive bay cover from the back of your PS
You’ll see a rectangular metal bracket held in place by a single screw. Use a Phillips screwdriver to remove this screw and slide the metal bracket out. Now, carefully remove the old hard drive by gently lifting it out of the bay.
Take the new WD Black SSD and line it up with the pins in the bay. Slide it in gently but firmly until it clicks into place. Finally, replace the metal bracket and screw it back in, then put the hard drive bay cover back on and plug your PS5 back in.
It’s that simple! With your new WD Black SSD installed, you’ll enjoy faster load times and smoother gameplay, making the investment worthwhile.
Secure SSD onto mounting bracket
To install your WD Black SSD, you need to securely mount it onto the bracket. This process is crucial to keep your SSD firmly in place, especially if you’re planning to move your computer frequently. After removing the SSD from its protective packaging, you’ll need to screw it onto the bracket with the provided screws.
Make sure you secure all screws tightly to avoid any wobbling or rattling inside your computer case. Once you’ve done this, you can proceed with installing the bracket onto your computer case. Check the user manual or instructions that came with your computer case to ensure you’re mounting the bracket correctly.
Remember, a securely mounted SSD ensures your data stays safe and your computer runs smoothly, so take your time, and double-check your work.
Insert mounting bracket with SSD into storage expansion slot
To install your WD Black SSD, you need to insert the mounting bracket with the SSD into the storage expansion slot. It’s a fairly straightforward process that doesn’t require any special tools or expertise. The first step is to locate the storage expansion slot in your desktop or laptop computer.
It’s typically located near the hard drive or on the motherboard. Once you’ve found the slot, you need to insert the mounting bracket with the SSD into it. The mounting bracket is designed to fit into the expansion slot securely, so you shouldn’t encounter any resistance or difficulty when inserting it.
Once you’ve inserted the mounting bracket with the SSD, you can secure it in place with screws or other fasteners. It’s essential to ensure that the SSD is securely fastened to prevent any vibrations or movement that could damage the drive or affect performance. Overall, installing your WD Black SSD is a simple and quick process that can help you achieve faster load times and better system performance.
So go ahead and get your hands dirty – you’ll be glad you did!
Setup and Format SSD on PS5
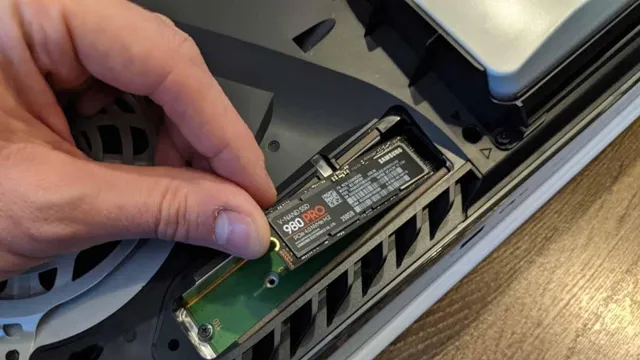
Installing an SSD on your PS5 is a smart move if you want to improve your gaming experience. One of the best SSDs you can install on your PS5 is the WD Black SSD. Before you start, make sure to back up your data and turn off the console.
Then, remove the plastic slot cover on the back of your console and carefully insert the SSD into the M.2 slot. Secure it in place with the screw provided in the package.
Once you turn on your PS5, go to the settings and select “storage.” Then, choose “format,” and your console will recognize your new SSD. It’s that simple! Your games will now load faster, and you’ll experience quicker load times.
Overall, installing an SSD like the WD Black on your PS5 is a worthwhile investment that will enhance your gaming experience.
Turn on PS5 and navigate to settings
Setting up and formatting an SSD on your PS5 can significantly improve the overall performance of your gaming console. To get started, turn on your PS5 and navigate to the settings menu. From there, select the “Storage” option and choose the SSD you want to format.
Make sure to back up any important data on the SSD before formatting, as this process will erase all existing data. Once you’ve confirmed that you want to format the SSD, wait for the process to complete before proceeding. After formatting, you can start installing games and applications onto your newly formatted SSD, providing a faster, more responsive gameplay experience.
So, if you’re looking to maximize the potential of your PS5, consider formatting an SSD to help improve your gaming experience.
Format SSD for PS5 use
If you’re looking to expand the storage capacity of your PS5, you’re in luck! With the latest system update, you can now install and format a compatible SSD to use with your console. But first things first, make sure you have a compatible SSD that meets the requirements for use with the PS Once you have the SSD, installation is relatively simple.
Just make sure your console is turned off and unplugged before opening the SSD slot on the back of the PS Carefully insert the SSD into the slot and tighten the screw to secure it. Once you power on your PS5, it should detect the new SSD and prompt you to format it.
Keep in mind that formatting the SSD will erase any data stored on it, so make sure to back up your files before proceeding. With a freshly formatted SSD, you’ll have plenty of extra storage space for all your favorite games and media.
Conclusion
Installing a WD Black SSD on your PS5 is like giving your gaming console a shot of adrenaline. It’s a quick and easy process that yields impressive results. With this upgrade, you’ll experience faster load times, improved graphics, and a smoother gaming experience overall.
So, don’t settle for slow loading screens and laggy gameplay. Follow our simple installation guide and upgrade your PS5 with a WD Black SSD to take your gaming experience to the next level. Your console will thank you for it.
“
FAQs
What is the WD Black SSD?
WD Black SSD is a high-performance, NVMe solid-state drive that is specifically designed for gaming and creative professionals. It is a reliable and robust storage solution that provides faster load times and data transfer rates.
Can I install a WD Black SSD on my PS5?
Yes, you can install a WD Black SSD on your PS5 console. However, you need to make sure that the SSD meets the specifications set by Sony for compatibility. You also need to follow the installation instructions provided by Sony to avoid any issues.
What are the benefits of installing a WD Black SSD on my PS5?
Installing a WD Black SSD on your PS5 will provide you with faster load times, shorter game loading screens, and faster data transfer rates. It will also reduce the time taken for game installations and updates, providing you with a better gaming experience.
How do I install a WD Black SSD on my PS5?
To install a WD Black SSD on your PS5, you need to remove the cover of the PS5 and locate the M.2 slot. Then, you need to carefully insert the SSD into the slot and secure it using the screwdriver provided with the SSD. Once installed, you need to initialize and format the SSD using the PS5’s system software.