If you’re looking to boost the speed and storage capacity of your computer, adding a second M.2 SSD is definitely worth considering. Installing it on your own might seem like a daunting task, but it’s actually pretty straightforward with the right knowledge and tools.
In fact, it’s similar to installing the first M.2 SSD with just a few extra steps. Not only will you have more space to store your files and programs, but also a faster system overall.
In this blog, we’ll walk you through the steps of installing a second M.2 SSD and explain the benefits of doing so. So, let’s get started!
Understanding Your System
Are you looking to upgrade your storage capacity by installing a second M.2 SSD? It’s a simple process that requires just a few steps. First, ensure that your motherboard supports two M.
2 slots. If it does, locate the second M.2 slot and remove the screw that holds the cover in place.
Insert the SSD into the slot at a 30-degree angle and gently push it in until it clicks into place. Replace the screw to secure the cover. Then, go into your computer’s BIOS settings and ensure that the system recognizes the new drive.
Finally, format the drive and start using it. By following these steps, you can easily expand your storage capacity and improve your system’s performance. Don’t hesitate to add a second M.
2 SSD and enjoy faster boot times, file transfers, and overall system responsiveness.
Check for Compatibility
When it comes to installing hardware or software onto your device, it’s essential to ensure that they are compatible with your system. Compatibility refers to whether a new piece of technology or software can function correctly with your computer’s existing components and operating system. Understanding your system and its specifications is crucial in determining what is compatible.
For instance, if your system has a 32-bit operating system, installing software that requires a 64-bit operating system will not work, and vice versa. Similarly, with hardware, you need to check that the motherboard can support the RAM or graphics card you intend to use. It’s always worth double-checking compatibility before making any purchases to avoid wasting money and time.
So, take the time to understand your system and its requirements to ensure that any updates or changes you make are compatible and function correctly.

Check Available Slots
If you’re looking to check available slots for a particular system, it’s important to understand how that system works. Each system is unique, with its own set of rules and limitations. For example, some systems may have designated time slots for certain activities, while others may allow for more flexibility.
Before attempting to check available slots, take some time to familiarize yourself with the system and its requirements. If you’re unsure, don’t hesitate to reach out to customer support or an expert in the field for guidance. By taking the time to fully understand the system, you can save yourself a lot of frustration and ensure a smoother experience when checking available slots.
Check for BIOS Support
When it comes to understanding your system, it’s important to check for BIOS support. The BIOS, or Basic Input/Output System, is essentially the firmware that runs on your computer’s motherboard. It’s responsible for initializing all of the hardware components during the boot process.
If your BIOS doesn’t support certain hardware features or configurations, it can lead to compatibility issues, slow performance, or even system instability. One way to check for BIOS support is to review the documentation that came with your motherboard or computer. This should provide a list of supported hardware and configurations.
You can also check the manufacturer’s website for any relevant updates or patches to the BIOS that may address compatibility issues. By staying on top of your BIOS support, you can ensure your system runs smoothly and efficiently.
Prepping for Installation
If you’re looking to upgrade your laptop or desktop with a second M.2 SSD, there are a few steps you need to take before installation. First, you’ll want to make sure that your device supports a second M.
2 slot and that it is compatible with the SSD you have chosen. You should also back up all of your important files and data, just in case there are any issues during the installation process. Additionally, you’ll need to make sure that you have the necessary tools, such as a screwdriver, to remove the cover of your device and install the SSD.
Once you have everything ready, you can begin the installation process by opening up your device, inserting the M.2 SSD into the second slot, and securing it into place with the screw that was provided. Finally, close up your device, turn it on, and configure your new drive.
With these steps, installing a second M.2 SSD is a simple process that can significantly improve your device’s performance.
Gather Necessary Tools
When it comes to preparation for installing a new feature or tool, gathering the necessary tools is crucial to ensuring a smooth and uncomplicated installation process. Some basic tools that you may need include a screwdriver, pliers, wire strippers, a soldering iron and wire connectors. However, depending on the type of installation, you may also need specialized equipment or materials.
It’s important to carefully read through the installation instructions and make a list of all necessary tools beforehand to avoid any surprises later on. Remember, having the right tools on hand will not only save you time but also reduce the risk of making a mistake. So, take the time to gather the right tools, and your installation process will be less frustrating and much smoother.
Prepare the System Environment
Before installing any software or system, it is essential to ensure that the environment is prepared and ready. Preparing the system environment involves checking that the hardware and software meet the minimum requirements for the system, updating the operating system and software, and checking for any compatibility issues that may arise. It is crucial to ensure that the system environment is stable to avoid any issues during the installation process.
One important aspect of preparing the system environment is to allocate enough resources to the installation process. This includes ensuring that there is enough storage space, memory, and processing power to complete the installation without any problems. In essence, preparing the system environment ensures that the installation process is smooth, efficient, and trouble-free.
By taking the time to prepare the system environment adequately, you can reduce the chances of encountering any problems that may arise during the installation process.
Disconnect Power and Other Components
Before installing any new hardware or making changes to your computer, it’s important to ensure that you disconnect all of the power and any other components. This includes unplugging the power cord, removing any batteries, and disconnecting any external devices or cables. Not only can leaving these components connected potentially damage your hardware, but it can also result in electrical shock or other potential risks.
Taking this extra precaution will also make it easier for you to access all necessary components during the installation process. Remember, safety should always come first when working with electronics. By taking the time to disconnect everything properly, you can ensure a smooth and successful installation without any unnecessary damage or complications.
Installing the Second M.2 SSD
If you’re looking to upgrade your computer’s storage, installing a second M.2 SSD is a great way to do it. This is especially useful if you’re starting to run out of space on your existing drive.
To begin, you’ll want to check if your motherboard has a second M.2 slot available. Once you’ve determined that it does, you’ll need to acquire a compatible M.
2 SSD. Make sure to read the specifications of your motherboard to ensure that the M.2 SSD you choose is compatible.
Once you have your second M.2 SSD in hand, you can open up your computer case and locate the second M.2 slot.
Typically, it will be located nearby the first M.2 slot. You’ll then want to insert the M.
2 SSD at a 30-degree angle and gently push it into place until it clicks. Finally, secure the M.2 SSD in place with a screw.
Locate the M.2 Slot
Looking to upgrade your computer’s storage capacity? Good news – installing a second M.2 SSD can be easy with a bit of know-how. First, you’ll need to locate the M.
2 slot on your motherboard. This slot is where your SSD will be installed. It’s important to check your motherboard’s manual or online specifications to ensure that it has an available M.
2 slot. Once you’ve found the slot, make sure to ground yourself before touching any components to avoid static damage. The M.
2 SSD is inserted at a slight angle and then pressed down until it clicks into place. Finally, use the screw provided with your motherboard to secure the SSD in place. Congratulations – you’ve just added more storage to your computer!
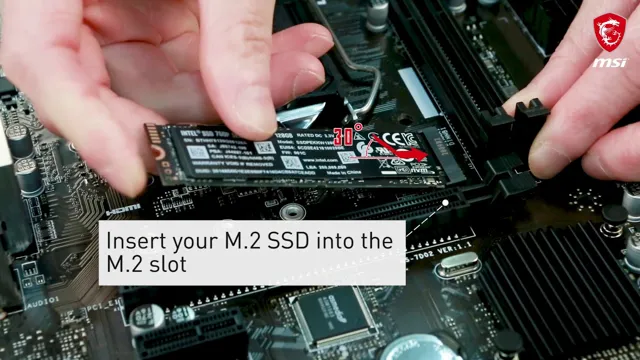
Install the SSD into the Slot
If you’re looking to add a second M.2 SSD to your system, the installation process is fairly straightforward. The first step is to locate the M.
2 slot on your motherboard and ensure that it supports the size of your SSD. Next, carefully insert the SSD into the slot at a 30-degree angle, making sure the notches on the SSD line up with those on the slot. Then, gently push down on the SSD until it clicks into place.
Finally, secure the SSD using the screw provided with your motherboard. It’s important to note that certain motherboards may have different methods of securing the SSD, so be sure to consult your motherboard manual for specific instructions. Once installed, you can format the new SSD and transfer files over for additional storage space and improved performance.
By adding a second M.2 SSD, you can take full advantage of your motherboard’s capabilities and optimize your system for speedy operation.
Securely Fasten the M.2 SSD
When installing a second M.2 SSD, it is important to securely fasten it to ensure optimal performance and prevent any potential damage to the device. One of the easiest and most effective ways to do this is by using the appropriate screw and standoff components provided by the manufacturer.
These screws and standoffs create a secure physical connection between the SSD and the motherboard, which helps to eliminate any potential wobbling or dislodging of the device. Once the screw and standoff components are in place, it is important to ensure that the M.2 SSD is properly aligned and inserted into the PCIe slot.
By following these simple steps, you can ensure that your second M.2 SSD is installed safely and efficiently, ultimately improving the overall performance of your computer system.
Testing the Second M.2 SSD
So you have decided to install a second M.2 SSD on your computer and wondering how to go about it? Well, you have come to the right place. First and foremost, make sure your motherboard has an available M.
2 slot. If not, you may need an adapter or consider replacing your motherboard. Once you have confirmed, turn off your computer and unplug any cables or wires.
Locate the M.2 slot and gently insert the SSD at an angle, making sure it is securely in place. Next, use the appropriate screw to secure the SSD in place.
Turn on your computer and check the BIOS to ensure that the new SSD is recognized. Congratulations, you have just successfully installed a second M.2 SSD! With this added storage capacity, you can now enjoy improved speed and performance for all your computing needs.
Reconnect Power and Components
Now that we have installed the second M.2 SSD into our system and connected all the necessary cables, we need to reconnect the power and components to ensure everything is running smoothly. Before proceeding any further, we must double-check that all connections are secure and tight.
Once we have done so, we can move on to testing the second M.2 SSD. Testing the SSD is crucial to ensure it is functioning correctly and that the system recognizes it as a bootable device.
We can do this by accessing the BIOS settings and checking if the SSD is listed in the boot sequence. If it is, then we can proceed with installing the operating system on the second SSD. In case the SSD is not detected, we can try reconnecting all the cables and checking the BIOS settings again.
It is essential to take our time and be patient throughout this process to ensure everything is done correctly, and the system operates correctly. Spectacular performance from our second M.2 SSD is just a few steps away!
Boot into the System BIOS
When it comes to testing a second M.2 SSD on your computer, the first step is to boot into the system BIOS. This is where you can access the motherboard settings and make any necessary adjustments.
Depending on your computer’s manufacturer, the process of accessing the BIOS may differ. However, it typically involves restarting the computer and repeatedly tapping a specific key (such as F2 or Delete) before the Windows logo appears. Once you’re in the BIOS, look for the section that deals with storage devices.
Here, you can check if the second M.2 SSD is being detected by the system. If not, make sure it’s properly installed and connected.
You can also make changes to the boot order to ensure that the computer is booting from the correct drive. By following these steps, you can test your second M.2 SSD and ensure it’s functioning properly.
Verify the SSD is Detected and Working
Once you’ve installed your second M.2 SSD, it’s important to check that it’s being detected and working properly. The first step is to boot up your computer and open the BIOS or UEFI settings.
Check for the presence of the new drive in the list of storage devices. If you see it there, you’re on the right track. Next, try to boot up your operating system and check if the drive is visible in Disk Management or similar tools.
You may need to format and assign a drive letter to make it usable. If everything looks good, you can run some benchmarks or file transfer tests to verify the performance of the new SSD. Keep in mind that not all M.
2 slots may support NVMe protocol, so you may be limited to SATA speeds if that’s the case. Overall, adding a second M.2 SSD can be a great way to increase your computer’s storage and speed, but it’s important to ensure it’s working correctly before relying on it for critical data.
Final Thoughts
If you want to upgrade your computer’s storage capabilities, installing a second M.2 SSD can greatly improve your system’s performance. To begin with, make sure that your motherboard has a second M.
2 slot and that it supports NVMe protocol. Then, turn off your computer and remove the side panel. Locate the M.
2 slot and unscrew the protective cover. Insert the new SSD at a 30 degree angle and apply gentle pressure until it clicks into place. Then, screw the cover back on and replace the side panel.
Finally, turn on your computer and format the new SSD. Voila! You now have a brand new SSD to store all your important files and run your favorite programs. Remember to back up your data before making any changes to your computer’s hardware.
Installing a second M.2 SSD can greatly increase your computer’s storage capacity and improve its overall speed and performance.
Conclusion
So there you have it, installing a second M.2 SSD can be a breeze as long as you follow these simple steps. Just remember, getting a second SSD is like having two scoops of ice cream – it’s twice as good! And who doesn’t love a little extra speed and storage capacity? So go forth and upgrade, my friends.
Your computer (and your data) will thank you.”
FAQs
What is an m.2 SSD and why would I want to install a second one?
An m.2 SSD is a type of solid-state drive that offers fast read/write speeds and takes up very little space in your computer. Installing a second one can increase your storage capacity and improve overall system performance.
Is it possible to install a second m.2 SSD in my computer?
This depends on the specific model of your computer and the number of m.2 slots available on your motherboard. You can check your motherboard documentation or contact the manufacturer to confirm if a second m.2 SSD is supported.
Do I need to purchase a specific type of m.2 SSD for a second installation?
It is important to ensure that the m.2 SSD you purchase is compatible with your motherboard and has the correct interface (PCIe or SATA). Additionally, you should consider the storage capacity and read/write speeds of the SSD to ensure it meets your needs.
How do I physically install a second m.2 SSD in my computer?
The exact process for installing a second m.2 SSD will vary depending on your computer and motherboard, but generally involves opening the case, inserting the SSD into the correct slot, and securing it in place with screws. It is recommended to consult your motherboard documentation or seek assistance from a professional if you are unsure.