Are you eager to speed up your Windows 11 computer? Well, one way to accomplish this goal is by upgrading to an SSD. Solid State Drives or SSDs offer blazing-fast boot times, snappier performance, and fast data transfer rates, resulting in a dramatically improved computing experience. However, not everyone knows how to install an SSD in a computer, which could make the prospect daunting.
Well, fear not, as we will take you through a comprehensive guide on how to install an SSD on your Windows 11 machine. We will explore the steps involved, the tools required, and offer tips to ensure a smooth SSD installation process. Trust us; by the end of this article, you will be ready to upgrade to an SSD with confidence.
So are you ready to take your Windows 11 machine to the next level? Then, let us embark on this SSD installation journey together.
Backup Data
If you’re looking to install a new SSD on your PC running Windows 11, you’ll want to backup your data beforehand to avoid losing anything important. There are a few different backup methods you can use, but one of the easiest is to simply transfer your files to an external hard drive or cloud storage service. Once you’ve transferred your data, you can then install your new SSD.
Depending on the type of SSD you’re using, you may need to download specific drivers or software in order to properly install it and get it up and running. Be sure to follow the manufacturer’s instructions carefully and take your time during the installation process to avoid any mishaps. With a little patience and careful planning, installing a new SSD can be a great way to improve your computer’s performance and keep your data safe.
Save data to an external storage device
Backing up your data is essential to ensure that you don’t lose any important information in case of a system failure or a computer crash. One of the best ways to do this is by saving your data to an external storage device. This can be anything from an external hard drive, a USB drive, or even a cloud-based storage platform.
By saving your data to an external device, you are essentially creating a backup copy that you can access in case of an emergency. One important thing to keep in mind is to have a backup plan in place and to regularly update your backups. Remember, you never know when disaster may strike, and having a backup copy of your important data is crucial.
So, take the time to backup your data and ensure that your digital life stays safe and secure.
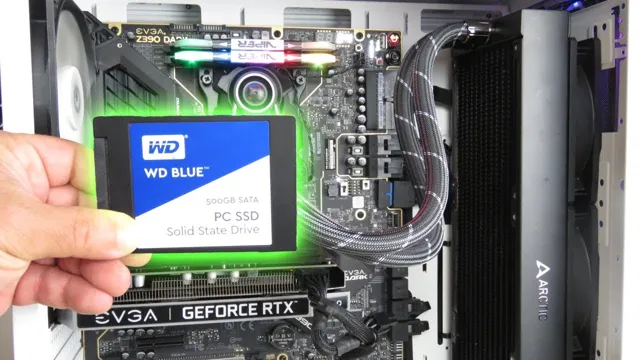
Locate & Install SSD
If you’ve recently upgraded to Windows 11 and want to improve your system’s performance, installing a new SSD is an excellent way to start. To install a new SSD, you must locate an available drive slot on your computer’s motherboard. Most desktops and laptops come equipped with an array of drive bays or slots that cater to different storage options such as
5 inches or 5 inches. Once you’ve identified the drive slot, remove the side panel or back cover of your computer to get access to the motherboard.
Gently place the SSD in the available slot and secure it with screws if required. Ensure that the SSD is aligned before you push it in all the way. After you’ve installed the SSD, close the back cover and turn on your computer.
Your computer should detect the new SSD automatically, and you’re ready to install Windows 11 on it. With the new SSD, your computer’s performance will increase significantly, allowing for faster load times, quicker file transfers, and better overall performance. So take the plunge, install a new SSD today, and experience the improved performance yourself!
Find the correct slot on your motherboard
If you’re planning to upgrade or install a new SSD, one of the first things you need to consider is the correct slot on your motherboard. Generally, modern SSDs are designed to fit into specific slots on your motherboard, so you’ll need to locate the correct one before you can install it.
One of the most common types of slots is the PCIe slot, which is typically found on modern motherboards.These slots offer fast data transfer rates, making them ideal for high-speed SSDs. You can identify them by their long, thin design and the clip at the end that helps to keep the SSD securely in place. Another common slot is the SATA III port, which is usually found on older motherboards.
These ports are ideal for older, slower SSDs, but you’ll need to make sure that your SSD is compatible with this type of port before you install it. Once you’ve identified the correct slot, the next step is to install the SSD. This is a relatively simple process, and it usually involves screwing the SSD into place and then connecting it to the motherboard using a data cable.
Overall, finding the correct slot on your motherboard is an essential part of installing a new SSD. By taking the time to locate the right slot and following the correct installation process, you can give your PC a significant speed boost and enhance its overall performance.
Slide it into the slot and screw it in
To improve the performance of your computer, you can install a solid-state drive (SSD) in addition to your hard disk drive. It’s not that difficult to install an SSD if you know what you’re doing. First, you need to locate the slot where the SSD will be installed.
Typically, it’s located in the drive bay of your computer’s motherboard. Once you have found the slot, the next step is to slide the SSD into the slot carefully. Make sure it’s seated properly before screwing it in place.
Don’t overtighten the screws, as this could damage the SSD. It’s suggested to wear an anti-static wristband or ground yourself before touching any computer components to prevent electrostatic discharge. After the installation of the SSD is complete, you may need to enter the BIOS of your computer to set up boot permissions so that your computer can detect and use your SSD.
With a new SSD installed, your computer will boot faster, applications will load more quickly, and your overall experience will become a lot smoother. So, if you want to improve your computer performance, an SSD installation is a cost-effective and simple solution.
BIOS Setup
When upgrading your computer’s storage, whether it be with a new SSD or hybrid drive, it’s important to properly set up the BIOS before installing Windows 1 The BIOS, or Basic Input/Output System, is a crucial component in booting up your system and managing hardware settings. To set up the BIOS for a new SSD installation, start by accessing the BIOS menu during startup.
Look for the option to change the boot order and make sure the new SSD is listed first. You’ll also need to enable AHCI mode for optimal SSD performance. Once these settings are adjusted, save and exit the BIOS and proceed with the Windows 11 installation process.
By properly setting up the BIOS for your new SSD, you can ensure a smooth and seamless installation process and get the best performance out of your upgraded storage. So, go ahead and give your computer an upgrade with a new SSD today!
Restart your computer & go to BIOS settings
If your computer is not functioning properly, there may be certain issues with your BIOS settings. Restarting your computer and going to the BIOS setup can be quite helpful in such a scenario. The BIOS is a firmware that manages your computer’s hardware and software settings, including the boot order, system date and time, and more.
By going to the BIOS setup, you can change any necessary configurations to ensure your computer runs correctly. To restart your computer and access the BIOS setup, first, we recommend you save any work you’re currently doing and close all programs. Then, click on the “Start” button and select “Restart.
” As the computer reboots, repeatedly press the key or keys necessary to enter the BIOS setup. Depending on the make and model of your computer, this could be one of the F keys or the Delete key.
Once you enter the BIOS setup, make the necessary changes, save them, and exit.It’s worth noting that changing your BIOS settings can have significant consequences, so it’s important to be careful while making any changes. If you are not sure about what you are doing, it’s best to consult a professional technician. In conclusion, restarting your computer and going to the BIOS setup is a useful solution for solving issues concerning your computer’s hardware and software settings.
By making the necessary changes, you can ensure that your computer runs correctly and optimally. Don’t forget that changing BIOS settings can have significant consequences, so it’s imperative to be cautious.
Select SSD as the primary boot device
If you have recently upgraded to a new SSD or wish to install an operating system on it, it is crucial to set it as your primary boot device. Doing so will allow your computer to boot from the faster SSD instead of the slow conventional hard drive. To set SSD as the primary boot device, you need to access the BIOS setup.
Usually, you can press the DEL or F2 key while booting to enter the BIOS. Once in the BIOS setup, head to the boot options and choose your SSD as the primary boot device. You may also disable other boot options or rearrange the boot order as per your preference.
After saving the changes, your computer will automatically boot from the SSD, giving you a lightning-fast experience. However, keep in mind that the steps might vary depending on the BIOS provider and the motherboard model. So, it’s wise to check the motherboard manual or search online for specific instructions.
Install Windows 11 on SSD
If you’re looking to install Windows 11 on a new SSD, there are a few steps you’ll need to follow. First, make sure you have the necessary files ready – you’ll need a copy of Windows 11 on a USB drive, as well as any necessary drivers for your computer. Once you have everything you need, shut down your computer and physically install the SSD.
Then, boot up your computer and enter the BIOS menu to ensure your computer recognizes the new drive. From there, simply follow the prompts to install Windows 11 on the new SSD. This process can vary slightly depending on your hardware and the version of Windows you’re installing, but with a little research and preparation, upgrading your computer’s storage with a new SSD and a fresh installation of Windows 11 can be a relatively simple process.
Insert Windows 11 USB/CD/DVD
So, you’re ready to install Windows 11 on your SSD? Great! The first step is to insert your Windows 11 USB/CD/DVD into your computer. Make sure that your system is set up to boot from the device that you have inserted. Once your computer starts up, follow the prompts until you get to the installation screen.
Now, select the language, time zone, and other preferences. Finally, you’ll arrive at the “Customize settings” screen. Here, you can choose to either upgrade your current operating system, or do a clean install.
It’s important to note that installing Windows 11 on an SSD can be a bit different than a traditional hard drive. Because SSDs use flash memory instead of spinning disks, it’s important to make sure that your BIOS is set up correctly to take advantage of the faster read and write speeds. To do this, go into your BIOS settings and look for the SATA mode option.
Make sure that it’s set to AHCI (Advanced Host Controller Interface) mode, which will allow your SSD to perform at its best. Overall, installing Windows 11 on an SSD is a great way to boost your computer’s performance. Just be sure to follow these steps carefully, and your new operating system should be up and running in no time!
Follow Windows 11 installation process
If you want to install Windows 11 on your SSD, there are a few things you should keep in mind. First and foremost, you will need to follow the Windows 11 installation process. This involves downloading the Windows 11 installation media, creating a bootable USB drive, and then booting your computer from the USB drive.
As you go through the installation process, make sure to select your SSD as the installation destination. This will ensure that Windows 11 is installed directly onto your SSD, which will provide faster boot and load times compared to a traditional hard drive. Once the installation is complete, you can start using Windows 11 on your SSD, enjoying faster performance and improved overall functionality.
It’s important to note that installing any new operating system can be a complex process, so make sure to follow the instructions carefully and seek help if needed. Overall, installing Windows 11 on your SSD is a great choice if you want to optimize your computer’s performance and speed things up.
Transfer Data
So, you’ve recently upgraded your computer’s storage with a new SSD and now you’re wondering how to install Windows 11 on it. Fear not, the process is easy and straightforward. Firstly, you need to make sure that your new SSD is properly installed and recognized by your computer’s BIOS.
You can do this by checking the BIOS settings or by using a system information tool. Once done, you’ll need to create a Windows 11 installation media. You can do this using the Windows Media Creation Tool, which is freely available on Microsoft’s website.
Once you have your installation media, simply insert it into your computer and restart it. From there, you’ll need to follow the on-screen prompts to select the new SSD and start the installation process. During the installation, Windows will prompt you to transfer data from your old drive to your new one.
You can choose the files and programs you want to transfer or just transfer everything. Once the transfer is complete, you’ll be able to enjoy all the perks of a new and improved SSD with Windows 1
Copy data from external storage device to SSD
When it comes to transferring data from an external storage device to your SSD, there are a few options available to you. The easiest and fastest method is to use a USB cable to connect the two devices and transfer the data directly. However, if your external storage device is formatted for a different file system than your SSD, you may run into issues.
In this case, you can use specialized software to clone your external drive onto your SSD, ensuring that all of your files and folders are moved over seamlessly. Another option is to use cloud storage or an online file sharing service to transfer your data. This can be a good choice if you have a slow internet connection or if you need to transfer a large amount of data.
Regardless of which method you choose, be sure to back up your data before you start the transfer process to avoid any loss of data. By taking the time to properly transfer your data, you can ensure that everything is moved over safely and efficiently, minimizing the risk of data loss or corruption.
Conclusion
So, there you have it folks, installing a new SSD on your Windows 11 computer is as easy as following a few simple steps. With the right tools and some careful planning, you can supercharge your system’s performance and take it to new heights. Whether you’re a seasoned pro or a complete beginner, just make sure to follow the instructions carefully and always keep safety in mind.
And who knows, with a little bit of luck and some good karma, maybe your computer will even start making your morning coffee. Happy installing!”
FAQs
What are the minimum system requirements for installing a new SSD on Windows 11?
The minimum system requirements for installing a new SSD on Windows 11 include a compatible motherboard with an available SATA or NVMe port, a screwdriver, and the SSD.
How do I physically install a new SSD on Windows 11?
To physically install a new SSD on Windows 11, first, remove the computer case cover, locate an available SATA or NVMe port on the motherboard, align the SSD with the port, and gently insert it. Secure the SSD with a screw to keep it in place.
How do I clone my existing drive onto the new SSD before installing it on Windows 11?
To clone your existing drive onto the new SSD before installing it on Windows 11, download a reliable cloning software like Acronis True Image, connect the new SSD to your computer, launch the software, select the clone option, and follow the instructions.
How do I install Windows 11 on a new SSD?
To install Windows 11 on a new SSD, connect the SSD to your computer, insert the Windows 11 installation media (USB drive or DVD), boot your computer from the installation media, follow the on-screen instructions to select the language, time zone, and keyboard preferences, enter your license key, select the drive where you want to install Windows 11 (the new SSD), and wait for the installation process to complete.