Are you planning on upgrading your PC’s storage system by adding a new M.2 SSD? Congratulations! You’re in for a significant performance boost. However, before you can start reaping the benefits of a lightning-fast SSD, you need to properly format it.
Think of it like moving into a new house. Before you can start arranging your furniture and making the space your own, you need to clean, paint, and set up the essentials. The same principle applies to your new M.
2 SSD. Formatting is a crucial step in preparing your drive for use. In this blog, we will guide you through the steps of formatting your new M.
2 SSD. Whether you’re a seasoned PC builder or a newbie, our comprehensive guide will make the process easy to follow. By the end of this post, you’ll be ready to set up your new drive and enjoy the blazing-fast speeds it offers.
So, let’s dive in!
What is an M.2 SSD?
If you’re looking to upgrade your computer’s storage performance, one option is to install an M.2 SSD. This type of solid-state drive uses a direct connection to your motherboard through the M.
2 slot, offering faster read and write speeds than traditional hard drives or even SATA-based SSDs. When setting up a new M.2 SSD, you’ll need to format it first before you can start using it for storage.
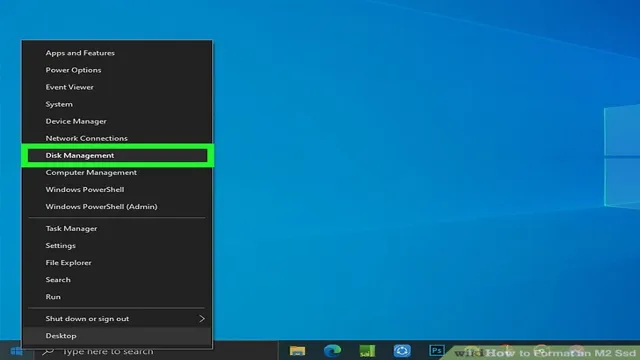
This process involves partitioning the drive and creating a file system, typically using the Windows built-in Disk Management tool. To get started, open Disk Management and locate the new M.2 SSD.
Right-click and select “New Simple Volume,” then follow the prompts to set up your partition and file system. Once that’s done, your new M.2 SSD will be ready to use, providing faster boot times and improved application performance.
Discussing the benefits of an M.2 SSD
M.2 SSD An M.2 SSD is a small solid-state drive that is becoming increasingly popular in modern computers and laptops.
Unlike traditional hard drives, which use spinning disks to store data, an M.2 SSD uses flash memory to store and retrieve data quickly. This makes it incredibly fast, with read and write speeds that are several times faster than traditional hard drives.
Additionally, M.2 SSDs are much smaller and more compact, meaning they take up less space in your computer and can be easily fitted into a range of devices. One of the biggest benefits of an M.
2 SSD is the speed at which it can access and transfer data. This makes it an ideal choice for gamers, graphic designers, and other professionals who need to work with large files quickly and efficiently. It can also help to speed up your computer’s boot time, making it start up much faster than with a traditional hard drive.
Another advantage of M.2 SSDs is their reliability – they have no moving parts, which means they are less likely to fail and have a longer lifespan than traditional hard drives. In conclusion, an M.
2 SSD is a great investment for anyone who wants to speed up their computer and improve its overall performance. Its fast read and write speeds, small size, and reliability make it a must-have for gamers and professionals alike, as well as anyone who wants to get the most out of their computer. So, if you’re looking to upgrade your computer’s storage, an M.

Preparing the SSD for Formatting
If you’ve just purchased a new M.2 SSD, the first thing you’ll need to do is prepare it for formatting. This process includes making sure that the SSD is properly installed, that it has been detected by your system, and that it’s ready to be partitioned and formatted.
To start, ensure that your computer is powered off and unplugged, then locate the M.2 slot on your motherboard and insert the SSD firmly into it. Once you’ve done so, power up your computer and open your operating system’s disk management tool to make sure that the SSD is recognized.
From here, you can partition the drive and format it to your liking. It’s important to note that when formatting the new M.2 SSD, you’ll want to make sure that you select the correct file system type (such as NTFS or FAT32) and choose the appropriate allocation unit size to optimize performance.
With these steps completed, your new M.2 SSD will be ready to use, giving you fast and reliable storage for all your important data.
Checking if your computer motherboard supports M.2 SSDs
When you’re preparing an M.2 SSD for formatting, there are a few key steps you’ll need to follow. First, make sure your motherboard supports M.
2 SSDs. This can usually be determined by looking at your motherboard’s specifications or consulting the manufacturer’s website. Once you’ve confirmed that your motherboard supports M.
2 SSDs, you can begin to prepare the drive for formatting. Start by installing the SSD into its designated M.2 slot and securing it in place.
Next, you’ll need to initialize the drive and create a partition using the Disk Management tool in Windows. Once you’ve completed these steps, your M.2 SSD will be ready for formatting and use.
Remember to always handle your SSD with care and take precautions to avoid damaging it during installation or use. With these steps complete, you can enjoy fast and reliable performance from your brand new M.2 SSD!
Installing the M.2 SSD in your computer
Once you have your M.2 SSD, it’s time to prepare it for formatting and installation. The first step is to make sure the SSD is compatible with your computer’s motherboard.
Check your motherboard manual or online specifications to verify if it supports M.2 SSDs and which type of M.2 slot it has, whether it’s PCIe or SATA.
Once you confirm compatibility, you can proceed by opening your computer case and finding the M.2 slot on the motherboard. Make sure to ground yourself by touching a metal object or wearing an anti-static wristband to avoid any damage from static electricity.
Then use the appropriate screwdriver to secure the SSD into the slot, making sure it’s aligned correctly. Congratulations, you’ve successfully installed your new SSD hardware! Now it’s time to format and optimize your drive to ensure peak performance.
Formatting the M.2 SSD
If you’ve just purchased a new M.2 SSD for your computer, the first thing you’ll need to do is format it before you can start using it. Fortunately, this is a simple process that you can do on your own.
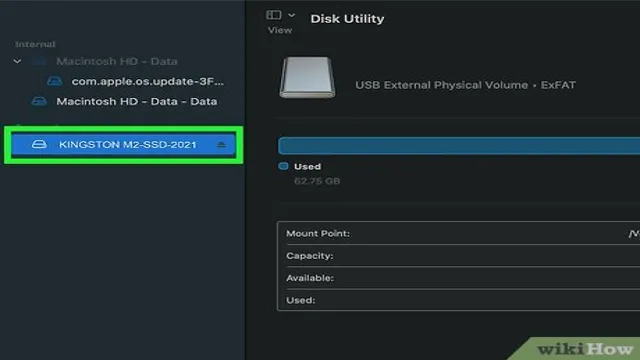
First, you’ll need to make sure that your computer recognizes the new drive. You can do this by opening up the Disk Management Tool in Windows and selecting the new SSD. Once you’ve done this, you can format the drive by right-clicking on it and selecting the “Format” option.
This will open up a window where you can choose various formatting options, such as the file system and allocation unit size. Be sure to choose the appropriate options for your needs, such as NTFS for Windows or exFAT for cross-platform compatibility. Once you’ve selected your options, click “OK” and the formatting process will begin.
Depending on the size of your SSD, this can take anywhere from a few minutes to an hour or more. Once the formatting is complete, your new M.2 SSD will be ready to use.
Using Disk Management to format the drive
When it comes to formatting an M.2 SSD, Disk Management is a great tool to use. Start by opening Disk Management and locating the drive you want to format.
Right-click on the drive and select “Format”. A new window will appear, and you can choose the file system you want to use. NTFS is the default option, but you can select a different one if desired.
You can also add a volume label to the drive if you want to. Once you have selected your options, click “OK” to begin the formatting process. Keep in mind that formatting will erase all data on the drive, so make sure to backup any important files before proceeding.
With Disk Management, formatting an M.2 SSD has never been easier.
Creating a new partition on the M.2 SSD
When it comes to setting up a new computer or upgrading an existing one, formatting the M.2 SSD is an essential step. This involves creating a new partition on the SSD to organize your files and ensure optimal performance.
To get started, you will need to access the Disk Management tool in Windows. From here, you can select the M.2 SSD and choose the option to “New Simple Volume.
” This will guide you through the steps to create a new partition with the desired size and format. It’s important to choose the format that best suits your needs, whether it’s the default NTFS or an alternative like exFAT or FAT3 Once the partition is created, you can start transferring your files and enjoying the benefits of a properly formatted M.
2 SSD, such as faster boot times and smoother application launch speeds. So, don’t overlook this crucial step in setting up your computer, and take full advantage of the power and speed that an M.2 SSD can provide.
Conclusion and Final Thoughts
Formatting a new M.2 SSD is like giving it a fresh start – it’s a chance to wipe away the old and make way for the new. Just like cleaning out your closet or decluttering your workspace, formatting a new M.
2 SSD can provide a sense of catharsis and revitalization. So go ahead, take the plunge and format that SSD with gusto! Your computer (and your mind) will thank you for it.”
FAQs
What is an M.2 SSD?
An M.2 SSD is a type of solid-state drive that uses the M.2 interface to connect to a computer’s motherboard.
How do I format a new M.2 SSD?
You can format a new M.2 SSD by opening Disk Management in Windows, selecting the unallocated space on the SSD, and then creating a new partition or volume.
Do I need any special software to format an M.2 SSD?
No, you do not need any special software to format an M.2 SSD. Windows includes a built-in Disk Management tool that can be used to format and partition the drive.
Can I use an M.2 SSD as my primary boot drive?
Yes, you can use an M.2 SSD as your primary boot drive. In fact, many people choose to use an M.2 SSD as their boot drive because of its fast read and write speeds.
What are some things to consider when choosing an M.2 SSD?
When choosing an M.2 SSD, you should consider factors such as its capacity, speed, and price. You should also ensure that your computer’s motherboard supports the M.2 interface.
