
Have you recently purchased a shiny new M.2 SSD, but you’re not quite sure how to format it in Windows 10? Don’t worry, you’re not alone. Formatting an M.
2 SSD can be a bit confusing and overwhelming, especially if you’re new to the world of PC upgrades. But fear not, because in this guide, we’ll walk you through everything you need to know about formatting your M.2 SSD in Windows
It’s like giving your SSD a fresh start, wiping the slate clean and preparing it for all the blazing-fast data transfers and lightning-fast boot times to come. So grab your SSD and let’s get started!
Step 1: Connect the M.2 SSD to Your Computer
If you’re wondering how to format M.2 SSD Windows 10, the first step is to connect the M.2 SSD to your computer.
This can be done by opening up your computer case and plugging the M.2 SSD into the designated slot on the motherboard. Alternatively, if your computer doesn’t have an M.
2 slot, you can purchase an M.2 to USB adapter and connect the drive via USB. Once connected, you’ll need to make sure the drive is detected by Windows
You can do this by going to “Disk Management” in the Control Panel, and checking if the drive is listed. If it is, you can proceed with formatting the drive. Formatting a drive erases all data on it and prepares it for use, so make sure any important data is backed up before proceeding.
Use a SATA to USB Adapter or Connect Directly to Motherboard
If you’re looking to upgrade your computer’s storage with a high-speed M.2 SSD, you’ll need to connect it to your computer first. One option is to use a SATA to USB adapter, which will allow you to connect the M.
2 SSD to your computer’s USB port. Alternatively, you can connect the M.2 SSD directly to your motherboard, using a compatible M.
2 slot. If you opt for the SATA to USB adapter, you’ll need to plug the adapter into an available USB port on your computer, and then connect the M.2 SSD to the adapter.
A SATA to USB adapter will give you the flexibility of being able to connect the M.2 SSD to any computer with a USB port, but you may experience slower data transfer speeds compared with connecting the SSD directly to your motherboard. To connect the M.
2 SSD directly to your motherboard, you’ll need to locate the M.2 slot on your motherboard. This will usually be on the back of the motherboard, near the SATA ports or the PCIe slots.
Once you’ve identified the M.2 slot, you can insert the M.2 SSD into it and secure it in place using the screws provided.
Step 2: Launch Disk Management
If you’re looking to format an m.2 SSD on your Windows 10 system, the second step is launching Disk Management. Disk Management is a utility that can help you manage your computer’s storage devices, including formatting them.
To launch Disk Management, you can simply follow these steps: first, press the Windows key on your keyboard and type “disk management” in the search bar. Then, select the “Create and format hard disk partitions” option to open Disk Management. From there, you’ll be able to see all of your computer’s storage devices, including the m.
2 SSD you want to format. Select the SSD, right-click on it, and then choose the “Format” option from the menu. This will bring up a window where you can choose the file system, allocation unit size, and volume label for your newly formatted SSD.
Once you’re satisfied with your choices, click “OK” to format your m.2 SSD. In just a few simple steps, you can format your m.
2 SSD and get it ready for use on your Windows 10 system.
Search and Open Disk Management on Windows 10
Now that you’ve searched for Disk Management on your Windows 10 machine, it’s time to launch it and start managing your hard drives. To launch Disk Management, you can simply click on the top search result or navigate to the Start menu and locate it under the Windows Administrative Tools folder. Once you’ve found it, click to open it.
If it is your first time using Disk Management, you may be prompted to initialize or partition your disk. From here, you’ll be able to manage your hard drives, including viewing their status, formatting them, creating partitions, and much more. It’s important to note that Disk Management allows you to manage only internal hard drives, so if you have external hard drives or USB drives that you want to manage, you’ll need to look for alternative software.
With these tips under your belt, you’ll be well on your way to understanding how to use Disk Management on Windows 10 like a pro!
Step 3: Locate the M.2 SSD
When it comes to formatting your M.2 SSD in Windows 10, the first step is to locate where it is. Typically, the M.
2 SSD is located on the motherboard of your computer. You may need to remove the access panel to access it. Once you have located the M.
2 SSD, you can proceed with formatting it. However, it’s important to note that formatting your SSD will delete all data on it, so be sure to back up any important files beforehand. To format the M.
2 SSD, simply right-click on it in the Windows explorer and select the “Format” option. From there, you can choose the file system and allocation unit size before proceeding with the formatting process. While formatting can seem daunting at first, taking the time to properly format your M.
2 SSD can greatly extend its lifespan and ensure efficient performance in the long run.
Identify the Disk Number and Capacity of the SSD
If you’re installing an M.2 SSD into your computer, it’s important to identify the disk number and capacity of the SSD so that you can properly configure it. Follow these steps to locate your M.
2 SSD: – Step 1: Open your computer case and locate the M.2 slot. It’s usually located beside the RAM slots.
– Step 2: Check the label on the SSD to identify its capacity. You may also need to check the manufacturer’s website for more information. – Step 3: Once you’ve determined the capacity of your SSD, you can identify its disk number.
Go to the “Disk Management” tool in Windows to view a list of disks. Your SSD should be listed with its capacity and disk number. Make a note of the disk number.
By following these steps, you should now know how to locate your M.2 SSD, determine its capacity, and identify its disk number. This information is essential for properly configuring your SSD and optimizing your system’s performance.
So, go ahead and get started with your M.2 SSD installation!
Step 4: Format the M.2 SSD
To format an M.2 SSD in Windows 10, follow these simple steps. First, open “This PC” and locate the M.
2 SSD drive. Right-click on it and select “Format” from the drop-down menu. Next, select the file system that you want to use for the drive, such as NTFS or exFAT.
You can also choose to give the drive a new name if desired. Finally, click “Start” to begin the formatting process. This process will erase all data on the drive, so make sure you have backed up any important files beforehand.
Once the formatting is complete, your M.2 SSD is ready to use. Remember to always safely eject the drive to prevent any data corruption.
Overall, formatting your M.2 SSD in Windows 10 is a straightforward process that can enhance your drive’s performance and efficiency.
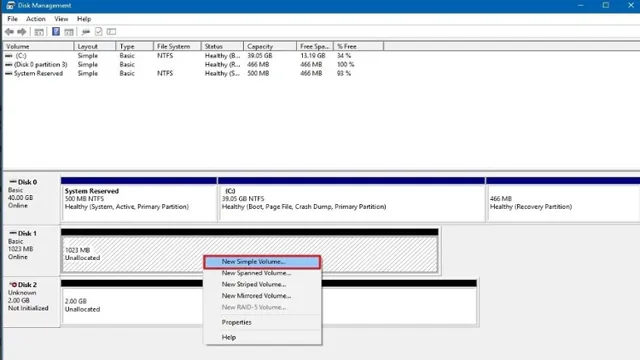
Right-click the M.2 SSD and Select ‘New Simple Volume’
When installing an M.2 SSD, it’s important to properly format the drive before you can start using it. Once you have initialized the drive in Disk Management, you can right-click on the M.
2 SSD and select the “New Simple Volume” option. This will open the New Simple Volume Wizard, which will guide you through the process of formatting the drive. You can set the volume size, assign a drive letter, and choose the file system that best suits your needs.
The most popular file systems for Windows are NTFS and exFAT. NTFS offers better security, compression, and file size support, while exFAT is ideal for external drives and transferring large files across different operating systems. Remember that formatting the drive will erase all data on it, so make sure to back up any important files before proceeding.
Once you have completed the formatting process, your M.2 SSD will be ready for use!
Select File System, Allocation Unit Size and Assign a Drive Letter
Now that the M.2 SSD is recognized in the system, it’s time to format it. Selecting the appropriate file system, allocation unit size, and assigning a drive letter are critical in ensuring the SSD performs optimally.
A popular file system for Windows users is NTFS, which is known for its larger clusters and improved security. However, if the SSD is going to be used in a different operating system, a different file system may be better suited. Next, the allocation unit size, or cluster size, should be considered.
A larger cluster size can improve performance for larger files, while a smaller cluster size can improve performance for smaller files. Finally, it’s important to assign a drive letter to the SSD for easy access in the future. Simply right-click on the SSD, select “Format,” and follow the prompts to complete the process.
With these simple steps, the M.2 SSD will be ready for use in no time.
Step 5: Complete the Formatting Process
Now that you have installed your M.2 SSD on Windows 10, it’s time to format it. The formatting process is vital to ensure that you can start using your new storage device properly.
To begin, right-click the start menu, and then select “Disk Management.” From there, you can locate your M.2 SSD and right-click to select the “Format” option.
The format window will appear, asking you to choose the file system you wish to use. For Windows 10, it’s best to use the NTFS file system. You can also choose to assign a drive letter and name your new SSD.
Once you’ve made your selections, click “OK,” and the formatting process will begin. Be patient as this may take a while, depending on the size of your SSD. Once the process is complete, your M.
2 SSD will be ready to use. Remember to save all your essential files and data on your new device to experience its faster speed.
Click ‘Finish’ to format the M.2 SSD
As you near the end of the M.2 SSD formatting process, you’ll need to click on the “Finish” button to complete the procedure. Once you do this, the application will start to partition the disk according to your preferences, if you have any.
This step may take a few minutes, depending on the size of your M.2 SSD. You might notice a progress bar that will tell you how much time is left before the partitioning process is complete.
Once that’s done, the system will notify you that the M.2 SSD has been successfully formatted, and you can now start using it. It’s important to remember that formatting an SSD will erase all data from it, so be sure to back up your files before you start the process.
Now that your M.2 SSD is ready to use, you can start to transfer files, install games, and enjoy faster speeds compared to traditional HDDs. Remember to keep your SSD clean and well-maintained, so it can run at optimal speeds for years to come.
Troubleshooting Common M.2 SSD Formatting Issues
If you’re having trouble formatting your M.2 SSD on Windows 10, don’t despair. There are several common issues that could be preventing your M.
2 SSD from formatting, but they’re all fixable. One common problem is that your M.2 SSD might not be properly recognized by your computer’s BIOS.
To fix this, make sure you’re on the latest version of your BIOS and that your M.2 SSD is properly installed and connected. Another issue that could prevent formatting is partitioning.
If your M.2 SSD has multiple partitions, you won’t be able to format it until you’ve deleted all the partitions from the drive. You can do this through the Disk Management tool in Windows
Finally, if you’re formatting your M.2 SSD as a boot drive, you’ll need to make sure it’s properly configured in your BIOS settings. By following these troubleshooting steps, you should be able to format your M.
2 SSD successfully on Windows
How to Fix ‘Cannot Format the Disk’ Error
If you’re having trouble formatting an M.2 SSD, you’re not alone. One common issue is the “cannot format the disk” error message.
This might be caused by the disk being write-protected, corrupted, or not recognized by your system. First, make sure the disk is not write-protected by checking the lock switch or disabling write protection in the disk properties. If that doesn’t work, try using Disk Management or Diskpart in Command Prompt to reformat the disk.
It’s important to note that formatting a disk will erase all data, so make sure to back up important files before proceeding. Additionally, updating your system’s BIOS or chipset drivers can sometimes fix compatibility issues with M.2 SSDs.
Don’t let this frustrating error stop you from using your SSD – try these troubleshooting steps and get back to storage bliss.
How to Fix ‘Disk Management Could Not Start Virtual Disk Service’ Error
If you’re having trouble formatting your M.2 SSD, you’re not alone. Many users have encountered issues with their SSD’s virtual disk service, resulting in the error message, “Disk Management Could Not Start Virtual Disk Service.
” However, don’t worry, as there are several ways to troubleshoot this issue. First, try restarting your computer and checking that your SSD is connected properly. If that doesn’t work, you can try updating your device drivers or running a disk check.
If all else fails, you may need to seek professional help or replace your SSD. With patience and perseverance, you’ll be able to get your SSD up and running again in no time.
Conclusion
So there you have it, formatting your M.2 SSD on Windows 10 is not rocket science! Follow these steps, and you’ll have a speedy and reliable storage solution in no time. Remember, always backup your data before taking any action, and never underestimate the power of a well-formatted SSD to enhance the overall performance of your system.
Happy formatting!”
FAQs
What is an M.2 SSD and why is it important for Windows 10?
An M.2 SSD is a type of solid-state drive that delivers faster transfer speeds and lower power consumption compared to traditional hard drives. It is important for Windows 10 because it allows for faster boot times and application load times, enhancing overall system performance.
How do I check if my motherboard supports M.2 SSDs?
Check your motherboard’s specifications online to see if M.2 connectors are available and compatible. Alternatively, you can look for an M.2 slot on your motherboard itself, located near the PCIe or SATA ports.
How do I install and format an M.2 SSD in Windows 10?
To install an M.2 SSD, locate the M.2 slot on your motherboard, insert the SSD, and secure it with the screw provided. To format the drive, right-click on the Windows Start menu, select Disk Management, right-click on the unallocated space on the SSD, select New Simple Volume, and follow the prompts to assign a letter and format the drive.
Why is my M.2 SSD not showing up in Windows 10?
This can be caused by a number of issues, such as outdated drivers, BIOS settings, or physical installation problems. Check your motherboard’s manual and online forums for specific troubleshooting steps, or contact the manufacturer for support.