
Changing SSD on Acer laptops can be a daunting task for those who haven’t done it before. However, upgrading your storage device is an excellent way to boost performance and speed up your computer. If you’re tired of waiting for your computer to start up, load programs, or transfer files, then it’s time to replace your current SSD with a faster and more robust one.
In this article, we’ll walk you through the steps you need to know to get the job done. Whether you’re a tech novice or an experienced user, we’ll provide the guidance and tips you’ll need to successfully replace your SSD. So let’s get started!
Step 1: Gather necessary tools
If you’re looking to change the SSD on your Acer laptop, the first step is to gather the necessary tools. Depending on your specific model, you may need a screwdriver, a plastic pry tool, and an external enclosure for your old SSD. It’s important to have the correct tools to avoid damaging your device during the process.
It’s also a good idea to back up any important data before beginning. Once you have everything you need, you can move on to the next steps of the process. By taking the time to gather the right tools, you’ll ensure a smoother and more successful SSD replacement.
So, grab your tools and get ready to give your Acer laptop a boost!
Locate and purchase SSD and screwdriver set
If you’re planning to upgrade your computer’s storage system by installing an SSD, the first step is to gather the necessary tools before you begin. You’ll need to locate and purchase an SSD and a screwdriver set. Finding an SSD shouldn’t be too difficult, as they’re readily available online and in most tech stores.
You’ll want to make sure to choose an SSD that’s compatible with your computer and has enough storage capacity to suit your needs. Look for high-quality SSDs from reputable brands with good reviews to ensure you’re getting a reliable product. When it comes to screwdrivers, you’ll want to make sure you have both a Phillips head and a flathead screwdriver in your set.
This will allow you to remove and install screws of different types and sizes during the installation process. Once you’ve gathered your tools, you’ll be ready to get started on the installation process. Properly preparing beforehand can save you time and frustration in the long run, so be sure to take the time to gather everything you need before beginning the installation process.
Step 2: Shut down and unplug Acer
If you’re ready to upgrade your Acer laptop’s storage to an SSD, the first step is to shut down and unplug the device. This is an essential safety measure that prevents any damage to both the computer and the new component. Shutting down the Acer correctly will preserve the integrity of the data and the operating system while reducing the risk of data loss.
Unplugging the Acer eliminates the risk of electrical shock and ensures you have an unobstructed view of the laptop’s components. After unplugging, keep the Acer on a flat surface and wait for a few minutes to let it cool down properly. Changing a laptop’s storage is an involved process that could take some time, so it’s best to have patience and follow the instructions diligently.
By following these steps, you can get started on the process of changing your Acer laptop’s storage to an SSD and experience better performance.
Ensure all data is backed up
When it comes to keeping your Acer computer safe and secure, backing up all your data should be a top priority. You never know when your device may crash or experience a technical issue that could potentially erase all your important files and information. That’s why step 2 in ensuring your Acer’s safety is to shut down and unplug the device before backing up all data to an external hard drive or cloud storage service.
This will not only protect your data but also give you peace of mind knowing that you have a backup copy in case anything goes wrong. Remember, it’s always better to be safe than sorry when it comes to safeguarding your personal and professional information, so take this step seriously and make sure all your data is backed up before moving on to the next step of securing your Acer.
Step 3: Remove bottom panel
Now that you have successfully removed the back cover, it’s time to take the next step in changing your Acer SSD. The third step is to remove the bottom panel of your Acer laptop carefully. You will need to unscrew all the screws that are holding the panel in place.
Make sure you keep the screws safe so that you don’t lose them. Keep in mind that some models may have clips holding the panel in place, so you will need to use a flat tool to carefully remove the panel. Once you have removed the panel, you will have access to the inside of your laptop, where the SSD is located.
Before removing the old SSD, make sure you follow the manufacturer’s instructions carefully to avoid causing any damage to other components. Once you have replaced the SSD with a new one, you can reassemble your Acer laptop by following the reverse order of these instructions. Overall, changing your Acer SSD isn’t a very complex process, but it does require some caution and attention to detail to avoid damaging other components.
Locate and unscrew bottom panel
Removing the bottom panel is the third step in fixing your appliance. To do this, locate the screws that secure the panel to the machine’s base. These screws are usually located towards the back of the appliance and are either Phillips or Torx.
Once you have determined the type of screws, use the appropriate tool to unscrew them. Take caution as some appliances may have clips or other fasteners designed to keep the panel in place and these clips may require additional pressure to release. After all the screws and fasteners have been removed, gently lift the panel off to expose the machine’s interior.
It is essential to remember that the panel’s placement may vary from one appliance model to another, and you should consult your owner’s manual for precise instructions. With this step complete, you are ready to proceed with the next step towards fixing your appliance. The key to success in this step is to pay close attention to the fasteners’ placement while unscrewing them to prevent damaging the panel or the appliance’s interior.
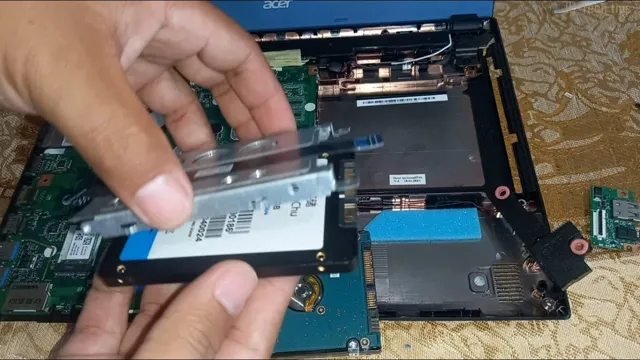
Step 4: Remove old SSD
Now that you’ve successfully cloned your current SSD onto the new one, it’s time to remove the old SSD. First, shut down your Acer laptop and unplug it from the power source. Then, carefully remove the back cover of your laptop using a screwdriver.
Locate the old SSD and gently remove it by pulling the connector away from the socket. You may need to unscrew any brackets or clips holding the SSD in place. Be sure to handle the old SSD with care and avoid touching the gold connectors.
Once removed, you can either keep it as a backup or recycle it appropriately. With the old SSD removed, you can now proceed to install the new one. Don’t forget to secure it properly in place before reattaching the back cover.
Congratulations, you’ve successfully upgraded your Acer laptop’s storage!
Locate and unscrew old SSD
Removing the old SSD is an important step in replacing it with a new one. Before you start with the replacement process, make sure to locate and unscrew the old SSD carefully. It is usually placed in a cage or a slot, and you might need to remove any bays or covers that are in the way.
When locating the old SSD, be mindful of the cables that are connected to it. Gently disconnect any cables or connectors from the old SSD, and then unscrew it from its place. Once you have successfully removed the old SSD, gently place it aside.
It is essential to exercising caution while unscrewing the old SSD to prevent any damage to the SSD or the cables. By following this process carefully, you can easily remove the old SSD and move on to installing the new one.
Step 5: Insert new SSD
Once you have removed the old SSD, it’s time to insert the new one. Make sure that you line up the connectors on the new SSD properly with the slot on your Acer laptop. Once lined up, gently slide the new SSD into place and secure it using the screws that you had removed previously.
Be careful not to overtighten the screws as this can cause damage to the new SSD. Once the new SSD is secured in place, you can reattach the back panel of your Acer laptop by reversing the previous steps. Congratulations, you have successfully changed your old SSD to a new one and your Acer laptop is now ready to perform at its best.
Insert new SSD into slot and screw it in
One of the final steps in upgrading your computer’s storage capacity is inserting the new SSD into the appropriate slot. First, locate your computer’s SSD slot and ensure it’s compatible with your new SSD. Then, carefully insert the SSD into the slot, making sure it’s properly aligned.
Next, use the screws provided with your new SSD to secure it in place. Don’t overtighten the screws, just ensure they’re snug enough to keep the SSD firmly in its slot. Once the SSD is securely installed, you can move on to installing your operating system and transferring your files.
By following these steps, you can easily upgrade your computer’s storage capacity and increase its performance.
Step 6: Replace bottom panel and power on Acer
Now that we’ve successfully installed our new SSD into our Acer laptop, we can start wrapping things up. The next step is to carefully replace the bottom panel of the laptop. Remember to tighten all the screws to ensure a secure fit.
And finally, it’s time to power on our Acer and see if everything’s working as it should. If you did everything correctly, your Acer should boot up faster than ever before, and you’ll be able to enjoy a faster and more responsive computing experience. Congratulations, you’ve successfully changed the SSD on your Acer!
Conclusion
In conclusion, swapping out your existing SSD with a new one from Acer is a wise move if you’re looking to boost your computer’s performance and storage. With just a few simple steps, you can easily upgrade your laptop or desktop and enjoy lightning-fast processing speeds and ample storage space to store all of your important files and applications. So go ahead and give your computer a little TLC – after all, a happy Acer means a happy you!”
FAQs
What are the minimum system requirements for changing the SSD on an Acer laptop?
The minimum system requirements for changing the SSD on an Acer laptop are a screwdriver, an SSD compatible with the laptop model, and basic knowledge of computer hardware.
How do I know if my Acer laptop’s warranty will be affected by changing the SSD?
Changing the SSD on an Acer laptop may or may not affect the laptop’s warranty depending on the terms and conditions set by the manufacturer. It is recommended to check with Acer customer support for clarification.
Is it possible to clone the existing data on my Acer laptop to the new SSD after installation?
Yes, it is possible to clone the existing data on your Acer laptop to the new SSD after installation. There are several third-party software tools available for this purpose.
Do I need to reinstall the operating system after changing the SSD on my Acer laptop?
It is not necessary to reinstall the operating system after changing the SSD on an Acer laptop if you cloned the old data on the new SSD. However, a fresh installation is recommended for optimal performance.