
Are you looking for ways to upgrade your computer’s storage and improve its overall performance? If so, one option you might consider is switching from a traditional solid-state drive (SSD) to a more advanced M.2 drive. M.
2 drives offer faster read and write speeds and are generally smaller and more convenient to use. However, the process of cloning your SSD to an M.2 drive can be somewhat complicated, especially if you’re not very tech-savvy.
In this blog post, we’ll go over everything you need to know about how to clone SSD to M.2, including the steps you need to follow, the tools you’ll need, and some tips to consider before you start. Whether you’re a beginner or an experienced computer user, this guide will help you successfully make the switch to an M.
2 drive and enjoy all the benefits that come with it!
Overview of SSD and M.2 Cloning
Cloning SSD to M.2 can help you transfer your data from one drive to another with ease. SSD cloning involves creating an exact replica of your entire hard drive or partition onto a new drive.
M.2 cloning is the process of copying data from one M.2 drive to another.
The process of cloning SSD to M.2 is relatively straightforward and can be accomplished in a few steps. First, you need to find suitable software that can clone your SSD to M.
Once you have the software, connect your new M.2 drive to your PC.
Then, use the software to clone your SSD onto the M.2 drive. Once the cloning is complete, disconnect the SSD and use your new M.
2 drive. Cloning SSD to M.2 can save you time and effort by making it easy to transfer your data from one drive to another.
What is SSD and M.2?
SSD cloning Solid State Drives (SSD) are storage devices that use NAND flash memory to store data, which is accessed faster compared to traditional hard drives. SSDs are compact and durable, and are becoming increasingly popular due to their faster speeds and reliability. M.
2, on the other hand, is a form factor for the SSDs, featuring a smaller and more compact design compared to traditional SATA drives. Cloning an SSD involves copying the data from one drive to another, which is a useful technique when upgrading to a larger drive or replacing a failing one. In general, there are two ways to clone an SSD: use a cloning software or use an external adapter.
While cloning software is relatively easy to use, it can be somewhat slow and may require additional steps to ensure the data is properly migrated. On the other hand, using an external adapter may be faster, although it requires a bit more technical know-how. Regardless of the method used, cloning an SSD can save significant time and effort compared to manually transferring data.
Reasons to Clone SSD to M.2
SSD to M.2 cloning If you’re looking to upgrade your computer’s storage, you might be considering cloning your SSD to an M.2 drive.
This process involves transferring all your data from your current SSD to a faster, more efficient M.2 drive. There are several reasons to make this switch.
Firstly, an M.2 drive can provide faster read and write speeds, which can significantly improve the overall performance of your computer. Additionally, M.
2 drives take up less space in your computer and consume less power, making them a more efficient option. Moreover, if your current SSD is running out of space, cloning it to an M.2 drive can provide you with more storage capacity.
Overall, cloning your SSD to an M.2 drive is a simple process that can significantly improve the performance and efficiency of your computer.
Step-by-Step Guide to Clone SSD to M.2
If you’re upgrading your computer with a new M.2 drive, you may want to clone your existing SSD to your M.2 to avoid the hassle of reinstalling your operating system and all your applications.
Fortunately, the process of cloning an SSD to an M.2 drive is straightforward and doesn’t require any special tools or expertise. To start, you’ll need a cloning software such as EaseUS Todo Backup or Acronis True Image.
Next, you’ll need to connect your M.2 drive to your computer, either directly or using an adapter. Once you have your software and M.
2 drive ready, you can start the cloning process by creating a bootable USB drive with the cloning software. You’ll then need to boot from the USB drive and follow the cloning software’s instructions to clone your SSD to your M.2 drive.
This process may take some time depending on the size of your SSD, but once it’s complete, you can remove your old SSD and start using your new M.2 drive. With this simple guide, you can easily clone your SSD to your new M.
2 drive and enjoy faster boot times and improved performance.
Step 1: Backup Your Data
If you’re looking to upgrade your computer’s storage capacity, cloning your SSD to an M.2 drive can be a great option. However, before you begin the process, you need to back up your data.
This can be done by transferring your important files to an external hard drive or cloud storage. Once your data is backed up, you can proceed with the below steps to clone your SSD to an M.2 drive.
First, you need to ensure that your M.2 drive is compatible with your computer’s motherboard and that it has the right interface. Next, you need to install the M.
2 drive onto your computer’s motherboard and ensure that it’s securely fastened. Once the M.2 drive is installed, you will need to use disk cloning software to transfer your data from the SSD to the M.
2 drive. There are several free and paid options available, such as EaseUS Todo Backup, Macrium Reflect, and Acronis True Image. After installing disk cloning software, you will need to select the SSD as the source drive and the M.
2 drive as the destination. Once selected, you can begin the cloning process. The process can take anywhere from a few minutes to a few hours, depending on the size of your data and the speed of your computer.
Step 2: Insert M.2 SSD
Now that you’ve prepared your computer and obtained a compatible M.2 SSD, it’s time to insert the new drive into your system. First, locate your M.
2 slot on your motherboard. It’s typically found near your other storage connections and may be labeled as “M.2” or “NVMe.
” Once you’ve found it, gently insert your M.2 SSD into the slot, lining up the notches on the drive with the keyway on the slot. Be sure to use equal pressure on both sides of the drive when inserting it, and don’t force it in.
Your M.2 SSD should click into place once properly installed. If you have more than one M.
2 slot, consult your motherboard manual to determine the best slot to use. Once you’ve inserted your M.2 SSD, you’re now ready to clone your old SSD to the new drive using your preferred software tool.
Happy cloning!
Step 3: Install Cloning Software
Once you have created a backup of your data, it’s time to install cloning software to copy everything from the current SSD to the M.2 drive. There are many cloning tools available, but we recommend using Macrium Reflect or EaseUS Todo Backup.
These tools are easy to use and can transfer your data quickly and efficiently. After downloading and installing the software, connect both SSD and M.2 drives to your computer, and launch the software.
The program should detect both drives. Then, select the source SSD drive, and choose the destination M.2 drive.
After selecting the drives, the cloning process will begin, which may take some time depending on the size of your data. Just sit back and wait until the cloning is complete. Once it’s done, shut down your computer, remove the SSD drive, and replace it with the M.
2 drive. When you turn on your computer again, everything will be exactly as it was before, except now you’ll be running off the faster M.2 SSD drive.
Step 4: Select Cloning Options
Cloning Options When it comes to cloning your SSD to an M.2, there are a few options to consider. One option is to use cloning software, which allows you to make an exact copy of your SSD onto your new M.
Another option is to manually transfer your data by backing up your files onto an external hard drive or cloud storage service, installing your new M.2, and then transferring your files back onto the new drive.
Whichever method you choose, it’s important to take the time to carefully review and select your cloning options to ensure a seamless transition. This includes selecting the appropriate cloning software, deciding whether to clone specific partitions or the entire drive, and determining the partition size of your new M.2 drive.
By taking the time to carefully consider your cloning options, you can successfully clone your SSD to your new M.2 without losing any data or performance.
Step 5: Begin the Cloning Process
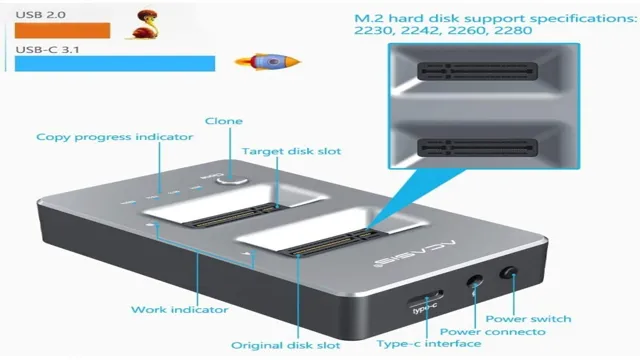
Now that we have everything in place, it’s time to begin the cloning process from your SSD to your M. Start by launching the software you downloaded earlier and select the “Clone” option.
Next, choose the source disk (your SSD) and the target disk (your M.2). Double-check to ensure you have selected the correct disks as this process will overwrite the target disk.
Once that’s done, click on “Start Clone” and wait for the process to finish. This may take several minutes or a few hours, depending on the amount of data you have on your SSD. It’s essential to keep your computer plugged in during the cloning process to prevent any loss of power or data.
After the cloning process is complete, check to ensure that everything has been transferred correctly and reboot your computer. You should now be able to boot from your new M.2 drive and enjoy the faster speeds.
Remember to keep a backup of your original SSD data, just in case anything goes wrong during the cloning process.
Step 6: Install Cloned M.2 SSD
Now that you’ve successfully cloned your SSD to the M.2, it’s time to install the new device onto your computer. Start by turning off your computer and unplugging it from all power sources.
Then locate the M.2 slot on your motherboard and unscrew the retention screw if there is one. Carefully align the M.
2 SSD with the slot and gently push it in until it clicks into place. Finally, replace the retention screw if you removed one and secure the M.2 SSD.
Once you’ve completed these steps, you can plug your computer back in and turn it on. The computer should recognize the new M.2 SSD automatically, but if it doesn’t, you may need to access your BIOS settings to configure it.
Enjoy the benefits of faster read and write speeds as well as greater storage capacity with your new M.2 SSD!
Troubleshooting Tips for Cloning SSD to M.2
Are you looking to upgrade your computer’s drive to an M.2 SSD? Cloning your existing SSD to an M.2 drive can save you a lot of time and effort.
However, the process can be tricky if you are not familiar with it. Here are some troubleshooting tips for cloning SSD to M.
Firstly, ensure that your computer supports M.2 SSD and check if you are using the correct type of M.2 SSD.
Also, make sure that your computer’s BIOS is updated to support the new M.2 SSD. Secondly, use reliable cloning software that can clone your entire SSD, including the operating system and boot records.
Thirdly, verify if the clone was successful by testing the new drive before replacing the old one. Finally, check if there are any issues such as driver or compatibility problems after booting up your computer again. With these tips, cloning your SSD to M.
2 should be a breeze.
Common Problems with Cloning Process
Cloning an SSD to M.2 drive can be a daunting task. Even experienced users can run into issues.
The most common problem is the size difference between the source and target drives. However, there are ways to troubleshoot this problem. One way is to make sure the target drive has enough free space before cloning.
Also, ensure that the target drive is formatted to the correct file system. Another issue that users face is partition alignment. When cloning, make sure that the partition is aligned to the correct sector size to ensure optimal performance.
Finally, the cloning process can be time-consuming, so it’s important to be patient and let the process run its course. With these troubleshooting tips, cloning your SSD to an M.2 drive should be a smooth and successful process.
Solutions to Common Cloning Problems
If you’re looking to upgrade your computer’s storage by cloning your SSD to M.2, you may encounter a few hiccups along the way. First, make sure that you have the correct software to perform the cloning process.
Some software may not be compatible with certain drives, so be sure to do your research beforehand. Secondly, if you are unable to boot from the new M.2 drive after cloning, you may need to go into your BIOS settings and change the primary boot device.
Additionally, you may need to adjust the partition size of your old SSD to fit onto the newer, smaller M.2 drive. Finally, it’s important to keep in mind that cloning can be a time-consuming process, so be patient and allow ample time for it to complete.
By following these troubleshooting tips, you can successfully clone your SSD to M.2 and enjoy faster storage speeds.
Conclusion and Next Steps
In conclusion, cloning your SSD to an M.2 drive is like giving your car a turbo boost – it’s faster, more efficient, and makes you feel like a boss. With a few clicks of a button and the right software, you can have your entire operating system and files transferred over in no time.
So, why settle for a horse-drawn carriage when you can have a Ferrari? Clone that SSD to an M.2 and take your computer to the next level. “
FAQs
What is the difference between cloning SSD to M.2 and a fresh installation?
Cloning SSD to M.2 is the process of making an exact copy of all the data from your existing SSD to M.2 drive, while a fresh installation requires you to install the operating system and other software from scratch.
Can I clone my SSD to M.2 without losing any data?
Yes, you can clone your SSD to M.2 without losing any data. It copies all the files and settings, including the operating system, applications, and personal data, without any damage.
What are the benefits of cloning an SSD to M.2?
Cloning SSD to M.2 offers several benefits, including higher speed, increased storage capacity, improved boot times, and overall performance, with no loss of data.
What tools do I need to clone my SSD to M.2?
You can use several third-party tools, including Acronis True Image, EaseUS Todo Backup, Clonezilla, and Macrium Reflect, to clone your SSD to M.2. You may need an M.2 enclosure or adapter to connect your SSD to your computer, depending on your system’s configuration.