
If you want to upgrade the performance of your computer, adding an SSD to your motherboard can do the trick. Solid-state drives (SSDs) are faster and more reliable than traditional hard disk drives (HDDs) because they use flash memory instead of spinning disks. Installing an SSD to your motherboard may seem daunting, especially if you’re unfamiliar with the process.
But fear not, because we’ve got you covered. In this article, we’ll guide you through the process of connecting an SSD to your motherboard step-by-step, so you can upgrade your computer with confidence. So, whether you’re a seasoned tech enthusiast or a beginner, keep reading to learn everything you need to know about connecting an SSD to your motherboard.
Understanding SSD Connections
When it comes to understanding how a SSD connects to a motherboard, it’s all about the interface. SSDs use a variety of interfaces to connect including, SATA, NVMe, and PCIe. SATA is the easiest and most common connection type, using a simple cable that connects to the motherboard.
NVMe and PCIe connections, on the other hand, use a more complex interface that can provide higher speeds. NVMe is designed specifically for SSDs and is capable of speeds up to six times faster than SATA. PCIe connections use a dedicated lane for data transfer, making them the fastest option with speeds up to three times faster than NVMe.
When selecting an SSD, it’s important to consider not only the speed but also the type of interface that will best suit your needs.
SATA Connection
SATA Connection When it comes to SSD connections, one of the most common options is SATA or Serial ATA. This connection type is widely used in computers and laptops, making it a popular choice for many users. SATA connections provide fast and reliable data transfer speeds, which is essential for SSDs to perform at their best.
Plus, they are easy to install, with most motherboards and computers featuring multiple SATA interfaces. It’s essential to remember that SATA connections come in a variety of speeds, ranging from SATA I at 5 Gbps to SATA III at 6 Gbps.
Thus, users must consider their system’s compatibility with their chosen SSD and ensure that they are utilizing the right SATA interface to achieve optimal performance. However, overall, SATA connections offer a reliable, accessible, and efficient means of connecting SSDs to a computer system.
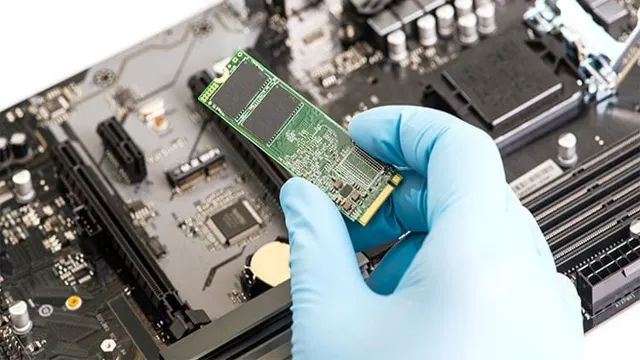
M.2 Connection
One of the most popular connection types for solid-state Drives (SSDs) is the M.2 connection. This type of connection provides a high-speed data transfer rate and a compact form factor.
M.2 SSDs connect directly to the motherboard of the computer, eliminating the need for cables and providing a secure connection. The M.
2 connection is also known for its high performance, making it a popular choice for gamers and enthusiasts who want fast and reliable storage. However, it’s important to note that not all motherboards support M.2 SSDs, so it’s essential to check compatibility before making a purchase.
Additionally, M.2 SSDs come in different sizes, so it’s crucial to double-check the physical dimensions before buying one. Overall, the M.
2 connection offers an excellent way to upgrade your computer’s storage and performance.
Step-by-Step Guide
If you’re planning to upgrade to a solid-state drive (SSD) from your old hard disk drive (HDD), one of the essential things to consider is how to connect it to your motherboard. Unlike the older HDDs, SSDs use a different type of connector called a SATA connector. On your motherboard, you’ll find several SATA ports located near the chipset.
To connect your new SSD, locate an unused SATA port and align the connector to the port. You’ll then need to take the SATA data cable that comes with your SSD and connect one end to the SSD and the other to the SATA port on your motherboard. Make sure that both are firmly attached to avoid any connection issues, and you’re all set! Your computer should now recognize your new SSD as a storage device, and you can start using it in your system to achieve faster boot times and improved performance.
It’s that simple – just a few easy steps to get your SSD connected to your motherboard.
Step 1: Identify the SSD Connection
When upgrading or installing an SSD, the first step is to identify the SSD connection. There are two primary types of SSD connections: SATA and NVMe. To make sure you get the right SSD for your computer, you need to know which connection your motherboard supports.
SATA is the most common type of connection, and you can easily identify it by looking for the SATA connector on your motherboard. NVMe, on the other hand, is a newer and faster option that requires an M.2 slot.
Some motherboards support both SATA and NVMe connections, while others only support one or the other. By knowing which type of connection your motherboard supports, you’ll be able to choose the right SSD for your computer.
Step 2: Prepare the SSD
Now that you’ve ensured your computer has the necessary hardware compatibility, it’s time to get your SSD ready for installation. First things first, you’ll want to back up all of your data from your current hard drive. This is to ensure that you don’t lose any of your essential files during the migration process.
Once that’s done, you’ll need to physically install the SSD into your computer. Depending on your setup, you may need to swap out the existing drive bay with the one designed for the SSD. You’ll then need to connect the power and data cables to the drive.
Before you can start using your new SSD, you’ll need to initialize and format it. You can do this by going to the “Disk Management” utility in Windows and following the prompts to format the drive. Congratulations! You’re now ready to start enjoying the speed and performance benefits of your new SSD.
Step 3: Connect the SSD to the Motherboard
Once you have the SSD ready, it’s time to connect it to the motherboard. This can be done easily with a few simple steps. First, locate the PCIe M.
2 slot on your motherboard. Then, gently insert the SSD into the slot, making sure it aligns with the socket. Secure it in place by screwing it down.
If you’re using a 5-inch SSD, you will need to connect it to a SATA port on your motherboard. Simply locate an available SATA port, connect one end of the SATA cable to the drive, and the other end to the motherboard.
Once you’ve made the connection, turn your PC on. The BIOS should detect the new drive automatically. If it doesn’t, you may need to enter the BIOS and manually enable the port.
With the SSD connected, you can enjoy faster boot times, improved application loading, and quicker file transfers. It’s a simple upgrade that can make a big difference to your computer’s performance.
Conclusion
In conclusion, it’s as simple as this – SSDs and motherboards have a special kind of love story. They connect with each other through a unique interface that involves no cables, no screws, and no hard work. Instead, they use a sleek and simple connector called the SATA connector, which is the core of their eternal bond.
With SATA, SSDs can slide into the motherboard’s slot, ready to share their lightning-fast speeds, their remarkable durability, and their amazing storage capacities. And with that, the two become one, a perfect match made in high-tech heaven. Together, they bring life to your computer, enrich it with power, and elevate your gaming, editing, and browsing experience to the next level.
All thanks to the magic of the SSD and the brilliance of the motherboard that embraces it.”
FAQs
What type of connector does a SSD use to connect to a motherboard?
Most SSDs use a SATA connector to connect to a motherboard, while some newer models use an M.2 connector.
Can an SSD be connected to any motherboard?
If the motherboard has a compatible connector (SATA or M.2), then an SSD can be connected to it.
Do all motherboards support SSDs?
Most modern motherboards support SSDs, but older or budget motherboards may not have a compatible connector.
Can I connect multiple SSDs to one motherboard?
Yes, most motherboards have multiple SATA or M.2 connectors, allowing for multiple SSDs to be connected. Some motherboards also have specialized RAID configurations for multiple SSDs.