Do you want to boost the speed of your computer? One way to do so is by using a solid-state drive (SSD) as your primary storage device. Not only does an SSD offer faster boot times and overall performance, but it can also extend the life of your computer. However, the thought of migrating your operating system (OS) and data to a new drive might seem daunting.
This is where Acronis comes in. In this blog post, we will guide you through the process of booting from SSD using Acronis. With our step-by-step tutorial, you’ll be up and running on your new drive in no time.
So, let’s get started!
Check Compatibility
If you’re wondering how to use Acronis to boot from your SSD, the first step is to make sure your computer’s hardware is compatible. Acronis is a powerful tool that can help you manage backups, disk imaging, and data recovery. However, it’s important to check if your computer’s hardware supports booting from an SSD.
You can do this by checking your computer’s BIOS settings. Once you’ve determined compatibility, you can proceed with the Acronis installation process. Make sure to follow the instructions carefully, and select the SSD as the target disk for the installation.
After installation, you can configure Acronis to boot from the SSD by accessing your computer’s boot options. With Acronis properly installed and configured, you can enjoy faster boot times and improved performance.
Ensure Acronis version supports SSD booting
If you’re planning to install Acronis on your system that uses SSD as the primary boot device, then it’s essential to ensure that the Acronis version supports SSD booting. Not all versions of Acronis are compatible with SSDs, and using an incompatible version can cause multiple errors, including system crashes, boot failures, and data loss. Therefore, it’s crucial to check the compatibility of Acronis before downloading or installing it on your system.
You can refer to the Acronis website or contact their support team to confirm the versions that support SSD booting. Also, make sure to download and install the latest version of Acronis, as it always includes patches and updates to ensure compatibility with the latest hardware devices.
Check and download latest firmware for your SSD
SSD firmware, compatibility When it comes to maximizing the performance of your SSD, having the latest firmware installed can make a huge difference. Firmware updates can fix bugs, improve stability, and introduce new features, so it’s definitely worth checking if you’re running the latest version. However, it’s important to make sure that the firmware you download is compatible with your SSD.
Installing the wrong firmware can cause serious issues, including data loss and even rendering your SSD unusable. To avoid this, make sure to check the compatibility of the firmware before downloading and installing it on your SSD. You can usually find this information on the manufacturer’s website or in the software that comes with your SSD.
Taking a few minutes to check compatibility can save you a lot of headaches in the long run. So, don’t forget to check for the latest firmware updates and make sure they’re compatible with your SSD.
Create Acronis Bootable Media
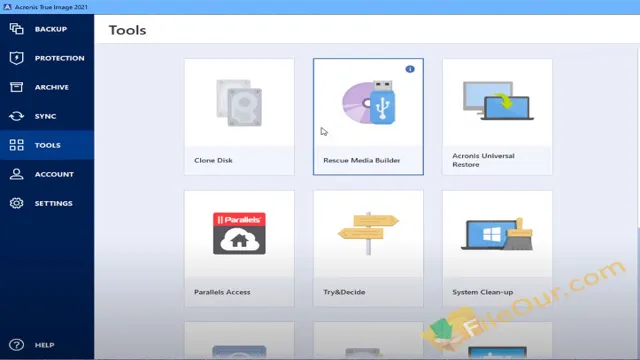
If you’re wondering how to use Acronis to boot from your SSD, creating Acronis bootable media is the answer. This process is fairly simple and involves downloading the Acronis True Image software to your computer. Once installed, open the software and navigate to the Tools menu.
From there, select “Rescue Media Builder” and follow the on-screen prompts to create your bootable media. This will allow you to boot from the media and access your SSD, giving you the ability to back up or restore your data as needed. It’s important to note that creating the bootable media is a one-time process, so be sure to keep it in a safe place for future use.
Overall, using Acronis bootable media is a reliable way to manage your SSD and ensure the safety of your important data.
Insert USB or CD with enough capacity
Creating a bootable media is an essential process for every computer enthusiast. It enables you to recover your computer in case of a system failure, malware infection, or other software problems. To create a bootable media, you first need to insert a USB or CD with enough capacity.
It’s always best to choose a high-speed USB or CD that can store your operating system’s installer files without any errors. Once you have the USB or CD, you can download and install Acronis True Image software from the official website and run it. Open the software and select the option to create a bootable media.
Follow the on-screen instructions, and the software will create a bootable media that you can use whenever you face any system problems. The Acronis True Image software provides an easy-to-use interface that simplifies the process of creating a bootable media. It’s a useful tool that every computer user should have on hand.
By creating a bootable media, you never have to worry about losing your data or having to reinstall everything from scratch again. It’s always better to be prepared for any situation, and a bootable media helps you do just that.
Open Acronis and go to Tools-> Rescue Media Builder
Acronis Bootable Media. Are you looking to backup your data or restore your system in case of a computer crash? If so, you’ll need Acronis Bootable Media. This powerful tool can help you create a bootable rescue disk that allows you to recover your system even if it cannot boot.
To get started, open Acronis and go to Tools-> Rescue Media Builder. From there, you can choose the media type and follow the prompts to create your bootable media. This process is straightforward and can save you a lot of time and headaches in case of a system failure.
Don’t wait until it’s too late, create your Acronis Bootable Media today and ensure your data is always safe and secure.
Follow the steps to create bootable media
Creating Acronis Bootable Media is a necessary step if you want to recover your system in case it crashes. It is essential to have a backup of your system, and creating a bootable media can help you restore your system in case of a problem. To create Acronis Bootable Media, you will require a USB or CD with a minimum capacity of 512MB.
The first step is to download Acronis Media Builder and run the software. The second step is to select the type of media (CD/DVD or USB Flash Drive) and choose the media output destination. The third step is to create a bootable media by following the on-screen instructions.
That’s it! Your Acronis Bootable Media is ready, and you can use it to restore your system or backup your data as required. It is essential to note that you must keep your bootable media in a safe place where you can easily access it in case of an emergency. So, start creating your Acronis Bootable Media today and have peace of mind knowing that you have a reliable backup plan in place.
Configure BIOS
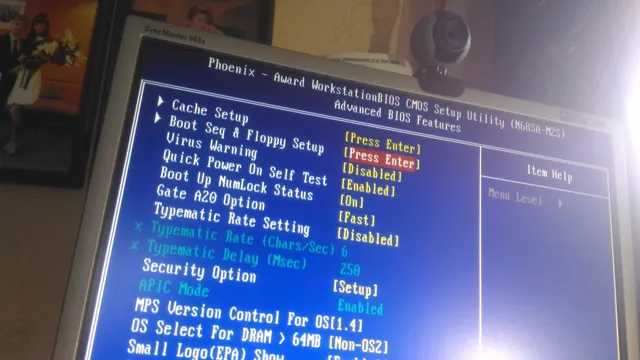
If you’ve recently cloned your hard drive to a new SSD, you’ll need to configure your BIOS settings before you can use Acronis to boot from your new drive. First, make sure your computer is turned off and then boot it back up and immediately press the key to enter your BIOS settings. This is usually the delete or F2 key, but can vary depending on your computer’s manufacturer.
Once you’re in the BIOS, navigate to the Boot menu and set your SSD as the first boot option. This will ensure that your computer automatically boots from your new drive instead of your old one. Save your changes and exit the BIOS, and your computer should now be ready to use Acronis to boot from your SSD.
With this simple configuration, you can begin enjoying the speed and efficiency of your new drive.
Insert Acronis bootable media and restart your computer
If you want to boot your computer with Acronis bootable media, there are a few things you’ll need to do first. One essential step is to configure your BIOS correctly. Generally, you will need to enter your computer’s setup program by pressing a key (such as F2, F10, or Del) during the boot process.
From there, look for the boot options menu and make sure that the Acronis bootable media is included as a priority option. You’ll also want to ensure that your computer’s hardware is configured correctly, such as ensuring that your hard drive is recognized and that the boot sequence is set up correctly. If everything is set up correctly, you should be able to reboot your computer and start using Acronis bootable media right away.
Remember to save the changes you make in the BIOS before you exit the program, or else your changes won’t take effect. With a little bit of patience and the right preparation, you should be able to boot up your computer with Acronis bootable media in a snap!
Enter BIOS by pressing the appropriate key for your computer
When it comes to configuring your computer’s basic input/output system (BIOS), the first step is to access it by pressing the appropriate key for your computer during the startup process. This key may vary depending on the manufacturer and model of your computer, but it’s typically displayed on the screen during boot up. Once you’re in the BIOS, you can configure various settings that affect how your computer operates.
For example, you can change the boot order to prioritize certain devices, adjust the date and time, enable or disable hardware components, and more. It’s important to be cautious when changing BIOS settings, as incorrect configurations can cause problems with your system. However, with a basic understanding of what each setting does, you can optimize your computer’s performance and ensure that it’s running at its best.
Remember to save any changes you make before exiting the BIOS, and don’t hesitate to seek help if you’re unsure about a particular setting. With a little bit of tinkering, you can customize your computer to suit your specific needs and preferences. So go ahead and explore the BIOS – you might be surprised at what you can do!
Set your SSD as the primary boot device
Congratulations on your new SSD! To take full advantage of its speed and performance benefits, it’s important to set it as the primary boot device in your computer’s BIOS. This ensures that your operating system and programs are loaded onto the SSD, resulting in faster boot times and snappier application performance. To configure BIOS, restart your computer and press the key to access the BIOS settings (usually F2, F12, or Del).
Look for the boot options, and select your SSD as the primary boot device. Be sure to save your changes before exiting. Once you’ve completed these steps, your computer should boot up faster than ever before.
Happy computing!
Boot from SSD using Acronis
So you’ve just upgraded to an SSD and you’re interested in how to boot from it using Acronis? Well, you’ve come to the right place! Firstly, it’s important to note that Acronis is a great tool for cloning your old HDD to your new SSD. Once you’ve done this, you’ll need to make sure that your SSD is set as the primary boot device in your BIOS. This will ensure that when you turn on your computer, it will boot from your SSD as opposed to your old HDD.
To enter your BIOS, typically you’ll need to press one of the function keys (F2, F10, F12) during the bootup process. Once you’ve made sure that your SSD is selected as your primary boot device, simply save the changes and exit the BIOS. Upon reboot, your computer should now boot straight from your SSD! It’s important to note that if you’re having trouble with this process, it’s always a good idea to check with your SSD manufacturer for specific instructions or troubleshooting steps.
But for most people, following these simple steps should get your computer up and running on your new SSD in no time!
Save BIOS settings and restart your computer
Once you have made the necessary changes to your BIOS settings, it is time to save them and restart your computer. This step is crucial as it ensures that all of the changes you have made will take effect. Simply navigate to the “Save Changes and Exit” option within your BIOS menu and hit enter.
Your computer will reboot and Windows will load up as usual. However, you’re not done yet. In order to boot from your SSD, you’ll need to use a program like Acronis.
This software allows you to create a full backup of your existing hard drive and transfer it over to the SSD, enabling you to boot from it. With Acronis, you can easily migrate your entire operating system, programs, and files over to the SSD, ensuring that everything is transferred seamlessly. Once you’ve successfully transferred your data, you’ll need to change your boot order in the BIOS settings to prioritize the SSD above your existing hard drive.
This will ensure that your computer boots up from the SSD each time you turn it on. With these steps, you’re ready to take full advantage of the benefits of SSDs, including faster boot times and improved performance.
Select Acronis bootable media as the boot device
If you’ve recently installed a new SSD and want to clone your existing system, Acronis is an excellent choice. To do this, you’ll need to boot your computer from the Acronis bootable media. Here’s how to do it: insert the bootable media into your computer’s DVD or USB port, then turn on the computer.
You may need to enter the BIOS settings and set the boot order to prioritize the bootable media. Once the bootable media loads up and you see the Acronis interface, you can begin the cloning process. Acronis makes it easy to select your source disk and target disk and will guide you through the rest of the steps.
Overall, using Acronis to clone an SSD is straightforward and efficient, thanks to its easy-to-use interface and robust features. So, if you want to upgrade your system’s storage with an SSD, Acronis can help you do it with ease.
Select ‘Acronis True Image’ and follow on-screen prompts
If you’ve recently upgraded your computer’s hard drive to a solid-state drive (SSD), congratulations! You’ve just taken a significant step towards faster and more reliable computing. However, you may be wondering how to boot from the SSD instead of the old hard drive. The good news is, with Acronis True Image, the process is easy to follow.
Acronis True Image is a powerful backup tool that allows you to migrate your operating system, programs, and data from one drive to another seamlessly. To boot from the SSD using Acronis, select the software and follow the on-screen prompts. Ultimately, with Acronis True Image, booting from your new SSD will be a breeze.
Select ‘Clone Disk’ and select your source and target drives
When it comes to upgrading your computer’s storage, Acronis is a great tool to help clone your existing disk onto a new one. To start the process, select “Clone Disk” option, which will prompt you to choose your source and target drives. Ensure that your SSD is connected and recognized by your computer before selecting it as the target drive.
The cloning process may take some time depending on the size of your disks, but once completed, you can set your computer to boot from the SSD. This will significantly improve your computer’s speed and performance, allowing for faster load times and more efficient multitasking. With Acronis, upgrading to an SSD is a breeze, and you can enjoy the benefits of faster storage in no time.
Select your SSD as the target drive and start the cloning process
After successfully cloning your existing hard drive to the SSD using Acronis, it is time to select the SSD as your target drive. This will allow you to boot from the SSD and enjoy faster speeds and better performance. To do this, you need to enter your computer’s BIOS settings and change the boot order to prioritize the SSD.
Once this is done, save the changes and exit the BIOS settings. Next, insert the Acronis bootable media and restart your computer. This will boot your computer from the Acronis media and allow you to select the SSD as your destination drive.
After selecting the SSD, you can start the cloning process and wait for it to complete. This may take some time depending on the size of your hard drive and the speed of your computer. Once the cloning process is complete, you will need to shut down your computer and remove the Acronis bootable media.
Restart your computer and enter the BIOS settings once again. This time, change the boot order to prioritize the SSD as your primary drive. Save the changes and exit the BIOS settings.
Your computer will now boot from the SSD, allowing you to enjoy faster boot times, faster loading times, and overall better performance. In conclusion, selecting the SSD as your target drive after cloning using Acronis is a simple process that can greatly improve your computer’s performance. Just remember to enter the BIOS settings and change the boot order to prioritize the SSD, and you’ll be up and running on your new drive in no time.
Conclusion
In conclusion, using Acronis to boot from your SSD is as easy as ABC…
D! Simply follow the steps provided by the software and before you know it, your computer will be up and running faster than a cheetah chasing its prey. So, don’t be afraid to take the plunge and switch to the lightning-fast world of SSDs with Acronis by your side!”
Congratulations on successfully booting from your SSD with Acronis!
Congrats! You’ve successfully booted from your SSD using Acronis. You must be thrilled with the impressive performance upgrade that SSDs provide. But getting to this point can be tricky, especially for those new to the process.
That’s why using Acronis to set up booting from your SSD is a game-changer. Not only is it straightforward, but it also streamlines the process, making it stress-free for you. When you boot from your SSD, everything runs faster, from startup and shutdown times to opening files and running applications.
Your computer will feel like it’s brand new. Overall, using Acronis to set up booting from your SSD is an excellent choice for anyone looking to upgrade their system’s performance quickly and easily.
FAQs
How do I create a bootable USB drive with Acronis True Image?
To create a bootable USB drive with Acronis True Image, follow these steps:
1. Insert a USB drive into your computer.
2. Open Acronis True Image.
3. Click on Tools and then Rescue Media Builder.
4. Select the USB drive you want to use and click Create.
5. Follow the prompts to create the bootable USB drive.
Can I clone my existing SSD with Acronis True Image?
Yes, you can use Acronis True Image to clone your existing SSD. Simply connect your new SSD to your computer, open Acronis True Image, and select the clone option. Follow the prompts to clone your SSD.
How do I restore my SSD from an Acronis True Image backup?
To restore your SSD from an Acronis True Image backup, follow these steps:
1. Connect the external device that contains your backup to your computer.
2. Open Acronis True Image and click on Backup.
3. Select the backup you want to restore from and click Recover.
4. Follow the prompts to restore your SSD.
How can I check the health of my SSD with Acronis True Image?
Acronis True Image includes a feature called “Disk Health”, which allows you to check the health of your SSD. To use this feature, open Acronis True Image, click on Tools, and then Disk Health. It will display the current health of your SSD and notify you if any errors or issues are detected.