Ready for a smoother and faster computing experience? It’s time to upgrade your hard drive to a solid-state drive (SSD) which has become a popular option for many Windows users. However, moving all your data from an old hard drive to a new SSD can be a daunting task. But, fear not.
We have got you covered with this simple guide on how to move Windows 10 to a new SSD. An SSD can greatly improve your system’s performance, boot time, load times, and transfer speeds. And if you’re switching from an old, slower hard drive, then an SSD can feel like a breathe of fresh air.
But if you’re worried about the complicated process of moving your Windows operating system, programs and files to a new SSD, don’t despair! It’s not as intimidating as you may think. In the next few paragraphs, we will outline a step-by-step guide on how to move Windows 10 to a new SSD without losing any data. We will cover important topics such as cloning your old drive, transferring your Windows 10 OS, troubleshooting, and much more.
By the end of this article, you’ll have a faster and more efficient computing experience on your new SSD and the knowledge to be able to repeat the process anytime. So, grab your favorite beverage and let’s dive into the simple yet detailed steps on how to move Windows 10 to a new SSD.
Check SSD Compatibility
If you’re looking to move your Windows 10 operating system to a new SSD, the first thing you need to check is SSD compatibility. Not all SSDs are created equal, and not all of them are compatible with every computer and operating system. Before you make any purchase, make sure to check your computer’s specifications and the SSD’s specifications to ensure they are compatible with each other.
You can also use online tools like the Crucial Advisor Tool to help you find the right SSD for your specific computer and OS. Once you’ve found a compatible SSD, you can use migration software like EaseUS Todo Backup or Clonezilla to clone your existing OS to the new SSD. This way, you can transfer all your data and settings to the new SSD without having to reinstall everything from scratch.
With the right SSD and the right migration software, moving to a new SSD can be a breeze and significantly speed up your computer’s performance.
Review SSD requirements for Windows 10
If you’re considering upgrading to an SSD for your Windows 10 system, it’s essential to ensure that your chosen SSD is compatible with your computer’s hardware and software. One of the first requirements you’ll want to check is the type of interface your SSD uses. Most SSDs today use either SATA or PCIe interfaces.
SATA SSDs offer decent performance and are compatible with older systems but are limited by SATA’s maximum transfer speed. PCIe-based SSDs are much faster, but you’ll need a newer computer to take advantage of their capabilities. Another critical factor to consider is the form factor of your SSD.
Depending on your computer’s hardware, you may need a 5-inch, M.2, or U.
2 form factor. Additionally, you’ll want to ensure that your system meets the necessary power requirements to support your new SSD. If you’re not sure which SSD to choose, consult your computer’s manual or contact the manufacturer for more information.
By checking these requirements before purchasing an SSD, you can avoid compatibility issues and ensure a seamless upgrade process – improving your system’s speed and performance.
Clone Current Drive
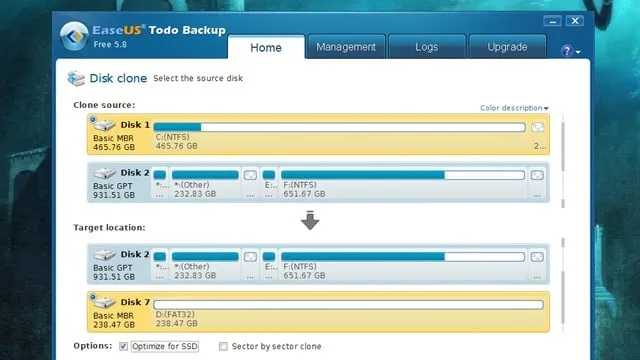
If you’re upgrading your computer’s hard drive or transferring Windows 10 to a new SSD, a software application can help you clone your current drive. This process involves copying the entire contents of one drive to another, including the operating system, system files, personal files, and settings. You’ll need a cloning software, such as EaseUS Todo Backup, Acronis True Image, or Macrium Reflect, and both your source and destination disks need to be connected to your computer.
Once you have installed and opened the cloning software, select the source disk and destination disk, and start the cloning process. Cloning your drive can save you time and hassle by making the transfer to a new SSD a smooth sailing experience. So, if you’re wondering how can I move Windows 10 to a new SSD, give disk cloning a try.
Download and install data migration software
When it comes to upgrading your computer’s storage, the easiest way is to clone your current drive to a new one. This process saves you a great deal of time and effort, especially if you have a lot of important data that you don’t want to lose. First, you need to download and install data migration software, such as Acronis True Image or EaseUS Todo Backup, on your computer.
Once you have the software, you can connect the new drive to your computer through a USB port or a docking station. Then, use the data migration software to clone your current drive to the new one. This process takes some time, depending on the size of your drive and the speed of your computer, so be patient.
Once the cloning is complete, you can disconnect the old drive and start using the new one. Remember that cloning your drive does not erase the data on your old drive, so you can keep it as a backup or wipe it clean to use as storage. By following these steps, you can easily upgrade your computer’s storage without losing your important files.
Connect new SSD to computer
Connecting a new SSD to your computer is an excellent way to improve your system’s performance. However, before you can start using the new SSD, you need to transfer the data from your current drive onto it. This process is known as cloning.
Cloning your drive is the most efficient and straightforward way to upgrade your system without losing any data or personal settings. There are plenty of software options available for cloning your drive, but Microsoft’s built-in application “Disk Management” is the easiest and most reliable tool. Once you have connected the new SSD, open up Disk Management and select the option to “Create and format hard disk partitions.
” From there, you can select your current drive and choose the “Clone Disk” option to begin the cloning process. With the cloning process complete, simply restart your computer and update your BIOS settings to boot from the new SSD, and you’re good to go! Enjoy the improved speed and storage capacity of your newly cloned drive.
Initiate cloning process
Initiating the cloning process of your current drive may seem daunting, but it’s actually a straightforward process that can save you time and hassle in the long run. Cloning your drive creates an exact copy of your current drive, including all files, applications, and settings. This can be incredibly helpful if you need to upgrade to a larger drive or switch to a new computer while maintaining all of your current files.
To begin the cloning process, you’ll need cloning software and a target drive to which you’ll be copying your data. Some popular options for cloning software include Clonezilla and Macrium Reflect. Once you’ve selected your software, simply follow the prompts and let the software do the work for you.
It’s important to note that the time it takes to clone your drive will depend on the size of your current drive, the speed of your computer, and the type of software you’re using. However, once the process is complete, you’ll have a fully-functional copy of your drive that you can use with ease. So, if you’re considering upgrading or switching computers, consider cloning your current drive to make the transition seamless and worry-free!
Swap Drives
If you’re looking to upgrade your computer’s storage by swapping drives, you might be wondering how to move Windows 10 to a new SSD. Thankfully, it’s not as complicated as it might sound. There are a few different ways to go about it, depending on your level of technical skill and how comfortable you are with tinkering under the hood of your computer.
One of the simplest methods involves using a cloning tool that can copy your entire system over to the new drive. Some SSD manufacturers even offer their own cloning software, which can simplify the process even further. Alternatively, you can perform a fresh install of Windows 10 onto the new SSD and transfer your files and settings over manually.
Either way, with a bit of patience and the right tools, you can have your new SSD up and running in no time.
Shut down computer properly
When it comes to swapping drives on your computer, it’s important to shut down your computer properly before doing so to avoid any potential damage to your hardware or data. Swapping out hard drives or installing new ones can be a great way to upgrade your system or increase storage capacity, but doing it without shutting down first can create problems. It’s like swapping the tires on your car while it’s still running – it’s just not a good idea! By properly shutting down your computer first and disconnecting all power sources, you can ensure that the drive swap goes smoothly and safely.
So, next time you’re planning to swap drives, remember to shut down your computer properly beforehand and avoid any unnecessary headaches.
Open up computer and locate old SSD
If you’re looking to upgrade your computer’s storage capacity or simply switch out an old drive, swapping an SSD is a great place to start. First, you’ll need to open up your computer and locate the old SSD, taking care not to damage any other hardware in the process. Once you have identified the old drive, it’s time to swap it out for the new one.
This process can vary somewhat depending on your computer’s make and model, but typically involves disconnecting the old drive and connecting the new one with screws or a caddy. With the new SSD in place, you’ll need to check your computer’s BIOS settings to ensure that it recognizes the new drive. Once that’s done, you’re ready to start enjoying the benefits of increased storage capacity and faster performance.
With this simple upgrade, you’ll be able to run software faster, load files more quickly, and enjoy smoother system operation overall. So why wait? Switch out that old SSD today and start enjoying a better computing experience!
Remove old SSD and replace with new one
Swapping out your old SSD for a new one can be a great way to revitalize your computer’s performance. Whether you’re upgrading to a larger drive or just need a faster one, the process is surprisingly simple. To begin, shut down your computer and unplug any cables.
Use a screwdriver to remove the back panel of your computer and locate the old SSD. Carefully unscrew it and disconnect any cables attached to it before removing it entirely from its slot. Then, take your new SSD and attach any cables necessary before placing it snugly into the same slot.
Make sure everything is securely in place before reattaching the back panel and plugging in your cables. Once everything is connected, you can turn your computer back on and enjoy the benefits of your new SSD. With faster read and write speeds, your computer will be running like new again in no time.
Boot Up and Test
So, you’ve decided to upgrade your computer with a new SSD and now you’re wondering how to move Windows 10 to this new drive. Well, the good news is that it’s not as difficult as you might think. First, you’ll need to make sure your new SSD is connected properly to your computer.
Make sure it’s recognized by your BIOS and operating system before proceeding. Once that’s done, you’ll need to clone your current hard drive to the new SSD. You can use software like EaseUS Todo Backup or Macrium Reflect to do this.
Simply follow the prompts and choose the new SSD as the destination drive. Once the cloning process is complete, you’ll need to set your computer to boot from the new SSD. You can do this by going into your BIOS settings and selecting the new drive as the primary boot drive.
Finally, test your new SSD by booting up your computer and running a few programs to ensure everything transfers smoothly. With these steps, you’ll have successfully moved Windows 10 to a new SSD and upgraded your computer’s performance in no time.
Power on computer and ensure new SSD is recognized
When you power on your computer after installing a new SSD, the first thing you want to do is ensure that the system recognizes the new drive. You can do this by entering the BIOS setup utility and checking the list of detected drives. If your new SSD is not listed, you may need to check your connection and make sure the drive is properly installed.
Once you confirm that the SSD is recognized, you can proceed with booting up your system and testing the drive’s performance. With the faster read and write speeds of your new SSD, you should notice a significant improvement in overall system performance. So go ahead and fire up your computer, and get ready to experience a speed boost like never before!
Test functionality of Windows 10 on new SSD
As a tech enthusiast, I recently upgraded my system by installing a new SSD and testing the functionality of Windows Booting up my computer after the installation, I was impressed by the lightning-fast speed with which my system loaded. Windows 10 also seemed to be running smoothly, without any lag or glitches.
To test its functionality, I opened multiple applications simultaneously and ran some resource-intensive software. I was pleased to see that my system could handle the load without any issues. The new SSD had indeed given my system a much-needed boost, enhancing its overall performance and efficiency.
If you’re looking to improve your system’s speed and performance, upgrading to an SSD could be a game-changer.
Conclusion
In conclusion, moving Windows 10 to a new SSD is like giving your computer a fresh pair of shoes. It increases the performance and speed, making your computer run as smooth as a silk scarf on a summer’s eve. With the right tools and a little patience, transferring your beloved operating system can be a breeze.
So don’t be afraid to step up your computer game and give it the upgrade it deserves. Your computer will thank you, and who knows, it might even start complimenting you on how good its new shoes look.”
FAQs
What is the easiest way to move Windows 10 to a new SSD?
The easiest way to move Windows 10 to a new SSD is by using a disk cloning software. You can use software like EaseUS Todo Backup, Acronis True Image, or Macrium Reflect to clone your existing Windows installation to the new SSD.
Do I need to reinstall Windows 10 on the new SSD?
It is not necessary to reinstall Windows 10 on the new SSD if you clone your existing installation to the new SSD. The cloned installation will boot up on the new SSD just like the old one.
What should I do before moving Windows 10 to a new SSD?
Before moving Windows 10 to a new SSD, you should backup all your important files and create a system image backup in case something goes wrong during the transfer process. Also, make sure that the new SSD has enough capacity to store your Windows installation and other files.
Can I move Windows 10 to a smaller SSD?
Yes, you can move Windows 10 to a smaller SSD if the size of the data on your existing drive fits within the capacity of the new SSD. However, it is recommended to use a new SSD with equal or greater capacity to avoid any performance issues and ensure ample storage space for future use.