Are you planning to upgrade your computer’s storage by swapping out your old SATA drive for a faster SSD? While the process might seem daunting, it’s actually quite simple to copy your SATA drive’s data onto your new SSD. This means you can keep all your files, documents, and settings without having to start from scratch. Think of it as moving your belongings from one house to another – all your furniture and possessions can come with you, but you’ll have a newer, better place to call home.
In this case, your computer will run faster and smoother, giving you a fresh start without losing any of your data. So if you’re ready to learn how to copy your SATA drive to an SSD, let’s dive in. We’ll walk you through the process step-by-step to ensure everything goes smoothly, so you can enjoy your upgraded system in no time.
Choose Your Cloning Tool
If you’re looking to upgrade your computer’s hard drive from a SATA drive to an SSD, you may be wondering how to copy all your data and files over. The process can actually be quite simple, thanks to cloning tools available online. These tools allow you to create a bit-for-bit copy of your SATA drive and transfer it to the new SSD.
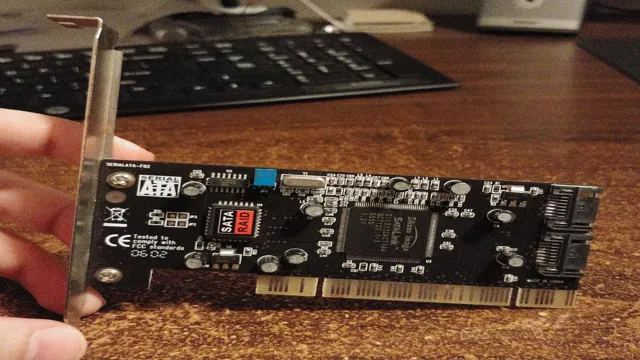
Some popular cloning tools include Macrium Reflect, Clonezilla, and EaseUS Todo Backup. With these tools, you simply connect both drives to your computer, select the source and destination drives, and start the cloning process. It’s important to note that you’ll need an external enclosure or adapter to connect the SSD to your computer if it doesn’t have an available slot.
With a bit of patience and the right tools, you can easily and quickly transfer all your data to your new SSD drive.
Consider EaseUS Todo Backup
Choosing the right cloning tool for your computer can be a daunting task, but EaseUS Todo Backup can make it a breeze. This powerful tool allows you to backup and clone your entire system, including files, applications, and settings. It’s easy to use, with a simple and intuitive interface that guides you through the process step-by-step.
And no matter what your level of expertise, EaseUS Todo Backup has the features you need to get the job done right. So if you’re looking for a reliable and efficient cloning tool, consider giving EaseUS Todo Backup a try – you won’t be disappointed!
Download and Install the Software
When it comes to cloning your hard drive, there are several cloning tools available in the market. Choosing the right one can be overwhelming, but you need to consider important factors such as speed, data safety, and user-friendliness. One reliable cloning software you can use is EaseUS Todo Backup.
It is a user-friendly program that offers a variety of backup and restore options, including system backup, disk backup, and partition backup. It also allows you to clone a hard drive or SSD without losing any data. To get started with EaseUS Todo Backup, simply go to their website and download the software.
Follow the installation instructions and you’re good to go. With this tool, you can easily clone your hard drive and ensure that your data is safe and secure.
Prepare Your Drives for Cloning
If you’re wondering how to copy a SATA drive to an SSD, the first step is to prepare your drives. For starters, ensure that both your SATA and SSD drives are connected to your computer. You’ll also need cloning software, which you can download online or purchase from a licensed vendor.
Once you’ve installed the software, you can begin the cloning process. Before you do that, however, it’s important to back up your files, just in case anything goes wrong during the cloning process. You’ll also want to remove any unnecessary files and programs from your SATA drive, as cloning can take up a significant amount of space.
By doing these preparatory steps, you can be sure that your cloning process will run smoothly, and you’ll soon have all your data safely copied to your new SSD.
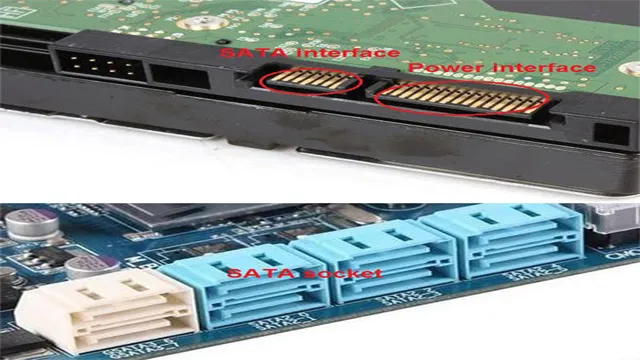
Connect Your Drives to the System
To clone your hard drives, the first step is to connect your drives to the system. It’s important to prepare your drives beforehand to ensure a successful cloning process. Begin by removing any unnecessary files or applications from your hard drives to free up space and speed up the process.
Next, defragment your drives to clear any fragmented data and optimize performance. You may also want to run a disk cleanup to get rid of temporary files and unnecessary system files that may cause issues during the cloning process. Once your drives are ready, connect them to your system using a USB cable or other suitable interface.
It’s important to ensure that your drives are recognized by your system and properly connected before proceeding with cloning. By preparing your drives before cloning and ensuring proper connectivity, you can ensure a seamless and successful cloning process.
Create a Disk Image
If you want to make an exact copy of your storage device, then creating a disk image is a brilliant idea. It ensures that you have a backup of your device in case anything goes wrong. To create a disk image, you need to prepare your drives for cloning first.
Before beginning the process, make sure to connect your destination drive, which is where you’ll store the image. Then, launch the disk imaging tool of your choice and select the source drive you want to clone. It’s crucial to have enough space on your destination drive to accommodate the image.
Otherwise, you’ll have an incomplete backup. Once you’ve selected your source and destination drives, you can kick-off the cloning process. Creating a disk image is an easy way to take full control over your data and ensure its safety.
Remember to regularly create disk images to protect your data against viruses, hard drive failure or accidental deletion.
Copy Your SATA Drive
Looking to upgrade your computer’s hard drive to an SSD? You may be wondering how to copy your SATA drive to your new SSD. Fortunately, the process is relatively straightforward. You can use a disk cloning tool such as Macrium Reflect or EaseUS Todo Backup to create an exact copy of your SATA drive on your new SSD.
Simply connect your new SSD to your computer and use the cloning software to copy all of your files, folders, and operating system over to the SSD. With your new SSD, you’ll enjoy faster boot and load times, as well as better overall performance. So, don’t hesitate to make the switch to an SSD and take advantage of its many benefits.
Open Disk Clone Wizard in Todo Backup
If you’ve ever wanted to copy the data from your SATA drive to another disk, then you’re in luck, because Todo Backup has a feature that allows you to do just that! To get started, first, open the Disk Clone Wizard in Todo Backup. This wizard will guide you through the process step-by-step, making the whole process a breeze. Once the wizard is open, select the source disk (your SATA drive), and the destination disk (the drive you want to copy your data to) and hit “Next.
” Todo Backup will then create an exact copy of your SATA drive on your new disk. It’s a great way to back up your data or replace an old drive with a new one. With Todo Backup, copying your SATA drive has never been easier!
Select the SATA Drive as the Source
To copy the contents of your SATA drive, you need to first select it as the source. This is an essential step to ensure that all the data is accurately copied to the destination drive. To do this, you need to connect the SATA drive to your computer, open the disk cloning software, and choose your SATA drive as the source.
Once the source is selected, you need to choose the destination drive where you want to copy your data. It is essential to have a larger capacity destination drive or partition to avoid any copying errors. Additionally, you may want to check and confirm the source and destination drives before initiating the copying process.
This will ensure that any errors or issues are detected before the copying process starts. By copying your SATA drive, you can create a backup of all your data and ensure that you won’t lose any important files in case of a system failure.
Choose the SSD as the Destination
When it comes to upgrading your computer’s storage, copying your SATA drive to an SSD can provide a significant boost in speed and performance. To do this, you’ll need to choose your SSD as the destination for the data transfer. One important thing to consider is the size of the SSD, as it must be large enough to store all the data from your SATA drive.
It’s also important to back up all your important data before beginning the transfer process. Once you’ve selected the destination SSD, you can use either a software tool or a hardware device to copy the data from your SATA drive to the SSD. This process can take some time, but the end result is a faster, more efficient computer with improved performance capabilities.
If you’re looking for a way to give your computer the boost it needs, copying your SATA drive to an SSD is a great option to consider.
Finalize the Cloning Process
If you’re wondering how you can copy a SATA drive to an SSD, then you’ll be pleased to know that the process isn’t as difficult as you may think. Once you’ve connected your SSD to your computer and downloaded a disk cloning software program, you can begin the cloning process. The software will guide you through the cloning process, which involves selecting your source drive (the SATA drive), selecting your destination drive (the SSD), and initiating the clone.
This process can take a few minutes or several hours, depending on the size of your SATA drive. Once the cloning process is complete, you can remove the SATA drive and set your computer to boot from the SSD. That’s it! Now you have a faster, more reliable, and more efficient SSD that’s a mirror image of your old SATA drive.
Configure the Cloning Settings
Now that you’ve configured the cloning settings, it’s time to finalize the cloning process. This is a crucial step because it ensures that your new cloned site is working perfectly, and all the settings are correctly transferred. One important thing to remember is to check the DNS settings and ensure that your cloned site has the correct hostname.
It’s also essential to check your new site’s SSL certificate, install any missing plugins or themes, and ensure that all the links and images are working correctly. Once you’re satisfied that everything is working correctly, it’s time to go live with your new cloned site. By following the process and taking care in your cloning settings, you can create an exact duplicate of your site that saves you time and headaches in the long run.
So, sit back, relax, and enjoy the benefits of your new cloned site!
Start the Cloning Process
Now that you’ve completed the initial steps and have successfully cloned your source, it’s time to finalize the cloning process. To do this, you’ll need to ensure that all of your files and content have been properly transferred and that any necessary configurations have been set up. It’s also essential to test your clone to make sure it’s functioning correctly before you start making any changes or updates.
Once you’ve confirmed that your clone is working correctly, you can begin to customize and adjust it to fit your needs. This might include updating the design, adding new pages, or modifying the content. Keep in mind that you should always make changes to your clone rather than your original source to avoid any potential data loss or corruption.
It’s important to remember that cloning is not a one-time process, especially if you have an active website or application. You will need to regularly update and maintain your clone to ensure that it stays in sync with your source and continues to function correctly. This might include updating your software, backing up your files, and regularly testing your clone to ensure that it’s still working correctly.
Overall, finalizing the cloning process requires attention to detail and a thorough understanding of your source and the technology you’re using. With the right approach, however, you can create a stable and reliable clone that will allow you to make changes and updates to your website or application with confidence. So go ahead and dive in; you’ve got this!
Confirm Your Successful Cloning
Once you have successfully cloned your desired organism, there are a few steps you can take to confirm its success. One of the first things you can do is check the cells under a microscope to see if they look identical to the original organism. If everything looks good, you can then perform genetic tests to examine the DNA and confirm that it matches the original.
Another way to verify the success of your cloning process is to observe the cloned organism’s physical traits and behavior. If it looks and behaves like the original, then you can be confident that your cloning process was successful. However, keep in mind that there may be slight differences due to environmental factors, so it is important to perform multiple tests to confirm your results.
Overall, the key to finalizing the cloning process is to be patient and attentive during the confirmation process to ensure that the cloned organism is an exact replica of the original.
Conclusion
Copying a SATA drive to SSD may seem like a daunting task, but fear not, intrepid tech adventurers! With the right tools and know-how, you can transfer your data faster than a cheetah on roller skates. So why wait? Upgrade your hard drive and reap the benefits of lightning-fast performance!”
FAQs
What is SATA and SSD?
SATA (Serial Advanced Technology Attachment) is a data transfer protocol used to connect storage devices such as hard drives and solid-state drives (SSD) to a motherboard. SSD is a type of storage device that uses memory chips instead of spinning disks to store data.
Why should I copy my SATA drive to an SSD?
SSDs offer faster read and write speeds compared to traditional hard drives, resulting in faster boot times and improved application loading times. Copying your SATA drive to an SSD will help to enhance your computer’s overall performance.
What tools do I need to copy my SATA drive to SSD?
You will need a cloning software, such as Acronis True Image, EaseUS Todo Backup, or Macrium Reflect. An external SSD enclosure or a docking station will also be useful if you want to make a direct SATA to SSD clone.
Can I clone my SATA hard drive to SSD without reinstalling the operating system?
Yes, you can clone your SATA hard drive to SSD without reinstalling the operating system. Cloning software typically includes a disk cloning feature that makes a bit-by-bit copy of your hard drive, including your OS and all installed applications.