
Are you tired of enduring painfully slow boot times on your computer? One easy solution is to switch to a solid-state drive (SSD) as your boot drive. Not sure where to start? Don’t worry, we’ve got you covered with this step-by-step guide. Think of it as giving your computer a brand new pair of running shoes.
Just as new shoes can make running feel effortless, upgrading to an SSD can make booting up your computer feel like a breeze. So, let’s dive in and get your computer up to speed with this guide on how to change the boot drive to an SSD.
Check BIOS Settings
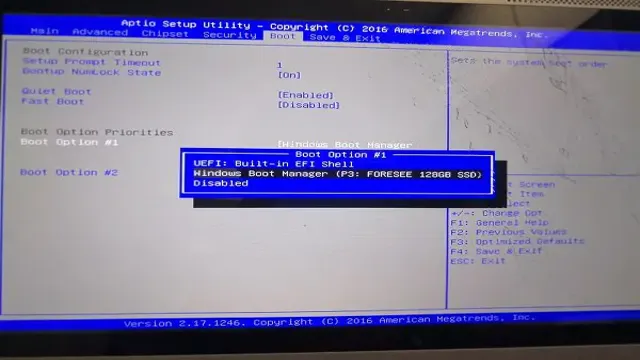
If you’re wondering how you can change your boot to your SSD, the first step is to check your BIOS settings. When you turn on your computer, it goes through a process called the Power-On Self-Test, or POST, which checks the hardware and checks for bootable devices. By default, most computers are configured to boot from the primary hard drive, which is often a traditional HDD.
To change the boot order to your SSD, you’ll need to access your computer’s BIOS settings and make the change there. The exact steps will depend on your computer’s make and model, but typically, you’ll need to press a key (such as F2, F10, or Delete) during the POST process to access the BIOS. Once you’re in the BIOS, look for a menu called “Boot” or “Boot Order,” and then select the SSD as the first boot device.
Save your changes and exit the BIOS, and your computer should now boot from the SSD. If you’re not comfortable changing BIOS settings yourself, you may want to ask a tech-savvy friend or professional for help. With a few basic steps, you can easily change your boot to your SSD and enjoy faster speed and reliability.
Enter BIOS during boot-up
If you need to adjust or check your computer’s BIOS settings, you’ll need to enter the BIOS setup utility during boot-up. The BIOS, or basic input/output system, is a set of firmware instructions that operate and control your computer’s hardware. To access the BIOS setup utility, you’ll need to press a specific key during the boot-up process.
This key varies depending on your computer’s manufacturer and model, but it’s often the F2, Delete, or Esc key. Keep in mind that the key needs to be pressed as soon as the computer begins to boot up, so you might need to restart your computer and try again. Once you’ve successfully entered the BIOS setup utility, you can navigate around the BIOS settings and make adjustments as needed.
Just be careful not to change any settings that you’re unsure of, as altering the wrong setting could potentially cause problems with your computer’s hardware.
Navigate to Boot Options
Navigating to boot options in the BIOS settings can be a daunting task, especially if you’re not familiar with the intricacies of your computer’s configuration. However, making sure that your boot options are set correctly is crucial when it comes to ensuring optimal performance for your system. One way to check your BIOS settings is by accessing them through your computer’s startup process.
You can do this by restarting your computer and pressing the key that corresponds to your system’s BIOS prompt (usually F2, F10, or Delete). Once you’re in the BIOS settings, look for the boot menu or boot priority options. This menu will allow you to set the order in which your device searches for bootable drives.
You can also create separate profiles for different boot options, enabling you to quickly switch between them as needed. By taking the time to check your BIOS settings and properly configure your boot options, you can ensure that your computer is running at its best, and avoid any potential issues down the road.
Select SSD as Boot Drive
If you want your computer to run faster, then it’s important to choose the right boot drive. Selecting an SSD as your boot drive is a great way to boost your computer’s speed and performance. However, before you can do that, you’ll need to check your BIOS settings.
BIOS stands for Basic Input/Output System, and it’s the firmware that controls your computer’s hardware. To access your BIOS settings, you’ll need to restart your computer and press a specific key (usually F2 or DEL) when the BIOS screen appears. Once you’re in the BIOS settings, you’ll need to find the option to select your boot drive.
Make sure you choose the SSD as your boot drive, and then save your changes before exiting the BIOS. With your SSD as your boot drive, your computer will start up faster, load programs quicker, and run more smoothly. So, what are you waiting for? Check your BIOS settings today and select an SSD as your boot drive!
Create Bootable Windows Installer on USB
If you are looking to change your boot to your SSD, there are a few steps you can follow to make the process easier. First, you will need to create a bootable Windows installer on a USB drive. This can be done by using a software tool like Rufus or the Windows Media Creation Tool.
Simply download the tool, select the USB drive you want to use, and follow the prompts to create the bootable installer. Once you have the installer on your USB, insert it into your computer and restart it, making sure to select the USB drive as your boot option in the BIOS settings. From there, you can install Windows onto your SSD and make it your primary boot device.
By following these steps, you can ensure that your computer is running efficiently from your SSD and enjoy faster startup times and better performance overall.
Download Windows USB Tool
If you’re looking to create a bootable Windows installer on a USB drive, you’ll need to download the Windows USB tool. This handy tool is available for free from Microsoft and can be used to create a bootable USB drive that can be used to install Windows on any computer. The process is relatively simple and involves downloading the Windows USB tool, selecting your USB drive, and then choosing the Windows ISO file that you want to install.
Once you’ve done this, the Windows USB tool will take care of the rest, creating a bootable USB drive that you can use to install Windows on any computer. With this tool, you can easily create a portable Windows installation that you can take with you wherever you go, making it an essential tool for anyone who needs to install Windows frequently.
Prepare USB Drive
To install Windows on a new computer or upgrade an existing one, you’ll need to create a bootable USB drive. This is a simple process that involves downloading the Windows ISO file and using a program like Rufus to make a bootable USB drive. Rufus is a free and easy-to-use program that creates bootable USB drives from ISO files, ensuring compatibility with both legacy BIOS and UEFI systems.
Once Rufus has been downloaded and installed, simply open the program and follow the on-screen instructions to burn the Windows ISO file onto the USB drive. This process may take a few minutes, depending on the size of the ISO file and the speed of your USB drive. Once the process is complete, you can use the USB drive to install Windows on your computer.
By following these simple steps, you can create a bootable USB drive and have the peace of mind that comes with having a reliable and safe installation.
Insert USB and Run Tool
Creating a bootable Windows installer on a USB drive is a great way to install Windows on a computer without an optical drive. It is a simple process that requires a few easy steps. Firstly, you’ll need a USB flash drive with at least 8GB of disk space and a Windows ISO file.
Once you’ve got these, insert the USB drive into a computer and download a Windows USB/DVD Download tool. After downloading the tool, run it and select “USB device” as your media type. Browse and select the Windows ISO file, then choose the USB drive as your destination.
Click on the “Begin copying” button and wait for the process to finish. Once completed, you can now use the USB drive to install Windows on your computer. With this method, you can install Windows quickly and efficiently, making it a convenient solution for businesses or individuals who need to install Windows on multiple devices.
Install Windows on SSD
If you want to install Windows on your SSD and set it as the primary boot device, you’ll need to take a few steps to make it happen. First, you’ll need to physically install your SSD into your computer, which may require some disassembly depending on your computer’s configuration. Once installed, you’ll need to enter your computer’s BIOS or UEFI settings and change the boot order so that your SSD is selected as the primary boot device.
This will ensure that Windows boots from your SSD instead of your old hard drive. Once you’ve made this change, you can proceed with installing Windows onto your SSD just as you would on any other storage device. It’s important to note that installing Windows onto your SSD will likely improve your computer’s performance and speed, as SSDs are generally faster and more reliable than traditional hard drives.
So, don’t hesitate to take the plunge and switch over to an SSD for your boot drive!
Restart PC and Boot from USB
If you’re planning to upgrade your PC by installing Windows on a new SSD, you’ll need to follow a few steps to make it happen. First, you’ll need to create a bootable USB drive with the Windows installation files. Once you’ve done that, you’ll need to restart your computer and boot from the USB drive.
This will launch the Windows installation process, which will guide you through the steps of selecting the installation file, choosing your language preferences, and selecting the location where you want to install the operating system. It’s important to make sure that you’ve backed up all of your important files before starting the installation process, as it will erase everything on your system. Once the installation is complete, you’ll be able to access all of your files on your new SSD, which will provide faster load times and improved performance.
With this simple process, you can take your PC to the next level and enjoy all of the benefits of having Windows installed on an SSD.
Select Language and Time Zone
When it comes to installing Windows on your SSD, there are a few important steps you need to take before diving in. One of the first things you’ll need to do is select your preferred language and time zone. This may seem like a small step, but it can make a big difference in terms of your overall experience with your new operating system.
Not only will selecting the right language make it easier to navigate through the menus and settings, but choosing the correct time zone will ensure that your computer’s clock is always accurate. This is particularly important if you plan on using your computer for time-sensitive tasks, such as scheduling appointments or sending emails. So before you start the installation process, take a moment to think about which language and time zone will work best for you and your needs.
Choose Custom Installation
When it comes to installing Windows on your SSD, it’s important to choose the Custom Installation option. This allows you to have more control over the installation process and ensure that your operating system is optimized for your specific hardware. Custom Installation allows you to choose which components of Windows you want to install, and also gives you the option to partition your SSD if necessary.
By partitioning your SSD, you can separate your operating system from your other files and programs, which can help improve performance. Overall, taking the time to choose Custom Installation when installing Windows on your SSD can help ensure that your system is running at its best and that you get the most out of your hardware.
Select your SSD as the Destination
When you’re installing Windows on your computer, don’t forget to select your SSD as the destination. This will ensure that you get the most out of your SSD and enjoy faster boot times and better performance overall. To do this, you’ll need to go through the installation process and choose the “Custom” option when asked.
Then, select your SSD as the place where you want Windows installed. It’s important to note that you should only have your SSD plugged in during this process, as having other drives connected could cause confusion and lead to errors. Once you’ve chosen your SSD as the destination, you can sit back and relax while Windows is installed onto your new, speedy drive.
With your SSD as the main drive, you’ll be able to enjoy faster load times, better file transfer speeds, and an overall smoother computing experience. So, if you’re looking to optimize your computer’s performance, be sure to select your SSD as the destination when installing Windows.
Conclusion
So, to sum it up, changing your boot to your SSD is like swapping out your old running shoes for a pair of brand new, high-performance sneakers. You’ll notice an immediate improvement in speed and efficiency, and your computer will thank you for it. With just a few simple steps, you can be up and running on your SSD in no time.
So why wait? Give your computer the upgrade it deserves and make the switch today!”
FAQs
What is the process of changing the boot drive to SSD?
Firstly, you need to go into the BIOS settings menu and select the boot order. Then, you need to move the SSD to the top of the list. Save and exit the BIOS settings menu, and the system will now boot from the SSD.
How can I access the BIOS settings menu?
Typically, you can access the BIOS settings menu by repeatedly pressing a specific key during the boot process, such as F2, F10, or Delete. This key can vary depending on the manufacturer of your motherboard, so you may need to check the user manual for your specific model.
Will changing the boot drive to SSD affect my installed programs and files?
No, changing the boot drive should not affect your installed programs and files. However, it is always recommended to back up important files before making any hardware changes, just in case.
Can I change the boot drive to SSD without reinstalling Windows?
Yes, it is possible to change the boot drive to SSD without reinstalling Windows. However, you may need to clone the contents of your current boot drive onto the SSD first, using a tool like Clonezilla or EaseUS Todo Backup. This will ensure that all system files and boot information are transferred over to the new drive.