Have you ever contemplated upgrading your MacBook Pro’s storage capacity? With the ever-increasing size of modern applications and files, your MacBook Pro’s internal hard drive can soon fill up. Installing an SSD on your MacBook Pro can significantly boost its performance by improving the speed and overall user experience. Not only will you have more storage space, but you’ll also enjoy faster loading times and improved battery life.
In this blog post, we’ll walk you through the steps to install an SSD on your MacBook Pro and show you how easy it is to do it yourself. So, grab your tools and let’s get started!
Preparation
Congrats on taking the first step towards enhancing your MacBook Pro’s performance by purchasing an SSD! Before diving into the installation process, there are a few preparatory steps you should take. Begin by backing up all your important files and folders to an external drive or cloud storage. This will ensure that you don’t lose any data during the installation process.
You also need to make sure that you have all the necessary tools, including a screwdriver set appropriate for opening your MacBook Pro. You can find many types of screwdriver sets that fit your laptop’s model online. Once you have these pre-installation tasks checked off the list, you are ready to replace your old drive with a new SSD.
Remember to follow the manufacturer’s instructions carefully and take any necessary safety precautions when undertaking the installation. Soon enough, you will be enjoying faster startup times and a more responsive system with your newly installed SSD.
Back up important files
When it comes to backing up important files, preparation is key. Before starting, it’s important to identify which files are essential and ensure they are all saved in one location. This can be done by manually transferring files to a designated folder or using a cloud storage service that automatically backs up files.
It’s also important to consider the frequency of backup and the type of backup, as there are different methods such as incremental backups or full backups. Losing important files can be a stressful experience but taking the time to prepare and backup can provide peace of mind. Remember, it’s always better to be safe than sorry.
Get screwdrivers for MacBook Pro
If you’re about to make some repairs to your MacBook Pro, you know how important it is to have the right tools. One essential tool in your toolkit should be a set of screwdrivers specifically designed for MacBook hardware. These screwdrivers typically have a variety of heads to fit different types of screws, so you can remove and replace parts with ease.
But before you rush out to buy just any set of screwdrivers, it’s important to do a bit of research and ensure you’re getting ones that are compatible with your specific MacBook model. You wouldn’t want to accidentally damage your device by using the wrong screwdriver. With the right set of screwdrivers, however, you’ll be well-prepared to tackle any repairs that come your way and keep your MacBook Pro running smoothly.
Installation
You’ve made a great decision in upgrading your MacBook Pro with an SSD! Installing it might seem daunting, but it’s actually a straightforward process that won’t take up too much of your time. The first step is to ensure that you have the right tools on hand, such as a screwdriver and a specialized SSD enclosure. Once you’ve backed up all of your important data, shut down your MacBook Pro and remove the bottom plate using the screwdriver.
Locate the old hard drive and remove it from the connector, then gently slide in your new SSD. Secure it in place with screws if necessary and re-attach the bottom plate. Finally, boot up your MacBook Pro and install your favorite operating system and any other necessary drivers.
With your new SSD installed, you can look forward to faster boot times, faster app loading, and an overall faster and more responsive system. Enjoy your upgraded MacBook Pro!
Shut down your MacBook Pro
If you want to install new software or update your operating system on your MacBook Pro, then you need to shut it down first. Shutting down your MacBook Pro is an easy process and can be done in just a few simple steps. Firstly, make sure that all your work is saved, and your applications are closed properly.
Once you have done that, click on the “Apple” icon at the top left corner of your screen and select the “Shut Down” option. You can also use the keyboard shortcut “Control + Option + Command + Power button” to shut down your MacBook Pro quickly. It is essential to shut down your MacBook Pro properly before installing any new updates or software to prevent data loss or damage to your device.
By following these simple steps, you can safely shut down your MacBook Pro and proceed with your installation process smoothly.
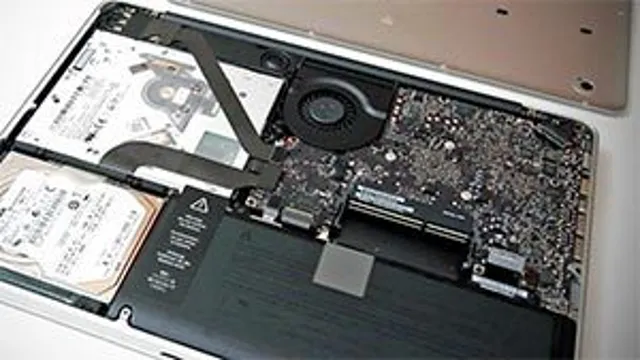
Remove the bottom cover
When installing a new component into your device, the first thing you need to do is remove the bottom cover. This can seem like a daunting task, but it’s actually quite simple. Start by turning off and unplugging the device to ensure your safety.
Then, locate and remove the screws that hold the bottom cover in place. Depending on the device, you may need a Phillips or flathead screwdriver to do this. Once all the screws are removed, gently lift the cover off the device, being careful not to damage any of the internal components.
It’s important to remember where each screw belongs as you’ll need to put them back in their respective holes when it’s time to reassemble the device. Removing the bottom cover gives you access to the inner workings of the device, allowing you to make the necessary repairs or upgrades with ease. By following these steps, you can safely and successfully remove the bottom cover of your device and move on to the next step of installation.
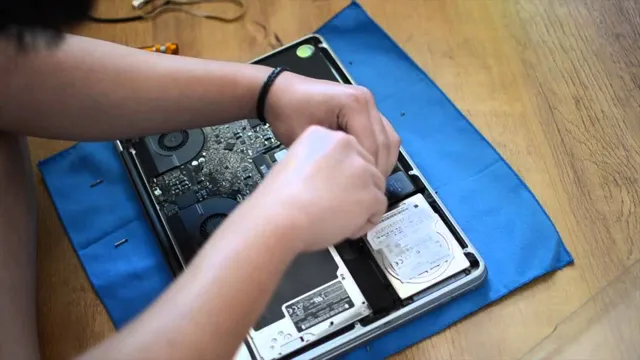
Remove the old hard drive
When it comes to upgrading your computer, one of the first steps is to remove the old hard drive. This may seem intimidating at first, but it’s actually a straightforward process. First, you’ll need to turn off your computer and unplug any cords.
Then, locate the old hard drive, which is typically located near the front of the computer case. You may need to unscrew the case or remove any cables connected to the hard drive. Once you’ve accessed the hard drive, carefully remove it from its slot.
Be sure to keep any screws or connectors in a safe place, as you’ll need them when installing the new hard drive. It’s important to be gentle during this process to avoid damaging any components. Removing the old hard drive is a crucial step in upgrading your computer and getting your system running smoothly.
Install the SSD
Now that you have chosen the SSD you want to install, it’s time to get started on the installation process. First, make sure you shut down your computer before opening the case. Locate the hard drive bay and remove the screws holding the cover in place.
Gently slide out the old hard drive and disconnect any cables connected to it. Take your new SSD and remove it from its packaging. Align the new drive with the SATA interface in the bay and secure it in place with screws.
Reconnect any cables that were disconnected and replace the cover. Finally, power up the computer and make sure the SSD is recognized by the BIOS. Congratulations, you have successfully installed your new SSD and can now enjoy faster performance and improved boot times.
Post-Installation
If you’ve bought an SSD for your MacBook Pro, congratulations, you’ve made an excellent decision! An SSD can significantly improve the performance and speed of your laptop. But now comes the tricky part – installing it. Before installing the SSD, make sure to back up all your data since the installation process typically involves wiping your hard drive.
Once you have a backup, use the appropriate tool to remove the bottom panel of your MacBook Pro. Take the hard drive out of the laptop and replace it with the SSD. Depending on the model of your MacBook Pro, you may need to use a bracket to mount the SSD in place.
Once the SSD is securely in place, replace the bottom panel and use a bootable USB to install the operating system. With the installation complete, restore your backup and enjoy the improved performance of your MacBook Pro!
Reinstall macOS
Once you have reinstalled macOS, there are a few steps you can take to ensure that everything is running smoothly. First, check your system preferences and make sure that all of your settings are to your liking. This includes things like your display settings, keyboard and trackpad preferences, and notification preferences.
You should also make sure that you have installed any necessary software updates. This will help to ensure that your system is up-to-date and runs optimally. Finally, you should consider backing up your system to an external hard drive or online backup service.
This will help to ensure that all of your data is safe and can be easily restored in the event of a catastrophic failure. With these steps in mind, you should be well on your way to a successful macOS reinstallation.
Transfer files to the new SSD
Once you have successfully installed your new SSD, it’s time to transfer your files over. This process can be quick and easy, especially if you utilize a file transfer software. One popular option is Samsung Data Migration, which is specifically designed for Samsung SSDs and allows for a seamless transfer process.
However, if you prefer to use a different program or method, that is also an option. It’s important to consider what files you want to transfer, as well as how much space will be required on your new SSD. Take the time to review and clean out any unnecessary files before transferring, and be sure to double-check that all essential items have successfully made the move.
With a bit of careful planning and attention, your new SSD can be up and running with all of your important files in no time.
Conclusion
In conclusion, upgrading your MacBook Pro with an SSD (solid state drive) is like replacing a horse-drawn carriage with a shiny new sports car. It dramatically improves the speed and performance of your device, making it feel brand new. And the good news is, installing an SSD is a straightforward process that even the least tech-savvy person can handle.
So go ahead, treat your MacBook Pro to a much-needed boost and enjoy the lightning-fast speeds that an SSD has to offer!”
FAQs
Can any SSD be installed in a MacBook Pro?
No, the SSD needs to be compatible with your MacBook Pro model. Check the manufacturer’s website to ensure compatibility.
What tools do I need to install an SSD in a MacBook Pro?
You’ll need a screwdriver, an anti-static wrist strap, and a spudger tool to safely open your MacBook Pro and install the SSD.
Is it necessary to clone my current hard drive before installing a new SSD?
Yes, it’s recommended to clone your old hard drive onto the new SSD to avoid losing any data during the installation process.
Do I need to install any software for a new SSD in my MacBook Pro?
No, the Mac operating system will automatically recognize the new SSD once it’s installed. However, you may need to format the SSD using Disk Utility before use.