If your computer has been running slowly, often freezing up or taking ages to boot up, upgrading to an SSD (Solid State Drive) is the perfect solution. Compared to traditional hard drives, SSDs are much faster, running at a much higher speed and providing faster data transfer rates. However, upgrading to an SSD can be quite daunting, especially if you’re not technically inclined or don’t know where to start.
But don’t worry, because we’ve compiled the ultimate guide to upgrading to an SSD, designed for everyone – from beginners to IT experts! So, let’s get started and improve your computer’s performance in no time!
Benefits of Upgrading to SSD
If you’re wondering how to upgrade your laptop to SSD, there are a few benefits you should know of before taking the plunge. One of the main advantages of upgrading to SSD is the significant boost in speed. An SSD has no moving parts and can access data faster than a traditional hard drive, which means your laptop will boot up much quicker and your programs will run faster.
Another benefit is increased reliability as SSDs are less prone to physical damage than traditional hard drives. Additionally, SSDs are silent as there are no moving parts to produce noise, which means your laptop will be much quieter. Lastly, upgrading to an SSD can extend the life of your laptop by reducing wear and tear on the device.
Overall, upgrading your laptop to an SSD is a wise investment that will improve your laptop’s speed, reliability, and lifespan.
1. Speed: Faster Boot and Application Load Times
Upgrading to an SSD can offer many benefits, but one of the most noticeable is the speed boost it provides. With faster boot and application load times, your overall computer experience will be greatly improved. SSDs have no moving parts, which means they can read and write data at much higher speeds than traditional hard drives.
This means that even complex programs or large files can be opened quickly, and you’ll be able to start working or playing without any lengthy delays. So if you’re tired of waiting for your computer to start up or your programs to load, upgrading to an SSD is definitely worth considering.
2. Durability: Longer Lifespan and Resistance to Physical Damage
If you’re looking to take your computer’s performance to the next level, upgrading to a Solid State Drive (SSD) is a surefire way to do it. One of the biggest benefits of upgrading to an SSD is its durability. Unlike traditional Hard Disk Drives (HDDs), SSDs don’t have any moving parts, which makes them more resistant to physical damage.
Since SSDs have no mechanical components, they’re less likely to fail due to wear and tear, which means they typically have a longer lifespan than their HDD counterparts. Plus, if you’re someone who drops their laptop or accidentally hits it against a hard surface, an SSD is much better equipped to handle the impact without suffering any damage. With an SSD, you can rest easy knowing that your important files and data will remain safe and secure for much longer.
So why settle for a less durable storage option when you can upgrade to an SSD and enjoy its many benefits for years to come?
Choosing the Right SSD
Are you looking to upgrade your laptop to SSD but are not sure where to start? The first step is to determine the type of SSD that is compatible with your laptop. There are two main types of SSDs: 5-inch and M.
5-inch SSDs are the most common and are compatible with most laptops.
M.2 SSDs are smaller and more compact, making them ideal for ultrabooks and thinner laptops. Once you have determined the type of SSD, you will need to consider the storage capacity and speed.
SSDs are available in various sizes ranging from 128GB to 2TB or more. The speed of the SSD is measured in megabytes per second (MB/s), and the higher the speed, the faster your laptop will run. Ultimately, choosing the right SSD depends on your budget and specific needs.
However, upgrading to an SSD will significantly improve your laptop’s speed and performance, making it a worthwhile investment. So, go ahead and upgrade your laptop to SSD for a more efficient computing experience.
1. Size: Determine the Space You Need
When choosing the right SSD, one of the most important factors to consider is size. You need to determine the space you need to store all your files, documents, and media. It’s always better to choose an SSD with more storage capacity than you currently need, to avoid running out of space in the future.
Typically, SSDs come in sizes ranging from 128 GB to 4 TB, and the larger the size, the more expensive the drive will be. It’s also important to note that the capacity of an SSD can affect its performance and speed. So, if you’re looking for faster performance, it’s recommended to go for an SSD with lower capacity.
However, if you need more storage space, then you may have to sacrifice some speed to get the right size. To sum it up, determining the right size for your SSD depends on your needs and usage patterns. So, always consider your requirements before making a decision.
2. Compatibility: Check Your Laptop’s Connector Type
When upgrading or replacing your laptop’s hard drive with an SSD, it’s essential to choose the right one that’s compatible with your laptop’s connector type. Most laptops feature either an M.2 or
5-inch SATA connector. M.2 SSDs are smaller, more energy-efficient, and offer faster transfer speeds.
However, not all laptops support M.2 SSDs, so it’s vital to check your laptop’s user manual to determine its compatibility before making a purchase. On the other hand, SATA SSDs offer larger storage capacities and are more widely supported.
They’re also relatively easy to install and require no additional cables or converters. Ultimately, choosing the right SSD for your laptop comes down to weighing the cost, performance, and compatibility factors. By doing this, you’ll be able to maximize your laptop’s performance and extend its lifespan.
3. Read/Write Speeds: Maximizing Performance
When it comes to maximizing the performance of your computer, one of the most important factors to consider is the read/write speeds of your SSD. Choosing the right SSD can make a huge difference in how quickly your computer is able to access and process data. Generally speaking, the higher the read/write speeds, the better the performance.
However, it’s important to keep in mind that read/write speeds can vary depending on the size of the drive, the type of interface it uses, and other factors. Your best bet is to look for an SSD that offers fast read/write speeds and has a reputation for reliability and durability. Some of the top options on the market today include the Samsung SSD 970 PRO, the Crucial MX500, and the WD Black NVMe SSD.
By choosing the right SSD for your needs, you can ensure that your computer runs smoothly and efficiently, no matter what tasks you’re performing.
Step-by-Step Guide to Upgrade Your Laptop to SSD
If you’re wondering, “how do I upgrade my laptop to SSD?” you’re in the right place! Upgrading your laptop’s hard drive to an SSD can dramatically improve its speed, performance, and overall functionality. Here’s a quick step-by-step guide to help you get started. First, back up all your important data before upgrading your laptop’s hard drive.
Next, turn off your laptop and unplug it from the power source. Remove the old hard drive from your laptop and replace it with the new SSD drive. Make sure to connect it to your laptop correctly.
Once that’s done, turn your laptop back on, and you should see an improvement in speed and performance almost instantly! Remember that upgrading to an SSD isn’t just swapping out one piece for another – it requires careful handling and a bit of technical know-how. If you’re unsure about doing it yourself, it’s best to get in touch with a professional who can help you with the upgrade and ensure everything goes smoothly.
1. Backup Your Data
Upgrading your laptop to a SSD can breathe new life into your computer, increasing its speed and performance significantly. However, before you start the upgrade process, it’s essential to back up your data. This step is crucial to prevent any loss of important files such as documents, music, photos, and videos.
To take a backup, you can use an external hard drive or cloud storage services. Once you’ve backed up your data, you can proceed with upgrading your laptop to a SSD. Remember, take the time to familiarize yourself with the process, identify the tools required, and choose the right SSD that matches your laptop’s specifications.
With the upgrade complete, you can enjoy a faster and more efficient laptop experience. Overall, backing up your data is the critical first step to ensure a smooth and stress-free upgrade to a SSD.
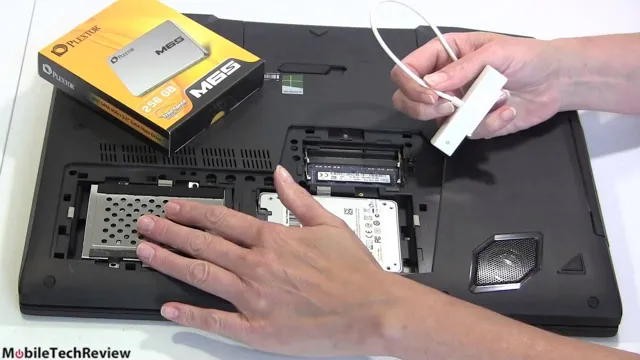
2. Acquire Necessary Tools & Accessories
When it comes to upgrading your laptop to an SSD, the first step is to make sure you have all the necessary tools and accessories before you start. These include an SSD, a small screwdriver set, an external hard drive or USB drive to back up your data, and a SATA-to-USB cable. It’s important to have a screwdriver set with different sizes and types of screwdrivers to ensure that you can remove all the screws holding your laptop together.
Additionally, it’s recommended to have an external hard drive or USB drive to back up your data before making any changes to your laptop. This is because the installation process will require you to completely erase all data on your current hard drive. Lastly, a SATA-to-USB cable is necessary for transferring data from your old hard drive to your new SSD.
By acquiring all the necessary tools and accessories, you’ll be ready to begin upgrading your laptop to an SSD and enjoying faster speeds and better performance.
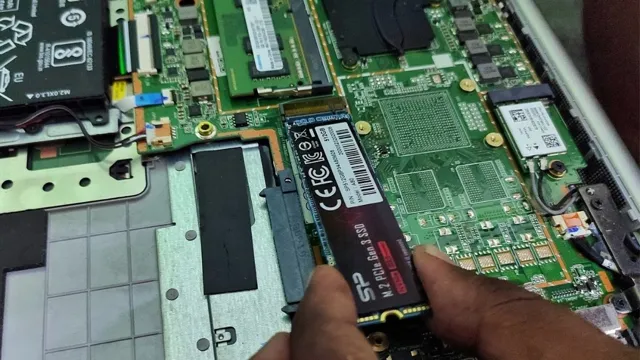
3. Open Your Laptop and Remove the Old Hard Drive
Upgrading your laptop’s hard drive to a solid-state drive (SSD) can significantly improve its performance and speed. However, before you can replace the old hard drive, you need to open your laptop and remove it. This step requires some knowledge of your laptop’s internal structure, so it’s important to consult your laptop’s manual or look up online guides for your specific model.
Once you’re familiar with the process, you can follow these steps to remove the old hard drive safely. Remember to power off your laptop and disconnect any external power sources before attempting this step. Unscrew the bottom of the laptop and locate the hard drive compartment.
Carefully remove the screws or latches that hold the hard drive in place and disconnect any cables or wires attached to it. Gently slide the hard drive out of its slot and set it aside. With the old hard drive out of the way, you’re now ready to install your new SSD and experience the benefits of improved laptop performance.
4. Install the New SSD
Now that you have backed up your data and removed the old hard drive, it’s time to install the new SSD. But first, make sure to carefully read the instructions that came with your new SSD. Installing an SSD is simple, but you want to be certain to avoid common mistakes that could cause damage during the process.
Begin by carefully inserting the new SSD into the slot in your laptop. Make sure it is properly seated and securely fastened in place. Next, replace the retaining screw(s) to keep the drive in place.
It’s important to be gentle during this process to avoid damaging your device. Once everything is in place, re-install the back cover and any other components you removed. Finally, turn your laptop back on and enjoy the faster speeds and improved performance that your new SSD brings.
Congratulations, you’ve successfully upgraded your laptop to an SSD and can now enjoy all the benefits that it provides!
5. Secure the New SSD and Close Your Laptop
Once you have securely installed your new SSD into your laptop, it’s time to make sure it stays in place. Most excellent SSDs come with screws or other mounting hardware to keep them in place. Be sure to use these materials to secure your new SSD firmly into your laptop.
Once the SSD is in place, it’s time to close up your laptop. Make sure all the screws or clips are back in place before turning your device on. It’s essential to be cautious when handling the delicate internals of your laptop.
A single slip-up can damage your device beyond repair. So take your time, and don’t rush the installation process. Ensure that everything is secure and in place before closing up your laptop.
By the time you’re done, you should have a brand new SSD in your laptop, ready to take your computer to the next level!
Next Steps: Configuring Your New SSD and Enjoying the Benefits
Upgrading your laptop to an SSD can be a game-changer in terms of speed and performance. After installing your new SSD, the next step is to configure it properly to enjoy the full benefits. First, you should check if your SSD needs a firmware update and install it if necessary.
Then, you’ll need to clone your old hard drive to your new SSD or do a fresh operating system install. Make sure that you have backup copies of your important files before doing this step. Once you have your system up and running on your new SSD, you should optimize it for maximum performance.
This includes disabling unnecessary system services, enabling TRIM for SSD maintenance, and tweaking settings like power management and performance options. With these steps completed, you’ll be able to enjoy a lightning-fast, responsive laptop that can keep up with even the most demanding tasks. So why wait? Upgrade your laptop to an SSD today and experience the benefits for yourself!
1. Install Your Operating System and Restore Your Data
Congratulations on installing your new SSD! Now it’s time to start configuring it so you can enjoy all the benefits of improved performance and faster boot times. The first step is to install your operating system onto the SSD. Follow the instructions that came with your operating system to install it onto the SSD, ensuring that you select the SSD as the destination drive.
Once your operating system is installed, you can start restoring your data from your backup. This is a good opportunity to clean up your files and get rid of any unnecessary data to free up space on your new SSD. Don’t forget to transfer over any important files, documents, and programs you need for your day-to-day work.
With your new SSD configured and your data restored, you’re ready to enjoy the improved speed and performance that your new drive can provide. Say goodbye to long boot times and slow load times and hello to a faster, more efficient computer experience.
2. Optimize Your Settings for SSD Performance
When you upgrade to an SSD, you’re making one of the smartest decisions for your computer’s performance. But don’t stop there! To get the most out of your new investment, it’s critical to optimize your settings for SSD performance. One simple step is to ensure that you’re using the latest firmware version for your drive.
Next, you can disable disk defragmentation, as SSDs don’t need to be defragmented like traditional hard drives. To speed up boot times, you can disable unnecessary startup programs and services. Finally, make sure that your operating system and applications are installed on your SSD, as this will provide the fastest possible speeds.
By taking these steps, you’ll be able to take full advantage of your new SSD’s capabilities and enjoy faster, more responsive performance from your computer.
Conclusion: Why Upgrading to SSD is Worth It
Upgrading your laptop to an SSD is like giving it a brain transplant – it’s faster, smarter, and totally transforms the way it operates. Plus, with today’s technology, it’s easier than ever to make the switch. So go ahead, give your laptop the gift of a speedy SSD – you’ll never look back!”
FAQs
What is SSD and why should I upgrade my laptop to it?
SSD stands for solid state drive, which is a type of storage device that is faster and more reliable than traditional hard disk drives (HDDs). Upgrading to an SSD can significantly improve your laptop’s performance, as it can boot up faster, launch apps quicker, and transfer files more efficiently.
How do I know if my laptop can be upgraded to an SSD?
You first need to check if your laptop has an extra slot for a 2.5-inch drive or an M.2 connector. You can find this information in your laptop’s manual or by searching online. You should also check the maximum storage capacity that your laptop can support.
What size of SSD should I buy for my laptop?
The size of the SSD you should buy depends on your needs and your budget. If you want to replace your laptop’s existing drive, you should buy an SSD with the same or larger capacity. If you want to add an SSD as a secondary drive, you can go for a smaller capacity.
How do I transfer my operating system and files to the new SSD?
You can use a cloning software such as Macrium Reflect or Acronis True Image to transfer your operating system, files, and settings from the old drive to the new SSD. You can also do a fresh installation of Windows on the new SSD and then copy your files over manually. Make sure to back up your data before transferring or reinstalling Windows.