Cloning a large hard disk drive (HDD) to a smaller solid-state drive (SSD) may seem like a daunting task, but it is actually much simpler than you may think. Whether you’re upgrading your computer or looking to switch to a faster and more reliable storage device, cloning your HDD can save you time and hassle when it comes to transferring your data. However, cloning a larger drive to a smaller one can be a bit tricky, as you need to ensure that everything fits snugly.
In this blog, we’ll explore some tips and tricks you can use to clone your larger HDD onto a smaller SSD with ease. Let’s dive in!
Introduction
If you need to upgrade your computer’s hard drive to a smaller SSD, then you may be wondering how to transfer all your data from the larger hard drive to the smaller SSD without losing anything. Fortunately, Acronis is a handy tool that can help you with this task. Acronis is easy to use, and it is one of the most reliable disk cloning tools available on the market.
With Acronis, you can clone your entire hard drive to your new SSD, including the operating system and all your files and applications. Moreover, Acronis allows you to perform this operation without any data loss, ensuring you have an identical copy of your original hard drive on your new SSD. In conclusion, if you need a step-by-step guide on how to clone a large hard drive to a smaller SSD, Acronis is an excellent choice that will make your life easier.
Why Clone?
Cloning has been a subject of debate for decades, with scientists and ethicists weighing the pros and cons of this technology. But why do we clone? Well, there are several reasons, both practical and theoretical. From a scientific standpoint, cloning provides a way to study genetics and gene expression, as well as create models for testing new drugs and therapies.
On a theoretical level, cloning raises questions about the nature of identity, individuality, and our understanding of what it means to be human. Ultimately, the decision to clone is a complex one that involves scientific, ethical, and philosophical considerations.
What You Will Need
When starting a new project, it’s important to make sure you have all the necessary tools and resources at your disposal. The same goes for starting a blog. To make sure you set yourself up for success, there are a few things you will need.
First and foremost, you will need a platform to host your blog. There are plenty to choose from, such as WordPress or Squarespace, so do your research and find the one that best suits your needs. Additionally, you will need a domain name, which is essentially the address people will use to find your blog.
It’s important to choose something memorable and relevant to your content. You will also need a reliable web host to ensure your blog is always accessible to your readers. Finally, make sure you have a clear idea of the content you want to create and a plan for how you will promote your blog.
By having these basics in place, you’ll be well on your way to starting a successful blog.
Step One: Back Up Your Data
If you’re thinking of upgrading to a smaller SSD, one of the biggest challenges you’ll face is figuring out how to clone the data from your large hard drive. That’s where Acronis comes in – it’s an easy-to-use tool that can help you transfer all of your data from your old drive to your new one without any hassle. The first step is to back up all of your data before you start the cloning process.
This is essential in case anything goes wrong during the transfer. Once you’ve done that, you can proceed to the next step, which involves installing Acronis on your computer and selecting the source drive (your old hard drive) and the destination drive (your new SSD). Acronis will take care of the rest, ensuring that all of your files, settings, and programs are transferred successfully.
So if you’re wondering how to clone a large hard drive to a smaller SSD, Acronis is the answer – just be sure to back up your data first!
Choose a Backup Method
If you have important files that you can’t afford to lose, backing them up is crucial. The first step in choosing a backup method is determining what kind of data you need to protect. If your files are mainly photos, videos, or music, you might consider using cloud storage services like Google Drive or Dropbox.
These services automatically sync your files to the cloud, so you don’t have to worry about losing them if your device crashes or gets lost. On the other hand, if you work with large data sets or sensitive information, you might need a more secure backup method such as an external hard drive or tape backup. These options provide offline storage, so you can physically access your files even in the event of a system failure or cyber attack.
Ultimately, the backup method you choose should be tailored to your specific needs.
Select the Destination Drive
When it comes to backing up your important data, the first step is to select the destination drive. This is the drive where all of your data will be saved, so it’s important to choose a reliable and secure option. You’ll want to consider the storage capacity of the drive, as well as its speed and lifespan.
Some popular options for backup drives include external hard drives, USB flash drives, and cloud storage services. You’ll want to choose a drive that is large enough to hold all of your data and has enough room for future backups. When selecting a drive, be sure to also consider its compatibility with your computer and any other devices you may need to access your backups from.
Remember, selecting the right destination drive is the crucial first step in ensuring the safety and security of your important data. So take your time, do your research, and choose carefully!
Step Two: Shrink Your Drive Partition
Acronis is a powerful tool that can help you clone a large hard drive to a smaller SSD, but the process involves several important steps. Once you have selected your source and destination drives and confirmed that they are compatible, the next step is to shrink your drive partition. This is necessary because the destination drive is almost certainly smaller than the source drive, and you’ll need to create a partition on the new drive that’s the same size or smaller than the original.
You can do this using the Disk Management tool in Windows, but be aware that it can be a time-consuming process. Acronis also provides a handy partition shrinking feature that can simplify the process and speed things up significantly. Simply select the option to “resize partitions proportionally” when configuring your clone job in Acronis, and the software will take care of the rest.
With a bit of strategic partitioning, you’ll be able to successfully clone your large hard drive to a smaller SSD without sacrificing any critical data or applications.
Use Windows Disk Management
Windows Disk Management After backing up your data, the next step when you want to partition your hard drive on Windows is to shrink your drive partition. And one of the easiest ways to do this is to use Windows Disk Management. This tool is built-in on all Windows operating systems from Windows 7 up to the latest version.
To shrink your drive partition, you will need to open Disk Management and right-click on the drive you want to partition. Next, select the “Shrink Volume” option, and the system will perform a scan to determine the amount of space available for shrinkage. From there, you can input a custom value for the partition size or use the maximum size available.
It’s essential to note that the disk must have an ample amount of unused space to enable successful shrinking of the partition. In summary, using Windows Disk Management is a straightforward and secure way to partition your hard drive without the need for third-party software.
Step Three: Clone the Drive
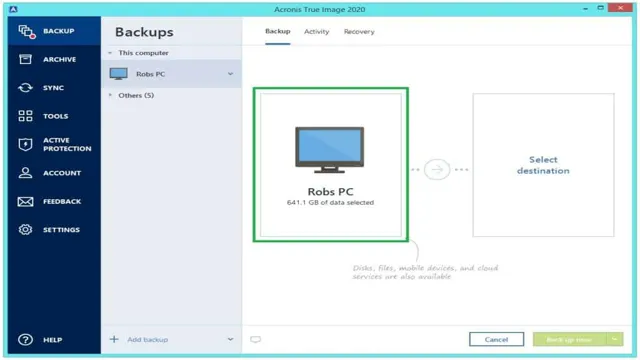
If you’re looking to clone a large hard drive to a smaller SSD, Acronis True Image is an excellent tool for getting the job done. Once you’ve created a backup of your large hard drive, the next step is to clone it onto your smaller SSD. To do so, simply connect your SSD to your computer, restart your computer, and boot from the Acronis bootable media.
Then, select “Clone Disk” from the main menu and choose your large hard drive as the source disk and your smaller SSD as the destination disk. You’ll be asked to confirm the settings before the cloning process begins. Once the process is complete, you’ll have an exact copy of your large hard drive on your smaller SSD, ready to use.
With Acronis True Image, cloning a large hard drive to a smaller SSD has never been easier.
Use Acronis True Image
If you want to ensure you have a backup of your system in case of a crash, cloning your drive is an important step. Acronis True Image makes it easy to clone your drive, creating an exact copy that can be used if needed. To get started, simply select the “clone disk” option and choose the drive you want to clone.
You can then choose to clone the entire drive or just specific partitions. Acronis True Image also allows you to schedule regular backups, ensuring that your clone stays up-to-date with any changes you make to your system. With this powerful software, you can have peace of mind knowing that your data is safe and secure.
Step Four: Replace the Old Drive with the New SSD
Congratulations on making it to the final step of cloning your large hard drive to a smaller SSD using Acronis! Now it’s time to replace the old drive with the new SSD. First, make sure your computer is shut down and unplugged from any power source before opening the case. Locate the old hard drive and unplug any data cables or power cords connected to it.
Once removed, connect the new SSD to the same data and power cables that were connected to the old hard drive. Carefully screw the new SSD into place in the same location as the old hard drive, making sure it’s securely fastened. Finally, power on your computer and enter the BIOS to make sure that the new SSD is detected as the primary boot device.
If everything is working correctly, you should be able to start up your computer without any issues. Congratulations, you’ve successfully cloned your large hard drive to a smaller SSD using Acronis!
Open Your Computer Case
Once you’ve opened up the case of your computer, it’s time to replace your old drive with the shiny new SSD that you’re itching to use. But don’t rush into it without a plan! First, locate the old drive and carefully remove it from the bay. You’ll want to take note of any screws or brackets holding it in place, as you will need to use these to secure your new SSD.
Once you’ve removed the old drive, insert your new SSD in its place and use those screws/brackets to keep it firmly in place. Make sure it’s straight and properly seated, and then close up your computer case. Congratulations, you’re almost there – all that’s left now is to configure your new SSD and enjoy lightning-fast speeds!
Remove the Old HDD and Install the New SSD
Now that we’ve successfully cloned the old HDD onto our new SSD, it’s time to physically replace the old drive with the new one. The first step is to power down the computer and unplug all cables. Depending on the model of your computer, you may need to open up the case to access the hard drive bay.
Once you have access, it’s important to ground yourself by touching a metal object to prevent any static electricity discharge that could potentially damage the drive. Then, carefully disconnect the SATA and power cables from the old HDD and remove it from the bay. Next, take your new SSD and connect the SATA and power cables in the same position as the old drive.
Gently slide the SSD into the bay and secure it in place with screws if necessary. Finally, close up the computer case and reconnect all cables. Power on your computer and check that the new SSD is detected.
Congratulations, you’ve successfully replaced your old HDD with a shiny new SSD!
Conclusion
In conclusion, with Acronis’ easy-to-use interface and advanced cloning technology, you can confidently clone your large hard drive to a smaller SSD without sacrificing any data or performance. It’s like shrinking your wardrobe to fit in a smaller suitcase without leaving anything behind. With Acronis, your digital life can fit in your pocket!”
Test Your New Drive
Once you’ve completed cloning your old drive onto your new SSD, it’s time to test it out and make sure everything is functioning properly before replacing your old drive. To do this, you can simply unplug your old drive from your device and connect your new SSD in its place. Once connected, turn on your device and make sure it boots up as expected.
You can also run some performance tests and compare them to the results from your old drive, ensuring that your new SSD is providing the improved speeds and responsiveness you were expecting. By taking the time to test your new drive, you can avoid any potential issues and ensure a smooth transition to your faster, more reliable SSD.
Enjoy the Benefits of a Faster SSD
Now that you have your new SSD, it’s time to replace the old hard drive with it. First, you need to find the location of your old hard drive in your computer. This can vary among different models, but most likely it’s located near the center of your machine.
You will need to remove the enclosure around your old hard drive and unscrew it to remove it. Carefully disconnect it from the motherboard and set it aside. Once the old drive is out, it’s time to install your new SSD.
Align it with the slot where the old drive was located and gently slide it in using even pressure until it clicks into place. Then, carefully connect it to the motherboard and screw it into the enclosure. Finally, put the enclosure back onto your computer and power it up.
Congratulations, you’ve successfully upgraded to a faster SSD and can now enjoy the benefits of lightning-fast speeds and improved performance!
FAQs
What is Acronis and how does it work for cloning a hard drive to an SSD?
Acronis is a software that allows you to clone a hard drive to an SSD. It works by creating a complete image of the hard drive and transferring it to the SSD, ensuring that all of your files and configurations are preserved.
Is it possible to clone a larger hard drive to a smaller SSD using Acronis?
Yes, it is possible to clone a larger hard drive to a smaller SSD using Acronis. However, you will need to ensure that the data on the hard drive will fit within the available storage space on the SSD.
How long does it take to clone a hard drive to an SSD using Acronis?
The time it takes to clone a hard drive to an SSD using Acronis depends on the size of the hard drive, the speed of your computer and the connection between the two. Generally, it can take anywhere from a few minutes to a few hours to complete.
Are there any risks or potential errors when using Acronis for cloning a hard drive to an SSD?
There is always a risk of errors or data loss when working with any type of software. To minimize the risk of potential errors when using Acronis, it is important to ensure that all of your hardware and software is up-to-date and that you follow the instructions carefully during the cloning process.