Are you looking for ways to boost your Acer E15’s speed and performance? Adding an M.2 SSD could be one of the best upgrades you could do. The M.
2 SSD is a newer type of solid-state storage that can deliver faster data transfer speeds than the traditional hard disk drive. Installing an M.2 SSD on your Acer E15 isn’t complicated and can be done within minutes.
In this blog post, we’ll walk you through the step-by-step process of installing an M.2 SSD on Acer E15, regardless of whether it’s your first time. So if you’re ready to speed up your Acer E15’s performance, let’s get started!
Check Compatibility
Are you looking to improve the storage on your Acer E15? One way to do so is by installing an M.2 SSD. However, before diving in, it’s important to check the compatibility of the M.
2 SSD you plan to use with your Acer E1 Different types of M.2 SSDs have different key notches, and not all of them will fit into your laptop.
Check the specs of your laptop to see what type of M.2 slot it has, and then check the specs of the M.2 SSD you plan to use to make sure they match.
Additionally, some Acer E15 models may require a BIOS update in order to properly recognize the new SSD, so be sure to do your research and follow the manufacturer’s instructions carefully. With the right preparation, installing an M.2 SSD on your Acer E15 is a great way to boost its storage capacity and speed up your computing tasks.
Confirm if Acer E15 supports M.2 SSD
If you are considering upgrading your Acer E15 laptop to an M.2 SSD, it’s essential first to check whether your device supports it. The good news is that most Acer E15 models come with an M.
2 slot, which means they are compatible with M.2 SSDs. However, it’s always a good idea to double-check with your manufacturer or user manual before purchasing your SSD to ensure that your laptop can support it.
Installing an SSD can provide a significant improvement in overall system performance. It provides faster boot times, faster application load times, and quicker file transfers. Not to mention it also reduces the wear on your laptop’s moving parts, which can extend the life of your device.
In conclusion, if you are planning to upgrade the storage of your Acer E15 laptop, an M.2 SSD is a great choice. But, it’s essential first to confirm if your device supports it before investing in one.

Identify the right M.2 slot for your SSD
When it comes to installing an SSD in your computer, it’s essential to identify the right M.2 slot for your drive. Not all M.
2 slots are created equal, and the wrong one could result in compatibility issues or even render your SSD useless. Before you purchase an M.2 SSD, it’s crucial to check its compatibility with your motherboard.
Firstly, you should make sure that your motherboard has an M.2 slot. Next, check the maximum storage capacity of the M.
2 slot and compare it to the size of your SSD. Some motherboards also have multiple M.2 slots, so you’ll want to ensure you’re using the one that provides optimal performance for your SSD.
By doing your research and identifying the right M.2 slot for your SSD, you can be confident that you’re getting the most out of your drive and avoiding any compatibility issues down the road.
Prepare for Installation
If you’re looking to upgrade your Acer E15 by installing an M.2 SSD, there are a few things you’ll need to do before you get started. First, make sure you have all the necessary tools on hand.
You’ll need a screwdriver, which should come in a kit with various detachable bits. Once you have your tools, you should power off your laptop and disconnect it from any electrical outlets. Then, flip your laptop over and locate the access panel on the back.
Make sure to remove the screws carefully and set them aside in a safe place. Once you’ve removed the panel, locate the M.2 slot and prepare to insert your SSD.
Double-check the orientation of the slot to avoid any damages to the pins on the SSD. Finally, carefully reassemble the computer and turn it on. If your SSD was installed correctly, you should now be able to use your laptop more efficiently than before.
Back up your data
Backing up your data is an essential step to take before installing any new software or performing any major updates. You never know when something could go wrong during the installation process, causing your computer to crash or data to be lost. So, it’s best to be prepared.
One way to back up your data is to use an external hard drive or cloud storage service. You can simply copy and paste all important files and documents onto the external drive or upload them to the cloud. This way, even if something goes wrong during the installation process, you can easily recover your data and files.
It may take a bit of extra time to back up your data, but it’s a small price to pay for the peace of mind knowing that your important information is safe and secure. So, make sure to back up your data before installing any new software or performing any updates. It’s a simple step that could save you a lot of headaches down the line.
Gather the necessary tools and equipment
So you’ve decided to take on the task of installing a new feature in your home or office space. Congratulations! The first step in this process is to gather all the necessary tools and equipment. This includes items like hammers, screwdrivers, drill bits, measuring tapes, and maybe even a power drill.
Depending on the installation project you plan to work on, other specialty equipment might be required as well. It’s important to make sure that you have everything you need before you start the installation process, to avoid any unnecessary trips to the hardware store mid-project. You want to be able to focus on the task at hand, without having to stop and run errands.
By taking the time to prepare beforehand, you’ll be setting yourself up for success and a smooth installation process.
Ground yourself to prevent electrostatic discharge
When preparing for an installation, it’s important to ground yourself to prevent electrostatic discharge (ESD). ESD can damage electronic components, leading to costly repairs or replacements. To prevent this, use an ESD mat or wear an ESD wrist strap.
These tools will help you discharge any built-up static electricity before working with sensitive electronics. It’s important to remember that ESD can occur even if you don’t feel a shock, so taking preventative measures is essential. Incorporating these safety measures into your installation process can save time and money in the long run.
So, if you’re planning an installation, make sure to take the necessary steps to prevent ESD and protect your equipment.
Install M.2 SSD
If you’re looking to upgrade your Acer E15 laptop’s storage capabilities, installing an M.2 SSD is a great option. It’s not a complicated process, but there are a few steps you need to follow.
First, make sure the laptop is turned off and unplugged. Locate the M.2 slot on the motherboard.
It should be a small, rectangular slot near the RAM slots. Remove the screw securing the cover and gently lift it up. Insert the M.
2 SSD into the slot, making sure the notches on the SSD align with those on the slot. Push it down gently but firmly until it clicks into place. Replace the cover and screw, and you’re done! Restart your computer and your new SSD should be recognized.
Congratulations, you’ve successfully installed an M.2 SSD on your Acer E15 laptop!
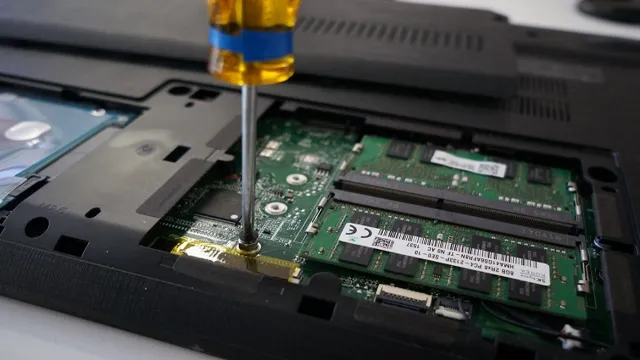
Open the back cover of Acer E15
Looking to upgrade the storage of your Acer E15 laptop? It’s easy! Just open up the back cover and install an M.2 SSD. First, unplug the laptop and turn it over onto a soft surface.
Locate the screws on the back cover and use a screwdriver to remove them. Carefully lift off the back cover and locate the M.2 slot.
Slide the M.2 SSD into the slot and secure it with the screw provided. Replace the back cover and screws, and you’re done! Boot up your Acer E15 and enjoy the increased storage and faster performance of your new M.
2 SSD. With this simple upgrade, you can easily boost your laptop’s capabilities and have more space for all your files and applications. So why wait? Upgrade your Acer E15 today with an M.
2 SSD and experience the difference for yourself!
Insert M.2 SSD in the right slot and secure it
Installing an M.2 SSD is a great way to upgrade your computer’s storage. However, it’s important to insert the M.
2 SSD in the right slot and secure it properly. The first step is to locate the M.2 slot on your motherboard.
It’s usually located near the CPU socket and labeled “M.” Once you’ve located the slot, carefully insert the M.
2 SSD into it at a slight angle, making sure that the notch on the SSD lines up with the key on the slot. Once the SSD is inserted, gently push it down until it clicks into place. Next, you’ll need to secure the SSD to the motherboard.
Look for a small screw that came with your SSD. It will be used to secure the SSD in place. Carefully align the screw with the hole in the SSD and screw it in using a small screwdriver.
Don’t overtighten the screw as this can damage the M.2 SSD. It’s important to note that M.
Install SSD driver and configure BIOS settings
Installing an M.2 SSD is the latest trend in PC building to ensure faster and more reliable storage. After acquiring the hardware, the next step is to install the SSD driver and configure BIOS settings.
Start by turning off your computer and opening the case to locate the M.2 slot on your motherboard. Gently insert the SSD into the slot and screw it into place.
When you next power on your PC, you might need to enter BIOS settings to ensure that the computer detects and recognizes the new hardware. From there, navigate to ‘Boot Settings’ and select the M.2 SSD as the primary boot drive.
This enables faster boot times and operating system loading speeds, as well as the ability to run multiple applications simultaneously without any lag time. In conclusion, installing an M.2 SSD is an easy and effective way to improve your computer’s performance.
Conclusion
In conclusion, installing an M.2 SSD in your Acer E15 is a savvy move for those seeking to boost their device’s performance. With a few simple steps and a bit of technical know-how, you can easily upgrade your laptop and take your computing experience to new heights.
Plus, with fast load times and seamless multitasking, your hard drive will thank you for the added storage space. So why wait? Go forth and install that M.2 SSD – your Acer E15 (and your brain) will thank you for it!”
FAQs
What is an M.2 SSD and why would I want to install one on my Acer E15 laptop?
An M.2 SSD is a small, high-speed solid-state drive that can greatly improve your laptop’s performance by speeding up boot times, loading applications quickly, and reducing file transfer times.
What size M.2 SSD can I install in my Acer E15 laptop?
The Acer E15 supports M.2 SSDs in the 2280 (80mm) form factor, and can accommodate drives with capacities up to 1TB.
How do I physically install the M.2 SSD in my Acer E15 laptop?
First, locate the M.2 slot on the motherboard and remove the screw holding down the cover. Insert the M.2 SSD at a 30-degree angle, then press down gently until it clicks into place. Replace the cover and screw it back down.
Do I need to clone my existing hard drive onto the M.2 SSD, or can I do a clean install of Windows?
You can do either, depending on your preference. If you want to clone your existing drive, you can use software like Acronis True Image or Macrium Reflect to create an exact copy of your old drive on the M.2 SSD. If you prefer a clean install, you can use a Windows installation USB drive to install a fresh copy of Windows onto the M.2 SSD.