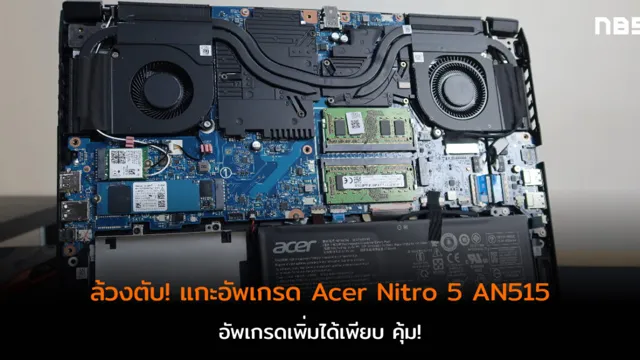
Looking to boost your Acer Nitro 5’s storage and performance? Installing an SSD can significantly improve your computer’s speed and responsiveness. However, if you’re not particularly tech-savvy, the idea of opening up your laptop and tinkering with its internals might seem a bit daunting. But fear not, as this guide will walk you through the step-by-step process of installing an SSD on your Acer Nitro
Whether you’re upgrading a new or old Nitro 5 laptop, this guide covers everything you need to know to get it done in no time. So, grab your tools and let’s get started!
What You’ll Need
If you’re looking to upgrade your Acer Nitro 5 with an SSD, you’ll need a few things to get started. The most important item you’ll need is, of course, the SSD itself. Make sure to get one that’s compatible with your laptop, taking into consideration its size and interface.
You’ll also need a SATA cable to connect the SSD to your laptop’s motherboard. A screwdriver set will come in handy for opening up the back panel and removing the hard drive. If you don’t have one, consider investing in an anti-static wristband to avoid any damage due to static electricity.
With these items on hand, you’ll be ready to install your new SSD and enjoy faster performance on your Acer Nitro
SSD
If you’re looking to upgrade your computer’s storage speed and performance, an SSD is the way to go. But before you go and buy one, there are a few things you need to consider. First, make sure your computer is compatible with SSDs.
Most modern computers are, but if you have an older model, you may need to do some research or ask a professional to check. Second, decide how much storage space you need. SSDs tend to be more expensive than traditional hard drives, so you don’t want to overspend on storage you won’t use.
Finally, consider the brand and model of SSD you want to purchase. There are many different options out there, each with their own pros and cons. Do your research and read reviews to ensure you’re getting the best SSD for your needs.
With a little bit of planning and research, you can upgrade to an SSD and enjoy faster speeds and improved performance on your computer.
SATA Cable
If you’re building your own PC or looking to upgrade your hard drive, you’re going to need a SATA cable. A SATA cable is what connects your hard drive or SSD to your motherboard and allows data to flow between the two. It’s a vital component of any computer build, and without it, your storage won’t work.
SATA cables come in different lengths and colors, but the important thing is that they’re compatible with your motherboard and storage device. When choosing a SATA cable, look for one that’s labeled as “SATA 3” or “SATA 6,” which refers to the data transfer rate. The faster the transfer rate, the faster your storage will be.
So, if you want to get the most out of your hard drive or SSD, make sure you have a high-quality SATA cable that’s built to handle the job.
Screwdriver
When it comes to DIY projects, a screwdriver is a must-have tool. There are different types of screwdrivers available in the market, including flathead screwdrivers, Phillips screwdrivers, and Torx screwdrivers. Before you start your project, make sure you have the appropriate screwdriver for the job.
Apart from the screwdriver, you’ll also need a few other tools to complete your project. A measuring tape, hammer, level, and pliers are some of the essential tools you should have on hand. Depending on the project, you may also need a drill, saw, or sandpaper.
It’s essential to have a secure and reliable grip to prevent slipping and falling while using the screwdriver. A rubber grip is an excellent option that helps you maintain a firm grip while using the screwdriver. Remember to keep your work area clean and organized while working on any project.
This will help you avoid losing small parts and make the project go smoothly. In summary, the screwdriver is an essential tool for DIY projects. Make sure you have the right screwdriver, other necessary tools, and a secure grip to get the job done right.
Don’t forget about organization to make the project run efficiently.
Step 1: Prepare Your Laptop
If you’re looking to improve your Acer Nitro 5’s performance, installing an SSD is a great way to speed up your PC. However, before you begin, there are a few things you need to do to prepare your laptop for installation. Firstly, make sure you turn off your laptop and unplug it from any power sources.
Then, remove the screws from the bottom panel of your laptop and gently pry it open. Be careful not to damage any components as you do this. Once the panel is open, locate the hard drive bay and remove the screws holding the hard drive in place.
After you’ve removed the hard drive, you can then install your SSD, making sure it’s properly inserted into the bay. Finally, you’ll need to screw in the SSD and put the panel back on your laptop. Once you’ve completed these steps, you’re ready to start using your Acer Nitro 5 with your new SSD.
Shut It Down and Unplug It
When it comes to shutting down your laptop, there are a few steps you should take to properly prepare it. First, make sure you save any unsaved work and close all programs. This will ensure that your laptop is not running any processes that could interfere with the shutdown process.
It’s also a good idea to disconnect any external devices, such as a mouse or USB drive, to avoid potential damage during shutdown. Once everything is saved and closed, you can properly shut down your laptop. To do this, head to the Start menu and select “Shut down.
” This will initiate the shutdown process and power off your laptop. Giving your laptop a few seconds to rest before unplugging it is also recommended. This will allow any residual electrical current to dissipate before you remove the power source.
Remember, taking these steps will help ensure the longevity and proper functioning of your device.
Remove Battery and Power Cord
Preparing your laptop for repairs or maintenance is crucial for the longevity and functionality of your device. The first step in preparing your laptop is to remove the battery and power cord. This step ensures that there is no power running through the laptop while you work on it, which eliminates the risk of electric shock and protects your device from any power surges.
To remove the battery, locate the release button or switch and push or slide it in the appropriate direction. Gently lift the battery out of the compartment. For the power cord, unplug it from the outlet and laptop.
It’s essential to follow these steps correctly, especially if you are not a tech-savvy person. Not doing so may result in severe damages to your laptop. By removing the battery and power cord, you’re taking the first step in ensuring safe and effective repairs or maintenance to your laptop.
Step 2: Open the Laptop
If you want to install an SSD in your Acer Nitro 5 laptop, you’ll need to open it up first. Before we get into that, make sure you have all the necessary tools, including a screwdriver and an anti-static wrist strap. Once you have everything ready, flip the laptop over and remove the screws from the bottom panel.
Gently lift the panel off to reveal the internals. You may need to disconnect the battery and remove a few more screws before you can access the hard drive bay. Once you’re there, simply unscrew the hard drive and slide it out.
Then, replace it with your new SSD and screw it in place. Don’t forget to reconnect the battery and put the bottom panel back on before firing up your laptop! With these simple steps, your Acer Nitro 5 will benefit from improved performance and faster boot times thanks to your new SSD.
Remove the Screws on the Back Cover
Once you have located all the screws on the back cover of your laptop, it’s time to remove them. This is a crucial step in opening up your device and accessing its components. You’ll need a screwdriver that fits the size of the screws, and it’s important to be gentle and not force the screws out.
Once you have removed all the screws, carefully lift the back cover upward and away from the laptop. Be mindful of any cables or connections that may be attached to the cover and gently disconnect them if necessary. Remember, opening up your laptop can be tricky, so take your time and don’t rush the process.
With this step complete, you’re one step closer to accessing the inner workings of your laptop and making any necessary repairs or upgrades.
Open the Back Cover and Locate the HDD
To upgrade or replace your laptop’s HDD, the first step is to open the back cover. Start by turning off your laptop and unplugging it from the power source. Locate the screws that hold the back cover in place and use a screwdriver to remove them.
Gently lift the cover to avoid damaging any internal components. Once you have access to the inside of the laptop, it’s time to locate the HDD. Most laptops have the HDD located in a slot or bay that is easily accessible.
Some laptops require you to remove additional screws or components to access the HDD. This may be a bit tricky, but with a little patience and careful attention, you can easily open your laptop and locate the HDD. Remember to handle the parts with care and to keep track of screws and other small parts to ensure easy reassembly later on.
Step 3: Remove the HDD
Now that the back cover has been removed, it’s time to remove the old HDD and make room for the new SSD. Locate the HDD and unscrew the small screws that are holding it in place. Once these screws have been removed, gently slide the HDD out of its bay and disconnect the SATA and power cables from the back.
Be sure to handle the HDD carefully as it is a delicate piece of hardware. Now that the HDD has been removed, set it aside and get ready to install the new SSD. This part of the process is crucial for upgrading your Acer Nitro 5’s storage capacity and increasing its overall performance.
So, take your time, be careful, and follow the steps closely to ensure a smooth installation.
Unplug the SATA Cable from the HDD
If you want to remove your HDD, you need to unplug the SATA cable. This is a crucial step in the process. The SATA cable is what connects your HDD to the motherboard, and you cannot remove the HDD if it is still connected.
Make sure to unplug the cable gently and slowly. If you pull too hard, you risk damaging the cable or the connector. You might need to wiggle the cable slightly to get it out of its socket.
Once you have unplugged the SATA cable, you can safely remove the HDD from your computer. Remember, this step is necessary to ensure that you don’t cause any damage to your PC.
Remove the Screws Holding the HDD in Place
To remove the HDD, the next step is to remove the screws holding it in place. These screws are what keep the hard drive securely attached to the computer’s chassis. Use a screwdriver to carefully unscrew each screw, taking care not to damage the HDD or the surrounding components.
Once all screws have been removed, gently slide the hard drive out of its compartment, being mindful not to tug or pull too hard on any cables that may be attached. It’s essential to ensure that the HDD is not damaged during this process, as any physical damage to the drive can result in data loss or corruption. Remember to keep the screws in a safe place as they will be needed to reattach the HDD or any other component that was removed.
The process of removing the HDD may seem daunting but remain calm and take your time, and soon it will be completed.
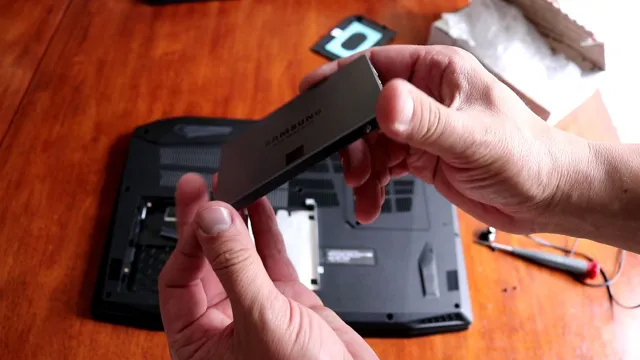
Gently Pull the HDD out of the Slot
Removing a hard drive can be a daunting task, but it’s actually quite simple. The third step is to gently pull the HDD out of the slot. This can be done by taking a firm grip on the HDD and pulling it straight out, without twisting or jerking it.
It’s important to be gentle, as any sudden movements could damage the drive or the connector. Once the HDD is out of the slot, it can be set aside. It’s important to remember that hard drives are delicate and should be handled with care.
By following these simple steps, you can safely remove a hard drive from your computer. So next time you need to replace or upgrade your hard drive, don’t be intimidated. With a little bit of knowledge and care, you can do it yourself!
Step 4: Install the SSD
Now that you’ve prepared your Acer Nitro 5, it’s time to install your SSD. First, make sure your laptop is unplugged and powered off. Locate the compartment for your SSD and open it up.
You may need to use screws to secure the SSD in place, so make sure you have a screwdriver handy. Gently and carefully insert the SSD into the designated slot, making sure it’s securely in place. Once the SSD is in place, secure it with the screws provided.
Finally, close up the compartment and power on your laptop. Your Acer Nitro 5 should automatically detect the new SSD and you’re all set to enjoy faster read and write speeds with your new upgrade. Congrats on a successful installation!
Plug the SATA Cable into the SSD
When it comes to installing your SSD, one of the crucial steps is plugging the SATA cable into the device. But before you do that, make sure that you properly mount your SSD in its allocated area. Once your SSD is securely in place, grab the SATA cable and connect it to the empty SATA port on your motherboard.
This is typically located near the area where your HDD (Hard Disk Drive) is plugged into. If you’re unsure which port is the right one, you can always refer to your motherboard’s manual. After connecting the cable, make sure that it’s firmly connected to both the SSD and the port.
This will ensure that data can pass through the connection without any interruptions, allowing your system to fully recognize the new SSD. With this step done, you’re almost ready to use your new SSD to boost your computer’s performance and storage space.
Screw the SSD in Place
Now that you have prepared your computer and removed the old hard drive, it’s time to install the new SSD. The first thing you should do is screw the SSD in place. This will ensure that it is secure and won’t move around inside your computer case.
It’s important to note that every computer case is different, so the exact location of the SSD will vary. You can refer to your computer’s manual or do an online search for instructions specific to your make and model. Once you have located the correct spot, use the screws provided with your SSD to secure it in place.
Make sure that it is flush with the bracket and that you don’t overtighten the screws. Once you have done this, you are ready to move on to the next step in your SSD installation process.
Step 5: Replace the Back Cover
Now that you’ve installed your new SSD on your Acer Nitro 5, it’s time to replace the back cover. Before doing so, double-check that your SSD is properly secured and connected to your motherboard. Once you’re confident in that, place the cover back onto your laptop and gently press it down.
You should feel it snap back into place. Be sure to tighten any screws that were removed during the installation process, and turn your laptop back on to make sure everything is working smoothly. With your new SSD installed, you’ll be able to enjoy lightning-fast boot-up times and improved overall performance on your Acer Nitro
Congratulations on a successful installation!
Put the Back Cover Back On
Replacing the back cover of a device may seem like a simple task, but it is an essential step in ensuring the safety and functionality of your device. Once you have completed any necessary repairs or cleaning, it’s time to put the back cover back on. Start by lining up the cover with the device’s body, making sure all the edges and corners match up perfectly.
Gently snap the cover in place, making sure it’s secure and flush with the device’s frame. Avoid using too much force as this could damage the cover or the device’s internal components. Finally, give the cover a quick once-over to make sure it’s properly attached and free of any gaps or loose areas.
With the back cover back in place, your device should now be fully functional and protected.
Replace the Screws
Now that we have successfully reattached all the necessary cables and components, it’s time to replace the screws and secure the back cover back in its place. Ensure that you have placed all the screws back in their respective holes on the back cover and use the right tool to firmly tighten them. Be careful not to apply too much pressure on the screws as it may damage the cover or the device.
Double-check to make sure that all screws are in the correct position and securely fastened. Once you have tightened all the screws, give the back cover a gentle press to ensure it’s firmly attached, and you’re done! Your device should now be working well, and your repairs have been successfully completed. With the back cover replaced, you can now enjoy using your device without any issues.
Step 6: Turn It On and Check Your New SSD!
Once you have installed your new SSD in your Acer Nitro 5 laptop, it’s time to turn it on and make sure everything is working properly. Before doing so, double-check that all the screws are tightened and that the SSD is securely placed in its slot. When you turn on your laptop, you should go straight to the BIOS to make sure that the new SSD has been detected.
If it’s not, try unplugging and plugging it back in, and if that doesn’t work, you may need to consult the user manual for further troubleshooting. Assuming everything looks good, check the amount of available storage on your new SSD and ensure that your operating system is installed on it. If not, you’ll need to clone your old hard drive or install a fresh copy of your OS.
Congratulations, you’ve successfully installed a new SSD in your Acer Nitro 5 – enjoy the improved performance and quicker load times!
Conclusion
In conclusion, upgrading your Acer Nitro 5 with an SSD is like adding a turbocharger to a race car. It supercharges your laptop’s performance and allows it to reach new speeds. With a little bit of technical know-how and patience, installing an SSD in your Nitro 5 can be done easily and quickly.
So don’t be afraid to take the plunge and give your laptop the boost it deserves!”
FAQs
What type of SSD is compatible with Acer Nitro 5?
Acer Nitro 5 is compatible with NVMe M.2 SSDs. Make sure to check the size compatibility before purchasing.
How do I install an SSD in Acer Nitro 5?
To install an SSD in Acer Nitro 5, you need to remove the back cover and locate the M.2 SSD slot. Insert the SSD correctly and secure it in place. Then, replace the back cover and boot up the laptop.
Can I install an SSD alongside the existing hard disk drive (HDD) in Acer Nitro 5?
Yes, you can install an SSD alongside the existing HDD in Acer Nitro 5 to improve the performance and storage capacity. You can use the HDD as a secondary storage drive and install the operating system and frequently used applications on the SSD.
Do I need to clone my existing drive data to the SSD before installation?
It is not mandatory to clone the existing drive data to the SSD before installation. However, if you want to transfer your operating system, files, and applications to the new SSD, you can use a cloning software tool. Remember to backup your data before proceeding with the cloning process.