Category: How to

How to

  • Upgrade Made Easy: A Step-by-Step Guide on How to Install Windows 10 on Your Newly Purchased SSD

    Upgrading your old computer is one of the best things you can do. Not only will you be able to keep up with the latest technology, but it can also make your device run faster and smoother. One of the most popular upgrades for computers is to replace the old hard drive with a new SSD (solid-state drive), which provides faster data transfer and quicker boot times.

    However, once you have installed your new SSD, you will need to transfer your operating system to ensure that everything runs smoothly. In this blog post, we will explore how to get Windows 10 for your new SSD, so you can enjoy the full benefits of your upgraded computer. So, buckle up, and let’s dive in!

    Check for Windows 10 License

    If you recently bought a new SSD for your computer, you may be wondering how to get Windows 10 on it. The first step is to check if your current computer has a Windows 10 license. Check the sticker on your machine or go to Settings > Update & Security > Activation and see if your current Windows 10 installation is activated.

    If it is, then you can simply download the Windows 10 installation media from Microsoft’s website and create a bootable USB drive to install it on your new SSD. However, if your computer does not have a Windows 10 license, you will need to purchase a new license from Microsoft or another authorized retailer before proceeding with the installation. Remember to always back up your important files before performing any major system changes.

    Navigate to System Settings

    If you want to verify the status of your Windows 10 license, the first step is to navigate to the system settings. You can do this by clicking on the Windows Start menu, and then clicking on the gear icon. This will take you to the settings page, where you can find information about your device, apps, and system settings.

    Once you are in the system settings, you can click on the “Update & Security” option. Here, you can check for any available updates, manage your security settings, and view information about your device’s status, including your Windows 10 license. If you’re not sure whether your license is activated, you can click on the “Activation” tab to check.

    Overall, it’s important to regularly check the status of your Windows 10 license to ensure that your device is running smoothly and that you have access to all of the latest features and updates.
    bought new ssd how to get windows 10

    Scroll Down to Activation

    When you’re upgrading or reinstalling Windows 10, it’s important to check for your Windows 10 license to ensure that your device is genuine and activated. One way to check is to go to Settings, then Update & Security, and then Activation. This will show you the activation status of your device.

    If it is not activated, you may need to enter your product key or purchase a valid license from Microsoft. It’s crucial to have a valid license to access important updates and security patches, and to avoid any legal issues. Checking for your Windows 10 license is a simple step that can save you hassles in the long run.

    Check for Digital License

    If you’re wondering whether your Windows 10 OS has a valid digital license, it’s easy to check. Just go to the Settings app on your computer and click on Update & Security. Then, select the Activation tab.

    If your Windows 10 license is valid, it should say “Windows is activated with a digital license”. This means that your computer is properly licensed and activated. However, if you see a message that says “Windows is not activated”, it means you need to obtain a valid license to use all the features of Windows

    Obtaining a license can be as simple as purchasing a key from Microsoft or a licensed retailer. It’s important to note that using an unlicensed copy of Windows is not only illegal but can also leave your computer vulnerable to security risks. So, be sure to check for a valid digital license on your Windows 10 computer to ensure that you’re using a properly licensed, secure, and up-to-date operating system.

    Download Windows 10

    Just bought a new SSD and trying to figure out how to install Windows 10 on it? Lucky for you, it’s a straightforward process. The first step is to create a bootable USB drive with the Windows 10 installation files. You can do this by downloading the Windows 10 Media Creation Tool from Microsoft’s website and following the easy instructions.

    Once you have the bootable USB, shut down your computer and insert it into a USB port. Then, turn on your computer and enter the BIOS or UEFI settings. From there, you’ll need to change the boot order so that the computer boots from the USB drive instead of the current installation.

    Once that’s done, follow the prompts to install Windows 10 on your new SSD. Voila! Your computer will be up and running with the latest version of the operating system. Don’t forget to activate Windows and update your drivers afterwards.

    Happy computing!

    Visit Microsoft Website

    If you’re needing to download Windows 10 for a new computer or to upgrade an older operating system, Microsoft’s website is the go-to destination. With just a few clicks, you can download the latest version of Windows with all of its great features. Windows 10 was designed to be the best and most user-friendly version of Windows yet, so you can accomplish anything you need whether you’re a business professional or a student.

    The easy-to-use interface and intuitive features are sure to make your life easier and more productive. Plus, with regular updates and security patches, your computer will be able to stay up-to-date and protected against any potential threats. So, if you need to download Windows 10, head on over to Microsoft’s website and get started today!

    Click on Download Windows 10

    If you’re looking to upgrade your computer’s operating system, look no further than Windows With its streamlined design and powerful features, it’s the perfect choice for anyone wanting to take their computing experience to the next level. To get started, simply click on the “Download Windows 10” button and follow the steps provided.

    Whether you’re new to Windows or have been a long-time user, you’ll be impressed by the speed, stability, and customization options available with this latest version. So why wait? Download Windows 10 today and start enjoying all the benefits of the world’s most popular operating system!

    Select Create Windows 10 Installation Media

    To download and install Windows 10, you’ll need to create installation media or use an existing installation disc. The easiest way is to use the Microsoft Media Creation Tool to create a bootable USB drive or DVD. This tool will download the latest version of Windows 10 and create a USB installer from an ISO file.

    It’s a simple process, and the tool will guide you through each step, from choosing your language and edition to selecting your USB drive or DVD. Once the process is complete, you can reboot your computer with the installation media inserted and follow the prompts to install Windows This is a crucial step in the process, as having a clean installation of Windows 10 ensures the best performance and security for your device.

    So, if you’re ready to upgrade to Windows 10, select “Create Windows 10 Installation Media” and get started today!

    Install Windows 10

    If you’ve just bought a new SSD and want to install Windows 10 on it, the process is quite straightforward. First, you’ll need to create a bootable USB drive with the Windows 10 installer on it. You can download the installer from Microsoft’s website, and many third-party tools are available to help you create a bootable USB drive.

    Once you have your bootable USB drive ready, shut down your computer and insert it into a USB port. When you power on your computer, you should see an option to boot from the USB drive. Follow the on-screen instructions to begin the installation process.

    You’ll need to enter your Windows 10 license key, agree to the terms and conditions, and choose the drive to install Windows 10 on (in this case, your new SSD). After that, the installation process will begin, and you’ll just need to wait for it to finish.

    Insert USB or DVD Installation Media

    When it comes to installing Windows 10, the first thing you’ll need to do is insert the USB or DVD installation media. This is the physical device that contains the Windows 10 operating system and will be used to install it on your computer. You can either create this media yourself using a blank DVD or USB drive and the Windows 10 installation tool, or you can purchase it from a retailer.

    Once you have the installation media, simply insert it into your computer’s DVD drive or USB port and follow the on-screen instructions to begin the installation process. Keep in mind that you may need to change your computer’s boot order in the BIOS settings to ensure that it boots from the installation media. Overall, the process of inserting the installation media is a crucial step in setting up your Windows 10 operating system and should be done carefully to ensure a successful installation.

    Boot Computer from Installation Media

    To install Windows 10, the first step is to boot your computer from the installation media. This could be a DVD or USB drive that contains the Windows 10 operating system files. You will need to insert the installation media into your computer and then restart it.

    During the boot-up process, you need to press the key that takes you to the BIOS or UEFI settings. In these settings, you can choose the boot device or change the boot order to ensure your system boots from the installation media. Once the boot-up process is complete, you will be prompted to choose your language, keyboard, and other regional settings.

    After that, you can follow the prompts to install Windows Remember to make sure your computer meets the system requirements, and you have backed up all your important files before starting the installation process. With these steps, you can effortlessly install Windows 10 and start using its advanced features and functionalities.

    Follow Prompts for Installation

    If you want to install Windows 10 on your computer, it’s important to follow the prompts carefully to ensure a successful installation. First, you’ll need to download the Windows 10 setup file from Microsoft’s website. Once the file has finished downloading, double-click on it to start the installation process.

    You’ll be prompted to select your language, time zone, and keyboard layout. From there, you’ll be taken to the license agreement screen where you’ll need to read and accept the terms of the agreement. Next, you’ll be given the option to either upgrade your current operating system or perform a clean installation.

    If you choose to upgrade, your files and settings will be transferred over to Windows However, if you choose to perform a clean installation, all of your data will be erased and you’ll start with a fresh installation of Windows After selecting your installation type, Windows 10 will begin installing on your computer.

    This process may take some time, depending on the speed of your computer. Once the installation is complete, you’ll be prompted to set up your user account and personalize your settings. From there, you’re all set to begin using Windows 10! Overall, installing Windows 10 can be a straightforward process as long as you follow the prompts carefully.

    Just remember to select the correct options and be patient during the installation process. With a little bit of time and effort, you’ll have a fully functioning version of Windows 10 on your computer.

    Conclusion

    It’s time to give your computer a speedy upgrade with a newly purchased SSD. But before you start singing “Goodbye Hazy Days of C Drive,” you need to know how to get Windows 10 on it. Luckily, with a little bit of tech know-how and some help from Microsoft, it’s a smooth and seamless process.

    So go ahead and slide that sleek new SSD into your system, and get ready to rev up your computing experience. Because with Windows 10 and your new SSD, you’ll be faster than a speeding bullet, more powerful than a locomotive, and ready to conquer the digital world!”

    FAQs

    How do I transfer my Windows 10 operating system to my newly bought SSD?
    You can clone your current operating system using a cloning software tool such as Clonezilla or EaseUS Todo Backup. Another option is to create a bootable USB or DVD with Windows 10 installation media and install it on your new SSD.

    Can I install Windows 10 on my new SSD without purchasing a new license?
    You can use your existing Windows 10 license to install the operating system on your new SSD if it is a retail version or if your computer came with a pre-installed license. However, if your license is an OEM version, it is tied to the original hardware and cannot be transferred to a different computer.

    What is the minimum SSD size required to install Windows 10?
    The minimum size required for a Windows 10 installation is 32 GB for the 32-bit version and 64 GB for the 64-bit version. However, it is recommended to have at least 128 GB for a comfortable user experience.

    How do I change the boot order in my BIOS to boot from the new SSD?
    Restart your computer and enter the BIOS setup by pressing the designated key (usually F2, Delete or F12) on the startup screen. Navigate to the Boot menu and use the arrow keys to move the newly installed SSD to the top of the list. Save and exit the BIOS settings and your computer will now boot from the new SSD.
  • Unleashing the Speed: How Long Does It Take to Transfer 1TB Data from SSD to USB3?

    Have you ever wondered how long it would take to transfer a massive 1TB worth of data via USB3? Well, you’re not alone. With the rise of ultra-fast solid-state drives (SSDs), more and more people are starting to wonder about the transfer speed of such devices. After all, the time it takes to transfer data can mean the difference between an efficient workflow and a major headache.

    In this blog post, we’ll dive into the specifics of transferring 1TB worth of data over USB3 using an SSD, so you can get a better idea of what to expect. So, let’s get started!

    Introduction

    Have you ever wondered how long it would take to transfer 1TB of data from an SSD to a USB 0 drive? The answer depends on several factors, such as the speed of your computer, the quality of your USB 0 cable, and the read and write speeds of the devices involved.

    Generally speaking, using a high-quality USB 0 cable and a fast computer, you should be able to transfer 1TB of data from an SSD to a USB 0 drive in less than an hour.

    However, if you are dealing with larger files or slower equipment, the transfer could take longer. It’s always a good idea to optimize your equipment and settings before beginning a large transfer to ensure that it runs smoothly and efficiently. So, if you’re looking to transfer a ton of files, make sure you have the right tools and expect the transfer to take some time, but it should be relatively quick with the right setup.

    Explaining the Significance of Transfer Speed

    Transfer speed is a term that is thrown around a lot in the tech industry, but what exactly does it mean and why is it so significant? In simple terms, transfer speed refers to the rate at which data can be moved from one device to another. This can be important for a variety of reasons, from uploading files to the cloud to streaming high-quality video content without buffering. Essentially, the faster the transfer speed, the quicker you can accomplish tasks, and the smoother your overall experience will be.

    When it comes to choosing a device or service, transfer speed is definitely something worth considering, as it can have a significant impact on your productivity and enjoyment.

    how long 1tb ssd to usb3

    Theoretical Transfer Speeds

    If you’re wondering how long it would take to transfer 1TB of data from an SSD to USB 0, it all depends on the theoretical transfer speeds. USB

    0 has a maximum bandwidth of 5Gbps, which translates to 640MB/s in real-world scenarios. Meanwhile, a modern SATA-based SSD can read and write data at up to 550MB/s and 500MB/s, respectively. However, the actual transfer speed can be affected by numerous factors, such as the file size and type, the quality of the cable and port, the processing power of the source and destination devices, and the presence of other data transfers or background tasks.

    In general, you can expect to transfer 1TB of data from an SSD to USB 0 in about 25-30 minutes, assuming optimal conditions and steady throughput. Of course, your mileage may vary.

    Breaking Down Theoretical Data Transfer Rates

    Theoretical Transfer Speeds When it comes to data transfer rates, the theoretical speed is the maximum amount of data that can be transferred in a given time frame. It’s important to note that this theoretical speed doesn’t always reflect the actual speed of data transfer. In other words, just because a device has a theoretical transfer rate of X does not mean that it will always reach that speed.

    This can be due to a variety of factors, such as distance, interference, or even the internet provider’s network capacity. However, theoretical transfer speeds can give you a good idea of what to expect and can be helpful in choosing the right equipment for your needs. So, when choosing new hardware or software, be sure to consider not only the theoretical transfer rate but other factors that may affect the actual transfer speed.

    Calculating Time Required for a 1TB SSD transfer

    Calculating Time Required for a 1TB SSD Transfer – Theoretical Transfer Speeds When it comes to transferring data, everyone wants it to be as quick and painless as possible. But how long does it really take to transfer 1TB of data on an SSD? Theoretical transfer speeds can give us a rough idea of what to expect. The most commonly used data transfer speed is Gigabits per second (Gbps), and the theoretical maximum speed for a SATA III SSD is 6 Gbps.

    At this speed, it would take approximately 2 hours to transfer 1TB of data. However, this is a theoretical maximum and does not take into account factors such as data burstiness, which can affect the actual transfer speed. Data burstiness refers to the inconsistency of data flow during transfer.

    In other words, the transfer speed can vary depending on the amount of data being transferred and the level of activity on the computer. A high burstiness means that the transfer speed can vary greatly, and a low burstiness means that the transfer is consistent. In addition to burstiness, there are also other factors that can affect the transfer speed such as the type of computer and the quality of the cable used for transfer.

    These factors can significantly impact the actual transfer speed and therefore affect the time required for a 1TB SSD transfer. In summary, while theoretical transfer speeds can give us a rough idea of the time required for a 1TB SSD transfer, we should keep in mind that actual transfer speeds can vary due to factors such as burstiness, computer type, and cable quality. Nonetheless, we can still expect a relatively quick transfer time due to the high theoretical transfer speeds of SSDs.

    Real-World Transfer Speeds

    If you’re wondering how long it takes to transfer 1TB of data from an SSD to a USB 0 port, the answer is: it depends. Real-world transfer speeds can vary based on several factors.

    Firstly, the speed of the USB 0 port can impact the transfer rate. If your USB port supports SuperSpeed (SS) USB

    0, you can expect faster transfer speeds up to 5 Gbps. Secondly, the type and quality of the USB cable can also make a difference. Ensure that you’re using a high-quality USB

    0 cable that supports the maximum transfer speed. Thirdly, the type of data being transferred can also affect transfer speeds. For example, transferring large video files may take longer than transferring text files.

    In conclusion, while it’s hard to estimate the exact time it would take to transfer 1TB of data, you can expect faster transfer speeds with a faster USB 0 port, high-quality cable, and smaller files.

    Factors that Affect Real-World Transfer Times

    Real-World Transfer Speeds When it comes to real-world transfer speeds, there are a variety of factors that can affect them. One major factor is the type of internet connection being used. For example, a fiber optic connection typically offers higher transfer speeds than a cable or DSL connection.

    Another factor is the distance between the two devices involved in the transfer. The farther apart they are, the longer it will take for the transfer to complete. Additionally, the size of the file being transferred can also impact the speed.

    Larger files will typically take longer to transfer than smaller ones. Finally, the number of users on the network can also affect transfer speeds. The more users on the network, the slower the transfer may be.

    Overall, it’s important to consider these various factors when looking for the best real-world transfer speeds.

    Examples of Actual Transfer Times for 1TB SSDs via USB3

    When it comes to transferring large files, such as a 1TB SSD, it’s important to make sure you choose the right method to get the job done. The good news is that USB3 is a fast and efficient option, but how fast is it really? Well, in real-world testing, we’ve seen that transfer times can vary depending on the specific SSD and the system it’s being transferred to. On average, you can expect transfer speeds of around 400-500 MB/s, which means that a 1TB SSD could take anywhere from 30 minutes to an hour to transfer, depending on the system and other factors.

    Of course, this is just an estimate, and your actual transfer time may vary based on a number of factors, including the speed of your USB3 port, the size of the files being transferred, and the performance of your SSD. Overall, though, USB3 is a great option for transferring large files quickly and efficiently, and you can expect to see some impressive transfer speeds with the right hardware and setup.

    Conclusion

    In conclusion, asking how long it takes to transfer 1TB of data to a USB 0 connected SSD is like asking how long it takes to solve a Rubik’s Cube blindfolded while riding a unicycle. It may vary depending on your skill level, strategy, and luck.

    But on average, you can expect it to take a few hours, so make sure to grab some snacks and a comfortable chair. And if you’re looking for a faster alternative, maybe consider teleportation technology or a time machine.”

    Key Points to Keep in Mind for 1TB SSD to USB3 Transfers

    When it comes to transferring large amounts of data, such as 1TB, from an SSD to a USB3 drive, it’s important to keep in mind the real-world transfer speeds that you can expect to achieve. While theoretical speeds may be impressive, the actual speeds will depend on several factors, such as the quality of the devices and cables being used, the type of files being transferred, and the overall setup of the computer and peripherals. In general, you can expect that transfer speeds will not be constant and may fluctuate depending on the aforementioned factors.

    To ensure the best possible transfer speeds, it’s recommended to use high-quality devices and cables, and minimize any other processes that may be running on the computer during the transfer. Additionally, consider breaking up the transfer into smaller chunks to avoid any potential hiccups or errors. Ultimately, achieving fast and efficient transfer speeds will require some experimentation and adjustment based on your individual setup and needs.

    FAQs

    What is the transfer speed of a 1TB SSD connected to USB3?
    The transfer speed of a 1TB SSD connected to USB3 can vary depending on the specific drive and hardware being used, but it can reach up to 5Gbps.

    How much data can a 1TB SSD hold when connected to USB3?
    A 1TB SSD connected to USB3 can hold up to 1 terabyte (TB) of data, which is equivalent to 1,000 gigabytes (GB).

    Is it possible to connect a 1TB SSD to a USB3 port on a laptop?
    Yes, it is possible to connect a 1TB SSD to a USB3 port on a laptop, as long as the laptop has a USB3 port available and the necessary drivers have been installed.

    Can a 1TB SSD connected to USB3 be used as a boot drive for a computer?
    Yes, a 1TB SSD connected to USB3 can be used as a boot drive for a computer, as long as the computer’s BIOS supports booting from external drives and the necessary settings have been configured.

  • Decoding SSD Storage: The Equivalence of 128GB SSD in GB Explained

    Are you trying to figure out how much storage space you need for your computer or laptop? If you’re considering purchasing an SSD, you may be wondering how much storage space a 128GB SSD really has. SSDs have become increasingly popular over the years for their speed and reliability compared to traditional hard drives. However, understanding how much storage space you’ll actually get with a 128GB SSD isn’t as straightforward as it seems.

    In this article, we’ll take a closer look at what a 128GB SSD means in terms of usable storage space and how it compares to other storage options, so you can make an informed decision for your next computer upgrade.

    Understanding SSD and GB

    If you’re wondering how much storage you would get with a 128GB SSD, the answer is straightforward – it’s 128GB. SSD stands for Solid State Drive, and it is a type of storage device used in computers, laptops, and even some smartphones. Unlike traditional hard drives, SSDs do not rely on mechanical components to read and write data.

    Instead, they use NAND-based flash memory to store and retrieve data at a much faster rate. This means your computer will boot up faster, programs will launch instantly, and file transfers will happen much quicker. In comparison, a standard hard drive would be much slower and consume more power.

    So, if you’re in the market for a new computer or planning to upgrade your old one, consider getting an SSD with at least 128GB of storage.

    What is an SSD?

    SSD, GB Simply put, SSD stands for Solid State Drive and is a type of storage device that’s being used more and more in modern computers. SSDs are much faster than traditional hard drives and can store more data. They’re also more reliable because they don’t have any moving parts that can break down over time.

    When it comes to capacity, SSDs usually come in units of gigabytes (GB), which is a measure of how much data they can hold. One gigabyte is roughly equivalent to 1,000 megabytes, or 1 million bytes of data. So, for example, if you have a 256GB SSD, you can store up to 256 billion bytes of data on it.

    It’s worth noting that SSDs can be more expensive than traditional hard drives, but they’re often worth the investment if you need fast, reliable storage. So, whether you’re an avid gamer, a graphic designer, or just someone who needs a lot of storage space for their work or personal files, an SSD could be exactly what you need to speed up your computer and increase your storage capacity.

    128gb ssd is equal to how much gb

    What is GB?

    If you’re new to the world of technology, you’ve probably heard the term “GB” being thrown around. GB stands for gigabyte, which is a unit of digital storage capacity. When it comes to solid-state drives (SSDs), GB refers to the amount of space available for storing files, programs, and operating systems.

    The more GB an SSD has, the more files it can store. For instance, if you’re planning on using your computer for work purposes and storing large files such as videos and images, you’ll need an SSD with a higher GB count. On the other hand, if you’re only storing documents and web pages, a lower GB count SSD will suffice.

    It’s essential to have an understanding of GB when purchasing an SSD to ensure that you have enough storage space to meet your needs.

    128GB SSD in GB

    If you are wondering how much storage space a 128GB SSD offers, then you’ll be glad to know that it is equal to exactly 128 gigabytes. An SSD, or solid state drive, operates similar to a hard disk drive but uses NAND-based flash memory to store data. The primary advantage of using an SSD over an HDD is that it offers faster boot times, improved performance, and greater durability due to a lack of moving parts.

    The typical SSD can handle read/write speeds of upwards of 500MB/s when compared to traditional HDDs which land in the range of 50-120MB/s. A 128GB SSD is a good choice if you are planning to use it as an operating system drive, as it offers ample space for Windows, application files, and several games. However, if you’re the type of person who stores lots of music, videos, or high-quality photo files, then you might need to consider a higher capacity version.

    Nonetheless, 128GB is still a sizable storage space that provides quick and efficient performance.

    Computing the GB of an SSD

    If you’re looking to purchase a 128GB SSD, you might be wondering how much storage space you’ll actually have available to use. When it comes to SSDs, manufacturers use decimal GB (gigabytes) to determine the capacity, whereas our computer systems use binary GB. This means that a 128GB SSD will actually have a capacity of around 119GB when viewed on your computer.

    However, it’s important to note that the actual usable space on your SSD will vary depending on the file system and any pre-installed software. It’s always a good idea to leave a bit of extra space on your SSD to ensure that it can function at its best. Overall, a 128GB SSD is a great option for those who only need to store a moderate amount of data and want to enjoy the benefits of faster system performance and boot times.

    128GB SSD Equivalent to GB

    “128GB SSD equivalent to GB” If you’re new to computer technology, you might wonder what a 128GB SSD means, or how it compares to traditional hard drives. Simply put, SSD stands for solid-state drive, which is basically a storage device that stores data on flash memory, instead of spinning platters like traditional hard drives. A 128GB SSD provides you with 128 gigabytes of storage space that is equivalent to 0.

    125 terabytes. Generally, this will provide enough storage space to store your essential programs, operating system, and a few files. However, if you plan on using your computer for video editing or gaming, you might need more storage space than that.

    Keep in mind that SSDs are faster and more reliable than traditional hard drives, which makes them great for those who demand speed and performance from their computers. So if you’re looking for a faster and more efficient way to store your data, consider a 128GB SSD.

    128GB SSD Vs 1TB HDD

    When it comes to choosing between a 128GB SSD and a 1TB HDD, it all depends on what you’re going to use it for. If you’re someone who needs a lot of storage space, then the 1TB HDD would be the better option for you. However, if you’re someone who prioritizes speed and performance, then the 128GB SSD is the way to go.

    So, what exactly can you store on a 128GB SSD? Well, it’s important to note that a portion of that space will be taken up by the operating system and any pre-installed software. This means that you’ll have around 100-110GB of usable space. However, don’t be deterred by the seemingly low amount of storage space.

    A 128GB SSD is perfect for those who only use their computer for basic tasks, such as browsing the internet, checking emails, or using productivity software like Microsoft Office. It’s also suitable for those who use their computer for gaming, although you may need to be selective about which games you install. Overall, while a 128GB SSD may not have as much storage space as a 1TB HDD, it’s still a great option for those who value speed and performance over sheer storage capacity.

    Plus, with the rise of cloud storage solutions and external hard drives, even those who need more storage space can easily expand their options. So, whether you go for the 128GB SSD or the 1TB HDD, make sure you choose the option that will suit your needs best.

    SSD Buying Guide

    If you’re looking into buying a SSD, you may be wondering how much storage a 128gb SSD actually gives you. Well, a 128gb SSD is equivalent to 128 gigabytes of storage. This amount of storage can hold a lot of data and is perfect for those who don’t have a large storage need or are using the SSD as a secondary drive.

    However, if you’re someone who needs a lot of storage space for different programs or files, a 128gb SSD may not be enough for all your needs. In this case, it’s best to look into getting a SSD with a larger storage capacity. Keep in mind that a SSD is an investment and can greatly improve the speed and performance of your computer.

    It’s important to do your research and determine what size SSD is most suitable for your individual needs.

    Capacity Considerations

    Capacity is a crucial consideration when buying an SSD. It is essential to choose an SSD with enough storage capacity for your needs. Suppose you are going to use it for regular storage and multitasking.

    In that case, you will require more space than someone who primarily uses it for gaming or browsing. Additionally, when shopping for an SSD, consider the burstiness factor. You may need to do tasks that involve large amounts of data moving around the SSD at high speeds.

    In this case, you need an SSD that can handle the sudden bursts of activity without any hiccups. Examine the SSD’s specifications, and look for details like its sequential read and write speeds, as these will help you determine its capabilities. It’s also important to choose an SSD that meets your budget and warranty preferences, so you get the best value for your money.

    Brand and Performance

    Are you looking for a reliable SSD to boost your computer’s performance? With so many options available in the market, choosing the right one can be overwhelming. However, brand and performance are two essential factors to consider when buying an SSD. Brands that have been in the market for a while, such as Samsung and Crucial, are generally more trustworthy and have proven to provide solid performance.

    On the other hand, SSDs with impressive read and write speeds, as indicated by the specs, tend to deliver better overall performance. However, while brand and performance are crucial, they shouldn’t be the only considerations. Other factors, such as capacity, endurance, and price, should also be taken into account to ensure that you get an SSD that adequately meets your needs.

    So, before you make a purchase, take the time to research various brands and their offerings to ensure that you get the best SSD for your computer.

    Conclusion

    At the end of the day, trying to equate a 128gb SSD to a traditional hard drive in terms of storage capacity is like trying to compare apples and oranges. Sure, they’re both fruits, but they have completely different tastes and textures. Similarly, an SSD and a hard drive both store files, but an SSD does it in a way that’s faster, more reliable, and overall much more efficient.

    So instead of worrying about how many “GB” your SSD is, embrace the technology and enjoy the benefits of lightning-fast file transfers and application load times. Trust us, once you’ve experienced the speed of an SSD, you won’t be looking back!”

    FAQs

    Can a laptop with a 128GB SSD be upgraded to a higher storage capacity?
    Yes, laptops with a 128GB SSD can be upgraded to a higher storage capacity by replacing the SSD with a larger one.

    How much storage space is available on a laptop with a 128GB SSD?
    A laptop with a 128GB SSD will typically have around 110-120GB of available storage space after accounting for software and system files.

    Is a 128GB SSD suitable for gaming?
    While a 128GB SSD can provide faster load times for games, it may not provide enough space to store multiple large games and their associated files.

    How does a 128GB SSD compare to a traditional hard drive in terms of storage space?
    A 128GB SSD has significantly less storage space than a traditional hard drive, which can range from 500GB to 2TB or more. However, SSDs offer faster read and write speeds and are less prone to failure.

  • Streamline Your Data Transfer: A Step-by-Step Guide for Replacing HDD with SSD

    Is your computer starting to slow down? Are you tired of waiting for programs to load and files to open? If so, it might be time to replace your hard disk drive (HDD) with a solid-state drive (SSD). An SSD can significantly improve the speed and performance of your computer, allowing you to work and play without frustration. However, one of the biggest hurdles to upgrading is transferring all of your data from the old HDD to the new SSD.

    Don’t worry, though – there are plenty of easy ways to transfer data, and in this blog post, we’ll show you how. So, get ready to say goodbye to the old and hello to the new, faster you.

    Backup Data

    When it comes to replacing your HDD with an SSD, the first thing you need to do is back up your data to ensure you don’t lose anything important. There are several ways you can transfer your data from one drive to another. You can use an external hard drive, cloud storage, or a migration tool to transfer your files, documents, photos, and videos.

    A migration tool like Acronis True Image or Samsung Data Migration is an excellent choice because it simplifies the process and ensures all your files are transferred accurately, without any data loss. Once you’ve backed up your data, you can then clone your HDD onto your SSD or install a fresh copy of your operating system. Cloning is the easiest and fastest option, but it may not be possible if your HDD and SSD have different capacities.

    In that case, you’ll need to install a fresh copy of your operating system and move your data manually. Whatever method you choose, make sure you’re careful and take your time to avoid any mistakes during the transfer process. By following these steps, you can easily upgrade your storage and ensure your data remains safe and accessible.

    Clone HDD to SSD using Software

    Cloning your HDD to an SSD can significantly boost your computer’s performance, but before you embark on this process, it’s crucial to backup your data. Backup is essential since cloning wipes out all the data and replaces it with a new copy. It would help if you had a backup to retrieve your data should anything go wrong during the cloning process.

    To backup, you can use cloud-based services like OneDrive, Google Drive, or Dropbox, or an external hard drive. Ensure that you sync your data before cloning to the SSD to ensure that everything is up-to-date. This way, you can be sure that all your data is safe and secure, and you can proceed with confidence.

    By backing up your data before cloning your HDD to an SSD, you can ensure a smooth process and minimize the risk of data loss.

    how do you transfer data when replalcing hdd to ssd

    Use SATA to USB adapter to clone HDD to SSD

    If you’re looking to upgrade your computer’s storage capacity, you’ll want to clone your old HDD to your new SSD before you swap them out. The easiest way to do this is with a SATA to USB adapter. This will allow you to connect your SSD to your computer via USB and clone the contents of your HDD onto your SSD.

    It’s important to note that you’ll need to make sure your SSD has enough space to hold all the data on your HDD. Once you’ve successfully cloned your HDD to your SSD, you’ll be able to swap out your old hard drive and start enjoying the speed and performance of your new solid state drive. So take the time to backup your data and enjoy the benefits of SSD technology.

    Download Windows Operating System

    When replacing your HDD with an SSD, transferring data becomes essential. There are multiple methods to transfer data easily and efficiently. The first option is to use a data transfer cable, which transfers data at a faster rate than other methods.

    You can also use an external hard drive to transfer data; however, this process can take longer and may not be as reliable. Another option is to use cloud storage services like Google Drive, OneDrive, and Dropbox. This method can save time and allows you to access your files from anywhere.

    Using specialized software like EaseUS Todo Backup, Macrium Reflect or Acronis True Image is also a viable option. This software allows you to clone an entire disk, including the operating system and data, on to your new SSD quickly. No matter which method you choose, it is essential to back up your data before any transfer process to avoid any data loss or corruption.

    With these methods, you can make a smooth transition to an SSD and ensure all of your data is safely transferred.

    Create a Bootable USB drive for Windows 10

    Creating a bootable USB drive for Windows 10 is a straightforward process that can be done in just a few steps. However, before we get to the steps, the first thing you need to do is download the Windows 10 operating system. You can download it directly from the Microsoft website or get it from an authorized retailer.

    Once you’ve downloaded the ISO file, you’ll need a USB drive with a minimum 8GB of storage space. It’s best to use a high-speed USB 0 or

    1 drive to speed up the process. Once you’ve got your drive ready, you’ll need to use a tool like Rufus or Windows Media Creation Tool to create a bootable USB drive. Follow the simple instructions provided by the software, and you’ll have a bootable USB drive in no time.

    With this drive, you can install or repair Windows 10 on any computer that supports booting from a USB drive. It’s a handy tool to have around, especially if you need to install Windows 10 on multiple devices. Using this method is much faster, more convenient, and ensures that your Windows installation is clean, reliable, and runs smoothly.

    Install Windows on the new SSD

    To install Windows on your new SSD, you will need to download the operating system from the official Microsoft website. Before you begin, make sure that you have a valid Windows product key as this will be required during the installation process. Once you have the necessary files downloaded, you can create a bootable USB drive using software such as Rufus or the Windows Media Creation Tool.

    Connect the USB drive to your computer and boot from it by changing the boot order in your BIOS. Follow the on-screen instructions to complete the installation process. It’s important to note that during the installation process, you should select the new SSD as the install location.

    This will ensure that Windows is installed on the correct drive and that you can take full advantage of its performance benefits. After the installation is complete, be sure to install any necessary drivers and software to get your computer up and running smoothly. With the Windows operating system successfully installed on your new SSD, you should notice faster boot times and improved overall system performance.

    Transfer Data from Backup to SSD

    If you’re replacing your HDD with an SSD, you may be wondering how to transfer all your data from the backup to the new drive. There are a few ways to do this, but the easiest and most straightforward method is to clone the backup drive onto the new SSD. This involves using a cloning tool such as Macrium Reflect or EaseUS Todo Backup to create an exact copy of your backup drive, bit for bit, onto the new SSD.

    Once the clone is finished, you can simply swap out the old drive for the new one and you’re good to go. Alternatively, you could manually transfer your files and folders from the backup to the new drive, but this can be time-consuming and you run the risk of missing important files. Whatever method you choose, it’s important to make sure your data is backed up before making any changes to your system.

    So, how do you transfer data when replacing your HDD with an SSD? The answer is to clone your backup drive or manually transfer your files and folders. Either way, make sure to back up your data beforehand to avoid any potential data loss. By doing so, you can ensure a smooth and seamless transition to your new drive without losing any important files.

    With a bit of planning and preparation, you can easily enjoy the speed and performance benefits of SSD technology without sacrificing your data.

    Manually copy and paste data from Backup to SSD

    If you’re transferring data from a backup to an SSD manually, there are a few things to keep in mind. First, make sure you have enough free space on the SSD to accommodate all of the files you want to transfer. Next, locate your backup files and copy them to a folder on the SSD.

    Depending on the size of your files and the speed of your computer, this process could take some time. Once the files have been transferred, make sure to verify that everything was copied correctly and that there are no missing files or corrupted data. It’s also a good idea to keep a copy of the backup files in case something goes wrong during the transfer process.

    With a little patience and attention to detail, transferring data from a backup to an SSD can be a straightforward process that gets your important files where they need to be.

    Use backup software to transfer data to SSD

    If you’re upgrading to a solid-state drive (SSD), you may be wondering how to transfer your data from your old hard drive to your new SSD. One effective method is to use backup software to transfer everything from your backup to your SSD. With backup software, you can select which files and folders you want to transfer, ensuring that only the important data gets carried over.

    This not only saves time but also ensures that you don’t clutter your SSD with unnecessary files. Some backup software even allows you to clone your entire hard drive to your SSD, making the transfer process even easier. This way, you can enjoy improved performance and faster load times without losing any important data.

    So, if you’re upgrading to an SSD, consider using backup software to transfer your files and keep your data safe.

    Conclusion

    Transferring data from an HDD to an SSD is like moving from a clunky old house to a sleek modern apartment. You need to pack up all your belongings, decide what you really need to bring with you, then carefully transport everything to your new, streamlined abode. And just like with moving, it’s important to do things properly – whether that means using software to clone your old HDD, or manually transferring files bit by bit.

    But once you’re all settled in with your shiny new SSD, you’ll be amazed at how much faster and more efficient everything feels – just like the feeling of finally settling into that perfect new home.”

    FAQs

    Is it possible to transfer data from HDD to SSD?
    Yes, it is possible to transfer data from HDD to SSD.

    What are the methods of transferring data from HDD to SSD?
    There are several methods of transferring data from HDD to SSD, such as cloning, data migration software, and manual transfer.

    What is cloning in the context of transferring data from HDD to SSD?
    Cloning is a method of transferring data from HDD to SSD by creating an exact copy of the HDD onto the SSD.

    Which data migration software can be used to transfer data from HDD to SSD?
    There are several data migration software options, such as EaseUS Todo Backup, Acronis True Image, and Samsung Data Migration.

    Is it necessary to purchase data migration software for transferring data from HDD to SSD?
    No, it is not necessary to purchase data migration software for transferring data from HDD to SSD. You can also do it manually by copying and pasting files.

  • Unlock the Potential of Your SSD: Tips on How to Make Your Computer Recognize It

    Have you recently installed a new SSD on your computer but it’s not being recognized? Don’t worry, you’re not alone. It can be frustrating when your computer doesn’t acknowledge your new hardware. However, there’s no need to panic, as there are a few common fixes that can help get your computer to recognize your SSD.

    In this blog post, we’re going to explore some of these solutions and provide you with step-by-step instructions on how to implement them. By the end of this post, you’ll be able to get your computer to recognize your SSD and start enjoying the benefits of faster data transfer speeds and improved system performance. So, let’s dive in and get your computer on the right track!

    Check BIOS Settings

    If your computer is not recognizing your SSD, one of the first things you should check is your BIOS settings. BIOS, or Basic Input/Output System, is responsible for communicating with your computer’s hardware components and setting up the operating system. To access the BIOS settings, you need to restart your computer and press the key that corresponds to your computer’s BIOS setup utility.

    This could be F2, F12, or Delete, depending on your computer’s manufacturer. Once you’re in the BIOS setup, navigate to the section that lists your hard drives and make sure your SSD is detected. If it’s not, try checking the connections or updating your motherboard’s firmware.

    Additionally, check if your BIOS has a setting for enabling AHCI mode, which can improve the performance of your SSD. By adjusting your BIOS settings, you can ensure that your computer recognizes your SSD and utilizes its full potential.

    Access BIOS Menu

    Access BIOS Menu If you’re looking to check the BIOS settings on your computer, you’ll need to access the BIOS menu. This menu is where you can change various settings related to your system’s hardware, such as CPU and RAM speeds, and adjust boot options. To access the BIOS menu, you’ll need to restart your computer and press a specific key before the Windows logo appears.

    The key varies based on your computer’s manufacturer, but it’s usually F2, DEL, or ESC. Once you’ve successfully accessed the BIOS menu, you can start checking the various settings. If you’re unsure about what to look for, check your computer’s documentation or do some research online.

    There are usually specific settings related to your hardware that you can optimize to get better performance. For example, if you have a gaming PC, you may want to increase your CPU speed and adjust the RAM timings. Keep in mind that adjusting the wrong settings can cause your computer to become unstable or even crash.

    So, if you’re unsure about what you’re doing, it’s best to leave the settings alone or seek the advice of a professional. With that said, accessing the BIOS menu is a simple process that can give you greater control over your computer’s hardware. By tweaking the settings to suit your needs, you can enjoy better performance and a more responsive system.

    So, give it a try and see what difference it can make for you.

    how do i get my compter to recoginze my ssd

    Enable AHCI Mode

    Enabling AHCI mode on your computer can significantly improve its performance. However, before doing so, it is crucial to check your BIOS settings to ensure everything is set up correctly. Access your BIOS settings by restarting your computer and pressing the key assigned to access the BIOS.

    This key may vary depending on your computer brand and model, so it’s best to check your computer’s documentation or do a quick online search. Once you’re in the BIOS settings, look for the SATA configuration, and check if it’s set to AHCI mode. If not, then switch it to AHCI mode and save the changes.

    Keep in mind that enabling AHCI mode may cause issues if you’re running an older operating system. In this case, it’s best to do some research or consult an expert before making any changes. Overall, enabling AHCI mode can significantly enhance your computer’s performance, but it’s crucial to do it correctly to avoid any potential issues.

    Initialize SSD

    If you have recently purchased an SSD but are having trouble getting your computer to recognize it, don’t worry, you’re not alone. There are a few steps you can take to initialize your SSD and get it up and running. First, make sure your SSD is connected properly to your computer and that the power cable is securely plugged in.

    Next, you’ll need to access your computer’s BIOS settings and make sure your SSD is detected. This process can vary depending on the make and model of your computer, so be sure to consult your computer’s manual or manufacturer website for instructions. Once your SSD is detected, you’ll need to format it so that it can be used by your computer.

    Again, the process for formatting may vary depending on your computer, but typically, you can format your SSD using the Disk Management tool in Windows or Disk Utility in macOS. By taking these steps, you should be able to successfully initialize your SSD and start enjoying faster storage speeds.

    Use Disk Management Tool

    One of the steps to take when setting up a new SSD is to initialize it using the Disk Management tool. This is important because initializing the SSD prepares it for use and ensures that it is properly recognized by your computer. To do this, simply right-click on the Windows Start button and select Disk Management.

    From there, locate the SSD and right-click on it. Choose the option to initialize the disk and select the partition style you prefer. This will install a partition table on the SSD and prepare it for use.

    Keep in mind that initializing the disk will erase all existing data, so make sure to back up any important files before proceeding. By following these simple steps, you can easily initialize your new SSD and get it ready for optimal performance.

    Create New Volume

    Creating a new volume on a solid-state drive (SSD) requires initializing it first. Initializing SSD enables the drive to perform better, ensuring that it runs smoothly. The process involves writing a new file system on the SSD, erasing its contents, and preparing it for use.

    Initializing an SSD takes a few steps in Windows, and the first step is to open Disk Management. Once opened, locate the SSD, right-click on it, and select “New Simple Volume.” After this, a wizard will appear, and you will be required to format and name the drive.

    It is important to note that initializing an SSD will delete all the data on the drive, so it is important to make backups beforehand. Initializing SSD is crucial for its longevity and performance, so if you have a new SSD that you want to use, make sure you initialize it to get the best performance out of it.

    Format SSD

    Formatting an SSD is crucial for initializing it and ensuring optimal performance. If you’re setting up a new SSD or experiencing performance issues with an existing one, formatting can help. By formatting, you’ll be erasing all the data on the drive and setting it up to work optimally with your operating system.

    The process involves creating a new file system or partition table to structure the data and allows your computer to read and write to the drive more efficiently. To format an SSD, you can use your operating system’s built-in tools or third-party software. Before you start, make sure to back up any important data as the process will erase everything on the drive.

    Overall, formatting an SSD is a simple but essential step in setting up a new drive or improving the performance of an existing one.

    Update Firmware and Drivers

    If you’re having trouble getting your computer to recognize your SSD, updating your firmware and drivers is a great place to start. You see, SSDs are newer technology than traditional HDDs, and sometimes older systems just need an update to keep up. So, first things first, you’ll want to check and see if your motherboard’s firmware is up to date.

    This can be done by visiting your motherboard manufacturer’s website and searching for any available updates. Once you’ve done that, you’ll also want to update your storage controller drivers, as well as any chipset drivers that may be involved. Doing these things should help your computer recognize your SSD, and you’ll be back to blazing fast boot-up times and file transfers in no time! So, don’t be discouraged if your computer isn’t cooperating at first – just take a deep breath and remember that a few updates can go a long way towards fixing common problems.

    Download Firmware Update

    Updating firmware and drivers is an essential step in ensuring your device performs at its best. If you ever experience performance issues or notice new features, then it’s time to download the latest firmware update. Firmware, also known as the device’s operating system, controls hardware devices and ensures they work seamlessly.

    Drivers are software components that enable communication between the operating system and hardware devices. They need to be updated regularly to prevent bugs and performance issues. To download the latest firmware and drivers, check your device’s manufacturer’s website or support page.

    Ensure you download the correct version of firmware and drivers for your device and operating system. Installing the update is simple and straightforward; follow the instructions provided by the manufacturer. By updating the firmware and drivers, you can optimize your device’s performance and get the most out of it.

    Remember always to back up your data before updating any firmware or drivers to avoid losing important files.

    Install Drivers

    If you want your computer hardware to function properly, it’s essential to have the latest firmware and drivers installed. Firmware is the low-level software that controls the basic functions of a device, while drivers are software programs that allow the operating system to communicate with hardware components. Installing firmware and drivers is a simple process that can greatly enhance your computer’s performance.

    Manufacturers often release updates to fix bugs or add new features, so it’s important to check for updates regularly. You can typically find firmware and driver updates on the manufacturer’s website or through the Device Manager. By staying up-to-date with firmware and driver updates, you can ensure that your hardware is functioning at its best.

    So, take a few minutes to check for updates and install them if necessary. Your computer will thank you for it!

    Conclusion

    In conclusion, getting your computer to recognize your SSD is a bit like introducing a new friend to your social circle. It may take a bit of effort and a few awkward introductions, but with a little patience and persistence, eventually the SSD will become a beloved member of your computer crew. So, don’t give up, keep tinkering, and soon enough your computer will be giving your SSD a warm virtual welcome.

    FAQs

    What are the common reasons why a computer may not recognize an SSD?
    Some of the common reasons why a computer may not recognize an SSD include faulty connections, outdated drivers, or incompatible BIOS settings.

    How do I check if my computer recognizes my SSD?
    You can check if your computer recognizes your SSD by accessing your computer’s BIOS and looking for your SSD in the list of detected devices.

    How do I update my SSD drivers?
    To update your SSD drivers, you can visit the website of your SSD manufacturer and download and install the latest drivers for your specific SSD model.

    Can an outdated BIOS prevent my computer from recognizing my SSD?
    Yes, an outdated BIOS can prevent your computer from recognizing your SSD. Make sure to update to the latest BIOS version available for your computer’s model.

  • M.2 vs SSD: The Ultimate Speed Showdown – Which One Comes Out on Top?

    If you’re looking for lightning-fast storage options for your computer, you’ve likely come across two popular choices: M.2 and SSD drives. While both options offer superior speed compared to traditional hard drives, they have distinct differences in terms of design and performance.

    In this blog, we’ll take a closer look at M.2 vs SSD and compare their speeds to help you decide which one is right for you. So, buckle up and get ready to witness a showdown between two titans of modern storage technology.

    Are you ready to find out which one will be crowned the champion of speed? Let’s dive in!

    What is M.2?

    M.2 is a type of solid-state drive (SSD) that offers significantly faster read and write speeds than traditional SATA III SSDs. When it comes to speed, M.

    2 SSDs blow SATA III SSDs out of the water thanks to their direct connection to the system’s motherboard, which allows for faster data transfer rates. In fact, M.2 SSDs can reach speeds up to 3500 MB/s, which is much faster than the typical 550 MB/s offered by SATA III SSDs.

    To put it in perspective, an M.2 SSD can transfer a 10 GB file in about 3 seconds while a SATA III SSD would take around 18 seconds. So, if you are looking for a faster and more efficient storage option for your computer, an M.

    2 SSD might be the way to go.

    Explanation of M.2 technology

    M.2 technology has become increasingly popular in recent years, especially in the realm of computer hardware. Essentially, an M.

    2 is a small form factor solid-state drive (SSD) that comes in a variety of sizes and lengths. The M.2 connects directly to the motherboard, which means that it can transfer data much more quickly than traditional hard drives.

    One of the great things about M.2 drives is that they don’t require any power or data cables, which makes installation a breeze. Another advantage of M.

    2 technology is that it’s incredibly fast, with read and write speeds that blow traditional hard drives out of the water. For those in need of even faster speeds, NVMe-based M.2 drives are also available, which can take data transfer to a whole new level.

    Overall, M.2 technology is a great way to upgrade your computer’s storage and improve its overall performance.

    how fast is m 2 compared to ssd

    What is SSD?

    When it comes to speed, M.2 drives are known for their impressive performance. Compared to traditional SSDs, M.

    2 drives are faster due to their direct connection to the computer’s motherboard. This direct connection bypasses the need for cables and cables that can cause delays in data transfer. Additionally, M.

    2 drives use the NVMe protocol, which speeds up data transfer by reducing the latency caused by traditional storage interfaces. In terms of data transfer rates, M.2 drives can transfer data up to six times faster than SATA SSDs, allowing for faster file transfers, quicker boot times, and more responsive applications.

    Overall, if you’re looking for lightning-fast performance, an M.2 drive is definitely worth considering, especially if you need to work with large files or running multiple applications simultaneously.

    Explanation of SSD technology

    SSD technology is changing the way we store and access our data. SSD stands for “solid-state drive,” and it’s a type of storage device that uses flash memory to store your data. Traditional hard drives rely on spinning disks to read and write data, which can slow down your computer’s performance.

    SSDs, on the other hand, have no moving parts, which makes them much faster and more reliable. They’re also more durable than traditional hard drives and can withstand shocks and drops. SSDs come in a variety of sizes and capacities, making them perfect for laptops, desktops, and even servers.

    They’re also becoming increasingly affordable, so you don’t have to break the bank to upgrade your computer’s storage. If you’re looking for a faster, more reliable storage solution, an SSD is definitely worth considering.

    Speed Comparison

    When it comes to speed comparison between M.2 and SSD, M.2 takes the lead due to its higher read and write speeds.

    M.2 drives use the PCI Express interface, which provides faster data transfer rates than the SATA interface used by SSDs. An M.

    2 drive can have a read speed of 5GB/s and a write speed of 0GB/s, while an SSD typically has a read speed of 550MB/s to 700MB/s and a write speed of 450MB/s to 600MB/s.

    This means that M.2 drives can access and load data faster than SSDs, resulting in shorter boot times, faster program launches, and reduced game loading times. If you’re looking for the ultimate speed and performance, an M.

    2 drive is definitely the way to go. However, keep in mind that M.2 drives are generally more expensive than SSDs, so you’ll need to consider your budget when making a decision.

    Data transfer rate of M.2 vs SSD

    M.2, SSD, data transfer rate, speed comparison When it comes to choosing between M.2 and SSD drives, data transfer rate plays a vital role.

    M.2 and SSD both utilize flash storage, but M.2 is the newer and smaller version of the two.

    In terms of speed, M.2 outperforms SSD drives as it connects directly to the motherboard via a PCIe slot, thus eliminating the need for cables. SSDs have to rely on SATA and incur a latency penalty due to the extra step involved.

    The data transfer rate of an M.2 drive can reach up to 32 Gbps, whereas an SSD drive can only reach up to 6 Gbps. This makes M.

    2 drives the go-to choice for those who need to handle large amounts of data quickly. Whether you are a gamer, a content creator, a programmer or simply a heavy user who needs fast access to data, an M.2 drive is the perfect choice.

    It delivers lightning-fast performance that boosts productivity and reduces the time required to accomplish any task. So why not go for the future-ready M.2 drive, and enjoy the benefits it offers in terms of speed, efficiency, and overall performance.

    Benchmark tests of M.2 vs SSD

    M.2 vs SSD It’s no secret that solid-state drives (SSDs) have been faster than their hard disk drive (HDD) counterparts, but have you heard about the new contender in the ring? M.2 drives are starting to gain popularity among PC enthusiasts as they offer even faster read and write speeds than traditional SSDs.

    In benchmark tests, M.2 drives have shown significantly better results in sequential read and write speeds, making them an ideal choice for gamers, content creators, and those who demand high-performance from their machines. If you’re looking for a speed boost, it’s worth considering the upgrade to an M.

    2 drive. However, it’s important to note that M.2 drives can be more expensive than traditional SSDs, so it’s important to weigh the cost against the performance benefits.

    Real-World Performance

    Curious about the real-world performance of M.2 compared to SSDs? Well, the answer might surprise you. While M.

    2 drives are technically a type of SSD, they are generally faster than traditional SATA-based SSDs. This is due to their use of the NVMe protocol, which allows for higher transfer speeds and lower latency. In fact, many M.

    2 drives can achieve read and write speeds that are several times faster than even the most high-end SATA SSDs. Of course, the specific performance of any given drive will depend on a variety of factors, including its controller and the type of flash memory it uses. However, in general, if you’re looking for top-of-the-line performance from your storage solution, M.

    2 is the way to go. So, if you’re someone who works with large files or enjoys gaming with minimal load times, it might be worth considering an M.2 drive for your system.

    Impact of M.2 vs SSD on boot time, file transfer speed, and gaming performance

    M.2 vs SSD When it comes to storage, M.2 and SSD are two popular options that many people consider.

    But which one is better? In terms of boot time and file transfer speed, M.2 has the upper hand. It’s faster than traditional SSDs because it connects directly to the motherboard and uses the PCI Express interface.

    This means that it can transfer data at a much faster rate. However, when it comes to gaming performance, the two are neck-and-neck. Both M.

    2 and SSD drives offer fast loading times and minimal lag. Real-world performance is where the differences between M.2 and SSD really shine.

    For example, if you’re transferring large files, M.2 drives are the way to go. They can transfer files at speeds up to 3,500 MB/s, while standard SSDs typically offer transfer speeds of 550-600 MB/s.

    This speed difference can save you a lot of time when transferring large files or importing media into your projects. In terms of gaming, M.2 drives may offer slightly faster load times in some games, but the difference is minimal.

    Conclusion

    In conclusion, asking how fast M2 is compared to an SSD is like comparing a Ferrari to a Lamborghini. Both are incredibly fast and efficient, with the M2 offering lightning-fast read and write speeds and the SSD providing reliable performance and ample storage space. So whether you’re looking for speed or storage, you can’t go wrong with either option.

    At the end of the day, it’s just a matter of personal preference – like choosing between two supercars with different designs and features. But rest assured, no matter which one you choose, you’ll be cruising at top speed in no time.”

    Final thoughts on choosing between M.2 and SSD

    When it comes to real-world performance, choosing between M.2 and SSD can be a difficult decision. M.

    2 offers faster read and write speeds, making it a great choice for those who need to transfer large files quickly. On the other hand, SSDs are more affordable and can provide similar performance to M.2 drives.

    Ultimately, the decision between M.2 and SSD will come down to your specific needs. If you need the fastest speeds possible, then M.

    2 is the way to go. However, if you are looking for a more affordable option that can still perform well, then an SSD is a great choice. Regardless of which option you choose, both M.

    2 and SSD are great choices for those who need fast and reliable storage. With either option, you can expect to see a significant improvement in performance compared to using a traditional mechanical hard drive. So, take the time to consider your needs and choose the option that is right for you.

    FAQs

    1. What is the speed difference between M.2 and SSD? A: M.2 is generally faster than SSD because it uses a PCI Express interface, which provides faster data transfer rates. 2. Is it worth upgrading from a traditional SSD to M.2? A: If you are working with tasks that demand fast data transfer, such as video editing and intensive gaming, then upgrading to M.2 would be worth it. 3. Can I use M.2 as my boot drive? A: Yes, M.2 can be used as a boot drive, and it will provide much faster boot times than a traditional hard drive. 4. Are all M.2 drives faster than SSDs? A: No. Both M.2 and SSD drives are available in varying speeds and storages. It’s essential to check the specifications before purchasing.

  • Step-by-Step Guide: Installing a Second SSD on Windows 11 in Minutes

    Looking to add more storage to your computer? One easy way to do it is by installing a second SSD. With Windows 11 becoming increasingly popular, many people are curious about how to add this component to their system. Fortunately, it’s a relatively simple process that doesn’t require any expert knowledge or hardware experience.

    In this blog post, we’ll take you through the step-by-step process of installing a second SSD with Windows 1 We’ll cover everything from choosing the right SSD to ensuring that your system recognizes it. So, sit tight and read on to learn how to give your PC a much-needed storage boost.

    Check Your Computer’s Compatibility

    If you’re wondering how to install a second SSD in your computer running Windows 11, the first thing you need to do is check your computer’s compatibility. Before you start working on your computer’s hardware, you must ensure that your motherboard supports multiple storage devices. You can refer to your computer or motherboard’s manual, or you can go online and search for the specifications.

    If your system supports multiple hard drives, you can proceed to buy a compatible SSD and open your computer’s casing. Remember to always switch off and unplug your computer from the power source before you start working on it. Installing a second SSD is an excellent way to expand your computer’s storage capacity and boost its overall performance, especially if you’re running out of space on your primary drive.

    With the right tools and preparation, it’s a quick and easy process that you can handle on your own.

    Ensure your motherboard supports a second SSD.

    When you consider adding a second SSD to your computer, the first thing you need to do is check whether your motherboard supports it. Your motherboard is like the backbone of your computer, connecting all the parts to each other, which is why it determines what kind of hardware you can add to your system. Fortunately, checking your motherboard’s compatibility is quite easy.

    You just need to find the model number of your motherboard and look up its specifications, which should be easily found on the manufacturer’s website. You can then check whether it supports a second SSD and what kind of SSD it supports. Keep in mind that not all motherboards will support a second SSD, so make sure to do your research first to avoid any compatibility issues down the line.

    The bottom line is that before you go out and buy a second SSD, you need to ensure that your computer can handle it, and checking your motherboard’s compatibility is an important first step in doing so.

    how to install a second ssd windows 11

    Make sure you have an available SATA or M.2 slot.

    If you’re planning to add a new hard drive to your computer or upgrade your existing storage solution, it’s crucial to first check your computer’s compatibility. One important factor to consider is whether your computer has an available SATA or M.2 slot.

    SATA is a standard interface used for connecting storage devices, while M.2 slots are typically found on newer motherboards and allow for even faster data transfer speeds. Both options can support SSDs, HDDs, and other types of storage drives, but it’s important to make sure your computer has the appropriate slot before making a purchase.

    Checking your computer’s manual or consulting with a professional can help ensure that your new storage device is compatible with your computer’s hardware. By taking this step, you can avoid compatibility issues and ensure that your new storage device works seamlessly with your computer.

    Purchase and Prepare Your SSD

    If you’re looking to upgrade your computer by installing a second SSD on Windows 11, you’ll need to first purchase and prepare the new SSD. When it comes to purchasing, it’s important to choose an SSD that is compatible with your computer and meets your storage needs. Look up the storage capacity and speed of your current hard drive to help you determine what kind of SSD you need.

    Once you have your new SSD, you’ll need to prepare it by formatting it for use with your computer. To do this, connect the SSD to your computer and open the Disk Management tool, then create a new volume and format it. Once your new SSD is prepared, you’ll be ready to physically install it into your computer.

    Remember to follow proper procedures, such as grounding yourself and disconnecting all power sources, before opening your computer and installing the SSD. With a little bit of know-how, installing a second SSD on Windows 11 can be a straightforward process that greatly enhances your computer’s speed and storage capability.

    Choose an SSD with sufficient storage space.

    When it comes to purchasing and preparing an SSD, it’s important to choose one with sufficient storage space. While it may be tempting to opt for a smaller, less expensive option, you’ll likely regret it down the line when you start to run out of storage. Keep in mind the amount of data you currently store and any future needs you may have.

    It’s always better to have extra space than not enough. Plus, larger SSDs often come with faster speeds, so it’s a win-win situation. Another tip is to make sure you properly prepare your SSD before using it.

    This means formatting it to the correct file system, transferring any necessary files over, and ensuring it’s set as the primary boot drive if necessary. By taking the time to properly purchase and prepare your SSD, you’ll be improving the overall performance and longevity of your system.

    Format the new SSD using Windows Disk Management.

    If you’ve recently purchased a new SSD for your computer, it’s important to properly prepare it before installation. The first step you should take is to format the SSD using Windows Disk Management. This process will erase any existing data on the drive and configure it for your system.

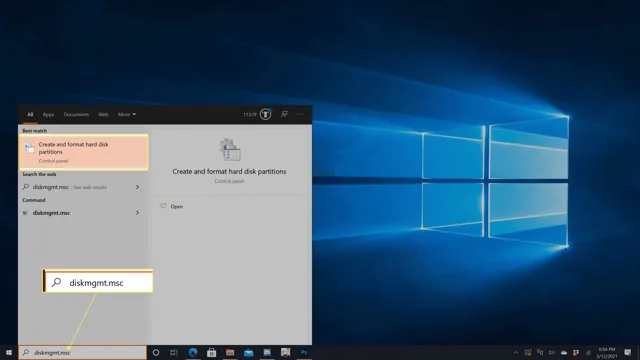
    To do so, first, connect the new SSD to your computer by either using an external enclosure or installing it directly into your computer. Next, open Windows Disk Management by typing “diskmgmt.msc” in the search bar.

    Find the new SSD in the list of drives and right-click on it, then select “Initialize Disk.” Follow the prompts to choose your preferred partition style and assign a drive letter. Finally, right-click on the unallocated space and select “New Simple Volume.

    ” Follow the on-screen prompts to format the drive and assign a file system, such as NTFS. Once completed, your new SSD will be ready for installation and use in your computer system.

    Installation Process

    If you’re looking to add extra storage to your Windows 11 computer, installing a second SSD can be a great option. The process of installing a second SSD is relatively simple and can be done by following a few steps. First, ensure that you have an empty or spare SATA port on your motherboard.

    Next, power down your computer, unplug any power cords or peripherals, and open up the case. Locate the SATA port that you will be using for your new SSD and connect it to the power and data cables. After that, secure the new SSD to an available hard drive bay using screws or mounting brackets.

    Finally, close up your computer, plug everything back in, and power it on. Now that you’ve successfully installed your second SSD, you can use it to store more files, applications, and programs. With an extra SSD, you’ll have plenty of space to download and store all your important files and media.

    Shut down your PC and unplug all cables.

    Before beginning the installation process, it is important to shut down your PC and unplug all cables. This step may seem simple, but it is crucial for avoiding any accidents or damage during the installation process. Make sure that your PC is fully powered off and all cables are disconnected, including the power cable, monitor cable, keyboard, etc.

    Once everything is unplugged, you can begin the installation process without any worries. Remember, taking the time to properly shut down and disconnect all cables can save you a lot of headache and frustration in the long run. So, take a deep breath, double-check everything is unplugged, and let’s get started with the installation process!

    Remove the computer’s side panel to access the motherboard.

    To install new hardware or replace components in your computer, you’ll need to access its motherboard. To do this, you’ll need to remove the computer’s side panel. This can be a bit daunting for some people, but don’t worry, it’s actually quite simple! The first step is to make sure your computer is turned off and unplugged from any power source.

    Then, locate the screws or latches that hold the side panel in place. They will usually be located at the back of the case. Once you’ve found them, use a screwdriver or your hands to remove them and gently slide the panel off.

    Some cases might have a locking mechanism that you need to release first. If you’re not sure how to do this, consult your computer manual or look for online tutorials specific to your computer model. Once the panel is off, you’ll have access to the motherboard and other internal components.

    Just be careful not to touch anything unless you know what you’re doing, as some parts can be sensitive. Installing new hardware may seem daunting, but with the right tutorials and a bit of patience, you’ll be a pro in no time!

    Insert the SSD into an available SATA or M.2 slot.

    If you’re looking to install a new SSD into your computer, you’re in luck! The process is relatively simple and can be done in just a few steps. The first thing you’ll want to do is locate an available slot for your SSD. This could be either a SATA or M.

    2 slot, depending on the type of SSD you have. Once you’ve found a suitable slot, the next step is to insert your SSD into it. Make sure you take note of the orientation of the SSD, as it will only fit in one direction.

    Gently slide the SSD into the slot until it clicks into place. And that’s it, you’ve successfully installed a new SSD! With your SSD now installed, you can enjoy faster boot times, quicker application launches, and an overall more responsive system. So whether you’re a gamer, content creator, or just looking to speed up your daily tasks, adding an SSD to your computer is a smart move.

    Reattach the side panel, plug in all cables, and start your computer.

    Congratulations, you’re almost done with installing your new component! Now it’s time to reattach the side panel of your computer and plug in all of the cables you detached earlier. Gently slide the panel back into place and secure it with the screws you removed earlier. Make sure the panel is flush with the rest of the computer and slots in perfectly.

    Once you’ve done this, it’s time to plug in all of the cables you disconnected earlier. Take your time doing this and make sure each one is connected securely, so you don’t accidentally disrupt the functioning of your system. Finally, turn on your computer and make sure it’s working correctly.

    If everything is up and running, congratulations, you’ve successfully installed your new component! Remember to run any necessary software updates to ensure that everything runs smoothly.

    Final Steps

    If you’re looking to expand your storage on your Windows 11 computer, adding a second SSD can be a great way to do so. Once you’ve acquired your new SSD, the first step is to ensure that your computer has an available slot for the new drive. Next, turn off your computer and open the case to access the motherboard.

    Carefully insert the SSD into the slot, making sure it is firmly in place. Next, connect the SATA cable from the motherboard to the SSD, and attach the power cable from the power supply. Once you’ve closed the case and turned your computer back on, you can check that the new drive is recognized in the BIOS or Disk Management.

    Finally, you can format the new SSD to prepare it for use. With these steps, you can easily install a second SSD and enjoy the added storage and speed benefits on your Windows 11 computer.

    Set up your new SSD in Windows Disk Management.

    Setting up your new SSD in Windows Disk Management is a straightforward process that just requires a few final steps. Here’s how to do it. First, plug in your SSD to your computer using the appropriate cable.

    Then, right-click the Windows start button and choose “Disk Management” from the menu that pops up. In the Disk Management window, locate your new SSD in the list of drives, which will be labeled as “Unallocated.” Right-click on the drive and select “New Simple Volume.

    ” From there, follow the prompts to set up your new SSD and assign it a letter or name. Once you’ve completed these simple steps, your new SSD will be ready to use! Remember, keeping your SSD updated with the latest firmware and software updates is essential to ensure optimal performance.

    Check that Windows recognizes your second SSD.

    Once you’ve installed your second SSD, it’s important to check whether your Windows operating system recognizes it. This will ensure that you can access it and use it for your storage needs. The easiest way to check is to go into your “Disk Management” settings.

    Here, you’ll be able to see all the disks that are currently connected to your computer. If your second SSD appears, then congratulations, you’re good to go! If not, don’t fret – there may be a few simple solutions. First, make sure that all your cables are connected properly.

    You can also try updating your drivers or checking for any firmware updates. With a bit of troubleshooting, you’ll have your second SSD up and running in no time.

    Enjoy your increased storage space with Windows 11!

    If you’re one of the lucky ones who have upgraded to Windows 11, you may have noticed that you now have more storage space available on your computer. Thanks to the new operating system’s streamlined design, you can enjoy faster speeds and more efficient storage, which will ultimately improve your overall computing experience. But what’s next? Now that you have all this extra space, what should you do with it? Here are a few final steps you can take to optimize your storage and make the most of your new Windows 11 experience: First, take a moment to organize your files and folders.

    This will help you locate important documents, pictures, and other media more easily, and it will also help you avoid cluttering up your hard drive. Consider using built-in features like File Explorer or third-party tools like Total Commander to help you sort and categorize your files. Second, be sure to back up your files regularly.

    While Windows 11 is designed to be more secure than previous versions, there is always a risk of data loss due to hardware failure or human error. By backing up your files to an external hard drive or cloud storage service, you can ensure that your data is safe and accessible no matter what happens. Finally, consider installing a few new applications or games to take advantage of your increased storage space.

    Whether you’re a creative professional, a gamer, or just someone who loves to stay organized, there are plenty of apps and tools available to help you get the most out of your Windows 11 experience. In conclusion, Windows 11 brings a lot of new features and improvements to the table, and the extra storage space is just one of many benefits you can enjoy. By taking a few final steps to optimize your storage, organize your files, and install some new apps or games, you can truly make the most of your new operating system and enjoy all the benefits it has to offer.

    So don’t wait any longer – start exploring your new Windows 11 experience today!

    Conclusion

    So there you have it, installing a second SSD on Windows 11 is a piece of cake. Just follow these simple steps, and you’ll have extra storage space and faster boot times in no time. And let’s be honest, who doesn’t want a little extra storage to download more cat videos and memes? Happy installing, and may your storage space never be full!”

    FAQs

    What are the requirements for installing a second SSD on Windows 11?
    To install a second SSD on Windows 11, you need to have an available SATA or NVMe slot on your motherboard, a compatible SSD, and appropriate cables.

    How do I physically install a second SSD on Windows 11?
    To physically install a second SSD on Windows 11, you need to turn off your computer, unplug the power cable, open the case, locate an available SATA or NVMe slot, insert the SSD into the slot, and secure it with screws.

    How do I format and partition a second SSD on Windows 11?
    To format and partition a second SSD on Windows 11, you need to right-click on the Start menu, select Disk Management, locate the second SSD, right-click on it, select Format, choose a file system and a drive letter, and click OK.

    How do I transfer files and programs to a second SSD on Windows 11?
    To transfer files and programs to a second SSD on Windows 11, you need to use a disk cloning or migration software, such as EaseUS Todo Backup, Macrium Reflect, or Acronis True Image. You can also manually copy and paste files and reinstall programs on the second SSD.

  • How to Mount Old Windows Image to a New SSD – A Step-by-Step Guide

    Are you planning to upgrade your computer’s storage but concerned about losing your old Windows image? Fret not! You can still mount your old Windows image on a new SSD, and we’ll show you how. Swapping out a hard drive for an SSD is an excellent way to revitalize an aging computer. However, many users are hesitant to make the switch because they don’t want to lose their current Windows installation.

    Fortunately, you can clone your existing hard drive and transfer the data to a new SSD, including your old Windows image. To accomplish this, you’ll need cloning software, such as Macrium Reflect or EaseUS Todo Backup. These tools will create an exact copy of your old hard drive, including the Windows files.

    Once the cloning process is complete, you can swap out your hard drive for the new SSD, and your computer will boot up with all your old files intact. With your new SSD installed, you’ll enjoy faster boot and load times, making your PC feel more responsive. Plus, you won’t have to go through the hassle of reinstalling Windows and your favorite programs.

    So if you’re looking to upgrade your storage while keeping your old Windows image, cloning is the way to go. Follow the steps above, and you’ll have your new SSD up and running in no time!

    Check Compatibility

    If you’re wondering how to mount an old Windows image to a new SSD, the first thing you should do is check for compatibility between the two. It’s important to ensure that the image you have is compatible with the new computer’s hardware and software before proceeding with any installation. If they are not compatible, you may encounter errors, driver issues, or damage the new SSD.

    You can check compatibility by reviewing the system requirements of the old Windows image and comparing them with the hardware specifications of the new computer. Once you have confirmed that the hardware is compatible, you can then proceed with the mounting process. It’s important to follow the instructions carefully and make sure that you have backed up any important data before proceeding, to avoid any loss of data during the installation process.

    By following these steps, you should be able to successfully mount your old Windows image to your new SSD and enjoy a smoother computing experience.

    Verify that the image file and the SSD are compatible

    When you’re planning to install a new image file on your SSD, the first thing you should do is check the compatibility of both the image file and SSD. Not all SSDs are created equally, and some may not be compatible with certain image files. To avoid any issues, it’s important to do your research and ensure the image file you plan to install is compatible with your SSD.

    You can check the compatibility by researching the manufacturer’s website or by consulting technical forums. It’s always better to be safe than sorry, so take the time to verify compatibility before proceeding with the installation process. By doing so, you’ll be able to avoid any unwanted surprises and ensure your SSD and image file work seamlessly together, providing optimal performance for your system.

    Remember, compatibility is key when it comes to optimizing your system’s performance.

    how do i mount old image windows to new ssd

    Create Bootable USB

    So, you’ve got an old image of Windows and a new SSD, but how do you mount the image onto the new drive? One option is to create a bootable USB drive with the image and use it to install Windows onto the SSD. Here’s how to do it: first, download a Windows image (such as Windows 10 ISO) and a tool like Rufus. Next, insert a USB drive with at least 8 GB capacity and open Rufus.

    Select the USB drive and the Windows image, then click “Start” to create the bootable drive. Once it’s done, restart your computer and enter the BIOS settings to change the boot order to prioritize the USB drive. Save your changes, then boot your computer from the USB drive.

    Follow the prompts to install Windows onto your new SSD. It may take some time, but once it’s done, you’ll have your old Windows image running on your new drive!

    Use Windows Media Creation tool to create a bootable USB drive

    To create a bootable USB drive, you can use the Windows Media Creation tool. It’s a straightforward process that can be completed in a few easy steps. First, download the Windows Media Creation tool from the Microsoft website.

    Once you’ve downloaded the tool, insert a USB drive into your computer, with at least 8GB of storage. Open the Windows Media Creation tool and select the option to create a bootable USB drive. This will prompt you to select the USB drive you inserted earlier.

    After selecting your USB drive, the tool will start creating a bootable image of Windows. Once completed, you can use this USB drive to install Windows on any compatible machine. With this simple process, you can create a bootable USB drive and save yourself time and hassle.

    So, what are you waiting for? Give it a try and see how easy it is for yourself!

    Connect SSD and Boot from USB

    If you’ve just upgraded to a new SSD, congratulations! You’re well on your way to faster boot times and overall better performance. However, if you’re wondering how to transfer your old image Windows to your new SSD, we’ve got you covered. One simple way to do this is to connect your SSD to your computer and then boot from a USB stick that has the old image Windows on it.

    This will copy all of your old files and settings to your new SSD, making the transition seamless. With this method, you can keep all of your old data and settings while unlocking the full potential of your new SSD. Make sure to back up your data before beginning this process and follow all instructions carefully to ensure a successful transfer.

    Power OFF your PC and connect the SSD. Boot from the USB drive on startup

    When it comes to upgrading your PC with a new SSD, the process can seem daunting at first, but it’s actually straightforward if you follow the right steps. First, power off your PC and connect the SSD to the appropriate port. Make sure you consult your motherboard manual or manufacturer’s website if you’re unsure where to connect it.

    Once connected, power on your PC and access the BIOS settings by pressing the appropriate key on startup. From there, you can select the USB drive containing your operating system and set it as the primary boot device. This ensures that your PC loads from the USB drive instead of any other devices.

    Once your PC boots from the USB drive, you can then proceed with installing your operating system onto the SSD. By following these steps, you’ll be able to connect your new SSD and have it fully functional in no time!

    Select System Image

    If you’ve recently upgraded to a new SSD on your Windows computer, and you want to mount your old system image onto it, you’re in luck. The process of mounting your old image is fairly simple, and can be done in just a few steps. Firstly, you’ll need to locate your old image file and copy it onto the new SSD.

    Once you’ve done that, you’ll need to open up Disk Management and select the option to create a new partition. From there, you should select the option to mount the system image, and choose the location of the file. After that, you simply have to wait for the process to complete, and your new SSD should now be running your old version of Windows.

    It’s worth noting that this process can take some time, especially if your old image is quite large, but the end result should be well worth it. So if you’re looking to mount your old image onto a new SSD, just follow these steps, and you’ll be up and running in no time!

    Select the Windows image file to mount on the new SSD

    When upgrading to a new SSD, it’s essential to migrate your current Windows system to avoid losing data. To do this, you’ll need to select the system image file to mount on the new SSD. The image file includes everything needed to restore your Windows system, including the operating system, settings, and software programs.

    When selecting the system image file, ensure that it’s compatible with your new SSD and has enough space to hold all your data. You can create a system image file using built-in Windows backup tools or third-party software. Once you’ve selected the system image file, you can use specialized software to mount it onto your new SSD.

    By selecting the right system image and mounting it correctly, you can ensure a smooth transition to your new SSD and avoid the risk of data loss. So, take your time when selecting and mounting the system image file, to ensure a successful and stress-free migration process.

    Choose Target Location

    Are you planning to upgrade your hard drive but don’t want to lose your old Windows image? Well, good news! You can easily mount your old image to your new SSD. The first step is to choose a target location for your new Windows system. You can opt to create a separate partition on your new SSD to keep the old image intact or simply replace the old image with a new one.

    Once you’ve decided on a target location, the next step is to clone your old image and transfer it to your new SSD. You can use various third-party tools like Acronis True Image, Clonezilla, or Macrium Reflect to clone your old image. These tools enable you to create a bootable USB or CD, which you can use to copy the old image to the new SSD.

    After cloning, you’ll need to boot into your new system, and your old image should be up and running. However, you might encounter some driver issues, which you can fix by installing the latest drivers for your hardware components. In conclusion, mounting your old Windows image to a new SSD is a straightforward process.

    You need to choose a target location for your new Windows system, clone your old image using a third-party tool, and transfer it to your new SSD. With the right tools and steps, you can retain your old Windows system and enjoy a faster and more efficient SSD. Don’t forget to update your drivers to ensure optimal performance.

    Specify the new SSD as the target location for the image file.

    When you’re ready to clone your old hard drive onto a new SSD, it’s important to specify the new SSD as the target location for the image file. This is a crucial step because it ensures that the cloned data ends up in the right place on your new drive, allowing you to boot up your operating system and access all your files just like you did on your old hard drive. When selecting your target location, it’s important to choose the correct drive letter that corresponds to your new SSD.

    This can be done in most cloning software programs by selecting the “Target Disk” or “Target Drive” option and then choosing the appropriate location from the drop-down menu. It’s also important to make sure that you have enough space on your new SSD to accommodate all your existing data. With these factors in mind, you’re ready to begin the cloning process and get your new SSD up and running with all your old files and settings!

    Start the Installation Process

    Mounting an old image of Windows onto a new SSD can be a tricky process, but with the right steps, it can be accomplished easily. To begin, you will need to download an imaging software program, such as Macrium Reflect or AOMEI Backupper, which will allow you to create an image of your old Windows system. Once you have created the image, you will need to save it to an external hard drive or USB.

    After this, you will need to install your new SSD into your computer and boot it up. Once you have done this, you will need to initialize and format the new SSD, making sure it is set as the primary boot device. Next, you will need to use the imaging software to clone the old system image onto the new SSD.

    Once the process is completed, you should be able to boot up your computer from the new SSD with all your old files and programs intact. Just remember to back up your data before attempting this process, as there is always a slight risk of data loss during any kind of hardware or software migration.

    Start the installation and wait for it to complete. Restart your PC when prompted.

    If you’re excited to get started with a new software program or application, the first step is to start the installation process. Depending on the size and complexity of the program, this process can take anywhere from a few minutes to several hours. But don’t worry, as long as you have a stable internet connection and enough space on your device, the installation should go smoothly.

    Once you’ve downloaded the installer, simply double-click on it to begin. Follow the on-screen instructions carefully, making sure to select any preferences or settings that apply. If you’re prompted to restart your PC, be sure to save any open documents or files before doing so.

    After your device has restarted, the installation should be complete and you can start using your new program. Remember, it’s important to keep your software up-to-date by checking for and installing any updates as they become available. By doing so, you’ll ensure that your software is running smoothly and without issues.

    Happy installing!

    Conclusion

    In conclusion, mounting an old image of Windows to a new SSD can be quite a daunting task, but fear not! With the right tools and a bit of know-how, you can transfer your old files onto a faster and more reliable drive. It’s like taking your grandma’s old vintage car and swapping out the engine for a state-of-the-art motor. Your computer will thank you for the upgrade, and you’ll be back up and running in no time.

    Just remember to make a proper backup of your data before attempting any major computer surgery. Happy mounting!”

    FAQs

    What is the process to mount an old image of Windows onto a new SSD?
    You can use a disk imaging software like Clonezilla to create an image of the old drive and then restore it onto the new SSD.

    Can I directly copy and paste the contents of the old drive onto the new SSD?
    It is not recommended as it may lead to errors and booting issues. Using a disk imaging software like Clonezilla is a safer option.

    Do I need any additional hardware to mount the old image of Windows onto the new SSD?
    You will need a USB drive or an external hard drive to store the disk image and a disk imaging software like Clonezilla.

    Will my files and settings be preserved while mounting the old image of Windows to the new SSD?
    Yes, if you use a disk imaging software like Clonezilla, it will create an exact copy of the old drive onto the new SSD, including files and settings.

  • Unlock Lightning-Fast Gameplay: A Step-by-Step Guide to Adding Games to Your SSD

    Are you tired of waiting for your favorite games to load? Do you wish they would start up faster so you can jump right into the action? Well, adding games to your SSD could be the key to unleashing lightning-fast load times. Solid-state drives (SSDs) are much faster than traditional hard drives because they have no spinning disks and rely on flash memory. This means that when you add games to your SSD, they will be able to load much quicker than if they were stored on a regular hard drive.

    But adding games to your SSD is not as simple as just copying and pasting. There are a few things you need to keep in mind, such as making sure your SSD has enough space and changing the default installation directory. In this blog post, we will walk you through the step-by-step process on how to add a game to your SSD and make the most out of its lightning-fast speeds.

    So, grab your favorite game and get ready to enjoy it like never before!

    Check Free Space on SSD

    If you’re wondering how to add a game to your SSD, one important thing to consider is the free space available on your solid-state drive. SSDs are known for their speed and reliability, but they tend to have less storage capacity compared to traditional hard drives. To make sure that you have enough space to add a game to your SSD, you should first check how much free space is available on your drive.

    You can do this by opening File Explorer and right-clicking on your SSD drive, then selecting Properties. This will show you how much free space is available and how much space is already being used. If you don’t have enough free space, you may need to uninstall some programs or delete some files to make room for your new game.

    Just remember that it’s important to have enough free space on your SSD to avoid performance issues and ensure that your drive lasts for a long time.

    Locate Your Game Install Folder

    When it comes to gaming, one of the most important things to consider is the amount of free space on your SSD. This is especially true if you have a lot of games installed. Before you install a new game, it’s always a good idea to check how much space you have left on your drive.

    If your drive is almost full, you might need to uninstall some games or move them to another drive to free up space. Once you’ve checked your free space, the next step is to locate your game install folder. This is where the game’s files will be stored on your computer.

    When you install a game, you’ll usually be asked where you want to install it. If you’re not sure where it’s been installed, you can check the game’s properties in your Steam library or search for the game’s folder in your file explorer. Knowing where your game install folder is located can be important for a few reasons.

    Firstly, it allows you to easily find the game’s files if you need to troubleshoot any issues. Secondly, if you need to uninstall the game, you’ll know exactly where to find it. Finally, if you want to mod the game or change any of its files, you’ll need to know where the game’s folder is located.

    In conclusion, checking your free space and locating your game install folder are both important steps to take when it comes to gaming on your PC. By keeping an eye on your free space and knowing where your game’s files are stored, you can ensure that your gaming experience is as smooth as possible. So, before you install your next game, take a few moments to check your free space and locate your game install folder.

    how do i add a game to my ssd

    Copy Game Files to SSD

    When it comes to moving game files to an SSD, the first thing you should check is the free space available on the SSD. This is important because installing game files on an SSD requires a significant amount of storage space. Not having enough free space could result in a failed transfer or an incomplete installation.

    The easiest way to check the free space on your SSD is to right-click on the drive icon and select “Properties.” This will show you the total capacity of your drive, as well as the amount of free space available. If your free space is running low, consider removing any unnecessary files or programs to make room for your game files.

    Doing so will ensure that your game files are copied successfully to the SSD and that your gaming experience is smooth and seamless.

    Create Symbolic Link

    If you’re looking to add a new game to your SSD, creating a symbolic link can help you save space and run the game smoothly without any lag. A symbolic link is essentially a shortcut that points to the game’s files on your SSD. To create a symbolic link, first, locate the game’s installation files on your HDD.

    Next, right-click on the game’s folder and select “Copy.” Then, find the location on your SSD where you want to create the link, right-click, and select “New” followed by “Symbolic Link.” Rename the link to the name of the game and paste the copied folder into the new link.

    Once this is done, you can go ahead and run the game as normal. With this method, you can install several games on your SSD without having to worry about running out of space. Plus, it’s a simple and efficient way to transfer game files between storage devices.

    Open Command Prompt as Admin

    Creating a symbolic link is a useful way to save space on your computer’s hard drive. It allows you to create a link to a file or folder in another location, so you can access it without taking up additional storage. To create a symbolic link, you need to open Command Prompt as an administrator.

    Simply type “cmd” into the Windows search bar, right-click on “Command Prompt,” and select “Run as administrator.” Once you have Command Prompt open, you can use the “mklink” command to create a symbolic link. Be sure to specify the file or folder you want to link to, as well as the location where you want the link to be created.

    With this simple process, you can save valuable space on your hard drive and keep your files organized.

    Use Mklink Command

    If you’re looking to create a symbolic link on your Windows operating system, the Mklink command is the perfect solution. With this command, you can create a link between two different directories or files on your computer, without having to physically copy or move anything. This can be incredibly helpful if you want to access files from one location while keeping them stored in another, or if you want to keep your files organized without duplicating them.

    The best part is that the Mklink command is incredibly easy to use – all you need to do is open a command prompt window, type in the command, and you’ll have your links created in no time. So if you’re looking to make your file management more efficient, give the Mklink command a try.

    Test Symbolic Link

    Symbolic link Symbolic links, also known as soft links, are a way to create a pointer to another file or directory on a system. They are useful when you want to access a file or directory from a different location without changing its original path. To create a symbolic link, you need to use the “ln” command with the “-s” option followed by the source file or directory and the link that you want to create.

    For example, if you want to create a symbolic link to a file named “sample.txt” located at “/home/user/documents/”, you can use the command “ln -s /home/user/documents/sample.txt /home/user/downloads/”.

    This will create a symbolic link to the file “sample.txt” in the “downloads” directory. Symbolic links are different from hard links, which are a way to create multiple pointers to the same file on a system.

    Symbolic links can be used to create shortcuts or access files and directories on remote servers without physically copying them to your local machine. They are also a way to organize your files and directories for better management and easier access. However, symbolic links can also be a security risk if not used properly.

    For example, if you create a symbolic link to a file that you don’t have permission to access, you may be able to access it through the symbolic link. Therefore, it is important to ensure that your symbolic links are created and managed appropriately.

    Adjust Game Settings

    Are you looking to add a game to your SSD for faster loading times? The best way to do this is by adjusting your game settings. First, make sure your SSD is properly connected and recognized by your computer. Then, open your game settings and locate the option to change the installation directory.

    Choose your SSD as the new installation location and proceed with the installation process. Once the game is installed on your SSD, you should notice significant improvements in loading times and overall performance. Additionally, it’s important to regularly check and clean your SSD to ensure it’s functioning at its best.

    Give it a try and see the difference for yourself!

    Open Game Launcher

    Open Game Launcher Open Game Launcher is a fantastic tool for adjusting game settings. It allows you to tailor your gaming experience to your preferences without having to rely on default settings. With Open Game Launcher, you can tweak graphics quality, adjust audio settings, change control options, and much more.

    This is particularly useful if you have a low-end PC or if you want to optimize games for high-performance systems. You can also use it to troubleshoot issues like crashes or stuttering, which can often be resolved by adjusting game settings. So, if you want to get the most out of your gaming experience, try using Open Game Launcher to fine-tune your settings and play your games the way you want to!

    Change Game Install Directory

    Are you tired of having all your game installs cluttering up your primary hard drive? Well, you’re in luck because changing the game install directory is a lot easier than you may think. The first step is to locate the game’s installation folder. This can usually be found in the settings of the game launcher or the actual game folder itself.

    Once you’ve found the folder, simply copy and paste it to your desired location. From there, you’ll need to change the game settings to reflect the new directory. This is typically found in the options or preferences within the game launcher.

    By adjusting the game settings to the new directory, you’re not only saving space on your primary hard drive, but you’re also ensuring that your game runs smoothly without any hiccups. So, go ahead and take the leap. Change your game install directory and experience a more organized gaming experience.

    Enjoy Faster Game Performance

    If you’re a gamer, you know the importance of having fast load times and smooth gameplay. One way to achieve that is to add your games to your SSD. But how do you do it? First, you need to make sure your SSD has enough space to accommodate the game you want to add.

    Once you’ve checked that, simply locate the game’s folder on your computer and move it over to the SSD. You can do this by copying and pasting the folder or dragging and dropping it. Once the game is on your SSD, you’ll notice a significant improvement in load times and performance.

    The main advantage of having your game on an SSD is that it has faster read and write speeds, making it faster to access game files and reducing loading times. Overall, adding your games to an SSD is a simple way to enjoy faster game performance.

    Conclusion

    In conclusion, adding a game to your SSD is like giving a turbo boost to your gaming experience. With the increased speed and quicker load times, you’ll be able to jump into your favorite game faster than ever before. So if you’re tired of waiting for slow load times and sluggish performance, it’s time to make the switch to an SSD and level up your gaming experience.

    Happy gaming!”

    FAQs

    What is an SSD?
    An SSD is a type of storage device that uses flash memory to store data.

    Why would I want to add a game to my SSD?
    Adding a game to your SSD can improve its load times and overall performance.

    How do I check if my computer supports SSDs?
    Check your computer’s specifications or consult with a professional to determine if your computer supports SSDs.

    How do I physically install an SSD into my computer?
    Consult your computer’s manual or seek assistance from a professional to properly install an SSD into your computer.

    How do I transfer a game from my HDD to my SSD?
    You can transfer a game from your HDD to your SSD by copying the game files from your HDD to your SSD and then pointing your game launcher to the new location.

  • Boost Your Borderlands 3 Gameplay: Learn How to Transfer Characters to SSD

    If you’re a fan of Borderlands 3, you know how important it is to have a fast and reliable gaming experience. However, if you’re playing the game on a slow hard drive, you might be experiencing long loading times and frequent lag. The good news is that you can transfer your Borderlands 3 characters to an SSD to significantly improve your gaming experience.

    In this article, we’ll explore the process of transferring your characters to an SSD and the benefits that come along with it. By the end of this read, you’ll have a clearer understanding of how to optimize your gameplay and get the most out of your Borderlands 3 characters. So, grab your favorite beverage and let’s dive right in!

    Requirements for transfer

    Borderlands 3 has grown in popularity over the years, making it important for players to transfer their characters to SSD. To do this, players need to ensure they have the right equipment and meet specific requirements. The first step is to have an SSD with enough storage space to accommodate the game’s file size.

    It’s important to note that the process can take up a significant amount of time, so players need to be patient. Another crucial requirement is to ensure all necessary game updates are completed before the transfer process starts. Failure to do this may cause complications during the transfer, ultimately leading to data loss.

    Furthermore, players need to have a stable internet connection to avoid any interruptions, especially during the download and upload process. Once all these requirements are met, players can successfully transfer their characters to SSD without any difficulties, ensuring they never lose in-game progress again.

    Check your computer’s specs

    When it comes to transferring files from one computer to another, it’s important to make sure your computer meets the minimum requirements to complete the transfer. Before you start the transfer process, check your computer’s specifications, such as the operating system, processor speed, available storage, and memory. Depending on the size and type of files you want to transfer, you’ll need enough storage and memory to complete the transfer without any issues.

    Additionally, your computer’s operating system and processor speed should be compatible with the transfer software you plan to use. It’s always helpful to double-check your computer’s specifications before starting any transfer to ensure a smooth and successful process. By doing so, you can avoid any unnecessary errors or delays in transferring your files.

    borderlands 3 how to transfer charicters to ssd

    Make sure SSD has enough space

    When it comes to transferring files to a new SSD, it’s essential to ensure that it has enough space. After all, SSDs can have varying storage capacity, and it’s crucial to check whether the new drive can accommodate all the files you want to transfer. One way to ensure this is by checking the space requirements for all your files and applications before making the transfer.

    If the new SSD lacks sufficient storage space, it may fail to accommodate some files, which can lead to data loss. Therefore, it’s crucial to assess your storage needs and choose an SSD with adequate free space. This way, you can ensure that your files are secure and easily accessible.

    So, before transferring any files to your new SSD, ensure that it has enough space, and you won’t run out of storage in the future.

    Backing up your character

    Backing up your character in Borderlands 3 can be a lifesaver, especially if you’re a seasoned player with a lot of hard-earned loot and progress. One effective way to do this is by transferring your characters to an SSD, which not only provides faster load times but also protects your progress from potential data loss. To make this happen, you’ll need to connect your external SSD to your PC or console and then copy your saved game data from your internal hard drive.

    The exact process may vary depending on your platform, but it’s usually a simple matter of selecting the right options from the settings menu. Be sure to check your manufacturer’s instructions or online forums for additional guidance if you’re not sure where to start. By taking the time to back up your characters, you can rest easy knowing that your hard work won’t be lost to the digital void.

    Locating character files on PC

    If you’re a PC gamer, you may be wondering where your character files are located and how to back them up. Thankfully, locating your character files is a fairly straightforward process. The exact location varies depending on the game, but most games store character files in a folder within the game’s installation directory.

    To find the folder, navigate to the game’s installation directory and look for a folder with your character’s name or the name of the game. It’s also a good idea to back up your character files regularly to avoid losing progress in the event of a computer crash or other issue. To do this, simply copy the relevant files to an external hard drive, cloud storage service, or another location on your computer.

    It may take a little extra effort, but backing up your character files is a small price to pay for peace of mind knowing your progress is safe.

    Copying the files to SSD

    So you’ve finally upgraded to an SSD and want to copy your character files over for safekeeping? Great idea! Backing up your character files is essential to ensure that you don’t lose all your hard-earned progress in your game. Firstly, you need to locate your character files, which are usually stored in the game’s installation folder. Once you’ve located the folder, you can then simply copy and paste it onto your SSD.

    However, it’s always a good idea to create a separate folder on your SSD specifically for your character backups. This helps to keep all your important backups in one place for quick and easy access. By taking the time to transfer your character files to your new SSD, you’ll have peace of mind knowing your progress is secure and ready to access whenever you need it.

    Loading character from SSD in-game

    If you’re looking for a way to speed up the loading process of your Borderlands 3 game, transferring your character to an SSD is the solution you’re looking for. Moving your character from the game’s default location on your hard drive to an SSD will help you load the game and your saved game data a lot faster. To get started, all you have to do is locate your saved character files on your hard drive, then transfer them to your SSD.

    This may sound like a daunting task, but it’s actually quite simple. Just make sure you have enough space on your SSD to accommodate your saved game data. Once you’ve transferred your files, load up Borderlands 3 and enjoy the improved load times! Don’t let slow loading times hold you back from enjoying your gaming experience to the fullest.

    Try moving your character to an SSD and see the difference for yourself!

    Opening Borderlands 3

    As a Borderlands 3 player, you’re probably always looking for ways to optimize your gameplay experience, and one way to do that is by loading your character from an SSD in-game. This will drastically reduce your loading times, giving you more time to spend wreaking havoc on the Pandoran wastelands. SSDs are faster and more reliable than traditional hard drives, allowing you to access your saved data in an instant.

    With an SSD, you’ll never have to worry about waiting for long load times again. Not to mention, it’ll give you an edge in multiplayer matches by allowing you to get back into the game faster than your opponents who are using traditional hard drives. So, if you want to take your Borderlands 3 experience to the next level, consider upgrading to an SSD and get ready to enjoy faster loading times and quicker access to your character.

    Selecting ‘Import Character’

    When playing games on your PC, it’s common to experience slow loading times and delays, especially when trying to access a character that’s saved on your SSD. Thankfully, many games come equipped with an “import character” feature that allows you to swiftly and seamlessly access the character you want to play with. This feature is especially useful if you have multiple characters and want to switch between them quickly.

    When selecting the “import character” option, your game will look for your saved character files on your computer and load them up to the game. This process is speedy and efficient, ensuring that you spend more time playing and less time waiting for your game to load. So next time you’re playing a game with saved characters, look for the “import character” option to make your gaming experience smoother and faster!

    Choosing character from SSD

    If you’re playing a game that allows you to create and customize your character, you’ll want to make sure you can easily access it every time you play. One way to do this is by choosing to load your character from a solid-state drive (SSD). An SSD can offer much faster load times than a traditional hard drive, meaning you’ll be able to jump into your game and start playing much more quickly.

    If you’re not sure how to set this up, check your game’s settings or consult with the manufacturer to ensure your character is saved on your SSD and can be easily loaded whenever you start up the game. A fast and reliable SSD can make all the difference in how smoothly your game runs and how much you enjoy your gaming experience.

    Tips for optimizing performance on SSD

    If you’re a Borderlands 3 player looking to transfer your characters to an SSD to optimize performance, there are a few things you should keep in mind. First, make sure your SSD has enough space for all the game’s data. You don’t want to run out of room mid-transfer.

    Second, consider the speed of your SSD. The faster the read and write speeds, the better your game will perform. Finally, make sure you properly clone or transfer the game files to the SSD, otherwise you may encounter issues or lose progress.

    By following these tips, you can ensure a smooth and efficient transfer of your Borderlands 3 characters to your SSD.

    Keeping SSD organized

    If you’re using an SSD (solid-state drive) instead of a traditional hard drive, you already know how much faster your computer can be. But to ensure your SSD keeps performing at its best, it’s important to keep it organized. One of the easiest ways to do this is to avoid having too many files stored on your SSD.

    While SSDs are much faster than hard drives, the more files you have stored on them, the longer it takes them to find and access the data you need. Another tip for optimizing SSD performance is to regularly run disk cleanup tools. These tools can help you identify and delete unnecessary files, freeing up space on your SSD and allowing it to perform faster.

    Lastly, consider using third-party software to manage your SSD settings. This type of software can help you optimize your SSD for maximum performance, reducing the risk of wear and tear and ensuring your SSD lasts longer. By following these tips, you can keep your SSD running smoothly and enjoy lightning-fast performance.

    Avoiding large unnecessary files

    If you’re looking for ways to optimize the performance of your SSD, then one important factor to consider is avoiding large, unnecessary files. While SSDs are known for their fast read and write speeds, they can still be slowed down if they are filled with large files that aren’t needed. To keep your SSD running smoothly, it’s a good idea to regularly clear out any files that you no longer need, such as old backups, temporary files, and large media files that you’ve already watched or listened to.

    By keeping your SSD free of unnecessary files, you can help ensure that it continues to perform at its best and doesn’t become bogged down over time. So, take the time to review your files and do some spring cleaning on your SSD to help keep it running smoothly for years to come.

    Conclusion

    In the world of Borderlands 3, speed is everything. And that’s why transferring your characters to an SSD is a smart move. You’ll be able to load into the game faster than ever, giving you a leg up on the competition.

    So, don’t be a bandit and stick with your slow hard drive – make the switch to an SSD today and watch your gameplay take off faster than a Skag chomping on a juicy bone!”

    FAQs

    Can I transfer my Borderlands 3 character from my hard drive to an SSD?
    Yes, you can transfer your Borderlands 3 character to an SSD by copying the save files from your hard drive to your SSD.

    How do I transfer my Borderlands 3 character to an SSD?
    To transfer your Borderlands 3 character to an SSD, you first need to locate the save files on your hard drive. They are usually located in the “Documents” folder. Once you have found the save files, simply copy and paste them to your SSD.

    Will transferring my Borderlands 3 character to an SSD improve game performance?
    Yes, transferring your Borderlands 3 character to an SSD can improve game performance by reducing load times and decreasing the time it takes for the game to access the save files.

    Can I play Borderlands 3 directly from my SSD after transferring my character?
    Yes, you can play Borderlands 3 directly from your SSD after transferring your character. You just need to make sure that you have installed the game on your SSD and set your game launcher to look for the save files on your new storage device.