Author: David L. Lynn

  • Upgrade your Windows 10 speed: Essential steps for moving to SSD!

    Have you ever dreamed of ignition speed every time you power on your computer? Or are you tired of waiting for your programs to load endlessly? Then it might be time to consider moving your operating system to an SSD. Solid-state drive (SSD) is a data storage device that uses an array of flash memory to store data and deliver faster access times than traditional hard drives. In this blog, we’ll discuss how to move Win 10 to SSD and unleash the full potential of your computer.

    If you’re pondering whether it’s worth the effort or not, the answer is a resounding yes. Migrating to an SSD not only gives you faster boot-up and shutdown times but also loads applications and programs promptly. More importantly, it maximizes your computer’s performance and productivity with an overall smoother user experience.

    However, moving the operating system and all your data can seem like a daunting task, which leads to most users sticking to their old sluggish hard drives. But fear not, we’re here to break down the process into a few simple steps. Whether you’re an experienced tech wiz or a beginner, our guide will help you move Windows 10 to SSD seamlessly.

    We’ll explore the different methods available, including the built-in Windows tool and third-party applications. We’ll also address any potential issues like compatibility, driver installation, and data backup. So, grab your coffee, and let’s get started on maximizing your computer’s potential.

    Check SSD Compatibility

    If you’re wondering how you can move your Win 10 to SSD, the first thing you need to do is check whether your SSD is compatible with your PC. This involves checking the type of SSD connection your motherboard supports and ensuring your SSD uses the same standard. If your motherboard only supports SATA connections, you’ll need to get an SSD that uses the same connection type.

    Alternatively, if your motherboard supports NVMe connections, you can get an NVMe SSD for faster data transfer speeds. It’s essential to ensure compatibility before moving your Windows 10 to SSD to avoid any issues or inconvenience down the line. Once you’ve confirmed compatibility, you can proceed with the migration process.

    Check Size and Connector Type for Compatibility

    When it comes to upgrading your computer’s hard drive to a solid-state drive (SSD), there are a few things to consider. One of the most important aspects is SSD compatibility, which means checking the size and connector type that your computer is equipped with. You wouldn’t want to purchase an SSD that is physically too large or incompatible with your computer’s connection.

    It’s important to do your research and find the right fit for your needs. You may need to take a look at your computer’s manual or do some online research to determine what size and connector type your computer uses. The main keyword used organically here is “SSD compatibility”.

    By checking for compatibility, you can help ensure a smooth and hassle-free upgrade experience. So, be sure to double-check before making any purchases.

    how can i move my win 10 to ssd

    Verify BIOS Compatibility

    When it comes to upgrading your computer’s storage with an SSD, one important factor to consider is its compatibility with your system’s BIOS. Your computer’s BIOS (Basic Input/Output System) is responsible for managing hardware communication and settings during boot-up. Without a BIOS that supports your new SSD, you risk compatibility issues and even damage to your hardware.

    To verify that your SSD is compatible with your computer’s BIOS, you’ll need to check for updates and ensure that your system meets the necessary requirements. Upgrading your BIOS to the latest version can help ensure that your new SSD will run smoothly and efficiently. So, before investing in a new SSD, be sure to check its compatibility with your system’s BIOS to avoid any potential headaches down the line.

    Back Up Your Data

    If you’re wondering how you can move your Win 10 to SSD, the first thing you need to do is back up your data. This is because moving your operating system to a new drive involves some level of risk, especially if you’re not familiar with the process. To avoid losing important files, documents, and other data, it’s important to make a backup copy before you proceed.

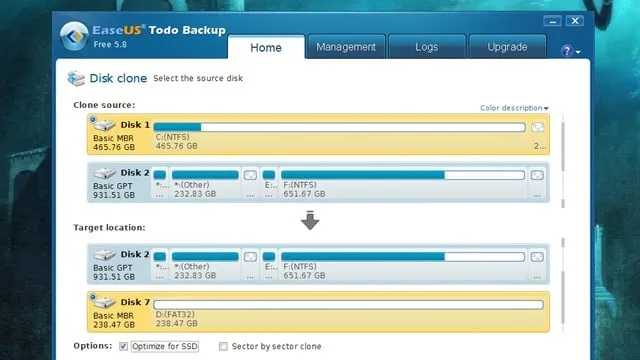
    You can do this using a cloud storage service like OneDrive or Google Drive, an external hard drive, or even a USB flash drive. Once you’ve backed up your data, you can then proceed to clone or migrate your Win 10 to the SSD using a software tool such as EaseUS Todo Backup, Macrium Reflect, or Clonezilla. Just make sure to follow the instructions carefully to avoid any errors or issues during the process.

    With a little bit of patience and effort, you can successfully transfer your Win 10 to SSD and enjoy faster performance and improved reliability on your computer.

    Transfer Files to External Drive

    Backing up your data is an essential step to protect your files from loss or damage. One way to back up your data is by transferring your files to an external drive. This process is simple, and it can save you from losing your important files in case your computer crashes or gets stolen.

    To transfer your files, simply plug in your external drive to your computer’s USB port and wait for the computer to detect it. Then, locate the files you want to transfer and drag them to the external drive’s folder. Make sure to organize your files in a way that makes it easy to find them in the future.

    It’s recommended to use an external drive that has a large storage capacity to accommodate all of your files. This way, you won’t have to worry about running out of space. By taking the time to back up your data, you can have peace of mind knowing that your files are safe and secure, and you can access them at any time.

    Create System Image

    Creating a system image is a crucial part of backing up your data. It’s like taking a snapshot of your entire system, including the operating system, settings, programs, and files. By doing so, you can restore your system to its previous state if something goes wrong.

    For instance, if your computer crashes or gets infected with malware, you can use the system image to restore all your data and settings without losing anything. To create a system image, you can use the built-in Windows Backup and Restore tool or third-party software like EaseUS Todo Backup, AOMEI Backupper, or Macrium Reflect. The process may take a while, depending on the size of your system and the speed of your backup drive.

    Once created, make sure to store your system image in a secure location, like an external hard drive or cloud storage, and update it regularly. With a system image at your disposal, you can rest assured that your data is safe and your system can be restored quickly and easily.

    Clone Your Hard Drive

    Are you wondering how to move your Windows 10 operating system to an SSD? One method that you can try is by cloning your hard drive. Cloning involves creating an exact copy of your original hard drive onto the new SSD. This ensures that all your files, drivers, and settings are identical and your system will function the same way as before.

    You can use various free and paid software tools available online to perform the clone. Once the clone is complete, you can replace your old hard drive with the new SSD and your computer will start up faster and perform better overall. With this method, you can seamlessly transfer your operating system to an SSD without any data loss or hassle.

    Give it a try and experience the benefits of an SSD for yourself!

    Download and Install SSD Migration Software

    When it comes to upgrading your computer’s hard drive, cloning your existing drive to a new SSD can save you time and effort. However, this process requires you to use SSD migration software to ensure that everything gets transferred over correctly. Fortunately, downloading and installing this software is a straightforward process that anyone can do, regardless of technical expertise.

    The first step in cloning your hard drive is to search for SSD migration software online and find a reputable provider. Once you’ve found a suitable program, you’ll need to download it onto your computer and install it. Most applications offer a step-by-step guide to assist with installation, so be sure to follow these instructions closely.

    Once the software is installed, you’ll need to connect both your existing hard drive and your new SSD to your computer. The SSD migration tool will then ask you to select the source drive (your current hard drive) and the destination drive (your SSD). From there, the application will automatically begin copying all of the data from your old drive to your new one.

    The process of cloning your hard drive may take a bit of time, depending on the size of your hard drive. However, the end result is well worth it, as you’ll have a faster, more reliable SSD to work with. So, don’t let technical jargon or confusion deter you from upgrading your hard drive.

    Just find a reliable SSD migration tool, follow the instructions, and enjoy the benefits of a faster, smoother computing experience. Keyword: SSD migration software

    Connect SSD to Your Computer

    If you’re thinking of upgrading your hard drive to a solid state drive (SSD), there are many benefits to doing so. SSDs are faster, more reliable, and use less power than traditional hard drives, making your computing experience smoother and more efficient. However, the process of transferring your existing data onto your new SSD can seem daunting.

    One option is to clone your hard drive, which essentially creates a copy of your entire drive onto the new SSD. This can be done using specialized software, and is relatively straightforward. By cloning your hard drive, you’ll be able to preserve all your files, applications, and settings, without the need for a fresh installation of your operating system.

    Overall, connecting an SSD to your computer can greatly improve your computer’s performance, and cloning your hard drive is a great way to make the transition as seamless as possible.

    Create a Clone of Your Hard Drive

    Cloning your hard drive may seem like a daunting task, but it’s a great method to secure your data and prevent potential loss. When you clone your hard drive, you create an exact copy of all the data on it, including your operating system, settings, files, and applications. It’s an efficient way to migrate to a new computer, replace a failing hard drive, or create a backup of your data.

    In short, cloning your hard drive can save you from a lot of trouble and headache in the long run. There are many software options available online that can help you clone your hard drive, such as Clonezilla, EaseUS, and Acronis True Image. With these tools, you can clone your hard drive with just a few clicks, making the process easy and straightforward.

    It’s definitely a step worth taking to ensure that your data is always safe and sound.

    Install Your SSD

    If you’re looking to transfer your Windows 10 operating system to your new SSD (solid-state drive), there are a few methods you can use. One of the most convenient options is to use a cloning software. This will make an exact copy of your current hard drive to your new SSD.

    However, before you do this, you’ll need to clear out any unnecessary files to ensure a smooth transfer process. Another option is to do a fresh install of Windows 10 on your SSD, which can be done by creating a bootable USB drive with the Windows 10 installation media. Once you’ve installed Windows 10 on your SSD, you’ll then need to transfer all your important files and applications over to the new drive.

    Whichever method you choose, it’s important to make a backup of your important data before starting the transfer process. By following these steps, you’ll be able to enjoy the speed and performance benefits of your new SSD with your Windows 10 operating system installed seamlessly.

    Physically Install Your SSD

    Installing your SSD is a relatively simple process that anyone can do. First, you need to locate the hard drive bays in your computer case. Then, gently remove the cables from your old hard drive and unscrew it from the bays.

    Once you’ve removed it, you can place your new SSD in the same slots and secure it with screws. Make sure to connect the appropriate cables to your new SSD and power it up to ensure it’s working correctly. It’s essential to take care and handle your SSD with caution as they are sensitive and prone to physical damage.

    By following these steps, you can quickly increase the speed and performance of your computer. So, what are you waiting for? Get your hands on an SSD and give your computer an extra boost!

    Change Boot Order in BIOS

    If you’ve installed a shiny new SSD and you’re ready to start using it, you’ll need to adjust your boot order in the BIOS so that your computer knows to boot from the SSD instead of the old hard drive. The process for changing the boot order can vary depending on your motherboard, but it typically involves pressing a key (often F2 or Delete) during boot-up to enter the BIOS settings. From there, you’ll navigate to the Boot tab and look for an entry that corresponds to your SSD.

    Once you’ve found it, move it to the top of the list so that it’s the first device the computer tries to boot from. Don’t forget to save your changes before exiting the BIOS! With the boot order adjusted, you should be able to enjoy the increased performance and storage capacity of your new SSD.

    Finishing Touches

    If you’re looking to speed up your computer, one of the easiest ways is to move your operating system onto an SSD. Thankfully, moving your Windows 10 to an SSD is a fairly straightforward process. First, make sure you have a larger SSD than the capacity of your operating system.

    You can use a cloning software to copy everything onto the new drive. This process should take a few minutes, depending on the size of your hard drive. Once the cloning is complete, shut down your computer and replace the old hard drive with your new SSD.

    Once you boot back up, you should see improvements in startup and overall performance. Don’t forget to update the firmware of your SSD to ensure optimal performance. By doing these simple steps, you can enjoy faster processing without having to buy a new computer.

    Remove Old Hard Drive

    When it comes to finishing touches after removing an old hard drive from your computer, the last step is to secure it properly. You don’t want sensitive data falling into the wrong hands, so it’s important to dispose of it in a responsible manner. Some ideas include physically destroying the drive, wiping it clean using special software, or using a professional electronics recycling service.

    Whichever method you choose, be sure to follow all necessary safety precautions. With this final step, you can rest assured that your computer is ready for a new, upgraded hard drive that will keep your data safe and secure. Remember, taking the time to properly dispose of your old hard drive is essential for protecting your privacy and ensuring the security of your personal and business information.

    Enable TRIM

    Enabling TRIM is one of the essential finishing touches that should be implemented in any new Mac setup. TRIM is a command that allows your operating system to communicate with your solid-state drive (SSD) and optimize its performance by freeing up space on the drive. When TRIM is enabled, your Mac can identify blocks of data that are no longer in use and mark them for deletion, which prevents the drive from slowing down over time.

    To enable TRIM, navigate to the System Preferences and click on the Security & Privacy tab. Then select the FileVault option and click on the Turn On FileVault button to encrypt your hard drive. Once that’s done, download and install TRIM Enabler from a trusted source, and follow the on-screen instructions to enable TRIM on your Mac.

    With TRIM enabled, your SSD will perform faster, and your Mac will be better optimized to handle heavy workloads.

    Enjoy Your Faster System!

    Congratulations, you’ve completed all the essential steps to speed up your system! But before you start celebrating, let’s add some finishing touches to make sure your faster system is performing at an optimal level. Firstly, make sure your system is up-to-date with the latest software updates and drivers. These updates usually contain performance enhancements and bug fixes, ensuring your system operates smoothly.

    Secondly, organize your files and folders properly to avoid clutter and unnecessary load on your system. Delete any programs or files you no longer use or need and move large files to an external drive. Lastly, maintain your system’s hardware by cleaning out any dust or debris regularly from the fans and vents.

    By following these additional steps, you can enjoy your faster system for an extended period.

    Conclusion

    Moving your Win 10 to SSD is like upgrading from a bicycle to a sports car – it’s faster, smoother, and all around better. With a wide range of tools and techniques at your disposal, making the switch has never been easier. So, whether you’re looking to boost performance, free up space, or simply indulge in a new tech toy, SSDs are the way to go.

    Trust us, your computer (and your sanity) will thank you.”

    FAQs

    What are the benefits of moving my Windows 10 to an SSD?
    Moving your Windows 10 to an SSD can lead to faster boot times, improved system performance, and overall faster access to files and programs.

    Can I transfer my entire Windows 10 system to an SSD?
    Yes, you can transfer your entire Windows 10 system to an SSD using cloning software.

    Is it possible to move my Windows 10 to an SSD without reinstalling programs and applications?
    Yes, using cloning software can transfer your entire system to an SSD without requiring you to reinstall programs and applications.

    What should I do before moving my Windows 10 to an SSD?
    Before moving your Windows 10 to an SSD, make sure to back up all important files and data, and create a recovery drive in case of any issues during the transfer process.

    How do I install my newly cloned Windows 10 system onto the SSD?
    Once the cloning process is complete, you can physically install the SSD into your computer and set it as the boot drive in the BIOS settings. Then, your newly cloned Windows 10 system will be ready to use on the SSD.
  • How to Speed Up Your Gaming Experience: Transfer Games from HDD to SSD!

    Do you want to improve your gaming experience by transferring your games from HDD to SSD? Upgrading to an SSD can significantly increase the speed and performance of your computer, making your games run smoother and load faster. However, transferring games to an SSD can seem like a daunting task, especially for those who are not tech-savvy. In this blog post, we will guide you through the process of transferring your favorite games onto an SSD, so you can enjoy faster load times and better gaming performance.

    It’s time to take your gaming to the next level!

    Check SSD Space and Compatibility

    If you’re looking to transfer a game from your HDD to SSD, there are a few things you need to keep in mind. First, you’ll need to check the available space on your SSD. Depending on the size of the game you want to transfer, your SSD might not have enough room for it.

    If that’s the case, you’ll need to free up some space or consider getting a larger SSD. Additionally, you’ll want to make sure that your game is compatible with your SSD. Some older SSDs might not be compatible with newer games, so it’s important to check beforehand.

    If you’re unsure about compatibility, it’s always a good idea to do some research online or reach out to the manufacturer. Overall, with a bit of planning and preparation, transferring a game from your HDD to SSD can be a straightforward process that can help improve game performance and load times.

    Find Suitable Game Folder Size

    When it comes to installing your favorite games on your computer, it’s important to make sure that you have enough space available to avoid any interruptions during gameplay. This means not only checking the available storage on your SSD but also considering the game folder’s compatibility with your system. One way to find a suitable game folder size is by checking the game’s recommended storage requirements and comparing them to your available disk space.

    It’s also important to consider other factors that may affect your game’s performance, such as installed programs and running processes. By taking the time to assess these factors, you can ensure that your game runs smoothly and without any lags or crashes while you’re in the middle of the action. So, before you start your next gaming session, make sure to check your SSD space and compatibility with the game folder for an uninterrupted and immersive gameplay experience.

    how can i transfer a game from hdd to ssd

    Backup Game Files

    If you’re looking to transfer your favorite game files from your HDD to an SSD, you’ve come to the right place. The process is relatively simple, but it’s important to make sure you’ve backed up your current game files before attempting any transfers. One of the easiest ways to do this is to locate your game files in your Steam or Origin library and transfer them to an external drive or cloud-based storage service.

    Once you’ve successfully backed up your game files, plug in your SSD and move the backed-up files from your external drive to the new SSD. Once transferred, you should be able to access your games from the new drive and enjoy lightning-fast game load times and smoother gameplay. It’s important to note that this process may vary slightly depending on the specific brand of SSD you’re using, so it’s always a good idea to consult your SSD manufacturer’s manual or online resources for more detailed instructions.

    Create a Backup Folder

    Creating a backup folder for your game files is a wise decision that can save you a lot of trouble and frustration in the long run. It’s common for games to crash, glitch, or even be lost due to hardware issues, and without a backup, you could lose all your precious progress. So, start by creating a separate folder on your computer, external hard drive, or cloud storage service to store your game files.

    Name the folder something like “Game Backups” or “Saved Games” to make it easy to remember. When it’s time to backup your game, simply copy and paste the game files to this folder. In case something goes wrong, you can always restore the files from your backup folder and continue playing like nothing happened.

    Don’t risk losing hours of gameplay, create a backup folder today and ensure your gaming experience remains enjoyable.

    Copy Game Files to the Backup Folder

    Backing up game files is a crucial step to ensure you won’t lose your beloved games in case of system failure or accidental deletion. To create a backup folder, first, create a new folder either on your desktop or in a different directory on your computer. Choose a name that’s easy to remember, such as “Game Backups.

    ” Next, navigate to the location where the game files are stored. Typically, game files are located in the “Program Files” folder or the “Documents” folder. Copy and paste the game files into your new backup folder.

    You may also want to include any other important files, such as save files or configuration settings. Remember to update your backup folder regularly, especially after installing new games or making significant changes to existing ones. By taking this simple step, you can rest easy knowing that your game collection is safe and secure.

    Move Game Files to SSD

    If you’re looking to speed up your PC gaming experience, transferring game files from your HDD to your SSD is a great way to do it. But how can you transfer a game from HDD to SSD? First, you need to make sure your SSD has enough space to accommodate the game files. Once you’ve confirmed that, you can simply copy the game folder from your HDD to your SSD.

    To do this, open the game folder on your HDD by navigating to the directory where the game is installed. Then, copy the folder to your SSD by navigating to the directory where you want to store the game on your SSD and pasting the folder. Be sure to update any shortcuts and launchers to point to the new location on your SSD.

    Voila! Your game is now stored on your SSD, ready to load lightning-fast during gameplay.

    Locate Game Folder in HDD

    If you’re looking to optimize your gaming performance, moving your game files to an SSD is one of the most effective ways to do so. However, locating your game folder on your HDD can be a bit of a challenge. To do this, you’ll need to open up your file explorer and navigate to the folder that contains your game files.

    Once you’ve located the game folder, you can then simply right-click on it and select “Properties.” From there, you can select the “Location” tab and choose the location on your SSD where you want to move the game files to. This will copy the files over to your SSD, and you can then delete the original files from your HDD to free up space.

    By doing this, you’ll be able to enjoy faster load times and smoother gameplay, making your gaming experience all the more enjoyable.

    Copy Game Folder to SSD

    If you’ve just upgraded your PC’s storage system with an SSD (solid-state drive), then congratulations – you’re in for a noticeable speed boost in your system’s performance. However, if you have a collection of games installed on your old hard drive, you’ll want to move them over to your new drive to enjoy the full benefits of your upgraded system. One way to do this is by copying the game folder to your SSD.

    This process involved simply locating the game folder in its current location, right-clicking it, selecting “Copy,” and then pasting it into your SSD’s designated game folder. It may take some time for the files to transfer, but once completed, you can enjoy faster load times and smoother gameplay. So if you want to upgrade your gaming experience, make sure to move your game files to your new SSD.

    Update Registry Settings

    If you’re looking to transfer a game from your HDD to SSD, there are a few steps you can take to ensure a smooth and successful transfer. One important step is to update registry settings in your computer’s system. This will help your operating system recognize the new location of the game files and make sure they’re properly installed on your SSD.

    To do this, go to your computer’s start menu and type “regedit” into the search bar. This will take you to the registry editor. From there, navigate to the “HKEY_LOCAL_MACHINE\SOFTWARE\Microsoft\Windows\CurrentVersion” folder and find the “ProgramFilesDir” key.

    Change the value to the new location of your game files on the SSD, and then restart your computer. Once you’ve completed these steps, your game should be successfully transferred to your SSD. Keep in mind that some games may require additional steps or settings adjustments to work properly on a new drive, so be sure to check the game’s documentation or online forums for specific instructions.

    Find Game Registry Entries

    If you’re experiencing issues with your computer games, it might be time to take a look at your registry settings. The registry is essentially a massive database that stores settings and configurations for your computer, including your installed games. By finding and updating the registry entries for a particular game, you can address any errors or performance issues that might be holding you back.

    The process involved in updating your registry can be a little complex, so it’s important to follow instructions carefully. However, once you have a handle on the process, you’ll see significant improvement in your gameplay experience. Whether you’re a casual gamer or a serious enthusiast, keeping your registry settings up-to-date is a must.

    Change Registry Entries to SSD Location

    If you’ve recently upgraded your computer to an SSD, you’ll want to ensure that your registry settings are updated to reflect the change. The registry is a critical part of your Windows operating system, and it contains all the settings and configurations for your computer’s hardware and software. When you install an SSD, you’ll need to make some changes to your registry to ensure that your computer is optimized for speed and performance.

    The process of updating your registry settings is straightforward, but it’s crucial to do it correctly to prevent any issues with your system. By updating your registry settings, you’ll be able to enjoy the benefits of your new SSD, including faster boot times, increased system responsiveness, and quicker program load times. So, don’t forget to update your registry and get the most out of your SSD upgrade.

    Test the Game on SSD

    If you’re looking to experience faster load times and improved gameplay performance, transferring your game from an HDD to an SSD might be the solution you’re looking for. But, how can you do it? Well, the process may vary slightly depending on the platform you’re using, but generally, you can start by installing your SSD onto your system and formatting it. Once done, locate the game you want to transfer in your HDD, and simply drag and drop it into the SSD.

    Depending on the game size, the transfer may take a few minutes or even hours, so be patient and let it run its course. Once the transfer is complete, launch the game from the SSD and see how it performs. You’ll be able to see a significant improvement in loading times and overall gameplay.

    By transferring games from an HDD to an SSD, you can not only enhance your gaming experience, but also enjoy the benefits of faster boot time, data transfer rates, and increased system responsiveness.

    Conclusion

    In conclusion, transferring a game from an HDD to an SSD can be a game-changer for your gaming experience. With faster loading times, smoother gameplay, and improved overall performance, it’s like upgrading to a Ferrari from a tricycle. So, don’t be afraid to take the leap, because with a little bit of tech knowledge and a lot of determination, you too can enjoy the benefits of SSD gaming.

    Plus, who doesn’t love a good upgrade? It’s like leveling up your technology skills and impressing all your friends with your tech prowess.”

    FAQs

    What is the benefit of transferring a game from HDD to SSD?
    Transferring a game from HDD to SSD can significantly increase loading times, resulting in a smoother and faster gaming experience.

    How do I transfer a game from HDD to SSD?
    You can transfer a game from HDD to SSD by locating the game files in the HDD, copying them to the SSD, and then reinstalling the game on the SSD.

    Can I transfer multiple games from HDD to SSD at once?
    Yes, you can transfer multiple games from HDD to SSD at once by copying all the game files to the SSD and then reinstalling the games on the SSD.

    Will transferring a game from HDD to SSD affect my game settings or progress?
    No, transferring a game from HDD to SSD will not affect your game settings or progress as all the game data is stored in the same files that are being transferred. However, it’s always recommended to back up your game saves before making any changes.

  • Effortlessly Transfer Your Data: A Step-by-Step Guide on How to Save Things to Your New SSD

    Upgrading to a new SSD can significantly improve the overall performance of your computer. It’s like giving your old car a turbocharger! However, before you start enjoying the lightning-fast speed of your new SSD, you need to transfer your data over from the old drive. This process might seem daunting, but it’s actually quite simple with the right tools and methods.

    In this blog, we’ll guide you on how to save data to a new SSD and ensure your files and applications are ready to go when you boot up your computer. So, grab your favorite beverage and let’s get started!

    Preparing Your System

    If you’re looking to save things to a new SSD, the first step is to prepare your system for migration. First, make sure your new SSD is compatible with your current system. You can check this by referencing the specifications of both your old and new SSDs.

    Next, create a backup of your current data on an external drive, as you will need to reinstall your operating system and applications onto the new SSD. You can use software like Macrium Reflect or Acronis True Image to create a full backup of your old drive. Once you have your backup saved, you can then install your new SSD into your system and boot from a USB or DVD with your operating system installation media.

    From there, you can select to install your operating system onto the new SSD and transfer your backed-up data onto it. By following these steps, you can safely and efficiently save things to your new SSD without losing any data or experiencing any technical difficulties.

    Create a Backup of Your Data

    When it comes to creating a backup of your data, the first step is to prepare your system. This means taking a close look at your computer or device to ensure that it is running smoothly and that there are no issues that could potentially compromise your files. You may need to update your operating system or software to ensure that everything is compatible and up-to-date.

    Additionally, it’s important to make sure that you have enough storage space to create a backup of all your important files. It’s also a good idea to run a virus scan and remove any malicious software before beginning the backup process. By taking these steps, you can ensure that your system is in good shape and ready to tackle the task of creating a backup of your data.

    how can i save things to new ssd

    Plan the Data Transfer

    To prepare for a successful data transfer, it is crucial to make sure your system is ready. One important step is to ensure that all hardware components are in good working condition. This includes checking devices such as hard drives, network interfaces, cables, and power sources.

    Additionally, you should have the latest software and operating system updates installed, as they often include bug fixes and security patches that can prevent issues during the transfer process. It’s also recommended to backup all important data before starting the transfer, just in case anything goes wrong. By taking these preparation steps, you can minimize the risk of errors or data loss during the transfer and ensure a smooth and efficient process.

    Transferring Data

    Are you planning to upgrade your computer’s hard drive to a solid-state drive (SSD)? It’s a great idea, as SSDs are faster, more reliable, and consume less power than traditional hard drives. But the question remains – how can you save your files and data from your old hard drive to the new SSD? The easiest way to do this is by cloning the old drive onto the new one. You can use a third-party software like EaseUS or Acronis to clone your hard drive.

    These tools will help you transfer everything from the old hard drive to the new SSD, including the operating system, files, and settings. After the cloning is complete, you can simply replace the old hard drive with the new SSD, and everything will work as it did before – only faster and with more efficient performance. Remember to back up your data before you start the cloning process and ensure you have enough space on the new SSD to accommodate everything.

    With this method, you can upgrade to an SSD without losing any of your files or data.

    Using the Built-in Windows Transfer Utility

    Transferring data from one computer to another can be a daunting task, especially when you have huge amounts of data to transfer. However, Windows operating system comes with a built-in utility called Windows Transfer Utility that can make this process much easier. This tool allows you to transfer files, photos, videos, documents, and even programs from one computer to another.

    All you need is a USB cable and a little bit of patience. First, connect the two computers using the USB cable. Then, open the Windows Transfer Utility on both computers and select which items you want to transfer.

    The utility will then start transferring the files, and you can leave your computers to do their job. Once the transfer is complete, you can disconnect the USB cable, and all your files will be on your new computer. This is a simple and efficient way to transfer data without having to use external devices or cloud storage.

    Using Third-Party Software

    When it comes to transferring data using third-party software, you want to ensure that your information is safe and secure. One important factor to consider is the encryption of your data during transmission. Look for software that uses strong encryption protocols, such as AES 256-bit, to prevent unauthorized access to your files.

    Additionally, consider the file size limitations of the software you are using. Some programs may have a limit on the amount of data you can transfer at once, so be sure to choose software that can handle your needs. It’s also important to read reviews and do your research on the software you are considering to ensure it has a good reputation and a history of successful data transfers.

    By taking these steps, you can feel confident in transferring your important data using third-party software.

    Using Cloud Storage Solutions

    When it comes to transferring data in the cloud, there are a variety of options available to users. Some cloud storage solutions provide direct transfer protocols, while others require the use of third-party applications or integrations. Regardless of the method chosen, it’s important for users to be aware of potential security risks and take measures to protect their data.

    When transferring data to the cloud, it’s recommended to use encryption and strong passwords, as well as regularly backing up data in case of any unforeseen issues. Additionally, users should consider the location of the data center where their data is stored, as some regions may have stricter data protection laws than others. By taking these precautions, users can ensure their data remains secure and easily accessible through cloud storage solutions.

    Finalizing the Transfer

    If you have purchased a new SSD and are wondering how to save your files, photos and other important data, there are a few different methods you can use. One way is to simply drag and drop your files onto the SSD once it is connected to your computer. Alternatively, you can use a cloning software that will transfer all of your files and settings from your old hard drive to your new SSD.

    This is a good option if you want to keep everything exactly the way it was before. Before transferring your files, it’s important to make sure you have enough space on the new SSD for everything you want to keep. You should also make a backup of all your important data, just in case anything goes wrong during the transfer process.

    By taking the time to properly transfer your files to your new SSD, you can ensure that you don’t lose anything important and that your new device is ready to use right away.

    Perform Necessary Updates and Maintenance

    When finalizing a website transfer, it is crucial to perform any necessary updates and maintenance tasks to ensure a smooth transition. This includes updating all software and plugins to their latest versions, checking for broken links or images, and ensuring that any security measures are in place. It is also a good idea to run tests to ensure that everything is working correctly before launching the site on the new server.

    By taking the time to perform these essential tasks, you can minimize any disruption to your site’s functionality and provide a seamless experience for your visitors. Remember, the success of your website transfer depends on how well you prepare and take the necessary steps to ensure everything is running smoothly on the new server.

    Verify the Transfer of Data

    Before finalizing the transfer of data, it’s crucial to verify that all the information has been correctly moved from the original source to the new destination. You can do this by checking the data for any discrepancies or errors that could have occurred during the transfer process. It’s always recommended to have a second set of eyes to verify the transfer of data.

    The last thing you want is for valuable information to be lost or corrupted. If you’re transferring data to a third-party service provider, verify that they’ve received all the data, and there are no missing pieces. Once you’ve verified the data transfer, you can go ahead and finalize the process and ensure that all the information is now securely stored in its new location.

    Remember, always double-check your data transfers to avoid unnecessary stress and potential losses.

    Conclusion

    In summary, saving things to a new SSD is like giving your computer a new set of wheels. It may take a bit of effort to transfer everything over, but the speed and performance boost it provides make it worth it in the end. So don’t hesitate to make the upgrade and give your device the ultimate makeover it deserves!”

    FAQs

    What is an SSD and why should I consider saving to one?
    An SSD (solid-state drive) is a storage device that uses flash memory to store and retrieve data. Compared to traditional HDDs (hard disk drives), SSDs offer faster read and write speeds, which can improve the overall performance of your computer. Additionally, SSDs are less prone to mechanical failure than HDDs, making them a more reliable option for long-term storage.

    How do I install an SSD in my computer?
    The steps for installing an SSD will vary depending on your computer’s make and model, but generally involve opening the case, disconnecting the power and data cables from the existing storage device(s), installing the SSD in an available drive bay, and connecting the power and data cables to the SSD. It’s important to consult your computer’s manual or an online guide for specific instructions.

    Can I transfer my existing files and programs to a new SSD?
    Yes, you can transfer your files and programs to a new SSD using software such as Macrium Reflect or Acronis True Image. These programs allow you to clone your existing drive onto the new SSD, preserving all of your data and applications in the process.

    What size SSD should I get for my needs?
    The size of SSD you need will depend on your specific needs and usage habits. If you primarily use your computer for everyday tasks such as web browsing and word processing, a smaller SSD (250GB-500GB) may be sufficient. However, if you use your computer for more demanding tasks such as gaming or video editing, a larger SSD (1TB or more) may be necessary to store all of your files and programs.

  • Seamlessly Transfer Windows 10 to a New SSD: Your Ultimate Guide for Smooth Performance!

    Ready for a smoother and faster computing experience? It’s time to upgrade your hard drive to a solid-state drive (SSD) which has become a popular option for many Windows users. However, moving all your data from an old hard drive to a new SSD can be a daunting task. But, fear not.

    We have got you covered with this simple guide on how to move Windows 10 to a new SSD. An SSD can greatly improve your system’s performance, boot time, load times, and transfer speeds. And if you’re switching from an old, slower hard drive, then an SSD can feel like a breathe of fresh air.

    But if you’re worried about the complicated process of moving your Windows operating system, programs and files to a new SSD, don’t despair! It’s not as intimidating as you may think. In the next few paragraphs, we will outline a step-by-step guide on how to move Windows 10 to a new SSD without losing any data. We will cover important topics such as cloning your old drive, transferring your Windows 10 OS, troubleshooting, and much more.

    By the end of this article, you’ll have a faster and more efficient computing experience on your new SSD and the knowledge to be able to repeat the process anytime. So, grab your favorite beverage and let’s dive into the simple yet detailed steps on how to move Windows 10 to a new SSD.

    Check SSD Compatibility

    If you’re looking to move your Windows 10 operating system to a new SSD, the first thing you need to check is SSD compatibility. Not all SSDs are created equal, and not all of them are compatible with every computer and operating system. Before you make any purchase, make sure to check your computer’s specifications and the SSD’s specifications to ensure they are compatible with each other.

    You can also use online tools like the Crucial Advisor Tool to help you find the right SSD for your specific computer and OS. Once you’ve found a compatible SSD, you can use migration software like EaseUS Todo Backup or Clonezilla to clone your existing OS to the new SSD. This way, you can transfer all your data and settings to the new SSD without having to reinstall everything from scratch.

    With the right SSD and the right migration software, moving to a new SSD can be a breeze and significantly speed up your computer’s performance.

    Review SSD requirements for Windows 10

    If you’re considering upgrading to an SSD for your Windows 10 system, it’s essential to ensure that your chosen SSD is compatible with your computer’s hardware and software. One of the first requirements you’ll want to check is the type of interface your SSD uses. Most SSDs today use either SATA or PCIe interfaces.

    SATA SSDs offer decent performance and are compatible with older systems but are limited by SATA’s maximum transfer speed. PCIe-based SSDs are much faster, but you’ll need a newer computer to take advantage of their capabilities. Another critical factor to consider is the form factor of your SSD.

    Depending on your computer’s hardware, you may need a 5-inch, M.2, or U.

    2 form factor. Additionally, you’ll want to ensure that your system meets the necessary power requirements to support your new SSD. If you’re not sure which SSD to choose, consult your computer’s manual or contact the manufacturer for more information.

    By checking these requirements before purchasing an SSD, you can avoid compatibility issues and ensure a seamless upgrade process – improving your system’s speed and performance.

    how can i move windows 10 to a new ssd

    Clone Current Drive

    If you’re upgrading your computer’s hard drive or transferring Windows 10 to a new SSD, a software application can help you clone your current drive. This process involves copying the entire contents of one drive to another, including the operating system, system files, personal files, and settings. You’ll need a cloning software, such as EaseUS Todo Backup, Acronis True Image, or Macrium Reflect, and both your source and destination disks need to be connected to your computer.

    Once you have installed and opened the cloning software, select the source disk and destination disk, and start the cloning process. Cloning your drive can save you time and hassle by making the transfer to a new SSD a smooth sailing experience. So, if you’re wondering how can I move Windows 10 to a new SSD, give disk cloning a try.

    Download and install data migration software

    When it comes to upgrading your computer’s storage, the easiest way is to clone your current drive to a new one. This process saves you a great deal of time and effort, especially if you have a lot of important data that you don’t want to lose. First, you need to download and install data migration software, such as Acronis True Image or EaseUS Todo Backup, on your computer.

    Once you have the software, you can connect the new drive to your computer through a USB port or a docking station. Then, use the data migration software to clone your current drive to the new one. This process takes some time, depending on the size of your drive and the speed of your computer, so be patient.

    Once the cloning is complete, you can disconnect the old drive and start using the new one. Remember that cloning your drive does not erase the data on your old drive, so you can keep it as a backup or wipe it clean to use as storage. By following these steps, you can easily upgrade your computer’s storage without losing your important files.

    Connect new SSD to computer

    Connecting a new SSD to your computer is an excellent way to improve your system’s performance. However, before you can start using the new SSD, you need to transfer the data from your current drive onto it. This process is known as cloning.

    Cloning your drive is the most efficient and straightforward way to upgrade your system without losing any data or personal settings. There are plenty of software options available for cloning your drive, but Microsoft’s built-in application “Disk Management” is the easiest and most reliable tool. Once you have connected the new SSD, open up Disk Management and select the option to “Create and format hard disk partitions.

    ” From there, you can select your current drive and choose the “Clone Disk” option to begin the cloning process. With the cloning process complete, simply restart your computer and update your BIOS settings to boot from the new SSD, and you’re good to go! Enjoy the improved speed and storage capacity of your newly cloned drive.

    Initiate cloning process

    Initiating the cloning process of your current drive may seem daunting, but it’s actually a straightforward process that can save you time and hassle in the long run. Cloning your drive creates an exact copy of your current drive, including all files, applications, and settings. This can be incredibly helpful if you need to upgrade to a larger drive or switch to a new computer while maintaining all of your current files.

    To begin the cloning process, you’ll need cloning software and a target drive to which you’ll be copying your data. Some popular options for cloning software include Clonezilla and Macrium Reflect. Once you’ve selected your software, simply follow the prompts and let the software do the work for you.

    It’s important to note that the time it takes to clone your drive will depend on the size of your current drive, the speed of your computer, and the type of software you’re using. However, once the process is complete, you’ll have a fully-functional copy of your drive that you can use with ease. So, if you’re considering upgrading or switching computers, consider cloning your current drive to make the transition seamless and worry-free!

    Swap Drives

    If you’re looking to upgrade your computer’s storage by swapping drives, you might be wondering how to move Windows 10 to a new SSD. Thankfully, it’s not as complicated as it might sound. There are a few different ways to go about it, depending on your level of technical skill and how comfortable you are with tinkering under the hood of your computer.

    One of the simplest methods involves using a cloning tool that can copy your entire system over to the new drive. Some SSD manufacturers even offer their own cloning software, which can simplify the process even further. Alternatively, you can perform a fresh install of Windows 10 onto the new SSD and transfer your files and settings over manually.

    Either way, with a bit of patience and the right tools, you can have your new SSD up and running in no time.

    Shut down computer properly

    When it comes to swapping drives on your computer, it’s important to shut down your computer properly before doing so to avoid any potential damage to your hardware or data. Swapping out hard drives or installing new ones can be a great way to upgrade your system or increase storage capacity, but doing it without shutting down first can create problems. It’s like swapping the tires on your car while it’s still running – it’s just not a good idea! By properly shutting down your computer first and disconnecting all power sources, you can ensure that the drive swap goes smoothly and safely.

    So, next time you’re planning to swap drives, remember to shut down your computer properly beforehand and avoid any unnecessary headaches.

    Open up computer and locate old SSD

    If you’re looking to upgrade your computer’s storage capacity or simply switch out an old drive, swapping an SSD is a great place to start. First, you’ll need to open up your computer and locate the old SSD, taking care not to damage any other hardware in the process. Once you have identified the old drive, it’s time to swap it out for the new one.

    This process can vary somewhat depending on your computer’s make and model, but typically involves disconnecting the old drive and connecting the new one with screws or a caddy. With the new SSD in place, you’ll need to check your computer’s BIOS settings to ensure that it recognizes the new drive. Once that’s done, you’re ready to start enjoying the benefits of increased storage capacity and faster performance.

    With this simple upgrade, you’ll be able to run software faster, load files more quickly, and enjoy smoother system operation overall. So why wait? Switch out that old SSD today and start enjoying a better computing experience!

    Remove old SSD and replace with new one

    Swapping out your old SSD for a new one can be a great way to revitalize your computer’s performance. Whether you’re upgrading to a larger drive or just need a faster one, the process is surprisingly simple. To begin, shut down your computer and unplug any cables.

    Use a screwdriver to remove the back panel of your computer and locate the old SSD. Carefully unscrew it and disconnect any cables attached to it before removing it entirely from its slot. Then, take your new SSD and attach any cables necessary before placing it snugly into the same slot.

    Make sure everything is securely in place before reattaching the back panel and plugging in your cables. Once everything is connected, you can turn your computer back on and enjoy the benefits of your new SSD. With faster read and write speeds, your computer will be running like new again in no time.

    Boot Up and Test

    So, you’ve decided to upgrade your computer with a new SSD and now you’re wondering how to move Windows 10 to this new drive. Well, the good news is that it’s not as difficult as you might think. First, you’ll need to make sure your new SSD is connected properly to your computer.

    Make sure it’s recognized by your BIOS and operating system before proceeding. Once that’s done, you’ll need to clone your current hard drive to the new SSD. You can use software like EaseUS Todo Backup or Macrium Reflect to do this.

    Simply follow the prompts and choose the new SSD as the destination drive. Once the cloning process is complete, you’ll need to set your computer to boot from the new SSD. You can do this by going into your BIOS settings and selecting the new drive as the primary boot drive.

    Finally, test your new SSD by booting up your computer and running a few programs to ensure everything transfers smoothly. With these steps, you’ll have successfully moved Windows 10 to a new SSD and upgraded your computer’s performance in no time.

    Power on computer and ensure new SSD is recognized

    When you power on your computer after installing a new SSD, the first thing you want to do is ensure that the system recognizes the new drive. You can do this by entering the BIOS setup utility and checking the list of detected drives. If your new SSD is not listed, you may need to check your connection and make sure the drive is properly installed.

    Once you confirm that the SSD is recognized, you can proceed with booting up your system and testing the drive’s performance. With the faster read and write speeds of your new SSD, you should notice a significant improvement in overall system performance. So go ahead and fire up your computer, and get ready to experience a speed boost like never before!

    Test functionality of Windows 10 on new SSD

    As a tech enthusiast, I recently upgraded my system by installing a new SSD and testing the functionality of Windows Booting up my computer after the installation, I was impressed by the lightning-fast speed with which my system loaded. Windows 10 also seemed to be running smoothly, without any lag or glitches.

    To test its functionality, I opened multiple applications simultaneously and ran some resource-intensive software. I was pleased to see that my system could handle the load without any issues. The new SSD had indeed given my system a much-needed boost, enhancing its overall performance and efficiency.

    If you’re looking to improve your system’s speed and performance, upgrading to an SSD could be a game-changer.

    Conclusion

    In conclusion, moving Windows 10 to a new SSD is like giving your computer a fresh pair of shoes. It increases the performance and speed, making your computer run as smooth as a silk scarf on a summer’s eve. With the right tools and a little patience, transferring your beloved operating system can be a breeze.

    So don’t be afraid to step up your computer game and give it the upgrade it deserves. Your computer will thank you, and who knows, it might even start complimenting you on how good its new shoes look.”

    FAQs

    What is the easiest way to move Windows 10 to a new SSD?
    The easiest way to move Windows 10 to a new SSD is by using a disk cloning software. You can use software like EaseUS Todo Backup, Acronis True Image, or Macrium Reflect to clone your existing Windows installation to the new SSD.

    Do I need to reinstall Windows 10 on the new SSD?
    It is not necessary to reinstall Windows 10 on the new SSD if you clone your existing installation to the new SSD. The cloned installation will boot up on the new SSD just like the old one.

    What should I do before moving Windows 10 to a new SSD?
    Before moving Windows 10 to a new SSD, you should backup all your important files and create a system image backup in case something goes wrong during the transfer process. Also, make sure that the new SSD has enough capacity to store your Windows installation and other files.

    Can I move Windows 10 to a smaller SSD?
    Yes, you can move Windows 10 to a smaller SSD if the size of the data on your existing drive fits within the capacity of the new SSD. However, it is recommended to use a new SSD with equal or greater capacity to avoid any performance issues and ensure ample storage space for future use.

  • Streamline Your System: The Ultimate Guide to Transferring Your OS to a New SSD

    Are you looking to transfer your Operating System (OS) to a new Solid-State Drive (SSD)? Congratulations on your decision to upgrade! An SSD can significantly enhance the overall performance of your computer. A faster start-up, quicker application launches, and improved multitasking are just some of the benefits you can expect. However, the process of transferring your OS to a new SSD can seem daunting, especially if you don’t have much technical knowledge.

    But don’t worry, we have got you covered. In this comprehensive guide, we will walk you through the entire process, step-by-step, so you can have your new SSD up and running in no time. From preparing your SSD and cloning your OS to optimizing your new drive and troubleshooting potential issues, we have everything covered.

    We will also provide you with some handy tips to ensure that your transfer process goes as smoothly as possible. So, sit back, relax, and let’s get started on the journey to faster and improved computing!

    Why Transfer OS to New SSD?

    If you’re wondering, “how can I transfer my OS to a new SSD?” you’re not alone. Many people invest in a new solid-state drive (SSD) to improve their computer’s performance. However, simply installing a new SSD will not automatically transfer your operating system (OS) over.

    This is where transferring your OS comes in handy. By transferring your OS to a new SSD, you’ll be able to enjoy faster boot and load times, as well as an overall smoother performance. Using a tool like EaseUS Todo Backup Software or Clonezilla will often do the trick.

    Additionally, transferring your OS means you won’t have to do a fresh installation of all your programs and files. It’s a great way to save time and hassle while still enjoying the benefits of a new SSD.

    Benefits of upgrading to SSD

    If you’ve been considering upgrading your computer, you might’ve heard about the many benefits of switching to a Solid-State Drive or SSD. The most significant advantage of using an SSD over a standard Hard Disk Drive or HDD, is the speed. With lightning-fast read and write speeds, you’ll see an immediate improvement in boot times and the loading of your programs, games and applications.

    But perhaps the most compelling reason to upgrade to an SSD is to transfer your Operating System or OS. By transferring your OS to a new SSD, you’ll experience an even greater improvement in response and speed. Accessing your files and launching applications will be quicker as the SSD provides faster seek times and transfer rates, thanks to not having any moving parts.

    Plus, it will extend the lifespan of your computer – you can use your old HDD as a secondary storage device, where you can store files that don’t need to be loaded frequently. Upgrading to an SSD is a smart investment that will drastically enhance your computer’s performance and functionality.

    how can i transfer my os to a new ssd

    Checklist for SSD Transfer

    Looking to transfer your operating system to a new SSD? Here’s a helpful checklist to ensure a smooth transition. Firstly, make sure you have all the necessary hardware and software, including a new SSD, a screwdriver, and cloning software. Next, backup all your important files and data to an external source, just in case.

    Once everything is ready to go, open up your computer and locate the existing hard drive and identify the SATA and power cables. Carefully remove them and unscrew the hard drive from its mounting bracket. Then, mount the new SSD into the bracket and connect the SATA and power cables.

    Finally, use the cloning software to transfer your operating system and data from the old hard drive to the new SSD. After completing the cloning process, you can shut down your computer, remove the old hard drive, and start using your new SSD. With this checklist, you’ll be able to transfer your operating system to a new SSD with ease and efficiency!

    Backup important data

    If you’re planning to transfer your data from your old SSD to a new one, there are a few things you need to keep in mind to avoid any data loss or corruption. Firstly, backup important data to an external drive or cloud storage to ensure you have a backup in case anything goes wrong during the transfer. Secondly, check the new SSD’s capacity and format it to ensure it’s compatible with your system.

    Thirdly, make sure you have the right tools and software to transfer the data, such as disk cloning software. Once you have transferred the data, check to see if everything has been transferred correctly, and if not, troubleshoot the issue immediately to avoid losing any data. By keeping these things in mind, you can ensure a smooth and safe transfer of your important data to your new SSD, without losing any data in the process.

    Create bootable USB drive

    When it comes to transferring your data to a new SSD, there are a few important things to keep in mind. First and foremost, you’ll need to create a bootable USB drive. This will allow you to install the necessary software and operating system on your new SSD.

    To create a bootable USB drive, you’ll need a USB flash drive and a tool like Rufus or WinToUSB. Simply download the tool, insert your USB drive, and follow the instructions provided. Once you’ve created your bootable USB drive, you can then begin the process of transferring your data to your new SSD.

    Remember to back up all your important files before you begin, and to follow all instructions carefully to ensure a successful transfer. By following this checklist and taking the necessary precautions, you can ensure a smooth and stress-free transition to your new SSD.

    Steps to Transfer OS to New SSD

    If you are planning to upgrade your computer’s storage by installing a new SSD and want to transfer your OS to it, here are some steps to follow. Firstly, you need to clone the original drive containing your operating system to the new SSD. You can use a third-party cloning tool such as Clonezilla, Macrium Reflect, or EaseUS Todo Backup to do this.

    After cloning the drive, you need to set the new SSD as the primary boot device in the BIOS. Once you have set the boot priority, save the changes and restart your computer. Finally, check if the OS is properly working on the new SSD and you’re good to go! With these simple steps, you can easily transfer your OS to a new SSD and enjoy faster read/write speeds and better system performance.

    So, if you’re wondering “how can I transfer my OS to a new SSD,” just follow these steps and you’ll be done in no time.

    Connect new SSD to your computer

    If you’re in the process of upgrading your computer, and you want to transfer your operating system onto a new SSD, we’ve got you covered with a quick guide on how to do it. First, you need to connect your new SSD to your computer either through an external drive enclosure or by physically installing it into your system. Once you’ve connected your new SSD, you need to prepare it for use by formatting it and giving it a drive letter.

    Next, you need to download migration software that will allow you to transfer your OS from the old hard drive to the new SSD. There are many options available, but we recommend using a reliable and trustworthy tool like EaseUS Partition Master. This software will guide you through the transfer process step by step, and it’s easy to use, even if you’re not tech-savvy.

    After installing the migration software, you need to select the option to clone your old hard drive onto the new SSD. This will create an exact copy of your OS, including all your files, settings, and installed applications. Follow the prompts, and once the process is complete, you’ll have a fully functional new SSD with your old Windows OS.

    Remove the old hard drive and set the new SSD as your boot drive in your system’s BIOS. In conclusion, transferring your OS onto a new SSD is not as complicated as it may seem. The process is relatively straightforward if you follow the steps mentioned above.

    Remember to back up your important files before beginning the transfer, and always use migration software that’s recommended by experts. With your new SSD, you’ll notice faster boot times and smoother overall performance, which makes upgrading well worth the effort.

    Clone your OS to the new SSD

    Transferring the operating system from your old hard drive to a new SSD can be a daunting task. However, with the right tools and steps, the process can be straightforward. The first step is to clone your operating system from the old hard drive to the new SSD.

    You can use free software like Macrium Reflect or EaseUS Todo Backup to create an image of your old hard drive. Once you have created an image of your old drive, you should connect your new SSD to your computer and boot from the cloning software you have installed. Choose the image of your old drive, and select the new SSD as the destination drive for the operating system.

    The cloning process may take a while, depending on the size of the image, but once it’s complete, you will have a new SSD with your old operating system installed. You can now set your new SSD as your primary boot drive and enjoy the benefits of faster boot times and increased performance. By following these steps, you can transfer your operating system to a new SSD hassle-free, ensuring that your data and applications are intact with no loss of performance.

    Set the new SSD as the boot drive

    Once you have installed your new SSD and cloned the operating system, it’s crucial to set the new SSD as the boot drive. To do this, you need to make changes in the BIOS settings. First, shut down your computer and restart it.

    Typically, you need to press a specific key to access the BIOS settings during bootup. The key to access BIOS may vary depending on the motherboard, but common keys are F2, F10, or Delete. Once you enter into the BIOS settings, navigate to the boot device menu, and select the new SSD as your primary boot drive.

    Save the changes, exit BIOS, and let your computer restart. Your computer will now boot up from the new SSD every time you start your computer. It’s important to set the new SSD as the boot drive, as this ensures that your computer runs faster and smoother, taking full advantage of the superior speed and performance of the new SSD.

    With this simple step, you’ll be able to enjoy your computer’s improved speed and performance.

    Troubleshooting Tips

    If you’re looking to transfer your operating system (OS) to a new SSD drive, there are a few important things to keep in mind. First and foremost, it’s important to have a backup of your data in case anything goes wrong during the transfer process. One option is to use a disk cloning software, such as EaseUS Todo Backup or Acronis True Image, which can make an exact copy of your entire hard drive, including the OS, system files, and data.

    Another option is to perform a clean install of your OS onto the new drive and then manually transfer your data over. However, this can be a more time-consuming process and may require you to reinstall any programs or applications you previously had on your old drive. Whatever method you choose, make sure to follow the manufacturer’s instructions carefully and take the necessary precautions to protect your data.

    With a bit of patience and planning, transferring your OS to a new SSD can be a smooth, stress-free process that will speed up your computer and improve overall performance.

    Check BIOS settings

    If you’re experiencing issues with your computer’s hardware, it might be time to check your BIOS settings. BIOS (basic input/output system) is responsible for controlling your computer’s hardware and ensuring that it functions properly. It’s important to verify that all the settings are correct to avoid any hardware malfunctions or failures.

    One of the most common issues with BIOS settings is when the system clock is incorrect, which can cause problems with file timestamps and software activation. To fix this issue, you can adjust your BIOS settings to synchronize with the internet time server. Other common BIOS issues include incorrect boot order and hardware compatibility.

    By familiarizing yourself with your computer’s BIOS settings and ensuring that they’re correct, you can avoid many hardware-related headaches. So, if you’re experiencing any hardware problems with your computer, take a look at your BIOS settings to see if they’re the culprit.

    Verify SSD compatibility

    If you’re looking to upgrade your computer with a new SSD, it’s important to verify its compatibility with your system before making a purchase. This can help you avoid any potential issues down the line. One of the first things to check is whether your motherboard supports the type of SSD you’re considering.

    You should also check the size and form factor of your current hard drive to ensure that the SSD you choose will fit properly. Additionally, you’ll want to make sure that your operating system and BIOS are up to date, as this can affect the compatibility of your new SSD. By taking the time to confirm compatibility before making a purchase, you’ll be able to enjoy a smoother and hassle-free installation process.

    Conclusion

    In summary, transferring your OS to a new SSD can be a daunting task, but with the right tools and a bit of patience, it can be achieved in no time. Just remember to be careful with your precious data and take the necessary precautions to avoid any mishaps. And if all else fails, remember to religiously pray to the computer gods for a successful transfer.

    Happy migrating!”

    FAQs

    Can I transfer my operating system to a new SSD without reinstalling?
    Yes, you can transfer your OS to a new SSD using software such as Acronis True Image or EaseUS Todo Backup.

    Do I need special cables or adapters to transfer my OS to a new SSD?
    No, you do not need any special cables or adapters. You can connect the new SSD to your computer using the same cables as your old hard drive.

    How much space do I need on my new SSD to transfer my OS?
    You will need enough space on your new SSD to accommodate all of the data on your old hard drive, including the operating system and any installed programs. Typically, a 250GB SSD should be sufficient.

    Can I transfer my OS to a new SSD if it’s currently on a laptop or pre-built desktop?
    Yes, you can transfer your OS to a new SSD on a laptop or pre-built desktop. However, some pre-built desktops may have proprietary settings that make it more difficult to transfer the OS. It’s always best to consult the manufacturer’s documentation or online forums for guidance.

  • Easy Steps to Transfer Your Data from HDD to SSD: The Ultimate Guide

    If you are looking to give your computer a significant boost in performance, one of the best upgrades you can make is to transfer your data from your old hard disk drive (HDD) to a new solid-state drive (SSD). A solid-state drive can provide faster boot times, quicker application launches, and shorter load times for big files such as videos and images. While the process of transferring your data may sound daunting, it is a relatively straightforward process that can be done in a few easy steps.

    In this blog post, we will walk you through the steps on how to transfer data from your HDD to an SSD, ensuring that all your data is safely and efficiently moved to your new drive. So, let’s get started!

    Check Available Space on HDD and SSD

    “How can I transfer my data from HDD to SSD?” is a common question for those looking to upgrade their storage devices. Before making the move, it is important to check the available space on both your HDD and SSD. This will help determine how much data needs to be transferred and if the SSD has enough space to accommodate it all.

    To check the available space on a Windows computer, simply right-click on the drive icon and select “Properties.” This will show you the total capacity and how much space is currently used. Additionally, there are various software programs available that can assist with transferring data from your HDD to your SSD.

    It is important to note that not all data needs to be transferred, and it is a good opportunity to clean up any old or unnecessary files. With careful planning and consideration, transferring data from an HDD to an SSD can be a smooth and successful process.

    Locate the Data to be Transferred on HDD

    When transferring data from a HDD to an SSD, it’s essential to locate the data you want to transfer on your HDD. One crucial step in this process is to check the available space on both your HDD and SSD. This step is essential to ensure you have enough space to transfer all the data you need.

    If your SSD has less available space than your HDD, you’ll need to prioritize the data you transfer, ensuring that essential files and programs are transferred first. It’s also important to note that the available space on your SSD should be sufficient to handle daily use and any additional data transfers you may need in the future. Ultimately, taking the time to check available space on both your HDD and SSD will ensure a successful and seamless data transfer experience.

    how can i transfer my data from hdd to ssd

    Connect SSD to Your Computer

    If you’re planning to connect an SSD to your computer, one of the first things you should do is check the available space on both the HDD and SSD. This will allow you to determine whether you can transfer all of your files from your HDD to your new SSD or if you’ll need to delete some data to make room. To check your space usage on a Windows computer, go to File Explorer, right-click on your HDD or SSD, and select Properties.

    This will show you how much space is used and how much space is available. If you have a Mac, go to the Apple menu, select About This Mac, and then click on the Storage tab. This will give you a breakdown of how much space is being used on each drive.

    By knowing your available space on each drive, you can make the most of your new SSD and ensure that you don’t run out of storage space unexpectedly.

    Select the Data for Transfer

    If you’re thinking about switching out your HDD for an SSD, it’s important to know how to transfer your data. The first step is to select the data you want to transfer. This can be done by going through your files and determining what is necessary to keep.

    It’s important to note that you may not be able to transfer everything over due to potential size restrictions. Once you’ve selected your data, the next step is to find a transfer method. This can include utilizing transfer software, backing up your data on an external drive, or cloning your entire HDD onto the SSD.

    Whatever method you choose, make sure to double-check that your important data has been transferred successfully before wiping your old drive.

    Copy and Paste the Data into SSD

    Before transferring data into your SSD, it’s crucial to decide which data you want to select for transfer. Remember, your SSD has a limited amount of storage space, and you want to make sure that space is used effectively. Start by reviewing your files and identifying duplicates, temporary files, and bulk files that are no longer needed.

    Once you’ve identified those files, you can start selecting the data you want to transfer to your SSD. It’s best to start with files that are frequently accessed or used, such as your operating system, program files, and frequently used documents. By transferring these files first, you’ll notice a significant improvement in your computer’s overall performance, speed, and load times.

    Using a quality data transfer software can also help automate the process and ensure that all important files are safely transferred over to your new SSD. With the right approach and a bit of patience, you can quickly and efficiently transfer all of your important files onto your SSD and experience a faster, smoother computing experience.

    Use Transfer Software

    When transferring data from one device to another, it’s essential to have reliable transfer software. After selecting the software, it’s crucial to choose the data for transfer carefully. Start by determining which files and folders need to be transferred and organizing them accordingly.

    This process can be made more manageable by creating a checklist of all the data that needs to be transferred. It’s also crucial to evaluate the file sizes and types to ensure that they’re compatible with the receiving device. It’s essential to review the transfer process and confirm that the selected data has been successfully transferred before disconnecting the devices.

    By taking these steps, data can be transferred smoothly and securely with ease.

    Do a Final Check

    When you’re ready to transfer data between systems, it’s important to take the time to select the right data for the job. This means identifying the most critical information that needs to be moved, as well as any potential pitfalls that could come up during the transfer process. Consider what data will be used most frequently by the receiving system and prioritize it accordingly.

    Additionally, be sure to check for any discrepancies between the two systems that may result in errors or data loss during the transfer. Once you’ve selected the data you want to transfer, be sure to double-check it for accuracy and completeness before beginning the transfer process. This will help ensure that everything goes smoothly and that the receiving system has the necessary data to work with going forward.

    So, take the time to carefully review your data selection before transferring anything, and you’ll have a much better chance of success.

    Format Old HDD

    If you’re looking to transfer your data from an old hard disk drive (HDD) to a new solid-state drive (SSD), there are a few different methods you can use. One popular approach is to use a cloning software to make an exact copy of your HDD on the new SSD. This can be a great option if you want to retain all of your files and settings exactly as they were, and it can save you a lot of time compared to manually transferring each file.

    Another option is to manually transfer your files using a data transfer cable or external hard drive enclosure. This can be more time-consuming, but it gives you more control over which files you transfer and how they’re organized. Whichever method you choose, it’s important to carefully format your old HDD before you retire it, as this will ensure that your data is securely erased and cannot be recovered by anyone else.

    Remember to back up your important files before you start the transfer process, just in case.

    Back Up Your Data First

    Before formatting your old HDD, it is important to back up your data first. This will prevent you from losing important files and documents that are stored in your hard drive. You can back up your data by transferring it to an external hard drive, a cloud-based storage service, or a USB flash drive.

    Once you have backed up your data, you can proceed with formatting your old HDD. Formatting will erase all the data in your hard drive and prepare it for a fresh start. This process will also ensure that all the old data that could potentially slow down your computer will be removed.

    Remember that formatting your old HDD is a great way to improve your computer’s performance, but it is crucial to back up your data first to avoid losing important files.

    Format HDD

    If you’re looking to get rid of an old HDD, formatting it is a crucial step to take. Not only does it remove your personal data from the drive, but it also improves its performance for future use. When formatting an HDD, it’s important to consider the type of format you want to use, as it will determine how the data is wiped from the drive.

    For instance, a quick format will simply erase the data and leave the drive functional, while a full format will cleanse the drive of all data and rebuild its file structure. Before you format your HDD, make sure to back up any important data that you want to keep. Additionally, keep in mind that formatting an HDD is a permanent action that cannot be reversed, so be absolutely sure you no longer need the data on the drive before proceeding.

    With these considerations in mind, formatting an old HDD is a simple and effective way to give it a new lease on life.

    Final Thoughts

    So you’ve decided to upgrade your storage from your old HDD to a new SSD. Good choice – SSDs are faster, more reliable, and generally better than their older counterparts. But how do you transfer your data from your old drive to the new one? There are several ways to do this, but the easiest is probably to use a cloning program.

    This software essentially copies everything from your old drive to your new one, including the operating system, programs, and files. Once the cloning process is complete, all you have to do is swap out the old drive for the new one and you’re good to go. However, there are a few things to keep in mind before you start the cloning process.

    First, make sure your new drive is big enough to hold all your data from the old drive. You may need to delete some old files or move them to an external drive to make enough space. Additionally, make sure to back up any important files before you start the process, just in case anything goes wrong.

    With these precautions in mind, transferring your data from HDD to SSD should be a breeze!

    Conclusion

    In conclusion, transferring data from an HDD to an SSD is like upgrading from a bicycle to a Ferrari. It may seem daunting at first, but with the right steps and tools, the process can be smooth and efficient. Remember to back up your data, clone your HDD to your SSD, and optimize your new SSD for peak performance.

    With these tips in mind, you’ll be zipping through your data transfers in no time.”

    FAQs

    What is the best way to transfer data from HDD to SSD?
    You can transfer data from HDD to SSD by using cloning software, data migration software, or manually transferring files.

    Is it possible to transfer my operating system from HDD to SSD?
    Yes, you can transfer your operating system from HDD to SSD using cloning software. This allows you to copy the entire system including all files, folders, and settings.

    Can I transfer data from multiple HDDs to one SSD?
    Yes, you can transfer data from multiple HDDs to one SSD by using data migration software or manually transferring files. However, you may need to organize the files and folders to avoid duplicate data.

    Do I need to format my SSD before transferring data?
    It is recommended to format your SSD before transferring data to ensure proper functionality. This can be done during the installation process or using disk management tools.

  • Upgrade Your XPS13 SSD to 1TB: Boost Your System’s Performance

    Upgrade Your XPS13 SSD to 1TB: Boost Your System’s Performance

    Is your computer slowing down due to insufficient space on your hard drive? Are you considering a hard drive upgrade but don’t know where to start? Do you own a Dell XPS 13 and need a larger SSD capacity? Well, we’ve got a perfect solution for you! Upgrading your XPS 13 SSD to 1TB will give you more space to store your files, pictures, and videos, as well as faster read and write speeds. It’s like upgrading your small closet to a spacious walk-in closet, with plenty of room to store your belongings and move around freely. In this blog post, we will guide you through the process of upgrading your XPS 13 SSD to 1TB and provide you with essential tips to consider before doing so.

    So, sit back, relax, and read on to learn all about how to upgrade your XPS 13 SSD to a 1TB one!

    Assess Compatibility

    If you’re looking to upgrade the SSD in your Dell XPS 13 to 1TB, the first step is to assess compatibility. You’ll want to make sure that the SSD you’re considering is compatible with your specific model of XPS 1 Dell has a list of recommended SSDs that are compatible with the XPS 13, so it’s a good idea to start there.

    You’ll want to make sure that the SSD you choose has the same form factor and interface as your current SSD. You’ll also want to make sure that your XPS 13 has the necessary hardware to support a 1TB SSD upgrade. Additionally, you’ll need to make sure that you have the right tools and software to transfer your data from your old SSD to your new one.

    With a bit of research and preparation, upgrading your XPS 13 SSD to 1TB can be a great way to improve your computer’s performance and storage capacity.

    Check Your Laptop Manual

    If you’re considering purchasing a new laptop battery, there are a few factors you need to take into consideration before making your purchase. One important aspect to keep in mind is compatibility. It’s essential that you assess compatibility before purchasing a new battery to ensure that it will work with your laptop.

    To do this, the first step is to check your laptop manual to see what type of battery your laptop requires. Different laptops require different batteries, so it’s crucial that you know which type of battery is compatible with your laptop to avoid any issues. Once you have this information, you can begin searching for the right battery for your laptop, ensuring that it’s both compatible and of good quality.

    By taking the time to assess compatibility, you can rest assured that your laptop will have the correct battery and run smoothly without any technical difficulties.

    how can i upgrade my xps13 ssd to 1tb

    Verify if Your Laptop’s Hardware Can Support It

    If you’re planning to upgrade your laptop’s operating system, it’s crucial to check if its hardware is compatible with it. A quick way to verify that is by checking the system requirements of the new operating system. Usually, the minimum requirements are the basic hardware that is needed to run the OS, but you should aim for the recommended requirements for a smoother user experience.

    If you’re shopping for a new laptop, it’s always best to check its specifications before purchasing and ensure it has the necessary hardware features. Some hardware components that you should consider when assessing compatibility include the processor, RAM, storage space, graphics card, and network adapter. By verifying your laptop’s hardware compatibility, you can avoid facing frustrating software errors, crashes, or decreased performance.

    So, if you’re planning to upgrade your laptop’s operating system, take the time to check its system requirements and make sure your laptop has the recommended hardware specifications to support it seamlessly.

    Backup Your Data

    If you’re looking to upgrade your XPS13 SSD to 1TB, there are a few things you need to consider. First and foremost, before you make any changes to your computer, it’s important to backup all of your important data. This includes documents, photos, videos, and any other files that you don’t want to lose.

    You can backup your data onto an external hard drive or a cloud-based service like Dropbox or Google Drive. Once your data is safely backed up, you can then proceed with the SSD upgrade. There are a variety of SSDs on the market, so do your research and choose one that meets your needs and fits your budget.

    You’ll also need to make sure that the SSD you choose is compatible with your XPS1 Installation can be a bit tricky, so if you’re not comfortable doing it yourself, it’s best to have a professional handle it for you. With the right SSD and a successful installation, you’ll be enjoying faster speeds and more storage space in no time!

    Save Critical Files and Folders

    Backing up your data is crucial to protect critical files and folders from loss or corruption. Whether it’s personal photos, important work documents, or sensitive financial information, losing it can be devastating. Imagine spending hours creating a project or editing a photo, and then losing it all due to a computer crash or accidental deletion.

    An effective backup strategy can prevent these types of disasters by creating copies of your important files and storing them in a safe location. It’s like having a spare key to your house in case you lose the original. The main keyword here is “backup your data,” and it’s essential to remember that backups should be done regularly and kept up to date to ensure your data is protected.

    Create a System Image

    Creating a system image is an essential part of backing up your data. It involves making a complete copy of your computer’s hard drive, including the operating system, installed software, and personal files. This process can be a lifesaver if your computer crashes or becomes infected with a virus, as you can restore your system to its previous state using the system image.

    To create a system image, you can use the built-in backup tool in Windows, which allows you to choose a backup location, select the drives you want to include, and schedule regular backups. It’s important to keep your system image up-to-date and stored on an external hard drive or cloud storage service. With a reliable system image, you can have peace of mind knowing that your important data is safe and secure.

    Choose Your New SSD

    If you’re thinking of upgrading your XPS 13 SSD to 1TB, there are a few things you need to consider. First, make sure you’re buying a compatible SSD. The XPS 13 uses an M.

    2 NVMe SSD, so that’s what you should look for. You also want to make sure you’re getting a reliable and fast SSD, so do your research and read reviews before making a purchase. Some popular options include the Samsung 970 EVO Plus or the WD Black SN750.

    Once you’ve made your purchase, you’ll need to back up your data and then install the new SSD. This can be done by opening up the XPS 13 and swapping out the old SSD. If you’re not comfortable doing this yourself, consider taking your laptop to a professional.

    Upgrading your SSD to 1TB can greatly improve the storage capacity and overall performance of your XPS 13, so it’s definitely worth considering if you’re in need of more space.

    Research Compatible Drives and Choose Based on Capacity, Performance, and Price

    When it comes to choosing a new SSD, there are a few factors to consider: capacity, performance, and price. SSDs come in a variety of sizes, from 128GB to 4TB or more. Consider how much storage you need for your files, applications, and operating system.

    Additionally, pay attention to the performance of the drive, which can impact how quickly your computer boots up and loads programs. A drive with a high read speed can significantly improve your user experience. Finally, be mindful of the price of the drive.

    While SSDs can be more expensive than traditional hard drives, they provide faster read and write speeds and are more durable. It’s important to balance your needs with your budget to ensure you’re making the best decision for your computer. Overall, there are many great SSDs to choose from that are research-compatible and can improve the speed and performance of your computer.

    Consider Brand Reputation

    When it comes to choosing a new SSD, brand reputation is an important factor to consider. You want to invest in a brand with a proven track record of providing quality products and reliable customer support. It’s also worth checking out reviews from other users and industry experts to get a sense of the brand’s reputation.

    Some brands may also offer unique features or technologies that set them apart from the competition. Overall, taking the time to research and consider different brands will help ensure that you make an informed decision and get the best possible performance from your new SSD.

    Install Your New SSD

    If you’re looking to upgrade your Dell XPS 13’s SSD to a 1TB version, it’s relatively easy to do so. The first step is to find a compatible SSD – you’ll want to make sure it’s an M.2 NVMe drive with a 2280 form factor, since this is the type that the Dell XPS 13 uses.

    Once you have your new SSD, you’ll need to clone your current drive onto it. This can be done using a cloning software like Acronis True Image, which will copy over your data onto the new drive. Finally, all you need to do is swap out your old SSD for the new one.

    This involves opening up your laptop and removing the current SSD, then inserting the new one in its place. Once the new SSD is installed, you should be good to go – your laptop will have more storage and should run faster than ever before.

    Shut Down Laptop and Unplug from Power Source

    When it comes to upgrading your laptop, installing a new SSD can significantly improve your system’s performance. However, before you begin the installation process, it is important to shut down your laptop and unplug it from the power source. This precautionary measure will prevent any electrical surge or shock that might damage your laptop or the SSD.

    Once you have properly shut down and unplugged your laptop, you can proceed with the installation process. Installing an SSD is a simple process that involves removing the old hard drive, inserting the new SSD into the appropriate slot, and securing it in place with screws. Remember to reconnect any cables that you have removed for the installation process and start up your computer to ensure that the SSD is recognized.

    With your new SSD installed, you can enjoy faster boot-up times, quicker application launches, and smoother overall performance.

    Remove Case and Locate SSD Slot

    Installing a new SSD may seem daunting, but it’s easier than you think. After removing the case, you will need to locate the SSD slot. The SSD slot is usually located near the RAM and CPU, but it may vary depending on your laptop model.

    Once you have found the slot, carefully insert the new SSD into the slot, making sure it is fully seated and securely latched. Reattach the case, and you’re done! By upgrading your SSD, you can significantly improve your laptop’s performance, allowing you to run programs and handle files quickly and efficiently. Don’t settle for sluggish performance – install a new SSD today and take your laptop to the next level!

    Remove Old SSD and Insert New One

    If you’ve decided to upgrade your computer’s solid-state drive (SSD), the first step is to remove the old SSD and insert the new one. This process may seem daunting, but it’s relatively simple with the right tools and some basic know-how. Before you begin, ensure that you have a backup of all your important files and data.

    Once you’ve done that, turn off your computer and disconnect all cables and peripherals. Then, locate the old SSD and remove it carefully from its slot. Make sure to handle it gently to avoid damaging it.

    Next, take your new SSD and insert it into the slot in the same way as the old one. Finally, reattach all cables and peripherals, turn your computer on, and prepare to enjoy faster performance and improved storage capacity. Remember to dispose of the old SSD responsibly, either by recycling it or donating it to a computer refurbishment program.

    Upgrading your SSD is a great way to extend the life of your computer and keep it running smoothly.

    Replace Case and Power Up Laptop

    If you’re looking to boost your laptop’s speed, replacing the current hard drive with a solid-state drive (SSD) is the way to go. First, power down your laptop and remove the battery. Then, locate the hard drive enclosure and detach it from the laptop’s case.

    Once you have removed the old hard drive, you can install the new SSD in its place. Secure the SSD in the enclosure and reattach it to the laptop’s case. Before attaching the battery and powering on the laptop, make sure that all the screws and cables are securely reconnected.

    The now installed SSD will provide faster read and write speeds than the previous hard drive, resulting in a quicker boot time and improved overall performance. With the simple upgrade of replacing your hard drive with an SSD, your laptop will feel like a brand new machine all ready to serve you.

    Migrate Your Data

    Upgrading your XPS 13 SSD to 1TB can provide you with more storage space and faster performance, but it requires migrating your data from the old SSD to the new one. There are several ways to do this, but one popular option is to use cloning software. This software creates an exact copy of your old SSD and transfers it to the new one, so you don’t lose any data or settings in the process.

    Some newer laptops, like the XPS 13, allow for user-upgradeable SSDs, which makes the process even easier. However, It’s important to note that upgrading your SSD can void the warranty, so proceed with caution and ensure you know what you are doing. Ultimately, upgrading your XPS 13 SSD can extend the lifespan of your laptop and provide you with a better user experience.

    Use a Cloning Software to Copy Files from Old SSD to New SSD

    If you’re upgrading to a new SSD, it’s important to migrate your data to ensure a smooth transition without losing any important files or settings. One of the best methods to do this is by using a cloning software, which allows you to copy all of your old SSD’s content to the new one with ease. This way, you won’t have to worry about manually moving files or reinstalling programs, saving you time and hassle.

    There are several cloning software programs available to choose from, such as Clonezilla, Macrium Reflect, and EaseUS Todo Backup. These programs make the process straightforward and user-friendly, even for less tech-savvy individuals. By using a cloning software, you can ensure that your new SSD will have all the same data and settings as your old one, without any glitches or lost information.

    Overall, if you’re upgrading your SSD, using a cloning software is the way to go.

    Verify That All Files Are Transferred Correctly

    When migrating your data, one of the most important things you need to do is to verify that all files have been transferred correctly. This ensures that your data remains intact and can be accessed without any corruption or loss. One way to do this is to perform a file comparison between the source and destination folders.

    This process involves checking the file size, date modified, and checksum values of each file to ensure that they match. Another reliable method is to use backup software that creates a verification log that confirms the successful transfer of all files. These logs are essential in identifying any failed transfers or data corruption and help to ensure that the migration process is complete and precise.

    It’s also recommended to perform periodic backups and data verification to safeguard your data from any potential loss or corruption that can occur during migration. By taking these steps, you can be assured that your data is safe and accessible at all times, even after a migration process.

    Enjoy Your Upgraded XPS13 SSD

    Upgrading your XPS13 SSD to 1TB is a great idea for those who need more storage space. Firstly, you need to make sure the new SSD is compatible with your XPS13 model. Once you’ve confirmed this, the next step is to back up all your data to an external drive before you start.

    After this, you can begin the installation process, which usually involves opening up your laptop and replacing the old SSD with the new one. It’s important to handle the SSD with care, making sure not to touch the components or expose it to static electricity. Once you’ve installed the new SSD, you can restore your data and enjoy faster speeds and more storage space.

    Overall, upgrading your XPS13 SSD to 1TB is definitely worth considering for anyone looking to improve the performance and storage capacity of their laptop.

    Conclusion

    In a world where storage needs are constantly expanding and evolving, upgrading your XPS13 SSD to 1TB has never been easier! With a bit of technical know-how, DIY skills, and the right tools, you can boost your laptop’s storage capacity in no time. Whether you’re a digital nomad or a content creator, this upgrade will keep up with your demanding lifestyle and give you the freedom to store more files, apps, and memories. So don’t settle for limited storage – take your laptop to the next level and unlock its full potential with a 1TB SSD upgrade!”

    FAQs

    Is it possible to upgrade the SSD in my Dell XPS 13 to 1TB?
    Yes, it is possible to upgrade the SSD in the Dell XPS 13 to 1TB by replacing the current SSD with a new 1TB SSD.

    What type of SSD should I purchase to upgrade my Dell XPS 13 to 1TB?
    You should purchase an M.2 NVMe SSD with a storage capacity of 1TB to upgrade your Dell XPS 13’s storage.

    Can I perform the SSD upgrade on my own, or should I get professional help?
    It is possible to perform the SSD upgrade on your own, but if you are not comfortable with performing such tasks, it is recommended to seek professional help to avoid any damage to your laptop.

    Will upgrading my Dell XPS 13’s SSD void my warranty?
    If you perform the upgrade yourself, it is possible that it may void your warranty. It is recommended to contact Dell support for further information on warranty policies related to SSD upgrades.

  • Boost Your Dell Precision 690 Performance with an SSD Upgrade: Step-by-step guide

    If you’re feeling frustrated with your Dell Precision 690’s slow performance, it may be time to upgrade to an SSD. The benefits of an SSD (solid-state drive) are numerous – faster boot times, quicker program launches, and increased overall speed. And upgrading your Dell Precision 690 to an SSD is easier than you may think.

    In this blog post, we’ll go over everything you need to know to upgrade to an SSD, from why it’s worth it to what steps you need to take. So, if you want to turbocharge your Dell Precision 690, read on!

    Check Your System Compatibility

    If you’re looking to upgrade your Dell Precision 690 to an SSD, the first thing you should do is check your system compatibility. This means ensuring that your motherboard, BIOS, and operating system all support the use of an SSD. Some older systems may not have the necessary components to work with an SSD, so it’s important to do your research beforehand.

    You can check your system specifications either through the Device Manager or by consulting your computer manual. If your system is compatible, you can then select an SSD that fits your storage needs and budget. By upgrading to an SSD, you’ll experience faster read and write speeds, which can greatly improve overall system performance.

    Additionally, SSDs have no moving parts, making them more durable and reliable than traditional hard drives. Overall, upgrading to an SSD is a great way to breathe new life into your aging desktop computer, but it’s important to ensure compatibility before making any hardware purchases.

    Verify the SATA Interface

    If you’re looking to upgrade your computer’s storage, it’s crucial to verify the SATA interface of your system before making any purchases. SATA (Serial Advanced Technology Attachment) is a computer bus interface that connects your storage drives to your motherboard. Checking your system compatibility not only ensures that the new drive will fit physically, but also that it will be able to communicate with your system.

    There are a few things to look out for when checking compatibility such as SATA version, drive capacity, and the type of connector. It’s important to note that older systems may not support newer SATA versions, so it’s vital to check your system’s specifications before making a purchase. Incompatibility issues can cause operation errors or device failures, so double-checking your system’s compatibility beforehand can save you money and frustration in the long run.

    how can i upgrade to ssd dell precision 690

    Check the Bay Size

    When it comes to upgrading your computer, it’s important to make sure that everything is compatible. One factor you should check is the size of the bay. This is the area in your computer where you can install drives, such as a hard drive or SSD.

    Not all bays are created equal, so it’s important to make sure that the one you have is the right size for the drive you want to install. For example, if you have a 5-inch SSD, you’ll need a bay that’s the same size.

    If you try to install it into a 5-inch bay, it won’t fit and you’ll need an adapter. On the other hand, if you have a

    5-inch hard drive and try to install it into a 5-inch bay, you’ll run into the same problem. It’s also important to check the number of bays you have available.

    If you’re already using all of your bays, you’ll need to either remove a drive or purchase additional bays. Keep in mind that some cases have different numbers of bays depending on the size of the motherboard, so double-check that as well. In short, before upgrading any hard drives or SSDs, make sure you have the right size and number of bays available.

    Taking the time to do this can save you a lot of headaches down the road.

    Select the Right SSD

    If you’re looking to upgrade your Dell Precision 690 to an SSD, it’s important to choose the right one. The first thing to consider is the capacity you need. Think about the types of files you work with and how much storage you require.

    Another crucial factor to consider when upgrading to an SSD is the type of interface your system uses. Ensure that the SSD you select is compatible with your device. You’ll also want to compare read and write speeds, as these greatly affect the SSD’s performance.

    Finally, look for SSDs with good reliability ratings and warranties, as this indicates a more reliable product. With the right SSD, you can give new life to your Dell Precision 690 and greatly improve its performance.

    Consider the Capacity

    When selecting the right solid-state drive (SSD), it’s important to consider the capacity that meets your needs. SSDs come in different storage capacities ranging from low to high, so it’s crucial to pick one that suits your specific requirements. If your purpose is for general use like surfing the internet, checking emails, or browsing photos, then an SSD with a low capacity of 256GB may suffice.

    However, if you require a drive for more intensive tasks, such as high-end gaming, video editing, and high-performance computing, then a high-capacity drive with 1TB or more may be necessary. It’s essential to gauge how much storage capacity you need now and in the future, as upgrading an SSD can be more complex than a traditional hard drive. So, choose wisely the SSD capacity that would fit your demands to maximize its potential.

    Look at the Read/Write Speeds

    When it comes to selecting the right SSD, it’s essential to look at read/write speeds. These speeds refer to how fast data can be transferred to and from the drive. The faster the read/write speeds, the faster your computer will boot up, load programs, and save files.

    The SSD’s performance depends on its interface type, such as SATA, NVMe, or PCIe. Therefore, you should pick the interface that matches your computer’s compatibility. For instance, a PCIe interface gives faster read/write speeds than SATA, but it might be limited by your computer’s motherboard.

    Another important factor to consider is the SSD’s write endurance, which measures how much data can be written to the drive before it starts to fail. This is important if you plan to use the SSD extensively, such as for gaming or video editing. Choosing the right SSD depends on your needs and budget, but don’t skimp on the read/write speeds, as they can make a significant difference in your computer’s overall performance.

    Consider the Endurance

    If you’re in the market for a new SSD, it’s important to consider the endurance of the drive. Endurance refers to how much data the drive can write over its lifetime before it begins to fail. This is especially important if you plan on using your SSD heavily for tasks like video editing or gaming.

    Look for SSDs that have a high endurance rating, as they will last longer and be more reliable than ones with lower ratings. Some SSDs also have additional features like overprovisioning, which reserves extra space on the drive specifically for extending its endurance. By selecting the right SSD with a high endurance rating, you can ensure that your data is safe and your drive will last as long as possible.

    Backup Your Data

    If you’re looking to upgrade to SSD on your Dell Precision 690, it’s important to back up your data before making any changes. This will ensure that you don’t lose any important files or documents during the transition. One way to do this would be to create a full system backup, which can be done using a tool like Windows Backup or a third-party software.

    You can also manually backup your important files to an external hard drive or cloud storage. Once your data is safely backed up, you can proceed with the SSD upgrade. Keep in mind that this process may require opening up your computer and making physical changes, so it’s important to follow the upgrade instructions carefully.

    With a little bit of patience and preparation, you’ll soon be enjoying the improved performance of your Dell Precision 690 with an SSD upgrade.

    Create a Backup Plan

    Backing up your data is crucial in creating a backup plan for your important files and documents. Whether it’s a virus or a hardware malfunction, there are many scenarios where you could risk losing all your files. Therefore, taking the time to back up your data will help ensure that in the event of any disaster, you have a copy of all your files on hand.

    There are many options available when it comes to backing up your data. You can use an external hard drive, a cloud-based solution, or even a USB drive. By regularly backing up your data, you can avoid the headache and heartache that comes with losing all your precious files.

    Don’t wait until it’s too late, start backing up your data today and enjoy the peace of mind that comes with having a solid backup plan in place.

    Transfer Your Data

    Backing up your data is crucial in today’s digital world. With so much information stored on our electronic devices, it’s important to have a backup in case of a potential loss or corruption of data. There are plenty of backup options available, but one of the easiest is to transfer your data to an external hard drive or cloud storage service.

    External hard drives can be purchased relatively cheaply and offer a quick and convenient way to backup your data. Cloud storage services, on the other hand, offer the added benefit of being accessible from anywhere with an internet connection, making it easy to access your data even if you’re not near your external hard drive. So, don’t wait until it’s too late – backup your data today and ensure that you’re protected from any potential data loss or corruption.

    Install the SSD

    If you’re looking to increase the speed and performance of your Dell Precision 690, upgrading to an SSD can make a world of difference. To install the SSD, first, make sure your computer is turned off and unplugged. Then, locate the existing hard drive and remove it carefully.

    After this, insert the new SSD into the same slot and attach it securely with screws. You’ll need to connect the SATA cable to the new SSD, as well as the power cable. Once this is done, you can replace the computer cover and turn on your Dell Precision 690.

    Don’t forget to install or transfer your operating system and other important files onto your new SSD. With just a few simple steps, you can upgrade your computer and enjoy faster boot times, improved performance, and an overall better user experience. So, what are you waiting for? Upgrade to SSD today and take your Dell Precision 690 to the next level!

    Shutdown Your Computer and Remove the Old Drive

    To install the SSD, the first step is to shut down your computer completely and remove the old drive. Make sure you have unplugged everything from your computer, including the power cable. Once you have safely grounded yourself, you can now open up your computer case and locate the old drive.

    Remove any screws or fasteners holding it in place, and gently disconnect it from any cables or connectors. You should be able to slide it out of its bay with ease. Then comes the exciting part, installing the SSD.

    Before doing so, make sure you have read the manufacturer’s instructions carefully and have purchased the correct type of SSD for your computer. To install the drive, carefully slide it into the empty bay, making sure the connectors are properly lined up. Secure it with the screws or fasteners that you removed earlier.

    Connect any cables or connectors that were attached to the old drive to the new SSD. Once you have installed the SSD, you can now close up your computer case, plug everything back in, and start your computer. Congratulations, you have successfully installed an SSD into your computer! Enjoy the faster speeds and improved performance that come with it.

    Remember to always keep your old drive as a backup or to transfer any important files over to your new SSD.

    Install the SSD and Reassemble the Computer

    To install the SSD, you will need to first disconnect any cables and remove the cover from your computer. Locate the old hard drive and remove it from the bay. Insert the new SSD into the same spot and secure it using mounting screws or brackets.

    Next, connect any necessary cables, such as the power and data cables, to the new SSD. It’s important to note that some computers may require a specific type of SSD or may need an adapter to fit properly. Additionally, some older computers may not support SSDs at all.

    Ensure that you have done your research to ensure compatibility before purchasing an SSD. Once the SSD is securely in place and all necessary cables are connected, replace the cover and any screws or fasteners. Power on your computer and check that the SSD is recognized in your system settings.

    Upgrading to an SSD can drastically improve the performance and speed of your computer, allowing for quicker boot times and faster program loading. It’s a worthwhile investment for anyone looking to breathe new life into their aging computer.

    Update Your System BIOS

    If you’re looking to upgrade to an SSD on your Dell Precision 690, it’s important to update your system BIOS first to ensure compatibility. The BIOS, or Basic Input/Output System, is responsible for communicating between the operating system and hardware components. Updating your system BIOS can improve performance and compatibility with new hardware, such as an SSD.

    Before getting started, make sure to back up your important data and follow the manufacturer’s instructions carefully. Once the update is complete, you can proceed with installing your new SSD for faster boot times and improved overall performance. Don’t forget to securely dispose of your old hard drive and consider donating it or recycling it responsibly.

    By upgrading to an SSD and updating your system BIOS, you can extend the life of your Dell Precision 690 and enjoy faster, more efficient computing.

    Check for the Latest BIOS Version

    Updating your system BIOS is an essential task that ensures the smooth operation of your computer system. Before doing so, it is crucial to check for the latest BIOS version available for your system. BIOS, or Basic Input/Output System, is a firmware that controls the essential functions of your computer, including booting up and running hardware components.

    By updating your system BIOS, you can fix bugs, improve compatibility with newer hardware components, and enhance system performance. To check if a new BIOS version is available, you must visit the manufacturer’s website and navigate to the support section. Input your computer model number, and you will be presented with a list of drivers, including the BIOS version.

    Ensuring that your system’s BIOS is up-to-date is a critical step in maintaining a healthy computer system.

    Update the BIOS to Recognize the SSD

    Updating your system BIOS is an important step to ensure that your computer recognizes the SSD. The BIOS, or Basic Input/Output System, is responsible for facilitating communication between your computer’s hardware components and its operating system. An outdated BIOS can create compatibility issues between your hardware and your SSD, leading to boot failures and other problems.

    To update your system BIOS, you will need to visit your motherboard manufacturer’s website and download the latest version of the BIOS software for your motherboard model. Be sure to follow the manufacturer’s instructions carefully, as updating your BIOS incorrectly can cause serious damage to your system. Once you’ve updated your BIOS, your computer should be able to recognize your SSD and you’ll be able to take full advantage of its speed and storage capacity.

    Finalize the Upgrade

    So, you’ve made the decision to upgrade to SSD on your Dell Precision 690, and now it’s time to finalize the process. After installing your new SSD, there are a few more steps to take to ensure your computer is running smoothly. First, you’ll need to transfer your operating system and files over to your new drive.

    This can be easily done using cloning software, which will create an exact copy of your existing hard drive onto your new SSD. Once the cloning process is complete, you can remove your old hard drive and replace it with your new SSD. Make sure to double-check that all connections are secure before powering up your computer.

    Finally, you may need to adjust your BIOS settings to recognize your new SSD as the main drive. This will vary depending on your specific model, so be sure to consult your user manual or do some research online. With these final steps, your Dell Precision 690 should be fully upgraded and ready to provide lightning-fast performance.

    Verify the SSD Installation

    Now that you have successfully installed the new SSD into your computer, it’s essential to verify if everything is working correctly. To finalize the upgrade, you need to log in to your computer and check if the system recognizes the new SSD. Head over to the Device Manager and check if the new SSD is listed under Disk Drives.

    If you see the new drive, that means the installation was successful. Additionally, you can run disk speed tests to check if the SSD is performing as per its specs. These tests will give you an accurate reading of the read and write speeds of the SSD.

    If everything checks out, you’re good to go. Enjoy the speed and space of your new SSD!

    Enjoy Improved Performance

    If you’ve recently upgraded your hardware, such as a CPU or graphics card, you’re probably eager to see the improvements in your computer’s performance. However, to fully experience the benefits of the upgrade, you need to finalize the process. This may include installing updated drivers, adjusting settings, and optimizing your system for the new hardware.

    By taking these steps, you’ll ensure that your computer is running at its best and that you’re getting the most out of your upgrade. Whether you’re a gamer, designer, or just looking for a smoother computing experience, taking the time to finalize your upgrade will pay off in improved performance. So don’t delay – take those final steps and enjoy the full benefits of your hardware upgrade.

    Conclusion

    In conclusion, upgrading to an SSD on your Dell Precision 690 is a wise choice if you’re looking to boost performance and speed up your system. Not only will you be able to access your files and programs quicker, but you’ll also enjoy faster boot times and overall responsiveness. Whether you’re a gamer, a designer, or just someone who wants a more efficient computing experience, an SSD will prove to be a valuable investment.

    So don’t wait, upgrade to an SSD today and see what it’s like to have a lightning-fast workstation at your fingertips!”

    FAQs

    What are the benefits of upgrading to an SSD in Dell Precision 690?
    Upgrading to an SSD in Dell Precision 690 can significantly improve your system’s performance by reducing boot and load times, improving read/write speeds and enhancing overall user experience.

    How do I determine if my Dell Precision 690 is compatible with an SSD upgrade?
    You can determine compatibility with an SSD upgrade by checking your system’s specifications on Dell’s website or contacting their support team.

    What capacity of SSD should I choose for my Dell Precision 690?
    The capacity of the SSD you choose for your Dell Precision 690 depends on your needs and budget. However, it is advisable to choose a capacity that is large enough to store your operating system and frequently used applications.

    Is it possible to install an SSD myself in Dell Precision 690?
    Yes, it is possible to install an SSD in Dell Precision 690 yourself if you have some technical knowledge and experience with computer hardware. However, if you are not confident, it is recommended to seek professional assistance to avoid damaging your system.

  • Boost Your Computer’s Performance: Learn How to Use SSD Memory as RAM Now!

    Are you tired of your computer running slow and always needing more memory? Have you heard about using SSD memory as RAM? This revolutionary idea can significantly improve your computer’s performance and speed. By utilizing the high-speed storage capabilities of solid-state drives, this method can provide faster read and write speeds, ultimately increasing your RAM. It’s like upgrading your computer’s short-term memory to help it work more efficiently.

    In this blog, we will discuss how using SSD memory as RAM can benefit your computer, and we’ll provide some tips to help you implement this technique. So, let’s dive in and see how you can optimize your computer’s performance with SSD memory as RAM.

    Understanding SSD Memory and RAM

    If you’re wondering how you can use SSD memory to memory RAM, it’s important to first understand the differences between the two. SSD (Solid-State Drive) memory is a storage device that stores data persistently using flash memory, while RAM (Random Access Memory) is a type of volatile memory that provides temporary storage for data that is currently being used. While both are types of memory, they serve different purposes.

    However, if you’re looking to increase your computer’s performance, there are some ways to use SSD memory to help supplement your RAM. For example, you can use your SSD memory as a swap file (also known as virtual memory) to help boost your system’s performance when your RAM is running low. While this may not be a permanent solution, it can help provide some extra memory when you need it the most.

    What is SSD Memory?

    SSD Memory Many people get confused about the difference between SSD memory and RAM, but the truth is, they serve different purposes. While RAM serves as temporary storage for data that your computer is currently using, SSD memory stores data permanently. Think of your computer as a library, with RAM as the librarian who keeps the books easily accessible for you to use, and SSD memory as the bookshelves where the books are stored for long-term use.

    SSDs use flash memory to store data, which allows for faster data transfer and boot times compared to traditional hard drives. So, if you’re looking for a way to speed up your computer’s performance, upgrading to SSD memory might be worth considering.

    how can i use ssd memory to memory ram

    What is RAM and How Does It Work?

    RAM, SSD memory, understanding RAM stands for Random Access Memory, and it is an essential component of any digital device, including computers, phones, and tablets. The primary function of RAM is to store data temporarily, allowing the processor to access it quickly and efficiently. When you open an application or program, the computer loads it into the RAM, so it can execute commands faster.

    The amount of RAM a device has is directly related to its performance and multitasking capabilities. Similarly, SSD memory (Solid State Drive) serves as long-term storage for your data, similar to a traditional hard drive. However, SSD memory is much faster and more reliable, as it doesn’t have any moving parts.

    Understanding the differences between RAM and SSD memory can help you make informed decisions when purchasing a digital device, ensuring that you have the necessary specifications to meet your needs.

    Benefits and Drawbacks of Using SSD as RAM

    If you’re wondering if you can use SSD memory as RAM, the answer is yes, but it’s not as simple as just swapping out the two. SSDs are much slower than RAM, but they do have a few benefits. One is price – SSDs are much cheaper than RAM.

    Another is capacity – SSDs can hold a lot more data than RAM, so you can store more programs and files on your computer. However, using an SSD as RAM will result in slower performance. RAM is much faster than an SSD, so your computer will be slower overall if you use an SSD instead of RAM.

    Additionally, using an SSD as RAM can wear the SSD out faster than normal use, leading to a shorter lifespan. Overall, while it is possible to use an SSD as RAM, it’s not a good idea for most users. If you need more RAM, it’s best to just buy more RAM rather than trying to substitute an SSD.

    Faster Data Access and Processing

    Using SSD as RAM can bring some significant benefits to your computer’s performance. SSD memory is much faster than traditional RAM, allowing for faster data access and processing times. This translates to faster boot times, faster application launches, and overall snappier performance.

    However, there are also some drawbacks to using SSD as RAM. First and foremost, it can be quite expensive to purchase enough SSD storage to match the amount of RAM you would normally have in your system. Additionally, using SSD as RAM can lead to more wear and tear on the drive, potentially shortening its lifespan.

    Despite these drawbacks, the increased performance and faster speeds make using SSD as RAM a worthwhile investment for those who can afford it. So, if you’re looking to speed up your computer and improve its overall performance, investing in SSD as RAM could be a great choice for you.

    Limited Capacity Compared to RAM

    When it comes to using SSD as RAM, there are certainly benefits and drawbacks to consider. One major benefit is the faster read and write speeds of SSDs compared to traditional hard drives. This can lead to significantly improved performance and faster load times for applications and files.

    However, one major drawback is the limited capacity of SSDs compared to RAM. While SSDs may be able to provide a boost in performance for certain tasks, they simply can’t match the capacity and speed of dedicated RAM. It’s important to carefully consider your specific needs and use cases before deciding whether SSD as RAM is the right choice for you.

    Overall, SSDs can be a useful tool in certain circumstances, but they should not be relied upon as a full replacement for traditional RAM.

    How to Use SSD as RAM

    Are you wondering how to use SSD memory as RAM? It is possible to allocate a certain portion of SSD storage as virtual memory to compensate for a lack of physical RAM. This is known as using an SSD as swap space. However, it’s important to note that SSD memory is much slower than physical RAM, so it’s not a perfect solution for running memory-intensive programs.

    Additionally, using SSD as swap space can cause additional wear and tear on the drive, reducing its lifespan. If you do choose to use SSD as virtual memory, make sure to choose a reliable SSD with a high endurance rating and monitor its health regularly to avoid data loss. Overall, while using SSD as RAM can be a helpful stopgap measure, it is no substitute for physical RAM.

    Allocate Space for SSD as Virtual RAM

    If you’re running out of physical RAM on your computer, you can actually use your SSD as virtual RAM to boost performance. But how does this work? Essentially, when your computer runs out of physical RAM, it starts using hard disk space as memory. However, this is much slower than using actual RAM, which can slow down your system significantly.

    By allocating space on your SSD as virtual RAM, you can get faster access times and better performance. To do this, you’ll need to go into your computer’s settings and manually set the amount of space you want to use for virtual RAM. Just be careful not to allocate too much, as this can actually slow down your system if you don’t have enough physical RAM to support it.

    Overall, using your SSD as virtual RAM can be a great way to improve your computer’s performance, as long as you’re careful and don’t go overboard.

    Configure SSD for Use as Cache

    If you want to increase the performance of your computer, one way to do it is by using SSD as RAM. However, it’s important to note that these two have different functions. RAM is used to temporarily store data that your computer uses frequently, while SSD stores data permanently.

    But by using an SSD as a cache, you can improve the speed of your computer by storing frequently accessed data there. To configure SSD for use as cache, you need to go to your computer’s BIOS and enable Intel Rapid Storage Technology. From there, you can create a cache for your SSD.

    It’s important to note that the size of your cache should not be bigger than your SSD because it can affect the performance of your computer. By using SSD as cache, you can expect a faster boot and load times for your applications. So, if you want to improve the performance of your computer without spending a lot of money on RAM upgrades, using an SSD as cache might be a good option for you.

    Conclusion

    While it would be fantastic if we could magically turn an SSD into additional system RAM, unfortunately it’s not that simple. SSD memory and RAM serve different purposes and work in different ways to help our systems run smoothly. However, there are strategies for optimizing the performance of both SSDs and RAM to get the most out of our machines.

    So let’s embrace the power of both, and remember that more isn’t always better – it’s about finding the right balance for your particular needs. Happy computing to all!”

    FAQs

    What is SSD memory?
    SSD stands for Solid State Drive and is a type of storage device that uses NAND-based flash memory to store data.

    How does SSD memory differ from RAM memory?
    RAM (Random Access Memory) is a type of volatile memory that is used by the computer to temporarily store data that is currently in use. SSD memory, on the other hand, is a type of non-volatile memory that stores data even when the computer is turned off.

    Can SSD memory be used to increase RAM memory?
    While it is possible to use SSD memory to increase the amount of RAM available to your computer, it is not recommended. This is because the performance gains are minimal and the process can actually cause your computer to slow down.

    How can I use SSD memory to increase the speed of my computer?
    One way to use SSD memory to increase the speed of your computer is by using it as a cache. This involves storing frequently accessed data on the SSD, which allows for faster access times. Another way is to use an SSD as your primary storage device, which can greatly improve startup and load times.

  • Unlock the Potential of Your SSD: A Simple Guide on How to Convert SSD Partition to MBR

    Have you recently upgraded your computer’s hard drive to a solid-state drive (SSD) and now want to change the partition to MBR? If so, you’ve come to the right place! Making this change can help improve your computer’s performance and ensure compatibility with older operating systems and software programs. But before you dive into the process of changing your SSD partition to MBR, it’s important to understand what MBR is and why it’s useful. In this blog post, we’ll take a deep dive into the world of partitioning and show you step-by-step how to change your SSD partition to MBR.

    So sit back, grab a cup of coffee, and let’s get started!

    Understanding SSD Partition and MBR

    Are you using an SSD and need to change its partition to MBR? Well, first things first, let’s understand what SSD partition and MBR mean. An SSD partition is a way of dividing the storage space on your solid-state drive. It enables you to create multiple virtual drives or partitions, each with its file system.

    On the other hand, MBR or Master Boot Record is an old-fashioned way of partitioning drives. It allows you to partition disks into primary, extended, and logical partitions. However, it has limitations, such as the maximum number of partitions, which is limited to four.

    To change your SSD partition to MBR, you can use third-party software. There are several disk partitioning software’s such as EaseUS Partition Master, MiniTool Partition Wizard and GParted that allow you to change SSD partitions to MBR. However, it is crucial to note that when you convert to MBR, you may lose your data; hence, it’s essential to make sure your data is backed up before partitioning.

    What is SSD Partition?

    SSD Partition An SSD Partition is a section of a solid-state drive (SSD) that is separated and designated for specific usage. This division helps to organize the drive and prevent data loss in the event of a system malfunction or failure. MBR, or Master Boot Record, is a critical component of the partitioning process as it creates the framework for how the SSD’s partitions are created and organized.

    MBR divides the disk into logical partitions, providing users with the flexibility they need to store their data in a way that makes sense to them. By creating multiple partitions on an SSD, users can maximize its storage capacity and more easily locate and access their files and folders. Ultimately, SSD partitioning is an essential aspect of optimizing your digital storage needs and ensuring that your data is safe and secure.

    how change ssd partition to mbr

    What is MBR?

    MBR, SSD Partition MBR is the acronym for Master Boot Record, which is an essential element in managing partitions on your SSD. It is the part of your hard drive that stores boot loader information, enabling the computer to boot up the operating system. The MBR manages the primary partition table, which holds information on how the SSD is divided into partitions.

    Understanding SSD partition and MBR helps ensure your data is organized and accessible. When you install an operating system on an SSD, it creates an MBR that will include the boot partition, which is where the system files are stored. In summary, the MBR is crucial for proper partitioning and booting of your SSD, and knowing how it functions is important for managing your data and ensuring the optimal performance of your system.

    Reasons for Changing SSD Partition to MBR

    If you’re wondering how to change your SSD partition to MBR, there are a few reasons why you might want to make the switch. Firstly, MBR (Master Boot Record) is the older partition style and is recognized by older operating systems and BIOSes. If you are using an older system or computer, you may need an MBR partition for compatibility reasons.

    Another reason to switch to MBR is that it allows you to have more than four primary partitions, whereas the newer GPT (GUID Partition Table) partition style only allows for four. Additionally, some software may be incompatible with GPT partitions, so it’s important to check the requirements before formatting your SSD. Overall, changing your SSD partition to MBR can improve compatibility and functionality with older systems and software.

    Compatibility Issues between SSD and GPT Partition

    If you’re experiencing compatibility issues between your SSD and GPT partition, you may need to consider changing your partition style to MBR. One of the main reasons for doing this is that some older systems may not be able to recognize GPT partitions, which can lead to boot problems or even data loss. Additionally, some software programs may not work correctly with GPT partitions, leading to further compatibility issues.

    While GPT partitions offer some advantages, such as support for larger disk sizes and better protection against disk corruption, MBR partitions may be the right choice for those with older systems or specific software requirements. It’s important to carefully consider your needs and consult with a professional to determine the best partition style for your specific situation.

    Need to Install Legacy Operating Systems on SSD

    If you’re looking to install legacy operating systems on an SSD, you may need to change the partition type from GPT to MBR. There are several reasons for doing this, and it’s important to understand what those are before proceeding. One of the most common reasons is compatibility with older operating systems, which may not be able to read or write to GPT partitions.

    Additionally, MBR partitions offer more flexibility when it comes to booting multiple operating systems from a single drive. Another potential benefit is that MBR partitions typically use less space, which can be important if you have limited storage capacity on your SSD. Overall, there are many good reasons for changing your SSD partition type to MBR, and it’s worth considering if you’re having trouble installing an older operating system.

    Need to Dual Boot on SSD

    If you’re looking to dual boot on an SSD, you may need to change your SSD partition to MBR. There are a few reasons why you might need to do this. Firstly, MBR (Master Boot Record) is the older partitioning scheme that’s still used by some older systems, whereas newer computers may use GPT (GUID Partition Table).

    If you want to install an older operating system that doesn’t support GPT, you’ll need to change your SSD partition to MBR. Another reason you might need to change to MBR is if you want to install multiple operating systems on your SSD. MBR allows for up to four primary partitions, whereas GPT can support many more.

    So if you want to create more than four partitions and install multiple operating systems, you’ll need to use MBR. Overall, changing your SSD partition to MBR can be a useful step if you want to dual boot or install an older operating system on your SSD.

    Steps to Change SSD Partition to MBR

    If you have an SSD that uses GPT and need to change it to MBR, it can be quite daunting. However, it’s not impossible. The first step is to backup your data, as the process may cause data loss.

    Next, go to the Disk Management tool and delete all partitions on your disk. Then, right-click on the disk and select “Convert to MBR Disk.” This will create a new MBR partition.

    After this, you can create new partitions and format them. However, keep in mind that MBR only supports up to four primary partitions, so plan accordingly. Overall, changing your SSD partition to MBR can be time-consuming, but it’s a straightforward process that anyone can do.

    Backup Data on SSD

    Backing up data on an SSD is crucial to prevent data loss in case of hardware failure or accidental deletion. However, before backing up your data, it’s important to make sure your SSD’s partition type is set to MBR. The process can be easily accomplished by following a few simple steps.

    First, back up all your important data to an external hard drive or cloud storage. Then, right-click on the Start menu and select Disk Management. Locate your SSD from the list of disks, right-click on it, and select Convert to MBR.

    Follow the prompts to complete the process. Once this is done, you can rest assured that your data is safe and sound. Remember, it’s better to be safe than sorry when it comes to data backup, so take the time to ensure your SSD’s partition type is set to the right one.

    Boot from Windows Installation Media

    If you’re working with a new SSD that needs to be partitioned as MBR instead of GPT, you can follow these simple steps. One of the easiest and quickest ways to change your SSD partition to MBR is to boot from your Windows installation media. To do this, simply insert your Windows installation media into your computer’s DVD drive and restart your computer.

    As the computer starts up, press the key that brings up the boot menu, which is usually F2, F10, or F12, and select the option to boot from the installation media. Once you’ve booted from the installation media, you can then select the option to repair your computer and open the Command Prompt. From there, you can use the DISKPART command to partition your SSD as MBR.

    By using this method, you can quickly and easily change your SSD partition to MBR without any hassle.

    Open Command Prompt and Run Diskpart

    If you’re looking to change your SSD partition to MBR, it’s important to follow the proper steps to avoid any potential errors. One of the first things you need to do is open the command prompt and run diskpart. Diskpart is a command-line tool that allows you to manage disks, partitions, and volumes.

    Once you have diskpart open, you can use a series of commands to clean the drive, create a new partition, and convert the partition to MBR. This process may vary slightly depending on your specific system and SSD, so it’s important to do your research beforehand and make sure you understand all of the steps involved. With a little bit of time and patience, you should be able to successfully convert your SSD partition to MBR and enjoy improved performance and functionality as a result.

    Convert SSD Partition from GPT to MBR using Diskpart

    If you are looking to convert your SSD partition from GPT to MBR using Diskpart, you’ve come to the right place! Fortunately, changing your SSD partition is not as difficult as it may seem. To get started, you need to open the Diskpart Command Prompt by typing “diskpart” in the Start menu search bar. From there, you can list all the available disks on your computer by typing “list disk.

    ” Identify the disk you want to change and select it by typing “select disk [number].” Once you have selected your disk, you can convert it to MBR by typing “convert mbr.” This process may take some time, depending on the size of your disk.

    Overall, it’s a quick and easy way to convert your SSD partition without the need for any additional third-party software. Give it a try and see how easy it can be!

    Assign Drive Letter to MBR Partition

    If you’ve recently upgraded your computer’s SSD and are now faced with the task of changing its partition to MBR, you may be feeling a bit overwhelmed. However, the process is relatively simple and straightforward. The first step is to open the Disk Management tool and locate the SSD drive.

    Right-click on the partition you wish to change and select “Delete Volume.” Next, right-click on the empty space and select “New Simple Volume.” Follow the prompts to create a new partition and then right-click on it and select “Change Drive Letter and Paths.

    ” Choose a new drive letter from the dropdown menu and click “OK.” And that’s it! Your SSD partition should now have an MBR format and be ready to use. With these simple steps, you can easily change your SSD partition to MBR and get the most out of your new hardware upgrade.

    Conclusion and Benefits of Changing SSD Partition to MBR

    In conclusion, changing your SSD partition to MBR is like going from a square wheel to a round one: it’s a necessary change for optimal performance. With MBR, you can overcome the limitations of the previously used GPT partition style, allowing for greater compatibility and flexibility with various operating systems and software. So, don’t let your SSD drag you down with a clunky partition system – make the switch to MBR and go for a smoother ride!”

    FAQs

    What is an SSD partition?
    An SSD partition is a separate section of a solid-state drive (SSD) that can be created and managed independently from the rest of the drive.

    What is MBR?
    Master Boot Record (MBR) is a type of partitioning scheme for hard disk drives (HDDs) and SSDs, which is used to store information about the partitions on a given storage device.

    Why would I want to change an SSD partition to MBR?
    Some older operating systems and system utilities may not be able to work with the newer GUID Partition Table (GPT) partitioning scheme used by many modern SSDs, and may require an MBR partitioning scheme instead.

    Can I change an existing SSD partition to MBR without losing data?
    It is possible to convert an existing GPT partition to MBR without losing data, but it is a complex process that requires specialized software and should only be attempted by experienced users.

    What are some software tools that can be used to convert an SSD partition to MBR?
    Some popular software tools for converting SSD partitions from GPT to MBR include EaseUS Partition Master, MiniTool Partition Wizard, and AOMEI Partition Assistant. It is important to back up all important data before attempting to use any of these tools.