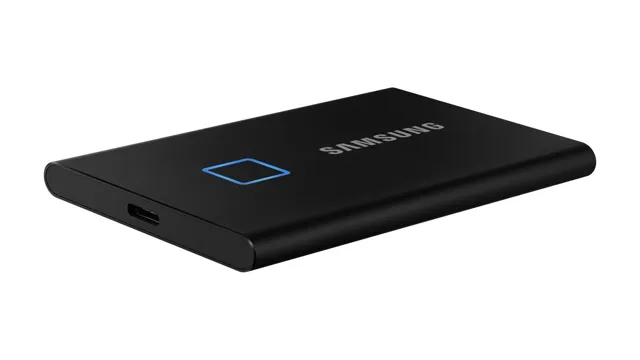
If you’re looking for a portable and reliable storage solution to expand your computer’s storage or to transfer files between devices, the Samsung T7 SSD is one of the best options in the market. With its sleek design, high-speed performance, and robust security features, the Samsung T7 SSD is an ideal choice for tech-savvy users who value productivity and data privacy. But how do you use the Samsung T7 SSD on Windows 10, and what settings should you tweak to get the best performance out of it? In this blog, we’ll guide you through the steps to set up the Samsung T7 SSD on your Windows 10 computer and cover some tips and tricks to optimize its performance and longevity.
Whether you’re a professional photographer, a gamer, or a business user, the Samsung T7 SSD can help you store, access, and share your files with ease and speed. So let’s dive into the world of portable SSDs and explore how the Samsung T7 can enhance your digital experience.
Check Compatibility
If you’re wondering how to use the Samsung T7 SSD on Windows 10, one of the most important things to consider first is compatibility. While the T7 is designed to work with a wide range of devices, including both Windows and Mac operating systems, it’s always a good idea to double-check that your setup is compatible before diving in. One of the easiest ways to do this is to visit the official Samsung website and review the system requirements for the T
This will give you a clear idea of whether your device meets the necessary specs to use the SSD effectively. Additionally, many online forums and communities dedicated to tech enthusiasts can offer valuable insights and tips on using the T7 with Windows 10, so don’t hesitate to seek out advice from other users who have experience with this popular external drive. Overall, taking the time to confirm compatibility and gather information can help ensure a smooth and successful experience using the Samsung T7 SSD on Windows
Check if your system meets the minimum requirements
Before installing any software on your system, it’s important to check if your system meets the minimum requirements or not. This step is known as checking compatibility. It can save you from a lot of hassle later on.
Every software comes with certain specifications that your system should have, such as RAM, processor, Graphics Card, and more. To check if your system is compatible with the software or not, you can either visit the website of the software manufacturer or simply look for the system requirements inside the software package. Usually, the required hardware and software specifications are mentioned on the download page, or you can find them in the manual guide.
If your system meets the standards mentioned, then you can go ahead and install the software. On the other hand, if your system falls short of any requirement, then you may need to upgrade your system or choose another software that your system is compatible with. In conclusion, it’s always advisable to check the compatibility of a software before installing it on your system.
It can save you time, efforts, and money. So, whenever you plan to install any software, don’t forget to go through its system requirements carefully.
Ensure your system supports USB 3.2 Gen 2 standard
When it comes to ensuring maximum speed and efficiency with your external storage devices, it’s important to make sure that your system supports the USB 2 Gen 2 standard. But how do you check compatibility? The first step is to consult your device’s specifications and look for USB
2 Gen 2 support. You can also check the type of USB port on your device. USB
2 Gen 2 ports are typically colored in blue, while older versions may be colored black or white. Another way to check is to use a benchmarking tool to test the speed of your USB ports and compare them to the speeds of USB 2 Gen 2 devices.
Keep in mind that even if your system doesn’t currently support USB 2 Gen 2, you may be able to upgrade your hardware to add this support. Doing so can provide a significant boost to your overall system performance and make transferring files faster and more efficient.
So make sure to check your devices and upgrade as needed to enjoy the benefits of USB 2 Gen 2 compatibility.
Connect Your Samsung T7 SSD
Connecting your Samsung T7 SSD to your Windows 10 computer is a straightforward process. First, ensure that your Samsung T7 SSD comes with the USB cable. Next, plug one end of the USB cable into the Samsung T7 SSD and the other end into a USB port on your Windows 10 computer.
Once your computer recognizes the Samsung T7 SSD, you can transfer and access your files quickly and easily. Using the Samsung T7 SSD makes it easy to carry around your documents, music, photos, and videos, especially when you’re on the go. Now that you know how to use Samsung T7 SSD on Windows 10, you can start enjoying the many benefits this storage device has to offer.
So, what are you waiting for? Give it a try and see for yourself.
Connect the SSD to your computer’s USB port
If you want to make the most of your Samsung T7 SSD, you need to connect it to your computer’s USB port. This is a simple process that will allow you to transfer data quickly and easily between these devices. The first step is to locate your computer’s USB port, which is typically found on the side or back of your computer.
You may need to move your computer to get a clear view of the USB port. Once you’ve found the port, you can insert the USB cable that came with your Samsung T7 SSD. Make sure that the cable is securely connected to both the SSD and the USB port on your computer.
If the cable is loose, you may experience connection issues or slow transfer speeds. Once the SSD is connected, you can start transferring files and backing up your data. With the Samsung T7 SSD, you can enjoy lightning-fast transfer rates and reliable storage for all your important data.
Wait for the driver installation to complete
Connecting your Samsung T7 SSD to your computer may seem like a straightforward process, but it’s important to be patient during the driver installation. Once you’ve plugged your SSD into your computer’s USB port, your operating system will automatically prompt you to install the necessary drivers. This is important in order to ensure that your computer recognizes and properly utilizes your Samsung T7 SSD.
The installation process may take a few minutes, so it’s important to refrain from unplugging your device or interrupting the process. Once the driver installation is complete, your Samsung T7 SSD will be ready to use and you can transfer files and data quickly and easily. Remember to always give your computer time to properly install any necessary drivers, as it can make a world of difference in terms of performance and efficiency.
Format the Samsung T7 SSD
If you’re using the Samsung T7 SSD on your Windows 10 computer, you’ll need to format it first. Formatting is the process of preparing a storage device so that it’s ready to be used by your operating system. To format your T7 SSD, first connect it to your Windows 10 computer using a USB cable.
Then, go to the Windows Search Box and type in “Disk Management”. From there, you’ll see a list of all storage devices connected to your computer. Find your T7 SSD in the list and right-click on it to select “Format”.
You’ll need to choose a file system, such as NTFS, and assign a drive letter. Once you’ve completed these steps, your T7 SSD will be ready for use on your Windows 10 computer.
Open the Disk Management Tool
To format a Samsung T7 SSD, you first need to open the Disk Management Tool on your Windows computer. This tool allows you to manage all the drives connected to your computer, including the Samsung T7 SSD. Once you open the tool, you will see a list of all the drives on your computer, including the Samsung T7 SSD.
You need to select the drive that you want to format and right-click on it. You will see a menu that includes the option to format the drive. Click on that option to begin the formatting process.
It is important to note that formatting the drive will erase all the data on it, so you should make sure that you have backed up any important files before proceeding. Overall, formatting a Samsung T7 SSD is a straightforward process that can be easily accomplished with the Disk Management Tool.
Locate your Samsung T7 SSD in the list of disks
Formatting the Samsung T7 SSD can be an imperative task, especially if you want to erase all the data stored on it or tackle any performance issues that may have arisen. To begin with, the first step is to locate your Samsung T7 SSD in the list of disks. This can be done by navigating to the Disk Utility program on your Mac computer.
Once you have located your Samsung T7 SSD, you can proceed to format it. Formatting can help erase all the data stored and reformat it to the preferred file system. You can choose between APFS, HFS+, or exFAT formats, depending on your needs and preferences.
You’ll also have the option of selecting the Scheme, which will determine the partition structure of the Samsung T7 SSD. Your ideal option would be GUID Partition Map for maximum compatibility. However, keep in mind that formatting the Samsung T7 SSD will erase all the data stored on it.
Therefore, it’s vital to make sure you have a backup of all your data before proceeding with the formatting process.
Right-click on the SSD and select ‘Format’
To format your Samsung T7 SSD, right-click on the drive in your file explorer and select the ‘format’ option. This will allow you to erase all the data on the drive and set it up for use. It’s essential to format the drive before using it, as it will ensure that you have a clean slate to work with and minimize any issues that may arise.
Once you’ve clicked on ‘format,’ you’ll be presented with a few options, including the file system, allocation unit size, and volume label. For most users, the default settings will work just fine, but you can customize these settings based on your needs. Just keep in mind that changing these settings can affect the performance and compatibility of the drive.
Formatting your SSD may seem like a daunting task, but it’s incredibly simple and necessary for optimal performance. It’s essential to back up any important files before formatting the drive as they will be erased during the process. Once the formatting is complete, you’ll have a clean, blank slate to work with.
This ensures that there are no corrupted files or previous data that can impact your system’s performance. So, if you’re setting up a new SSD, or experiencing any issues with your current one, formatting might just be the solution you need.
Choose the file system, allocation unit size, and volume label
When setting up a new Samsung T7 SSD, one of the important steps is to format the drive with the appropriate file system, allocation unit size, and volume label. The file system determines how the data is organized and stored on the drive, while the allocation unit size affects the efficiency and speed of read and write operations. Additionally, the volume label is a name you can give to the drive to help identify it easily.
To format the Samsung T7 SSD, connect it to your computer and open the built-in disk management utility. From there, choose the file system you want to use, such as NTFS for Windows or exFAT for cross-platform compatibility. You can also select the allocation unit size, which can impact the speed and performance of the drive.
Generally, a larger unit size is better for larger files, while a smaller one is more appropriate for smaller files. Lastly, give your drive a descriptive label that will help you identify it quickly and easily. It’s important to note that formatting the drive will erase all current data, so be sure to back up any important files before proceeding.
Once you’ve chosen the file system, unit size, and volume label, click format, and the disk management utility will take care of the rest. After formatting, your SSD will be ready to use with optimal performance and organization, ensuring that your data is protected and easily accessible.
Transfer Files To and From the SSD
If you just got your hands on the Samsung T7 SSD and want to transfer files to and from your Windows 10 computer, you’re in luck! One great feature of this external solid-state drive is just how simple it is to use. First, you’ll want to connect the T7 SSD to your computer via USB Type-C. Once you do, your computer should recognize it automatically, and you’ll be able to view the files on the drive.
From there, simply drag and drop files to or from the SSD as needed. You can also use third-party software like Samsung’s “Portable SSD Software” to manage and optimize the drive’s performance. With its fast read and write speeds, the Samsung T7 SSD is the perfect solution for quickly transferring files between devices or making backups.
So why wait? Give it a try today and see for yourself just how easy it is to use!
Drag and drop files to the Samsung T7 SSD
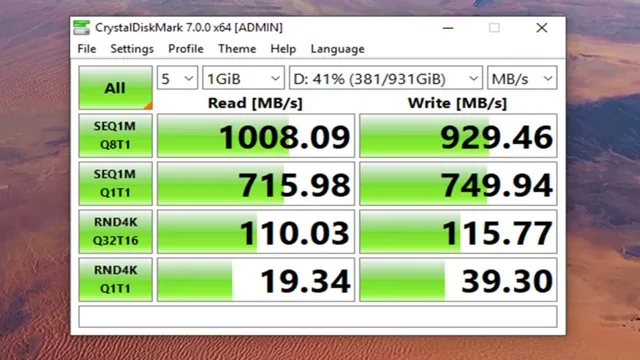
The Samsung T7 SSD offers lightning-fast data transfer speeds and the ability to easily drag and drop files, making it an excellent choice for anyone looking to quickly transfer large files. Whether you’re looking to move a single video file or an entire photo library, the process is quick and simple. All you need to do is connect the SSD to your computer and use the drag-and-drop method to transfer files to and from the drive.
This not only saves time but also ensures that your documents are safe and secure. With no additional software or special hardware required, the Samsung T7 SSD is an excellent choice for anyone looking to transfer files quickly and easily. So, if you need to move large files or backups, consider using the Samsung T7 SSD to help you get the job done quickly and efficiently.
Use Samsung’s Data Migration Tool for larger transfers
Samsung’s data migration tool is an essential tool when it comes to transferring files to and from an SSD. This tool is perfect for larger transfers, as it takes care of the entire process for you. Whether you’re switching to a new computer or upgrading your storage, Samsung’s data migration tool will make the process easy and stress-free.
Simply connect your SSD to your computer and launch the tool. The tool will automatically detect the SSD and guide you through the transfer process. With this tool, you can transfer not only your files, but also your operating system and applications, saving you time and effort.
So, if you’re looking for a seamless and efficient way to transfer your files to and from an SSD, look no further than Samsung’s data migration tool.
Eject the Samsung T7 SSD
If you’re wondering how to use Samsung T7 SSD on Windows 10, it’s actually quite simple. First, make sure the SSD is connected to your computer via the USB cable. Once it’s connected, Windows should automatically recognize the SSD as a new drive.
You can then transfer files to and from the SSD just like you would with any other external storage device. When you’re finished using the SSD, it’s important to properly eject it from your computer. This will ensure that any files you’ve transferred are safely saved and that the device is ready for future use.
To eject the Samsung T7 SSD, simply right-click on the drive in the file explorer and select “Eject.” Wait for the “Safe to Remove Hardware” message to appear before unplugging the USB cable. Overall, using the Samsung T7 SSD on Windows 10 is a fast and efficient way to transfer files and boost your computer’s storage capacity.
With its durable design and high-speed data transfer capabilities, it’s the perfect solution for anyone in need of extra storage space.
Safely eject the SSD to prevent data loss or corruption
Samsung T7 SSD When it comes to using an external SSD, it’s important to properly eject the device to prevent any potential data loss or corruption. The Samsung T7 SSD is a popular choice for many when it comes to external storage, and properly ejecting it is crucial. Ejecting the Samsung T7 SSD is quite simple and can be done in just a few steps.
First, locate the “Safely Remove Hardware” icon on your computer and click on it. Then, select the Samsung T7 SSD from the list of devices and click “Eject.” Wait until you receive a message that it is safe to remove the device, and then physically remove the cable from both the SSD and your computer.
By following these simple steps, you can ensure that your Samsung T7 SSD will continue to function correctly and that all of your important files and data will remain secure.
Conclusion
In conclusion, using the Samsung T7 SSD on Windows 10 is as easy as pie. With lightning-fast transfer speeds, ample storage space, and sleek design, this little device is a powerhouse of storage. Simply plug it into a USB port, and you’re good to go! Think of it as your personal pocket-sized hard drive that can accompany you on any adventure.
So if you’re looking for reliable, lightning-fast storage, the Samsung T7 SSD is the way to go on Windows “
FAQs
Can I use the Samsung T7 SSD on Windows 10 without installing any drivers?
Yes, you can use the Samsung T7 SSD on Windows 10 without installing any drivers. It is plug-and-play and can be used right out of the box.
Does the Samsung T7 SSD support USB 3.0 and 3.1?
Yes, the Samsung T7 SSD supports USB 3.0 and 3.1. It is backwards compatible with USB 2.0 as well.
Is it possible to password protect the Samsung T7 SSD?
Yes, the Samsung T7 SSD comes with built-in password protection and software encryption to keep your data secure.
How do I format the Samsung T7 SSD on Windows 10?
You can format the Samsung T7 SSD on Windows 10 by opening Disk Management, finding the SSD, right-clicking on it, and selecting Format. Make sure to select the correct file system (NTFS or exFAT) based on your needs.