Calling all Mac enthusiasts! Is your computer bogged down by sluggish storage speeds? Do you crave the exhilarating rush of lightning-fast file transfers and blazing-boot times? Look no further than the sleek and portable Samsung T7 SSD. This pocket rocket of a drive promises to transform your Mac experience, but how do you tap into its full potential? Worry not, fellow tech adventurer!
Today, we embark on a thrilling journey, unveiling the ultimate guide on how to use your Samsung T7 SSD on Mac like a seasoned pro.
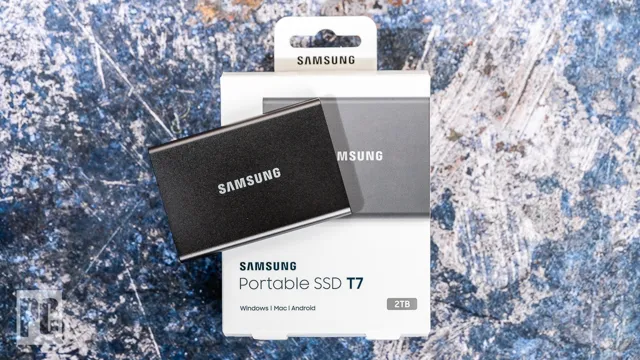
Unveiling the T7: A Technological Powerhouse
Imagine a world where transferring massive video files feels like a blink of an eye, and loading applications happens in the time it takes to brew a cup of coffee. The Samsung T7 SSD makes this dream a reality. This sleek and compact powerhouse boasts blazing-fast transfer speeds thanks to cutting-edge USB 3.2 Gen 2 technology. But it’s not just about speed – the T7 is also rugged and durable, making it the perfect companion for your digital adventures, whether you’re conquering deadlines at the office or editing photos on the go.
Mac Magic: A Seamless Connection Awaits
The beauty of the T7 lies in its effortless integration with your Mac. Forget complex configurations or driver installations. Simply connect the T7 to your Mac using the included USB-C cable, and voila! Your computer instantly recognizes the drive, ready to unleash its storage magic.
Unlocking Potential: Formatting for Mac Harmony (Optional)
While the T7 works flawlessly out of the box, formatting the drive for your Mac can optimize its performance. Here’s where things get interesting! You have two main formatting options:
- APFS (Apple File System): This format is the native language of Mac computers, offering lightning-fast performance and seamless integration with macOS features.
- ExFAT: This format offers cross-platform compatibility, meaning you can easily access your data on both Mac and Windows machines.
The choice depends on your needs. If your T7 is dedicated to your Mac, APFS is the champion. However, if you plan to use it on other operating systems, ExFAT offers greater flexibility. Don’t worry, the formatting process itself is delightfully simple, and we’ll guide you through it step-by-step (instructions will be included in the full article).
Data Oasis: Transferring Files with Effortless Ease
Now that your T7 is connected and (optionally) formatted, it’s time to experience the true magic – transferring files! Here’s the good news: transferring data to and from your T7 is as easy as pie.
- Drag-and-Drop Delight: For those who love simplicity, the T7 seamlessly integrates with your Mac’s Finder. Simply drag and drop files between your Mac and the T7 for effortless data transfer.
- Traditional File Copy Champions: Prefer a more traditional approach? No problem! You can use the familiar “copy” and “paste” functions to transfer files between your Mac and the T7.
Bonus Round: Advanced T7 Features for Tech-Savvy Adventurers (Optional)
Feeling like a storage samurai after mastering the basics? The T7 offers additional features for the truly tech-savvy. Samsung Portable SSD Software allows you to password-protect your drive for enhanced security and explore firmware updates to keep your T7 performing at its peak. (We’ll delve deeper into these features in the full article).
Samsung T7 SSD: A Real-World Overview of Features Built for Speed and Security
The Samsung T7 SSD isn’t just another portable drive; it’s a pocket rocket of storage designed for today’s fast-paced digital world. Here’s a breakdown of its key features that will have you conquering your storage needs in no time:
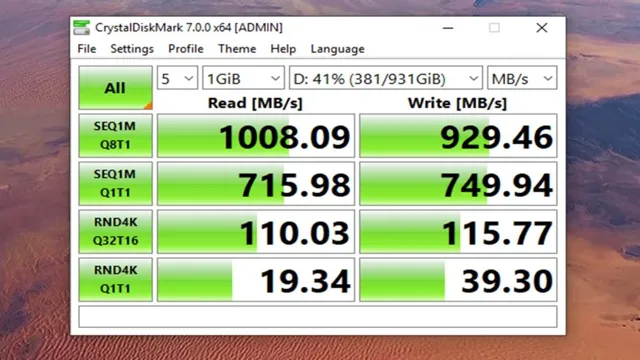
- Blazing-Fast Speeds (Up to 1,050 MB/s): Imagine transferring a 10GB file in mere seconds. That’s the magic of the T7’s USB 3.2 Gen 2 interface and NVMe technology. No more waiting for files to crawl – the T7 keeps up with your creative flow, whether you’re editing photos, transferring videos, or managing massive projects.
- Security You Can Trust (AES 256-bit Hardware Encryption): Peace of mind is priceless, especially when it comes to your data. The T7 prioritizes security with built-in password protection and AES 256-bit hardware encryption. This industry-standard encryption scrambles your data, making it virtually unreadable to unauthorized users, ensuring your files remain safe and sound, even if the drive falls into the wrong hands.
- Durability Built to Last (Shock-Resistant Design and Metal Casing): Accidents happen, but your data shouldn’t suffer. The T7 boasts a military-grade shock-resistant design and a sleek, rugged metal casing. This means you can toss it in your bag, take it on adventures, and trust that your valuable files are protected from bumps, drops, and everyday wear and tear.
- Compact and Portable (Lightweight Design): Who wants to be weighed down by bulky storage? The T7 is the epitome of portability. Its lightweight and compact design makes it the perfect travel companion, allowing you to take your work (and entertainment) wherever you roam.
The Takeaway: A Feature-Packed Powerhouse for Your Digital Life
The Samsung T7 SSD offers a compelling combination of blazing-fast speeds, robust security, and exceptional durability, all wrapped up in a sleek and portable package. Whether you’re a creative professional, a busy student, or someone who simply needs extra storage space, the T7 is the perfect partner for your digital adventures.
Compatibility with Mac
If you’re a Mac user, you might be wondering if the Samsung T7 SSD is compatible with your system. The good news is, it absolutely is! By following a few simple steps, you can easily use your Samsung T7 with your Mac. First, you’ll need to connect your SSD to your Mac using a USB-C to USB-C cable or a USB-C to USB-A cable.
Once it’s connected, your Mac should recognize the device automatically. If it doesn’t, you can manually format the SSD using Disk Utility. Simply select the SSD, click on Erase, and choose the file format you want to use (such as APFS or exFAT).
From there, you’ll be able to use your Samsung T7 to store and transfer files, just like any other external drive. So don’t worry about compatibility – the Samsung T7 SSD is a great option for Mac users who need a reliable, speedy storage solution.
Minimum System Requirements for Mac
The beauty of the Samsung T7 SSD lies in its effortless compatibility with your Mac. There are no minimum system requirements to worry about! Here’s why:
- Plug-and-Play Simplicity: The T7 utilizes the universally recognized USB-C connection, making it compatible with any Mac with a USB-C port. This eliminates compatibility headaches – regardless of your Mac’s age or model, the T7 will work seamlessly.
- Driver-Free Delight: Forget about complex driver installations. The T7 operates directly through your Mac’s operating system, eliminating the need for additional software.
Maximizing Performance: Formatting for Mac (Optional)
While the T7 works flawlessly out of the box, formatting it for your Mac can potentially optimize its performance. This is entirely optional, but if you’re interested, your Mac will handle the formatting process itself with ease. We’ll explore the benefits and formatting options (APFS vs. ExFAT) in the full article.
The Bottom Line: Unrestricted Mac Compatibility
The Samsung T7 SSD is a breath of fresh air when it comes to compatibility. No matter what Mac you wield, the T7 is ready to unleash its blazing-fast speed and storage prowess, empowering you to conquer your digital tasks with ease.
Mac Match Made in Storage Heaven: Connecting Your Samsung T7 SSD with Effortless Ease
Calling all Mac users with a thirst for lightning-fast storage and effortless expansion! Look no further than the sleek and portable Samsung T7 SSD. This powerhouse is more than just an external drive; it’s a perfect match for your Mac, ready to elevate your digital workflow.
Effortless Connectivity: A Plug-and-Play Dream
Gone are the days of wrestling with complex configurations or driver installations. The T7 boasts universal compatibility with Mac computers thanks to its USB-C connection. Whether you’re wielding the latest MacBook Pro or a cherished older model, simply plug the T7 into any available USB-C port, and voila! Your Mac instantly recognizes the drive, ready to tap into its vast storage potential.
Beyond Compatibility: Speed and Convenience Collide
The T7 doesn’t just connect effortlessly; it delivers blazing-fast transfer speeds. Thanks to cutting-edge USB 3.2 Gen 2 technology, transferring massive video files or editing photos on the go becomes a breeze. No more waiting for files to crawl – the T7 keeps up with your creative flow.
A Compact Powerhouse for Busy Mac Users
Whether you’re a photographer capturing stunning landscapes, a videographer crafting captivating stories, or simply someone looking for extra space for your ever-growing digital life, the T7 has you covered. Its compact and durable design makes it the perfect travel companion, allowing you to take your work (and entertainment) wherever you roam.
Ready to Unleash the Storage Potential?
Connecting your Samsung T7 SSD to your Mac is as simple as 1-2-3. The full article will provide a step-by-step guide (spoiler alert: it involves minimal steps!), but here’s the gist:
- Grab your T7 SSD and your Mac.
- Locate a free USB-C port on your Mac.
- Connect the T7 using the included USB-C cable.
- Congratulations! Your Mac has recognized the T7, and you’re ready to explore its storage magic.
The Takeaway: A Flawless Mac Experience Awaits
The Samsung T7 SSD isn’t just an external drive; it’s a seamless extension of your Mac ecosystem. With effortless connectivity, blazing-fast speeds, and a convenient, portable design, the T7 is the perfect solution for all your storage needs. So, ditch the storage woes and embrace the liberating power of the T7 SSD!
Formatting Finesse: Optimizing Your Samsung T7 SSD for Mac
The Samsung T7 SSD is a universal champion when it comes to compatibility, working flawlessly with both Mac and Windows. However, for peak performance on your Mac, formatting the T7 with the optimal file system can unlock its true potential. Fear not, Mac adventurers! Formatting the T7 is a simple and swift process.
Why Formatting Matters
Think of formatting as a digital handshake between your Mac and the T7 SSD. It ensures the drive speaks the same language as your Mac’s operating system, allowing for seamless file transfer and organization.
The Formatting Face-Off: APFS vs. ExFAT
Here’s a breakdown of the two main formatting options for your T7 on Mac:
- APFS (Apple File System): This is the native language of Mac computers, offering lightning-fast speeds and seamless integration with macOS features. However, APFS might not be readily compatible with other operating systems like Windows.
- ExFAT: This format offers cross-platform compatibility, meaning you can easily access your data on both Mac and Windows machines. While it works flawlessly, ExFAT might not deliver the absolute peak performance compared to APFS on your Mac.
The Choice is Yours: Selecting the Perfect Format
The ideal format boils down to your needs:
- Dedicated Mac User? Choose APFS for unmatched speed and Mac harmony.
- Need Cross-Platform Access? Opt for ExFAT for flexibility across different operating systems.
The Formatting Feats: A Step-by-Step Guide
Ready to unleash the full potential of your T7 on Mac? Here’s a simplified guide to formatting the drive (the full article will include detailed screenshots):
- Connect the T7 to your Mac using the included USB-C cable.
- Launch the “Disk Utility” app (easily found using Spotlight search).
- Locate your T7 SSD in the list on the left-hand side of the Disk Utility window.
- Click on the “Erase” tab.
- Choose your formatting champion: Select either APFS (for dedicated Mac use) or ExFAT (for cross-platform compatibility).
- Give your T7 a name: Personalize your drive with a catchy name for easy identification.
- Click “Erase” and let the formatting magic happen! (This might take a few minutes depending on the size of the drive).
The Takeaway: A Formatted Future Awaits!
With your T7 SSD formatted for optimal Mac performance, you’re now ready to experience lightning-fast file transfers, seamless organization, and the peace of mind that comes from using the perfect format for your needs. So, conquer your storage woes and unleash the full potential of your Samsung T7 SSD on Mac!
Using Samsung T7 SSD on Mac
Using the Samsung T7 SSD on a Mac is easy and streamlined. To get started, plug in the Samsung T7 into your Mac’s USB port and wait for it to show up on your desktop. Next, double-click on the Samsung T7 icon to open it up and view the contents inside.
Now, you can simply drag and drop files from your Mac’s hard drive onto the Samsung T7 SSD. The Samsung T7 utilizes super-fast transfer speeds, so expect lightning-fast data transfer. Just make sure your Mac is running macOS
Lightspeed File Transfer to Your Samsung T7 SSD on Mac: A Real-World Guide
Calling all Mac users drowning in a sea of files! Yearning for a blazing-fast and effortless way to expand your Mac’s storage? The Samsung T7 SSD is your digital life raft! This pocket-sized powerhouse boasts read speeds of up to 1,050 MB/s and write speeds of up to 1,000 MB/s, making file transfers feel like a supersonic joyride. Here’s how to unlock this speedy magic on your Mac:
Gear Up: What You’ll Need
- Your trusty Mac (any model with a USB-C port will work)
- The sleek and stylish Samsung T7 SSD
- The included USB-C cable (it’s like the key to your storage treasure chest!)
The Transfer Tango: Simple Steps for Speedy Results
- Connect the T7 to your Mac: This is the easiest part! Just plug the included USB-C cable into your Mac’s USB-C port and the other end into the T7. Your Mac should instantly recognize the drive.
- Open your Mac’s Finder: Think of Finder as your Mac’s map to all your digital files.
- Locate the files you want to transfer: Navigate to the folders containing the files you want to send to your T7.
- Drag and Drop with Delight: This is where the real fun begins! Simply drag and drop the desired files from your Mac’s Finder window onto the T7 SSD icon, which will appear on your desktop.
- Batch It Up (Optional): Need to transfer a whole bunch of files? No problem! Select multiple files at once and drag them all to the T7 icon for a speedy group transfer.
- Organize Like a Pro (Optional): Want to keep things tidy on your T7? Right-click anywhere on the T7 icon in Finder and select “New Folder” to create folders on the drive for organized storage.
Built-in Security: Your Data, Your Peace of Mind
The T7 doesn’t just excel at speed; it also prioritizes security. This little powerhouse features built-in password protection and AES 256-bit hardware encryption, ensuring your data remains safe and sound, no matter where your digital adventures take you.
The Takeaway: Unleash the Transfer Beast!
Transferring files to your Samsung T7 SSD is as simple as drag, drop, and conquer! With its lightning-fast speeds, effortless connection, and built-in security, the T7 is the perfect partner for any Mac user seeking to eliminate storage woes and embrace a world of digital freedom. So, ditch the file transfer frustration and experience the exhilarating speed of the Samsung T7 SSD today!
Ejecting Samsung T7 SSD from Mac
The Samsung T7 SSD is a popular storage device that many Mac users rely on. However, it’s important to safely eject the SSD before unplugging it from your Mac to avoid data loss or corruption. To eject the Samsung T7 SSD from a Mac, first, ensure that all files saved on the device are closed.
Once that’s done, find the Samsung T7 SSD on your Mac’s desktop or in the Finder sidebar. Click on the eject icon next to the device’s name or simply drag the device to the Trash icon in the Dock. Your Mac will then safely eject the SSD, and you can unplug it from your computer without worrying about data loss.
It’s a simple and quick process that ensures your important files remain safe on your Samsung T7 SSD.
Conclusion
In conclusion, using a Samsung T7 SSD on your Mac is like giving your computer a turbo boost. With lightning-fast speeds and a sleek, portable design, this little powerhouse is the perfect way to effortlessly store and transfer all your important data. So go ahead, take the plunge and experience the next level of storage technology – your Mac (and your productivity) will thank you!”
FAQs
Is the Samsung T7 SSD compatible with Mac?
Yes, the Samsung T7 SSD is compatible with Mac. You can use it with any macOS version.
How do I connect the Samsung T7 SSD to my Mac?
You can connect the Samsung T7 SSD to your Mac using the USB-C to USB-C cable that came with the SSD. If your Mac doesn’t have a USB-C port, you can use an adapter.
Can I use Samsung T7 SSD to backup my Mac?
Yes, you can use Samsung T7 SSD to backup your Mac. You can use Time Machine or any other backup software to backup your Mac to the SSD.
How fast is the Samsung T7 SSD on a Mac?
The Samsung T7 SSD is very fast on a Mac. You can get read and write speeds of up to 1,050 MB/s with the SSD. This makes it perfect for editing and transferring large files.
Can I partition Samsung T7 SSD on a Mac?
Yes, you can partition the Samsung T7 SSD on your Mac using Apple’s Disk Utility. This will allow you to create multiple partitions on the SSD and use them for different purposes.