If you’re looking to upgrade or replace your SATA SSD, you may be wondering how to remove it from your computer. Luckily, it’s a straightforward process that you can do yourself with just a few tools. In this step-by-step guide, we’ll walk you through the process of removing your SATA SSD, from preparing your workspace to disconnecting the cables and removing the drive.
So, buckle up and let’s dig into the details!
Preparation
Removing a SATA SSD from your computer might seem like a daunting task, but with the right preparation, it can be done in a breeze. Before getting started, make sure you have all the tools required for the job. Depending on your PC’s build, you may need a screwdriver or a specialized tool.
It’s also essential to back up all your data to avoid losing important files. Shut down your computer and disconnect all cables, including the power supply. Next, ground yourself by touching a conductive surface, such as an unplugged wall socket, to discharge any static electricity.
Once you’re prepared, locate the SATA SSD and carefully remove any screws or brackets keeping it in place. Gently pull it out of the slot, making sure not to damage any connectors. Voila! Your SATA SSD has been successfully removed.
Remember to store it in a safe place if you plan on reusing it in the future.
Turn off your device and unplug it.
As you get ready to unplug your electronic device, the first step is to turn it off completely. Most devices have a power button or switch that makes this process quick and easy. You can also close any open programs and shut down your computer through the start menu.
Once the device is turned off, you can unplug it from the wall socket or power strip. This preparation is important to ensure that you don’t accidentally shock yourself or damage the device while handling it unplugged. By taking the time to properly prepare your device for unplugging, you can help extend its lifespan and prevent any potential safety hazards.
Remember to always turn off and unplug your device before making any changes or repairs to it. This simple step can make a big difference in protecting both you and your device.
Locate the SATA SSD on your computer.
When it comes to upgrading or adding a new SSD to your computer, it’s important to locate the SATA SSD slot on your machine. The SATA SSD slot looks different on each computer, so it’s necessary to locate the slot properly before you purchase an SSD for installation. Most desktop computers have a dedicated area or drive bay where you can install an SSD, while laptops often require removing the back panel to access the storage drive.
It’s also essential to check for available compatibility options, such as checking the drive size and working with the current storage drive. Before proceeding with installation, research the specific process for your machine and back up important data, so you don’t lose any files. With a little preparation, you can quickly locate the SATA SSD slot for your computer and enjoy the benefits of a faster and efficient storage drive.
Removing the SATA SSD
If you need to remove your SATA SSD from your computer, it’s actually quite simple. Firstly, make sure your computer is turned off and unplugged from its power source. Then, locate the SATA SSD on your computer’s motherboard.
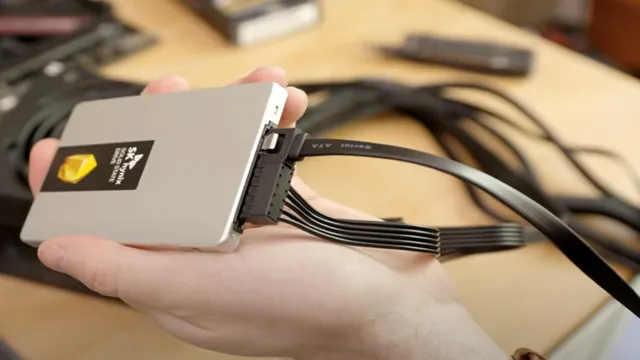
It’s usually a small rectangular box shape with a connector on one end. Now, gently disconnect the SATA data and power cables from your SSD by pressing the tabs and pulling them away from the connector. Once you’ve done that, you can carefully slide the SSD out of its slot on your motherboard.
Take extra care not to damage any surrounding components while doing so. And there you have it, your SATA SSD has been successfully removed!
Detach any cables connected to the SATA SSD.
Removing the SATA SSD from your computer can be a bit tricky, especially if you’re new to tinkering with computer hardware. One of the first steps you need to take is to detach any cables that are connected to the SSD. This includes the power cable and the SATA data cable.
It’s essential to disconnect these cables carefully, ensuring that you don’t damage the connectors or any other components. Start by unplugging the power cable from the SSD, and then carefully remove the SATA data cable by gently pulling it out of the port. Once you’ve done this, you can move on to the next steps in the removal process.
With these steps taken care of, you’ll be well on your way to removing the SATA SSD from your computer with ease.
Remove any screws or brackets holding the SATA SSD in place.
If you’re upgrading your computer’s storage, you’ll need to remove the old SATA SSD before installing the new one. The first step is to locate the SSD – it’s typically located near the bottom of the computer. Once you’ve found it, you’ll need to remove any screws or brackets holding it in place.
Be sure to keep these screws or brackets in a safe place, as you’ll need them to install the new SSD. Once the SSD is free, gently pull it out of the slot. If it doesn’t come out easily, double-check to make sure you’ve removed all screws and brackets, and try again.
With the old SSD removed, you can now install the new one – but be sure to take the time to properly secure it in place, using those same screws and brackets you removed earlier. By following these steps, you’ll be able to easily swap out your old SATA SSD for a brand new one, and enjoy all the additional storage capacity it provides.
Carefully slide the SATA SSD out of its slot.
Removing a SATA SSD can seem intimidating, but it’s actually a straightforward process. First, make sure the computer is turned off and unplugged. Find the location of the SATA SSD, usually located towards the back of the computer and attached to the motherboard.
Carefully slide out the SATA SSD from its slot, being cautious not to touch any of the other components or parts inside the computer. It’s essential to handle the SSD gently to avoid any damage or harm to the device. Once removed, the SATA SSD can be replaced with a new one, or it can be used in another device if desired.
Overall, removing a SATA SSD is a simple task that only takes a few moments of your time. Just remember to keep it safe and handle with care.
Next Steps
Removing a SATA SSD from your computer can be a quick and easy process if you follow the right steps. First, turn off your computer and unplug it from the power source. Open up your computer case and locate the SATA SSD that you want to remove.
Carefully unscrew the screws holding the SSD in place using a screwdriver. Once the screws are removed, gently slide the SSD out of its slot. Be sure to handle the SSD by its sides, rather than touching any of the components on the circuit board.
With the SSD now removed, you can replace it with a new storage device or perform any necessary maintenance on the computer. By following these steps, you can successfully remove a SATA SSD from your computer with ease.
Dispose of the SATA SSD in an environmentally friendly manner.
Now that you have upgraded your laptop or desktop with an improved SATA SSD, it’s time to dispose of the old one. But you need to be responsible and dispose of it in an environmentally friendly manner. Don’t just toss it in the trash bin.
Electronic waste is a significant global problem, and it’s estimated that more than 50 million tons of e-waste are generated annually. Some countries have strict regulations regarding the disposal of electronic waste, and you could face hefty penalties for improper disposal. Luckily, there are several ways you can dispose of your SATA SSD safely.
One option is to recycle it. Look for certified e-waste recyclers in your area who can handle electronic waste responsibly. These recyclers use environmentally friendly methods to dismantle and separate the components, ensuring that they don’t end up in landfills or pollute the environment.
Another option is to donate the drive to a local school or non-profit organization. They may be able to use it for educational purposes or refurbish it for someone in need. If neither of these options works, you can also contact the manufacturer for advice on proper disposal.
They may have a take-back program or other suggestions for disposing of the drive safely. Whatever you do, don’t just throw your SATA SSD in the trash. It may contain hazardous materials that can harm the environment and human health.
By taking a little extra effort to dispose of it properly, you’ll be doing your part to reduce electronic waste and preserve the environment for future generations.
Insert the new SSD, if desired.
If you’ve determined that you need a new SSD for your computer, the next step is to insert it. First, make sure you have properly prepared your computer by turning it off and unplugging it from the power source. Open the computer case, locate the drive bay, and insert the new SSD.
Make sure the connection is secure and the screws are in place to prevent any movement. Once the new SSD is installed, you can close up the computer case and reattach any cables or devices you removed. Finally, turn on your computer and verify that the new SSD is recognized in the system BIOS.
By following these steps, you can ensure a smooth and successful installation of your new SSD.
Conclusion
Removing a SATA SSD is like saying goodbye to an old friend, it can be bittersweet. But fear not, with these simple steps, you can easily separate yourself from your trusted storage device. Just make sure to safely eject and disconnect all cables, unscrew the mounting bracket, and gently slide the SSD out of its slot.
Remember, it’s always better to part ways gracefully – who knows, you may even reunite someday in the future!”
FAQs
What tools do I need to remove a SATA SSD?
You will need a Phillips head screwdriver and possibly a SATA data cable disconnect tool.
Can I remove a SATA SSD without turning off my computer?
It is not recommended. It is best practice to power down the computer before removing any hardware.
How do I safely remove a SATA SSD from my computer?
Power off the computer and disconnect all cables. Open the computer case and locate the SSD. Use a Phillips head screwdriver to remove the screws securing the SSD to the case or mounting bracket. Gently disconnect the SATA data and power cables from the SSD and lift it out of the case.
Do I need to back up my data before removing a SATA SSD?
It is always a good idea to back up your data before removing any hardware from your computer. This ensures that you do not accidentally lose important files.
Can I reuse a removed SATA SSD in another computer?
Yes, as long as the new computer has an available SATA port and the correct software drivers, you can reuse the SSD.