
If you’re someone who’s never opened up a laptop before, the thought of removing your laptop’s SSD might seem intimidating. But don’t worry, it’s not as complicated as you might think. In fact, removing the SSD is a straightforward process that won’t take much time.
Plus, it’s a valuable skill to have in case you need to replace or upgrade your SSD down the line. This step-by-step guide will walk you through the process and help you understand the tools and techniques you need to safely remove your laptop’s SSD.
Preparation
Removing an SSD from a laptop requires proper preparation. The first step is to shut down the laptop and unplug it from all external power sources. Then, you’ll need to gather the necessary tools.
Most laptops will require a small Phillips head screwdriver to remove the screws holding the SSD in place. It’s also important to ground yourself by touching a grounded metal object or using an anti-static wristband to avoid damaging the SSD or other components. Additionally, you should back up any important data on the SSD before removing it, as all stored information will be lost once it’s disconnected.
With these preparations in place, you’ll be ready to safely and efficiently remove the laptop SSD.
Backing up your data
Backing up your data is crucial to prevent the loss of important files and documents. Preparation is key when it comes to backing up your data. First, you should determine what data needs to be backed up.
This includes any important files, documents, photos, and videos. Once you have identified what needs to be backed up, you should decide on a backup method that works best for you. This can include external hard drives, cloud storage, or backup software.
Whichever method you choose, it is important to regularly back up your data to ensure that you always have access to the latest version of your files. By preparing and regularly backing up your data, you can avoid the stress and frustration of losing important information.
Powering off your laptop
When it comes to powering off your laptop, preparation is key. It’s important to save any unsaved work and close any open programs prior to shutting down your device. This ensures that your files won’t be lost and your computer won’t experience any glitches or errors when restarting.
Additionally, it’s a good idea to unplug any external devices, such as a mouse or keyboard, to prevent any potential malfunctions. By taking these simple steps, you can ensure that your laptop will shut down smoothly and be ready for use the next time you power it on. Remember, a little bit of preparation goes a long way in maintaining the longevity of your device.
Locating and Accessing the SSD
If you’re looking to remove or replace the SSD in your laptop, you first need to locate and access it. The location of the SSD varies depending on the laptop model and the manufacturer, but in most cases, it is located under the bottom cover. Before you start, make sure you have the necessary tools to open the bottom cover, such as a screwdriver.
Once you have the tools, turn off your laptop and disconnect it from its power source. Remove the battery if necessary, and then find the screws that hold the cover in place. Typically, they are located on the bottom of the laptop and are marked by small icons or arrows.
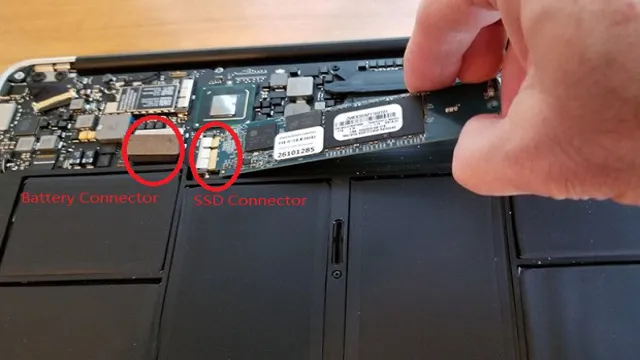
After removing the screws, carefully remove the bottom cover to reveal the internal components of your laptop. Look for the SSD, which should be a small rectangular board that is connected to the motherboard via a connector cable. Disconnect the cable and gently remove the SSD from its slot.
Congratulations! You have successfully removed your laptop’s SSD.
Identifying the location of the SSD
SSD, location, accessing When it comes to finding and accessing an SSD, it’s important to first identify which device you’re working with. If you’re using a desktop computer, the SSD will typically be located near the other storage devices, such as the hard drive or CD/DVD drive. On a laptop, it might be a bit trickier to locate, but most often it can be found by removing the back panel or battery.
Once you’ve located the SSD, it’s important to make sure you have the proper tools to access it. Some devices may require a special screwdriver or connector, and it’s important to research beforehand to avoid any damage. Once you’re ready, gently remove the SSD and handle it with care to avoid any damage to the drive.
With the right tools and careful handling, accessing an SSD can be a simple and efficient process.
Opening your laptop’s case or cover
Opening up your laptop’s case to access the SSD can seem intimidating at first, but it’s not as complicated as it seems. To begin with, you’ll need a screwdriver and some knowledge of what your laptop’s interior looks like. Once you remove the screws and lift off the cover, you’ll be able to spot the SSD.
It’s typically a thin, rectangular-shaped device with a SATA ribbon cable connecting it to the motherboard. If you’re having trouble spotting it, consult your laptop’s manual or look up an image of it online. Once you locate the SSD, gently disconnect the SATA ribbon cable and remove the screws securing it in place.
Remember to ground yourself beforehand to avoid damaging the components with static electricity. Once the SSD is accessible, you can upgrade it or transfer data to a newer one. With some basic hardware knowledge and a little bit of care, accessing your laptop’s SSD is a simple task that any DIY enthusiast can accomplish.
Locating the SSD
If you’re looking to upgrade or replace the SSD in your computer, the first step is locating it. The SSD is usually located near the bottom of your laptop or desktop. For laptops, you’ll need to remove the back panel of your device to access it.
For desktops, you may need to open up the case to access it. Once you locate the SSD, you’ll need to make sure that it’s not secured by any screws or brackets, as these will need to be removed before you can access the drive. It’s important to be gentle when removing any components, as you don’t want to cause any damage to your computer.
With a little patience and careful handling, you can successfully locate and access your SSD for replacement or upgrade.
Removing the SSD
If you’re wondering how to remove the SSD from your laptop, don’t worry, it’s not as complicated as it may seem. First, make sure you have all the necessary tools, such as a screwdriver and an anti-static wristband to prevent any damage to the components. Next, shut down your laptop and unplug all cables and peripherals.
Turn the laptop over and locate the SSD, which is usually located near the bottom of the laptop. Remove any screws or brackets holding the SSD in place, being careful not to damage any nearby components. Once the SSD is loose, carefully disconnect any cables or connectors attached to it.
Finally, gently remove the SSD from its slot. Congratulations – you’ve successfully removed your laptop’s SSD! Remember to handle the SSD with care when you’re ready to reinstall it.
Disconnecting the power and data cables
If you need to remove the SSD from your computer, the first step is to disconnect the power and data cables from the device. This ensures that no electricity is flowing to prevent any potential accidents. Once you’ve done this, gently remove the SSD by unscrewing any retaining screws or brackets.
The SSD should then slide out of its slot quite easily. It’s essential to handle the SSD carefully, as it is a delicate piece of equipment. Remember that these small devices can store a significant amount of data, so it’s crucial to handle them with care.
With just a few simple steps, you can remove the SSD safely and efficiently. So, take your time, follow the instructions, and you’ll have your SSD out of your computer in no time.
Securing the SSD bracket or screws
When it comes to removing the SSD from your computer, the first step is securing the bracket or screws. This is important because if the SSD is not held in place properly, it can become dislodged during the removal process and potentially cause damage to other components in your computer. To ensure that the SSD is secure, check that the bracket or screws are tightened correctly before attempting to remove it.
If you are unsure how to do this, consult your computer’s manual or seek professional help. Once the bracket or screws are secure, you can then safely remove the SSD by gently pulling it out of its socket. Remember to store the SSD in a safe place to avoid damage and make sure to properly dispose of it if you are no longer using it.
By taking these precautions, you can safely remove your SSD without causing any damage to your computer or components.
Removing the SSD from the motherboard or slot
Removing the SSD can be a daunting task, but it’s not as difficult as it may seem. There are many reasons why you might need to remove an SSD from your PC – maybe you’re upgrading to a larger capacity drive, maybe you’re troubleshooting a hardware issue, or maybe you’re trying to repurpose your SSD. Whatever the reason may be, there are a few steps you can follow to safely remove your SSD from the motherboard or slot.
First, make sure your PC is turned off and unplugged from the power source. Locate the SSD on the motherboard or slot and identify any screws or retention clips securing it in place. Carefully remove the screws or retention clips and gently slide out the SSD from the socket.
Be sure to handle the SSD with care, avoiding any rough handling or dropping it. Once you have removed the SSD, you can install your new drive or use it for whatever purposes you need. Remember to take the necessary precautions and always handle hardware with care to prevent any damage that may occur.
Conclusion
Removing a laptop SSD may seem like a daunting task, but with the right tools and a little bit of patience, it’s actually quite simple. Just remember to back up your data beforehand, and make sure you have the necessary screwdrivers and antistatic wrist strap to avoid any mishaps. And if all else fails, just give it a good whack with a hammer – I’m kidding, please don’t do that.
Now go forth and boldly remove that SSD, you tech-savvy superstar!”
FAQs
What tools do I need to remove my laptop SSD?
You will need a screwdriver, an anti-static wrist strap, and a plastic spudger tool.
Is it safe to remove the SSD from my laptop while it is powered on?
No, it is not safe to remove the SSD while the laptop is powered on. Make sure the laptop is turned off and unplugged before removing any components.
Will removing the SSD from my laptop void the warranty?
It depends on the manufacturer’s warranty policy. Some manufacturers may allow for user upgrades, while others may require an authorized service provider to perform any upgrades or repairs to maintain the warranty.
How do I transfer data from my old SSD to a new one?
You can use cloning software to transfer the contents of your old SSD to a new one. Some SSD manufacturers may also have their own transfer software available for download.