Are you looking to add some lightning speed to your Acer Aspire 5 laptop? Look no further, as we bring you a step-by-step guide on how to install an SSD. Upgrading from a conventional hard drive to an SSD can breathe new life into your laptop, giving it a significant boost in performance. It reduces boot-up time, enhances the overall speed of the machine, increases battery life, and provides ample space for storage.
If you are worried about the technicality of the process or the cost involved, we assure you that it’s neither complicated nor expensive. With a few simple tools and a compatible SSD, you can have your Acer Aspire 5 running like a dream in no time. We will guide you through the process from start to finish, including the precautions and preparatory steps, such as backing up your data and creating a recovery drive.
Our easy-to-follow instructions will enable you to switch out your HDD and install an SSD in its place without breaking a sweat. So why wait? Let’s transform your Acer Aspire 5 into a lightning-fast machine, and take your productivity to the next level.
Check Compatibility
If you’re looking to increase the storage capacity of your Acer Aspire 5 laptop, one of the easiest ways to do so is by adding an SSD. But before you go ahead and purchase one, it’s important to check its compatibility with your laptop. You need to make sure that the SSD you’re planning to install is the right size and interface for your laptop.
The Acer Aspire 5 supports 5-inch SATA SSDs, so make sure to get one that meets these specifications. Additionally, if your laptop already has an HDD, you need to make sure that there’s an open slot for an additional storage drive.
It’s always a good idea to consult the manufacturer’s specifications or seek the advice of a professional before making any changes to your laptop’s hardware. By taking the time to check compatibility, you can ensure a seamless upgrade and avoid any potential problems down the line.
Research compatibility of SSD with Aspire 5 model
If you’re looking to upgrade your Acer Aspire 5’s storage by adding a solid-state drive (SSD), the first thing you’ll need to check is compatibility. Not all SSDs are compatible with every laptop model, so it’s important to do your research before making a purchase. One way to ensure compatibility is to check the laptop’s specifications and look for the type of interface used by its current storage drive.
The Acer Aspire 5 typically uses a 5-inch SATA III interface, which means any SSD with the same interface should work. You can also check with the SSD manufacturer’s website to see if their product is compatible with the Acer Aspire 5 specifically.
Doing a little bit of research ahead of time can save you from frustration and potential compatibility issues down the road.

Buy SSD if compatible
If you’re thinking of upgrading your computer, one of the first things you might consider is investing in a solid-state drive (SSD). But before you dive in and make a purchase, it’s essential to check if your computer is compatible. Not all computers are designed to work with SSDs, and attempting to install one that isn’t compatible could cause more harm than good.
To find out if your computer is compatible with an SSD, you should start by checking the specifications of the computer’s motherboard. You can usually find this information by looking up the make and model of your computer online or by consulting the user manual. Pay attention to the type of SSD connector the motherboard supports as well as the type of interface the SSD uses.
It’s also a good idea to check if your operating system can support an SSD. Most modern operating systems such as Windows 10 and MacOS are compatible with SSDs, but it’s always best to double-check before making a purchase. Finally, you’ll also need to ensure that your computer has enough space to accommodate the new SSD.
In conclusion, an SSD can be an excellent investment for improving your computer’s performance. But before purchasing an SSD, it’s crucial to ensure that your computer is compatible to avoid any issues. Don’t be afraid to reach out to a professional if you are unsure about compatibility or installation.
Gather Tools
Adding an SSD to your Acer Aspire 5 laptop can significantly boost its overall performance, allowing for faster boot-up and application loading times. Before you start, make sure you have the necessary tools including a screwdriver and an anti-static wristband to avoid damaging your device during the installation process. You will also need an SSD, such as the Samsung EVO 860 or Crucial MX500, that is compatible with your laptop’s specifications.
Once you have gathered all the tools required, turn off your computer and disconnect the power source. Flip over your laptop and locate the screw that holds the bottom panel in place. Carefully remove the screw and slowly lift the panel to reveal the internal components.
Locate the empty SSD slot and align your SSD, gently sliding it into place until it clicks. Replace the bottom panel and reinsert the screw to secure it in place. Remember to connect the power source and turn your computer back on, making sure to check that your laptop detects the newly installed SSD.
With the addition of an SSD, you can now enjoy faster processing speeds and a more responsive computing experience.
Screwdriver, static-free wrist strap, and SSD
In order to upgrade or repair your computer or laptop, you’ll need a number of essential tools. Whether the task involves installing a new SSD hard drive or replacing a component, you don’t want to be caught without the necessary gear. One absolutely vital tool you’ll need is a screwdriver and it’s essential to have a magnetic one that won’t make screws go flying.
Another crucial item is a static-free wrist strap. This tool helps prevent static electricity from building up and damaging delicate electronic components. Lastly, if you are upgrading your hard drive, you’ll need an SSD that is compatible with your device.
Look for an SSD with a high read and write speed, and one that is designed to work with your specific computer or laptop. Ensuring you have these crucial tools before starting your project will make the task easier and make the likelihood of damaging your device much lower.
Open the Laptop
If you’re looking to add an extra SSD to your Acer Aspire 5, don’t worry, the process is pretty straightforward. The first thing you need to do is turn off your laptop and unplug it from the power source. Then, flip the laptop over and locate the screws that keep the bottom panel in place.
Once you remove these screws, you can easily lift the bottom panel off and expose the internal components of your laptop. Then, locate the empty SSD slot and install your new SSD into it. Be sure to secure it firmly in place with the screws provided.
Finally, snap the bottom panel back into place and tighten the screws back in. That’s it! With your new SSD installed, your Acer Aspire 5 will run lightning-fast, making your computing experience smooth and efficient.
Remove the screws holding the back panel in place
Opening a laptop requires removing the back panel. To do this, you first need to identify the screws holding it in place. Typically, these screws are located along the sides or the bottom of the laptop.
You can use a screwdriver to unscrew them, but be sure to keep track of where each screw goes. Once all the screws are removed, gently lift the back panel off. Some laptops may use clips or tabs to hold the back panel in place, so you may need to apply a bit of force to detach it.
Remember to be careful and patient when opening your laptop to avoid damaging any internal components. With these steps, you should now be able to access the internal components of your laptop and make necessary repairs or upgrades.
Gently remove back panel to expose internal components
If you’re looking to upgrade or repair your laptop’s internal components, the first step is to open the laptop. Gently removing the back panel is the best way to expose the internal hardware without damaging any of the components. This process can be intimidating for beginners, but with the right tools and careful attention, it can be done easily and safely.
It’s important to keep in mind that every laptop model is different, so make sure to consult the manufacturer’s manual or online guides for specific instructions on how to open your laptop. Once the back panel is removed, you’ll be able to access the RAM, hard drive, battery, and other internal components, and begin any necessary repairs or upgrades. Remember to work slowly and methodically, making note of any screws or connectors that may need to be removed or unplugged before accessing the desired component.
With a bit of patience and attention to detail, opening your laptop can be a simple and rewarding process.
Install the SSD
If you’re looking to improve the performance of your Acer Aspire 5, adding an SSD is a great option. The process is relatively simple, and you can do it yourself easily. Here’s how to install an SSD in your Acer Aspire
First, you’ll need to make sure you have the correct SSD for your laptop model. Once you have your SSD, you’ll need to power off your laptop, disconnect the power adapter, and remove the back panel. You may need to remove some screws or tabs to do this.
Once you have access to the inside of your laptop, you’ll need to locate the hard drive bay. Remove the hard drive and replace it with the SSD. Be sure to secure it in place with screws or tabs.
Once you’ve done this, replace the back panel, re-connect the power adapter, and power on your Acer Aspire Your laptop should recognize the new SSD and be ready for use. Adding an SSD can improve the performance of your Acer Aspire 5 significantly, giving you faster boot and load times.
It’s definitely worth the effort!
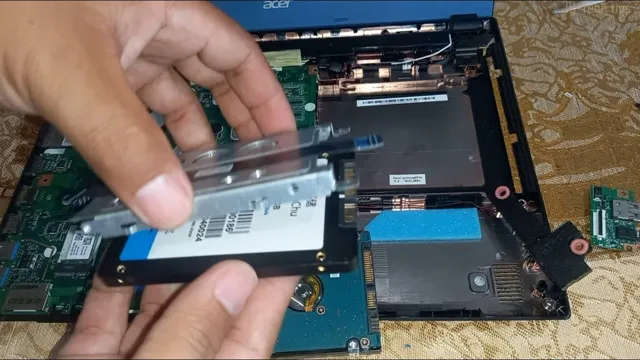
Locate the HDD bay and unscrew the bracket
Installing an SSD to replace your HDD is a great way to boost your computer’s performance and speed up loading times. Once you’ve obtained your SSD, the next step is to install it properly. First, locate the HDD bay in your computer by checking your user manual or doing a quick online search.
Once you’ve found it, unscrew the bracket that’s holding your HDD in place. Make sure to ground yourself to avoid any potential static damage to your hardware. After you’ve removed the bracket, gently slide out your HDD from the case and replace it with your new SSD.
Secure the SSD in place using the screws from the bracket you just removed. When you’re done, you can either store your old HDD or repurpose it as an external drive. With your new SSD installed, you’ll enjoy faster boot times, quicker app launches, and a more responsive computer overall.
So if you’re looking to upgrade your computer, installing an SSD is definitely worth considering.
Remove HDD and replace with SSD
If you’re planning on upgrading your computer’s performance, one of the best ways to do so is by replacing your hard disk drive (HDD) with a solid-state drive (SSD). By doing this, you can expect much faster boot times, faster application load times, and overall faster read/write speeds. To install your new SSD, you’ll need to first remove your old HDD from your computer.
This involves opening up your computer, unplugging the old HDD, and unscrewing it from the mounting bracket. Once you’ve done this, you can install your new SSD in the same mounting bracket, plug in the necessary cables, and screw it into place. With your new SSD in place, you’ll be ready to start enjoying the benefits of faster computing speeds.
So don’t be afraid to take the plunge and switch out your HDD for an SSD. Your computer (and your patience) will thank you!
Finalize Installation
If you’re looking to upgrade your Acer Aspire 5 by adding an SSD, the first step is to finalize the installation. Once you’ve physically installed the SSD by following our previous steps, you’ll need to format and install a new operating system onto the SSD. This involves creating an installation media such as a USB drive with the operating system files, then booting your laptop from the drive.
From there, you’ll need to follow the prompts to install the new operating system onto the SSD. During the installation process, be sure to select the SSD as the destination drive and format it to ensure it is working optimally. Once the installation is complete, you can start enjoying the enhanced performance and responsiveness of your Acer Aspire 5 with the new SSD.
Remember to backup any important files beforehand and consult with a professional if needed. Adding an SSD to your Acer Aspire 5 can significantly improve its overall performance, making it a worthwhile upgrade for any user.
Screw the SSD bracket in place
Now that you’ve attached the SSD to the bracket, it’s time to secure it in place by screwing it in. The bracket should have pre-drilled screw holes that align with your computer case. Using the appropriate screws, carefully screw the bracket into place.
Be sure not to over-tighten the screws as this could damage the bracket or computer case. Once you’re confident that the bracket is securely attached, gently slide the SSD into the bracket. It should fit snugly and securely.
Congratulations, you’ve successfully installed your SSD! With the increased speed and reliability, you can now enjoy a smoother computing experience with faster boot times and quicker response times. Just remember to back up your data regularly and stay up-to-date with regular SSD maintenance to ensure it continues to perform at its best.
Reattach back panel and screws
After successfully installing your device, it’s now time to close it up and make sure everything is locked in place. Reattaching the back panel and screws is the final step in the installation process. Start by aligning the panel with the device and carefully lower it into position.
Once it’s in place, gently press down to ensure a firm connection. Next, use the screws provided to fix the panel in place. It’s important to not overtighten the screws as that can cause damage to the device or strip the screw holes.
Once the screws are securely tightened, run your hand over the panel to check for any protrusions or gaps. If everything looks good, then you’re ready to start using your newly installed device. Congratulations on a successful installation!
Boot Up and Verify
Adding an SSD to your Acer Aspire 5 laptop is a great way to improve its speed and performance. Once you have installed the SSD, you need to boot up and verify that everything is working correctly. To do this, first shut down your laptop and remove the battery.
Then, locate the hard drive bay and carefully insert the SSD, making sure to securely fasten it in place. Next, replace the battery, plug in your laptop, and turn it on. Once you are logged in, go to the File Explorer and check that your SSD is recognized by your computer.
You can also check the storage capacity of your SSD and compare it to your previous hard drive to verify that the SSD has been installed correctly. Congratulations, you have successfully added an SSD to your Acer Aspire 5!
Power on laptop to ensure SSD is working correctly
SSD, laptop, boot up, verify It’s always a good idea to check your laptop’s SSD after installing it to ensure that everything is working correctly. The first step is to power on your laptop and wait for it to boot up. Once it’s running, navigate to your computer’s system information to check if the SSD is being detected and recognized by your device.
This can be done by going to “System -> Storage -> Disk Management”. Here, you should see the SSD listed as a new drive. If the SSD is not showing up in disk management, you may need to go into your BIOS settings and make sure that the SSD is enabled.
Additionally, you can run a speed test to verify that your new SSD is running at its advertised speeds. This can be done by downloading a free benchmark tool such as CrystalDiskMark. Running a benchmark test will give you an idea of the read and write speeds of your SSD and ensure that everything is running correctly.
By taking these steps, you can be confident that your laptop’s new SSD is functioning correctly and ready to use.
Verify SSD is recognized in the BIOS settings
If you have recently installed a new SSD on your computer, it is essential to check if it is properly recognized in the BIOS settings. To do this, you will need to reboot your computer and enter the BIOS settings by pressing the specific key during boot-up (usually F2, F10, or Delete). Once you are in the BIOS settings, navigate to the storage devices section, and check if your SSD is listed and detected.
If it is not, make sure that it is correctly connected to the motherboard and has enough power. It is also recommended to update your BIOS to the latest version to ensure compatibility with your new SSD. Remember, verifying SSD recognition in the BIOS is crucial for a hassle-free computer experience and better performance.
Conclusion
In conclusion, adding an SSD to your Acer Aspire 5 can be the ultimate upgrade for your laptop’s performance. It’s an affordable and straightforward process that can boost your computer’s speed, enhance your multitasking abilities, and give you peace of mind knowing that your files are safe and sound on a reliable storage device. So don’t wait any longer, take the leap, and add an SSD to your Acer Aspire 5 today – your laptop (and your productivity) will thank you!”
FAQs
What is the maximum SSD storage capacity that can be added to Acer Aspire 5?
Depending on the model, Acer Aspire 5 can support up to 1TB SSD storage capacity. It is recommended to check and confirm the maximum capacity supported by the specific model before adding an SSD.
Can I add an SSD to Acer Aspire 5 if it already has a hard disk drive (HDD)?
Yes, Acer Aspire 5 comes with a mounting kit for SSD as well as HDD. It is possible to add an SSD to it even if it already has an HDD.
What type of SSD is compatible with Acer Aspire 5?
Acer Aspire 5 supports NVMe as well as SATA SSDs. However, it is important to check the compatibility of the SSD before purchasing it.
Is it possible to install the operating system on the added SSD in Acer Aspire 5?
Yes, it is possible to install the operating system on the added SSD in Acer Aspire 5. The user can configure the boot order in BIOS to ensure that the system boots from the SSD.