Looking for a way to add flexibility to your computer’s booting options? One solution is to install Easy to Boot in the second partition of your SSD. This nifty tool allows you to create a customizable menu of operating systems and tools to boot from, giving you the ability to switch between different setups with ease. With Easy to Boot, you can bring life to an unused partition on your drive, making it a valuable addition to your workflow.
In this blog, we’ll go over the steps to install Easy to Boot on your second partition and show you how to customize your boot options to suit your needs. Whether you’re a frequent user of different operating systems or just want a more streamlined booting process, this guide will have you up and running in no time. So, let’s dive in and explore the benefits of an Easy to Boot installation.
Before you Begin
Before you begin installing Easy2Boot in the second partition of your SSD, there are a few things you should consider. First and foremost, make sure you have a backup of all your important files and data, as the installation process could potentially wipe out everything on your drive. Additionally, it’s important to ensure that your system meets the minimum requirements for running Easy2Boot smoothly.
These requirements typically include a system with at least 1GB of RAM and a 2GHz processor. Once you’ve taken these precautions, you’re ready to proceed with the installation process. Remember, always read the instructions carefully and don’t rush through the process.
By following these steps and taking the necessary precautions, you’ll be able to successfully install Easy2Boot in your second partition and enjoy all the benefits it has to offer.
Check SSD Compatibility
Before you start upgrading your computer with a new SSD, it’s essential to check its compatibility. SSDs come in different form factors, and not all of them are compatible with every computer. The first thing to consider is whether your computer has an open bay to install an SSD.
You also need to check the dimensions of the SSD to make sure it fits without any compatibility issues. Generally, most SSDs come in the 5-inch form factor, but you should check the documentation of your computer and SSD to make sure it’s compatible.
Additionally, check your computer’s BIOS settings and the version of your operating system to ensure that they can recognize and support the SSD. Overall, checking your computer’s compatibility with an SSD before installation can save you from future issues.
Backup Data
Before you begin backing up your data, it’s important to determine what exactly needs to be backed up. This could include important documents, photos, music, videos, and any other files that are essential to you. Once you have a clear idea of what you need to back up, you should also consider how frequently you will need to do so.
For instance, if you add new files to your computer regularly, it may be necessary to back up your data more frequently to ensure that you don’t lose any crucial information. Additionally, it’s important to choose a reliable backup method that suits your needs – whether it’s an external hard drive, cloud storage, or a physical backup like a USB drive. By taking these factors into consideration, you can protect your valuable data and ensure that you always have access to your most important files.
Creating a Second Partition
If you want to install Easy to Boot in a second partition of your SSD, the process is pretty straightforward. First, you’ll need to create a new partition on your SSD using your operating system’s disk management tool. Once you’ve created the partition, you can download Easy to Boot and extract the files to the new partition.
From there, you can configure the boot order in your BIOS or UEFI settings to prioritize the Easy to Boot partition. This will allow you to boot into the Easy to Boot environment whenever you need to, without interfering with your primary operating system. Just remember to make sure you have enough storage space on your SSD before creating the second partition.
With these steps, you can easily create a second partition and use Easy to Boot for all your booting needs!
Open Disk Management
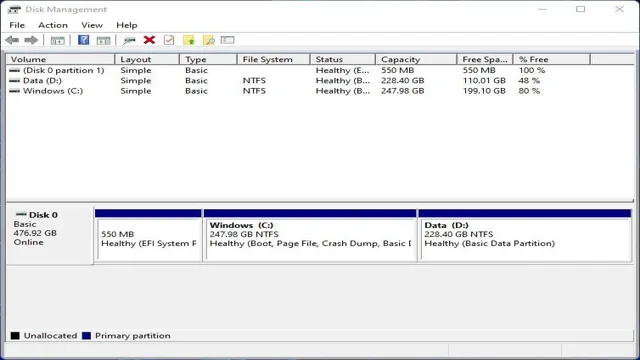
If you’re looking to create a second partition on your computer’s hard drive, you’ll need to access the Disk Management tool. Disk Management is a built-in Windows utility that allows you to manage disks and partitions. To access it, simply right-click on the Start button and select “Disk Management” from the menu.
Once you’re in Disk Management, you should see a list of all of your computer’s disks and partitions. To create a new partition, right-click on the disk that you want to create the partition on and select “New Simple Volume.” This will launch a wizard that will guide you through the process of selecting the size and formatting for your new partition.
Once you’ve completed the wizard, you’ll have a second partition on your computer’s hard drive that you can use for storing files and running programs. Just remember to be careful not to delete or modify any existing partitions, as this could cause data loss. With these simple steps, you can easily create a new partition to help keep your computer organized.
Shrink Existing Partition
If you need to create a second partition on your computer, you may need to shrink an existing partition first. This is a common process and can be done using the inbuilt Disk Management tool in Windows. To start, right-click on your computer icon and select “Manage.
” From there, select “Disk Management” and find the partition you want to shrink. Right-click on it and select “Shrink Volume.” This will bring up a window that will allow you to choose how much you want to shrink the partition by.
Keep in mind that you will need to leave enough space for the new partition you plan to create. Once you have selected the amount, click “Shrink” and the partition will be shrunk accordingly. From there, you can create a new partition in the unallocated space using the same Disk Management tool.
Overall, shrinking an existing partition is a simple process and can help you make the most of your computer’s storage space.
Create New Partition
Creating a second partition on your computer’s hard drive can be a great way to organize your files and improve system performance. To create a new partition in Windows, first, open the Disk Management tool by right-clicking on the Start menu and selecting “Disk Management” from the menu. From there, locate the drive you want to partition, then right-click on the unallocated space next to it and select “New Simple Volume.
” Follow the prompts in the wizard to set the size of the partition and assign a drive letter, then format the partition with the desired file system. It’s important to note that creating a new partition will erase any data on the drive, so it’s essential to back up any important files before proceeding. So, if you’re looking to optimize your computer’s storage and performance, creating a second partition can be a relatively easy and effective solution.
Installing Easy to Boot
If you’re struggling with installing Easy to Boot in the second partition of your SSD, don’t worry – the process is actually quite simple. The first thing you’ll need to do is download the Easy to Boot software and save it to your computer. From there, you should create your second partition on your SSD using a partition manager program.
Once that’s done, you can copy the Easy to Boot files from your computer to the second partition. You’ll then need to configure your computer’s BIOS settings to allow for booting from the second partition. This should be relatively easy to do, and you can find step-by-step instructions online or in the Easy to Boot documentation.
Once your BIOS is configured correctly, you should be able to boot your computer into Easy to Boot from the second partition on your SSD. With a little bit of patience and some careful configuration, you’ll be up and running with Easy to Boot in no time!
Download Easy to Boot
If you’re looking to install Easy to Boot on your computer, then you’re in luck! This software allows you to create a multi-boot USB drive, which means you can boot different operating systems or tools from a single USB drive. The first step is to download the Easy to Boot software from the official website. Once downloaded, extract the files and open the Easy2Boot USB drive.
From there, you can start to add ISO files for the operating systems you want to run. You can also customize the boot menu and add additional tools or software to your USB drive. Creating a multi-boot USB drive has never been easier thanks to Easy to Boot.
With this software, you can easily switch between different operating systems or boot tools with just a few clicks. So what are you waiting for? Start your Easy to Boot installation today and experience the convenience of a multi-boot USB drive!
Create Bootable USB
If you are looking for an easy way to create a bootable USB drive, then installing Easy to Boot is a great solution. Easy to Boot is a free tool that can help you create a bootable USB drive for Windows, Ubuntu, Linux Mint, and other operating systems. It’s a user-friendly tool that doesn’t require any technical knowledge.
All you have to do is download the tool from the official website, and install it on your computer. From there, you can easily create a bootable USB drive by following the step-by-step instructions. Whether you want to upgrade your operating system, or you need to troubleshoot a computer that won’t start, creating a bootable USB drive with Easy to Boot is a convenient and reliable option.
So don’t hesitate to download and install Easy to Boot today, and create a bootable USB drive for all your needs!
Boot from USB
If you’re looking to boot your computer from a USB drive, you may want to consider installing Easy to Boot. This versatile software allows you to create a bootable USB drive that can contain multiple operating systems and other tools, all in one convenient package. One of the great things about Easy to Boot is how easy it is to use.
Once you’ve downloaded and installed the software, you simply choose the ISO files you want to include on your bootable USB drive. Easy to Boot can even automatically create menus for the various operating systems and tools, making it easy to select the one you want to use. Another benefit of Easy to Boot is its flexibility.
You can customize your bootable USB drive as much or as little as you want, depending on your needs. This makes it a great option for IT professionals who need a variety of tools at their disposal, or for anyone who wants to experiment with different operating systems without having to install them on their computer. Overall, if you’re looking to boot from a USB drive, Easy to Boot is definitely worth considering.
It’s easy to use, highly customizable, and can save you a lot of time and hassle in the long run. So why not give it a try and see how it can help you get the most out of your computer?
Installing Easy to Boot in Second Partition
If you are looking to install Easy to Boot in the second partition of your SSD, it may seem daunting at first, but it doesn’t have to be. Your first step is to create a new partition on your SSD, using your preferred partitioning tool. Make sure the partition is large enough to hold all the files you will need for Easy to Boot.
Next, download the Easy to Boot software and save it to your new partition. From there, you can follow the installation instructions provided by the software. It’s important to note that Easy to Boot should be installed to the second partition, not the main one, to avoid conflicts with any other operating systems you may have installed.
With a bit of patience and following the instructions carefully, you’ll have Easy to Boot up and running in no time. Happy booting!
Select Second Partition During Installation
When installing Easy to Boot, it’s important to consider which partition you want to install it in. Selecting the second partition is a popular choice among users. This is because the first partition is typically reserved for the operating system, so installing Easy to Boot in the second partition allows for a clean separation of the boot environments.
By selecting the second partition, you can ensure that your primary operating system remains untouched and avoid any potential conflicts. This can also make it easier to manage and update your bootable USB drives. To select the second partition during installation, you’ll need to pay close attention to the prompts provided by the installation wizard.
Make sure to select the correct partition and avoid accidentally overwriting your primary operating system or other important data. Overall, choosing the second partition during installation can help streamline the process and prevent any unnecessary headaches down the road. So, if you’re installing Easy to Boot, consider selecting the second partition for a smooth and hassle-free experience.
Finish Installation and Test Booting
Now that we have created a second partition, it’s time to install Easy to Boot on it and test booting. Installing Easy to Boot is simple, but it requires some attention to detail. First, download the latest version of Easy to Boot from the official website.
Next, extract the files to a folder on your computer. Then, copy the contents of the ISO file to the second partition you created. Ensure that you copy the files to the root of the second partition and not into a subfolder.
Once the files are copied, run the MAKE_E2B_USB_DRIVE.cmd file and follow the instructions. After that, your USB drive should be ready to boot using Easy to Boot in the second partition.
To test booting, insert the USB drive into your computer and restart it. Depending on your computer’s settings, you may need to press a key to enter the boot menu. Choose the USB drive and wait for Easy to Boot to load.
Once it has loaded, test booting several ISO files to ensure that they work correctly. Easy to Boot is a versatile tool that simplifies the process of booting ISO files from a USB drive. With this tool installed on a second partition, you can easily and quickly test new ISO files without interrupting your primary system.
So, go ahead and install Easy to Boot, and enjoy the convenience it provides!
Conclusion
In conclusion, installing Easy2Boot on a second partition of your SSD is easier than a pie that’s been pre-sliced! With just a few simple steps, you’ll have a powerful and versatile tool at your fingertips that can handle just about any bootable ISO file you throw at it. So why settle for a single-boot system when you can have the flexibility and convenience of Easy2Boot? Go ahead, give it a try, and unlock a whole new level of convenience and efficiency!”
FAQs
What is Easy2Boot and how does it work?
Easy2Boot is a bootable USB drive creator that allows you to boot multiple ISO images from a single USB drive. It works by creating a second partition on your drive where you can store all your ISO images, and then uses a boot loader to display a menu of choices for you to select from when you boot your computer from the USB drive.
Can I install Easy2Boot on the second partition of my SSD?
Yes, you can install Easy2Boot on any partition of your SSD, and it is recommended to create a second partition specifically for your ISO images. This will ensure that your bootable USB drive remains organized and easy to use.
How do I create a bootable USB drive using Easy2Boot?
To create a bootable USB drive using Easy2Boot, you will need to download the Easy2Boot software and run it on your computer. Then, follow the on-screen instructions to select your USB drive and the ISO images you want to include. Once the process is complete, your USB drive will be ready to use.
How can I add or remove ISO images from my Easy2Boot USB drive?
To add or remove ISO images from your Easy2Boot USB drive, simply copy or delete the files from the second partition on your USB drive. You can also use the Easy2Boot software to quickly add or remove ISO images from your drive. Just make sure to update the boot loader menu after making any changes.