Are you looking to upgrade your computer by adding an SSD, but unsure of how to connect it to your motherboard? Fear not, as we have got you covered with a step-by-step tutorial on how to connect an SSD to a motherboard. An SSD, or solid-state drive, is a faster and more efficient storage device than the traditional hard drive. It uses flash memory to store data, rather than spinning disks, resulting in faster boot-up times and overall improved performance.
However, before you can enjoy its benefits, you need to connect it properly to your motherboard. The process may seem daunting at first, but it’s actually quite simple. With just a few tools and some basic knowledge, you can have your SSD connected in no time.
In this tutorial, we’ll guide you through the process, including identifying the correct components, mounting the SSD, and connecting it to your motherboard. So, whether you’re a seasoned tech enthusiast or a novice computer user, follow along with our tutorial and get ready to experience faster and more efficient performance from your computer.
Understanding SATA Connections
Have you ever wondered how an SSD gets connected to your motherboard? The process involves a SATA (Serial ATA) connection. The SATA interface is the most common and popular way to connect storage devices, including hard drives and SSDs, to a computer’s motherboard. SATA interfaces can be found on any modern PC and are located on the motherboard itself.
The actual connection is made using a SATA cable that runs between the SSD and the motherboard’s SATA port. It’s a straightforward process that allows for fast data transfer rates and reliable connectivity. Overall, the SATA connection method is an essential part of modern PC construction, enabling fast and reliable storage solutions for users.
SATA vs. SATA Express
SATA vs. SATA Express – Understanding SATA Connections When it comes to storage options, SATA has been the go-to standard for years. SATA offers high-speed data transfer rates and is widely supported.
However, with the increasing demand for faster transfer rates, SATA Express has emerged as a new standard. SATA Express provides faster transfer rates by incorporating PCIe technology, making it possible to achieve speeds of up to 16 GB/s. This is a significant improvement from the maximum of 6 GB/s for traditional SATA connections.
SATA Express also offers higher power output, which is beneficial for high-performance devices such as solid-state drives. However, one downside of SATA Express is that it requires a new connection type, meaning it is not compatible with standard SATA connectors. This means that if you want to take advantage of the faster transfer rates and higher power output of SATA Express, you will need to purchase new hardware that supports it.
In conclusion, both SATA and SATA Express have their benefits and can be suitable for different use cases. If you require faster transfer speeds and higher power output, SATA Express may be the way to go. However, for most general use cases, SATA will continue to be the widely supported standard for the foreseeable future.
Identifying SATA Ports on Your Motherboard
If you’re building or upgrading your own PC, understanding the different types of storage connections on your motherboard is crucial. SATA ports are the most common type of connection used for connecting hard drives, solid-state drives (SSDs), and optical drives to your motherboard. They’re typically rectangular in shape, with a small L-shaped notch on one side that helps you to line them up properly.
The port closest to the CPU is usually labeled as SATA0 or SATA1, with subsequent ports labeled sequentially higher (SATA2, SATA3, etc.). You can also usually identify SATA ports by their color – most motherboards use black or white ports for SATA connections.
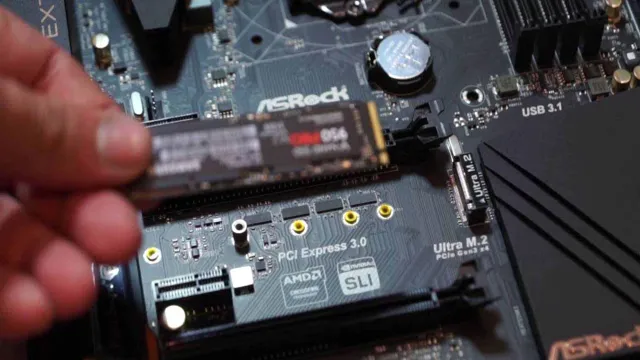
It’s important to note that SATA ports are not the same as M.2 slots or PCIe slots, which are used for faster storage options like NVMe SSDs or dedicated graphics cards. By understanding the different storage connection options available on your motherboard, you’ll be able to choose the best components for your build and optimize your computer’s performance.
Connecting the SSD
If you’re upgrading your computer or building a new one, you might be wondering how the SSD is connected to the motherboard. Well, the connection is done through a SATA III interface, which is a data transfer protocol that allows for fast transfer speeds between the SSD and the motherboard. The SATA III interface uses a small cable or connector that plugs into the motherboard and the SSD.
Most motherboards come with multiple SATA III ports, allowing you to connect multiple storage devices, including SSDs, HDDs, and optical drives. Additionally, some newer motherboards also support PCIe NVMe SSDs, which are even faster than traditional SATA III SSDs. Overall, connecting an SSD to the motherboard is a straightforward process and is essential for high-speed data transfer and great system performance.
Step-by-Step Guide to Connecting SSD to SATA Port
Connecting an SSD to a SATA port can be a simple and easy process. First, ensure that your computer is turned off and disconnected from any power sources. Once that is done, locate the SATA port on your motherboard.
It should be a small rectangular slot, usually located near the hard drive. Then, take your SSD and line up the connectors with the SATA port. Make sure to firmly press the SSD down until it clicks into place.
Once you have secured the connection, you can then power on your computer and begin using your new SSD. By following these simple steps, you can quickly and easily upgrade your computer’s storage capabilities and improve its overall performance. So, why not give it a try and see the difference for yourself?
Adding Power to the SSD
When it comes to adding power to your SSD, one of the most important steps is connecting it properly. Whether you’re upgrading your laptop or building a custom PC, it’s essential to ensure that the SSD is connected correctly to avoid any hardware malfunctions. First, make sure you have the appropriate SATA or NVMe cables that are compatible with your SSD.
Then, carefully attach the cables to the SSD and the motherboard, taking care not to bend the pins. Once you have connected the SSD, it’s important to ensure that it’s getting adequate power. Make sure that your power supply unit has the proper wattage output to support the SSD, and that all power cables are securely connected.
A properly connected and powered SSD can significantly boost your computer’s performance, providing faster boot and load times, and improved application responsiveness. So, don’t neglect this crucial step when upgrading your storage solution.
Troubleshooting Connection Issues
Connecting an SSD to your computer can sometimes be a daunting task, especially if you’re not tech-savvy. Before you begin the process, ensure that the computer is turned off and unplugged from the power source. Next, locate the SATA port on your motherboard.
The SATA port is where the SSD will be connected. Carefully insert the SSD into the SATA port and secure it in place using screws. Once the SSD is connected, power on your computer and go into the BIOS settings.
Ensure that the SSD is detected by the computer and set it as the primary boot device. This will allow your computer to boot from the SSD and greatly improve your computer’s performance. With these few simple steps, you can boost your computer’s speed and storage capacity by adding an SSD to your system.
Summary and Conclusion
In the world of technology, speed is everything. And when it comes to storage, nothing beats the lightning-fast speed of an SSD. But just how does an SSD connect to your motherboard? Well, it’s as easy as ABC! All you need is a compatible connector, a free SATA port and a power cable.
And voila! You’re all set to enjoy lightning-fast read and write speeds, increased durability, and improved boot and load times. So if you want to take your computer’s performance to the next level, it’s time to make the switch to an SSD. After all, with great storage performance comes great responsibility (and much shorter loading times).
“
FAQs
What is an SSD?
An SSD (solid-state drive) is a storage device that uses flash memory to store data, instead of the spinning disks used in traditional hard drives.
How is an SSD connected to a motherboard?
An SSD can be connected to a motherboard through several methods, including SATA cables, M.2 connectors, and PCIe expansion slots.
What are the advantages of using an SSD instead of a traditional hard drive?
SSDs offer faster read and write speeds, lower power consumption, less heat generation, and increased durability compared to traditional hard drives.
Can a motherboard support multiple SSDs?
Yes, most modern motherboards have multiple SATA ports and M.2 connectors, allowing for the installation of multiple SSDs. Some motherboards also have multiple PCIe expansion slots for additional SSDs.