Are you tired of your slow, outdated computer? Are you ready for a major upgrade that will drastically improve your device’s performance? Look no further than upgrading to an SSD. An SSD, or solid-state drive, is a storage device that uses flash memory to store data and has no moving parts. Unlike traditional hard disk drives, SSDs are faster, more reliable, and less likely to fail.
Upgrading to an SSD may sound intimidating, but it’s actually a relatively simple process that can be done in just a few steps. In this step-by-step guide, we’ll break down the process and show you how to upgrade to an SSD yourself. From choosing the right SSD for your needs, to backing up your data and transferring it to your new drive, we’ll cover everything you need to know.
So whether you’re a tech novice or a seasoned pro, follow our guide and you’ll be up and running on your new SSD in no time.
Why upgrade to an SSD?
Switching from an HDD to an SSD may seem daunting, but the benefits of upgrading make it worth the effort. An SSD, or solid-state drive, is faster and more durable than a traditional hard disk drive (HDD). Making the switch can lead to faster boot times, quicker application launch speeds and file transfers, and longer lifespan for your storage device.
How do you switch from an HDD to an SSD? Firstly, you’ll need to choose an SSD that meets your needs in terms of size, speed, and capacity. Next, you’ll need to clone your existing HDD to the new SSD. To do this, you can use specialized software or take your computer to a professional.
Once the cloning process is complete, you can swap out the HDD for the new SSD. If you’re not confident with opening up your computer, it’s best to consult a professional. Upgrading to an SSD can significantly improve your computer’s performance and extend the lifespan of your storage device, making it a smart investment for both personal and business use.
The benefits of an SSD over an HDD
Upgrading from a traditional HDD to an SSD can significantly improve the performance of your computer. The SSD, or solid-state drive, has no moving parts, meaning it can access and transfer data at much faster speeds than an HDD. This results in lightning-fast boot times and faster software launches, making your computing experience much more efficient.
Not only that, but an SSD is also much more reliable, as there are no moving parts that can fail, so you don’t have to worry about losing your data. Additionally, SSDs consume less power than HDDs, which means your laptop’s battery life will be extended. In summary, upgrading to an SSD can provide faster load times, increased productivity, improved reliability, and longer battery life.
So, if you’re looking to boost your computer’s performance, an SSD upgrade is definitely worth considering.
Prepare for the switch
Switching from an HDD to an SSD can be a significant upgrade for your computer’s overall performance. But how do I switch from an HDD to an SSD? First, you need to back up all your important files and data to an external hard drive or cloud storage. Then, you’ll need to purchase a compatible SSD with the same form factor as your current HDD.
You will also need a screwdriver to open up your computer and replace the hard drive. Once you’ve installed the new SSD, you can install your operating system and all your programs. If you’re not familiar with how to install an operating system, you can find step-by-step instructions online or have a professional do it for you.
Keep in mind that the process may vary depending on your computer model, so it’s always a good idea to research specific instructions beforehand. Upgrading to an SSD can provide faster boot times, faster load times, and improved overall system performance, making it well worth the investment.
Back up your data
If you’re planning on switching devices or upgrading your computer, it’s important to prepare beforehand by backing up all your data. You wouldn’t want to lose all your important photos, documents, and files due to technical difficulties or errors during the switch. Backing up your data ensures that all your information is safe and easily accessible after the transition.
You can choose to back up your data using an external hard drive, cloud storage, or even a USB drive. It’s important to take the time to carefully transfer your data to ensure a smooth and secure transition. Don’t let the fear of losing everything hold you back from upgrading your technology – just remember to back it up first!
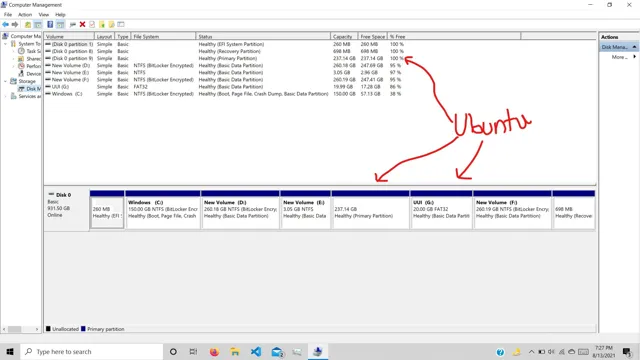
Create a bootable USB drive
If you’re considering switching to a different operating system, you’ll need to create a bootable USB drive. This is a crucial step in preparing for the switch. Creating a bootable USB drive allows you to install the new operating system onto your computer easily.
Plus, it gives you the flexibility to install the new OS on any computer you choose. To get started, you’ll need a USB drive that’s at least 8 GB in size and a reliable software program that can create a bootable drive. One popular option is Rufus, which is free to download and easy to use.
Simply download and install the program, insert your USB drive, and follow the step-by-step instructions. Once you’ve created your bootable USB drive, you’re one step closer to making the switch to a new operating system. So, don’t hesitate–prepare for the switch today and create a bootable USB drive with ease!
Install the SSD
If you’re looking to upgrade your computer’s storage capacity or improve its performance, switching from an HDD to an SSD can be a great idea. Before starting, you’ll need to gather some tools like a screwdriver and a migration kit (if your SSD didn’t come with one). After power off your computer, you’ll need to open your computer case and locate the hard drive mounting bay.
Unscrew the screws holding the HDD in place and remove it. Now, depending on your computer, you can insert the SSD into a separate bay or replace the HDD slot with the SSD. After placing the SSD, secure it with screws and then connect the SATA and power cables.
Finally, power on your computer and go to the BIOS settings to make sure the new drive is detected. Once detected, you can boot your operating system, and if everything is working correctly, you should notice a significant improvement in speed and performance. Hence, by following the above process, you can easily switch from your old HDD to a new SSD, giving your computer a much-needed boost!
Open your laptop or desktop
So, you’ve decided to upgrade your laptop or desktop’s performance by installing an SSD. Great choice! The first step in this process is to open up your computer. Depending on the device, this could be a simple task or require a bit of finesse.
It’s important to follow the manufacturer’s instructions carefully when doing so. Once your computer is open, locate the hard drive and remove it from the bay. Next, insert your new SSD into the same slot and secure it in place.
Double-check that it’s secure before closing up your computer and powering it on. Congratulations, you’ve successfully installed your SSD! Watch as your computer boots up faster and runs applications more smoothly than ever before.
Remember, before starting the installation process, make sure to back up any important data and research compatibility requirements for your specific device and SSD.By following these steps, you can have a faster, more efficient computer in no time. Happy upgrading!
Remove the old HDD
When upgrading your computer’s hard drive, the first step is to remove the old HDD. This can be a daunting task for some, but it’s actually quite simple. First, make sure to shut down your computer and unplug it from any power source.
Next, open up your computer case and locate the old hard drive. You’ll need to carefully disconnect its cables and remove any screws or brackets holding it in place. Once you’ve done that, you can set it aside and begin the process of installing the new SSD.
Remember to handle your old hard drive with care, as it may still contain important data or personal information that you need to preserve. With a little bit of patience and attention to detail, you’ll be able to remove the old HDD quickly and easily, and get started on your new and improved computer setup.
Install the new SSD
To install the SSD (solid-state drive), first, you need to turn off your computer and unplug it from the electrical outlet. Next, locate the hard drive bay inside your computer’s case. It’s usually on the side or bottom of the case and secured by screws.
Remove the screws and slide out the old hard drive carefully, being mindful of any cables that may be connected to it. Then, insert the new SSD in the same position where the old hard drive was. Make sure it’s securely in place before screwing it back in.
You’ll need to reconnect any cables that are attached to your old hard drive to your new SSD. Finally, turn on your computer and make sure it detects the new SSD. With the new SSD installed, your computer should boot up faster, and applications should open quicker.
Congratulations, you’ve successfully installed a new SSD!
Migrate your data
If you’re looking to upgrade from a traditional HDD to an SSD, you’ll need to migrate your data from the old drive to the new one. There are several methods to do this, but the easiest way is to clone your current drive to the SSD using specialized software. This will create an exact copy of your current drive, including the operating system, applications, and data.
You will need to connect both drives to your computer and ensure that there is enough space on the SSD to accommodate all your files. Once you’ve completed the cloning process, you can disconnect the old HDD and set the SSD as your primary drive. You’ll be amazed by the speed and performance boost you get from switching to an SSD.
So, don’t be intimidated by the process, just follow the steps carefully, and you’ll be enjoying all the benefits of an SSD in no time.
Clone your old drive
If you’re upgrading to a new hard drive or SSD, you may be wondering how to move all your files and data over to the new drive. One option is to clone your old drive to your new one. This involves copying the entire contents of your old drive to the new one, so you won’t lose any files or data.
However, it can be a bit complicated, so it’s important to do your research first. You’ll need to have a software program that can clone a hard drive, and you may need to purchase a new cable or adapter to connect the two drives. It’s also important to note that cloning a drive will overwrite the existing data on your new drive, so make sure you don’t have anything important on there that you haven’t backed up elsewhere.
Overall, cloning your old drive can be a good option if you want to keep everything exactly as it was before on your new drive, but make sure you do it correctly with the right tools and precautions to avoid any data loss.
Restore your data
Are you worried about losing your important data when migrating to a new device or system? Fear not, as there are various methods to help you restore your data. One effective way is to transfer your data to an external storage device, like a USB flash drive or an external hard drive. This ensures that your data is safe and can be restored to your new device easily.
Another option is to use cloud storage services like Google Drive or Dropbox. These services allow you to backup your data to the cloud, and you can access your files from anywhere, anytime. They also offer automatic syncing, so your files are always up to date.
Additionally, consider using data migration software to transfer your data seamlessly from your old device to the new one. This software can move your files, folders, and settings in just a few clicks, making the migration process stress-free. With these options, you can confidently migrate your data without any worries of losing valuable information.
Enjoy your new SSD!
Switching from a traditional hard drive to a speedy solid-state drive (SSD) is an excellent way to breathe new life into your computer. The process may seem daunting, but it’s relatively straightforward. Start by backing up all of your important data to an external drive or cloud storage service to avoid losing any files during the transfer.
Then, shut down your computer, unplug it, and remove the old hard drive. Replace it with the new SSD, secure it with screws, and reconnect all cables and power cords. Remember to install the operating system and necessary drivers on the new SSD.
Once you’ve completed this step, you’ll notice a significant improvement in your computer’s overall speed and performance. Enjoy your new SSD!
Conclusion
In conclusion, the transition from an HDD to an SSD may seem daunting, but with a little patience and know-how, you can make the switch and never look back. Think of it like upgrading from a clunky station wagon to a sleek sports car – your computer will run faster, smoother, and with less noise. So say goodbye to those loading screens and hello to a fresh new start on your computer journey.
It’s time to rev up those engines and switch to an SSD!”
FAQs
What are the benefits of switching from an HDD to an SSD?
Switching from an HDD to an SSD can significantly improve the speed and performance of your computer. SSDs have no moving parts and can read and write data much faster than HDDs, leading to faster boot times, faster application launches, and quicker file transfers.
What do I need to do to switch from an HDD to an SSD?
To switch from an HDD to an SSD, you will need to clone your HDD onto the new SSD. You can do this using built-in software on your computer or using a third-party cloning tool. You will also need to physically replace the HDD with the new SSD in your computer.
Can I switch from an HDD to an SSD on my laptop?
Yes, you can switch from an HDD to an SSD on your laptop. In fact, upgrading to an SSD is one of the most effective ways to improve the performance and speed of your laptop. The process of switching from an HDD to an SSD on a laptop is similar to the process on a desktop computer.
How much storage do I need on my SSD?
The amount of storage you need on your SSD depends on your usage and needs. If you mainly use your computer for basic tasks like browsing the web, checking email, and working on documents, a smaller SSD (around 120GB) may suffice. However, if you have a lot of files, photos, or videos, or if you use your computer for gaming or video editing, a larger SSD (around 1TB or more) may be necessary.