Are you looking to upgrade your system but don’t want to lose any of your precious data and settings? Cloning your SSD to a larger HDD on Windows 7 is a great solution! Not only will you gain extra storage, but your operating system will run just as smoothly as before. A clone is essentially an exact copy of your existing system, including all files, programs, and settings. This means that you can easily transfer all your data over to a new hard drive in one go, without having to reinstall every application again.
It’s the perfect solution for users who want to upgrade their storage or switch to a new system without losing any of their settings. In this blog post, we’ll guide you through the process of cloning your SSD to an HDD on Windows We’ll cover everything from preparing your system for cloning to installing your new hard drive.
With our step-by-step instructions, you’ll have your new system up and running in no time. So, why wait? Let’s get started with this straightforward process and upgrade your system today!
Create a system image backup
So, you want to know how to clone from SSD to HDD Windows 7? Well, the best way to do this is by creating a system image backup. This will allow you to make an exact copy of your SSD onto your HDD without losing any data or settings. First, connect your HDD to your computer and make sure it is detected.
Then, open the Control Panel and search for “backup and restore.” From there, click on “create a system image” and select your SSD as the source drive. Next, choose your HDD as the destination drive and start the backup process.
This may take some time depending on the size of your SSD and the speed of your computer, so be patient. Once the backup is complete, you can disconnect your SSD and boot up your computer using the HDD. Everything should be exactly the same as it was on your SSD, and you’ll be able to access all your files and programs with ease.
Open Backup and Restore
Backing up your computer is crucial to ensure that your important data is protected. One way to create a backup of your entire system is to create a system image backup using the “Open Backup and Restore” feature in Windows. This allows you to take a snapshot of your system settings, applications, and files at a particular point in time and restore them if something goes wrong.
To create a system image backup, go to the Control Panel, then click on “Backup and Restore” and select “Create a system image.” Choose where you want to save the backup, such as an external hard drive, and then follow the prompts to complete the backup process. It’s important to regularly create backups to ensure there’s always a recent version available in case of data loss or system failure.
By creating a system image backup, you can have peace of mind that your important files are safe and secure.
Create a system image on an external drive
To ensure that your computer is always protected and ready for any contingency, it’s important to create a system image backup on an external drive. This backup will contain all of your operating system settings, preferences, and personal files, allowing you to easily restore your entire system if your computer ever suffers from a catastrophic failure. To get started, simply connect an external hard drive to your computer and open the built-in Backup and Restore tool.
From there, select the option to create a system image backup and choose the external hard drive as your destination. Depending on the size of your system and the speed of your hard drive, this process may take several hours to complete. But once it’s finished, you can rest assured that you have a complete and up-to-date backup of your entire system, ready to use whenever you need it.
So don’t wait until it’s too late – create a system image backup today and enjoy the peace of mind that comes with knowing your computer is always protected.
Restore system image to HDD
If you’re looking to clone from SSD to HDD and restore your system image on Windows 7, you’re in luck! It’s a relatively simple process that can help you save time and effort, especially if you want to transfer your data and settings to a new hard drive. One of the most popular tools for this process is the Windows System Image Backup utility, which allows you to create a full backup of your system image and restore it on a different hard drive. To get started, you’ll need to connect your HDD to your PC and format it.
Then, create a system image backup and save it to an external drive or network location. Next, boot your PC from the Windows 7 installation disc and select the option to restore your system image from the backup. Once the process is complete, you should be able to access your files and settings on your new HDD as if nothing had changed.
With these simple steps, you can easily clone your system from SSD to HDD and get back to work in no time.
Boot from Windows installation disk/USB
After successfully creating a system image, the next step is to restore it to your HDD. To do this, you need to boot your computer from a Windows installation disk or USB. Once you are in the Windows Setup screen, select your language, time, and currency format.
Afterwards, click on the “Next” button and then select the “Repair your computer” option at the bottom left corner. You will be presented with a list of options; choose “Troubleshoot” and then select “System Image Recovery.” You will then be prompted to specify where the system image is located.
Once you have chosen the correct location, click on “Next” and then “Finish.” The system image restoration process will begin and all you need to do is follow the on-screen instructions. It is important to note that while the restoration process is ongoing, you should not interrupt it as this can corrupt the system image.
With a little patience and some time, you should be able to restore your system image successfully and continue using your computer as if nothing ever happened.
Select Repair Your Computer option
If you want to restore your system image to your HDD, the first step is to select the “Repair Your Computer” option from the Advanced Boot Options menu. This will take you to the System Recovery Options screen where you can choose the operating system you want to repair and then select the “System Image Recovery” option. From there, you can browse for the backup image you want to restore and follow the prompts to complete the process.
It’s important to note that this process will overwrite your entire hard drive, so be sure to back up any important files beforehand. By following these steps, you can easily restore your system image and get your computer back up and running smoothly.
Select System Image Recovery
If you are looking to restore your computer system to a previous state, then selecting the system image recovery option might just be what you need. This feature allows you to recover your system files and settings from a previously created backup or image file. To initiate the process, you need to access the advanced startup options by pressing the F11 key or any other key assigned by your manufacturer during bootup.
Then select the “troubleshoot” option and proceed to “advanced options.” From there, select “system image recovery” and select the appropriate image file you want to use. The process might take a while, depending on the size of the image file, but once it’s complete, your system will be restored to its previous state.
It’s always a good idea to regularly back up your system to avoid the loss of critical data and settings in the event of a system crash or malware attack. So, go ahead and give it a try to experience the convenience of system image recovery for yourself!
Select image backup on the external drive
When it comes to restoring your system image to your HDD, it’s important to have a reliable backup on an external drive. One option for backup is the image backup, which can be selected on the external drive. This type of backup creates a snapshot of your entire system – including all of your files, programs, and settings – so you can restore your computer to its previous state if something goes wrong.
To restore your system image to your HDD, simply connect the external drive and follow the on-screen prompts. Make sure to select the image backup option when prompted, and allow the restore process to run its course. With a little patience and some TLC, you’ll have your computer up and running in no time.
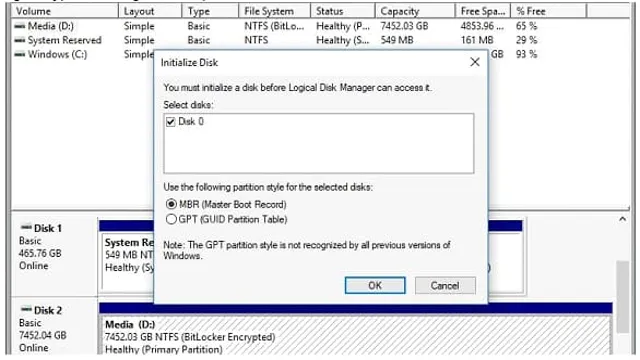
Choose to format and repartition HDD
When restoring a system image to your HDD, you may choose to format and repartition your hard drive to optimize its performance. This process involves erasing all the data on the HDD and creating a new file system, which can lead to faster boot times and system responsiveness. Nevertheless, it’s essential to back up all your important files and programs before starting the process, as you’ll lose everything in the formatting process.
Once you’re ready to begin, you can access the recovery utility on your computer and follow the wizard to restore the system image. This may take some time, depending on the size of the image and the speed of your computer. However, once the process is complete, you should be able to enjoy a fully restored and optimized system that runs like new.
So, whether you’re struggling with a sluggish computer or need to start fresh with a clean slate, formatting and repartitioning your HDD and restoring the system image can help you achieve the performance you need.
Ensure successful transfer
If you’re looking to clone your Windows 7 operating system from an SSD to an HDD, there are a few things you need to keep in mind to ensure a successful transfer. First, you’ll need to make sure your HDD has enough space to accommodate everything on your SSD. This includes not only your operating system but also any files, programs, or applications you may have installed.
Once you’ve confirmed that your HDD has enough space, you can begin the cloning process. One effective method is to use cloning software such as Macrium Reflect or EaseUS Todo Backup. These programs make it easy to transfer your entire operating system and all associated files from your SSD to your HDD, without the need for any manual configuration.
Make sure to also adjust your boot order in the BIOS to ensure the system boots from the new hard drive. By following these steps, you can successfully clone your Windows 7 operating system from an SSD to an HDD with ease.
Boot from the new HDD
Once you’ve successfully transferred your data to a new hard drive, the next step is to ensure that you can boot from it. To do this, you’ll need to adjust your computer’s BIOS settings. Start by restarting your computer and entering the BIOS menu by pressing the appropriate key (usually F2 or Del, but it can vary depending on the manufacturer).
Once you’re in the BIOS, navigate to the Boot menu and select the new hard drive as the primary boot device, making sure to save any changes. This will ensure that the next time you start your computer, it will boot from the new HDD instead of the old one. It’s important to double check these settings to make sure that your new hard drive is the main boot device, as you don’t want to accidentally boot from your old HDD and risk losing any data that you may have accidentally left behind.
Following these steps will ensure a smooth and successful transfer to your new hard drive.
Check if all files and programs are working
When transferring files and programs from one computer to another, it’s essential to check if everything is working correctly. It can be frustrating to transfer everything, only to realize that something didn’t transfer correctly or doesn’t work on the new computer. Before sending files and software, make sure to test them out on the original computer to ensure they are working correctly.
You can do this by double-checking that all the files are saved and stored correctly, and all programs are functioning as expected. It’s also a good idea to test the files and programs on the new computer after the transfer to make sure there were no errors during the transfer process. By checking everything beforehand, you can avoid potential issues and ensure a successful transfer.
Conclusion
In conclusion, cloning your Windows 7 system from SSD to HDD is like giving your high-performance sports car a makeover into a reliable family sedan. It may not be as flashy or lightning-fast, but it will get the job done with stability and consistency. Just like how parenting requires making sacrifices for the greater good, sacrificing speed for storage capacity may be the best option for your computer’s needs.
Ultimately, whether you choose SSD or HDD, what matters most is that you have a system that works best for you and your specific needs.”
FAQs
Can I clone my Windows 7 operating system from SSD to HDD?
Yes, you can clone your Windows 7 operating system from SSD to HDD using software like EaseUS Todo Backup, Macrium Reflect, or Clonezilla.
What is the benefit of cloning from SSD to HDD?
Cloning from SSD to HDD can help you transfer data from a faster but smaller SSD to a larger but slower HDD, allowing you to store more files on your computer without sacrificing speed.
Do I need any additional hardware to clone from SSD to HDD?
No, you do not need any additional hardware as long as you have both the SSD and HDD connected to your computer and have enough storage space on the HDD to transfer all data from the SSD.
How long does it take to clone from SSD to HDD?
The time it takes to clone from SSD to HDD depends on the amount of data being transferred and the speed of your computer. Generally, it can take anywhere from a few minutes to several hours.