
If you’re looking to improve your Acer laptop’s performance, one of the quickest and easiest ways to do so is by upgrading your solid-state drive (SSD). Replacing your laptop’s hard drive with an SSD is a surefire way to boost its speed, reduce boot and application load times, and improve overall system responsiveness. But the question is, how do you do it? In this guide, we’ll walk you through the steps to take when changing an SSD in your Acer laptop.
By the end of this article, you’ll be confident and ready to tackle this upgrade with ease. So, let’s get started!
What is an SSD and why change it?
If you’re looking to improve the performance of your Acer laptop, one way to do so is by changing your storage drive to a solid-state drive (SSD). An SSD, unlike a traditional hard drive, uses flash memory instead of spinning disks. This allows for much faster read and write speeds, resulting in quicker boot times, faster loading of programs and applications, and overall snappier performance.
To change your Acer laptop’s SSD, first, make sure to get a compatible replacement drive. Then, you’ll need to open up your laptop and physically replace the old drive with the new one. Don’t forget to back up all of your important files and data before making any changes to your storage drive.
With an SSD upgrade, you’ll be amazed at how much faster and responsive your Acer laptop can be.
Benefits of upgrading
Upgrading to a solid-state drive (SSD) can bring numerous benefits to your computer performance. SSDs, unlike traditional hard disk drives (HDDs), have no moving parts and use flash memory to store data, resulting in significantly faster boot times, application load times, and overall system responsiveness. HDDs are notorious for their slow speeds as they require time to spin up and locate the data on the disk, whereas SSDs can access data almost instantaneously.
The advantages of using an SSD include faster system start-up, faster overall performance, lower power consumption, and longer lifespan than the traditional HDD. Moreover, SSDs are more resistant to physical damage and are less prone to failure. In summary, an SSD is an advanced data storage technology that offers numerous benefits over traditional HDDs.
By upgrading to an SSD, you can significantly enhance your computer’s performance, reduce its power consumption, and increase its lifespan. The switch to an SSD is one of the easiest and cost-effective ways to get a noticeable speed boost from your computer.
What to consider before changing SSD
An SSD, or Solid-State Drive, is a form of storage device found in modern computers. It swaps out traditional spinning disks for memory chips, allowing for faster access to stored data. If you’re considering changing your SSD, there are a few things to keep in mind.
First, make sure your computer supports the specific type of SSD you want to install. Second, determine the storage capacity you’ll need to store your files and programs. Finally, decide on the brand and model of SSD that best fits your budget and performance needs.
Remember that switching out an SSD can be a significant upgrade, but make sure to do your research and consider all your options before making a decision.
Steps to physically change SSD in Acer laptop
If you’re looking to boost the storage capacity of your Acer laptop, changing the SSD is a great option. Fortunately, the process is not as difficult as you might think. First, make sure to turn off your laptop and unplug it from any power sources.
Locate the back panel of your device and unscrew it to reveal the SSD slot. Carefully remove the current SSD by unscrewing the bracket that holds it in place. Once it’s removed, insert the new SSD and secure it with the bracket.
Finally, replace the back panel and screw it back into place. You’re ready to start using your new SSD! Remember to properly dispose of the old SSD, and keep in mind that you may need to reinstall your operating system and applications on the new drive. With these easy to follow steps, you can quickly and efficiently change the SSD in your Acer laptop.
Required tools and materials
If you’re planning to physically change the SSD in your Acer laptop, you’ll need a few tools and materials. These include a screwdriver, anti-static wrist strap, and of course, the new SSD you’re installing. Before you proceed however, it’s important to make sure your laptop is turned off and completely unplugged from any power source.
Next, locate the back panel and remove the screws holding it in place with your screwdriver. Once the panel is removed, you should be able to see the current SSD. Simply remove it by unscrewing any screws holding it in place and gently pulling it out from its connector slot.
Then, insert the new SSD into the same slot and secure it with the screws. Replace the back panel, tighten the screws, and you’re done! Keep in mind that depending on your laptop model, the location of the SSD and specific steps may vary, so be sure to consult your manufacturer’s guide for more detailed instructions. With these steps done, you’ll be able to enjoy improved performance and speed with your new SSD.
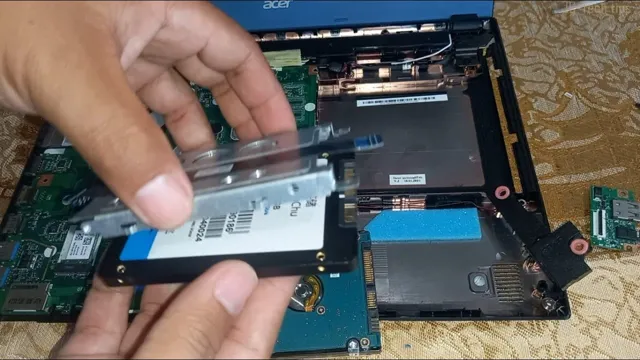
Step by step instructions with visuals
Are you experiencing slow load times and want to upgrade the SSD on your Acer laptop? Don’t worry, it’s a simple process that you can easily do yourself. Follow these step-by-step instructions with visuals to replace your Acer laptop’s SSD. Step 1: Turn off your Acer laptop and unplug it from the power source.
Flip the laptop over and remove the battery. Step 2: Unscrew the screws that hold the access panel in place. Gently remove the panel and set it aside.
Step 3: Locate the old SSD and remove the screws that secure it in place. Carefully pull the SSD out of the slot. Step 4: Insert the new SSD into the slot and secure it with screws.
Step 5: Put the access panel back into place and screw it in. Step 6: Reinsert the battery, flip the laptop over, and plug it back in. There you have it! By following these easy steps, you can upgrade your Acer laptop’s SSD and enjoy faster performance.
Remember to keep the old SSD in a safe place in case you need to retrieve data from it in the future. Keyword: Acer laptop SSD replacement.
Troubleshooting tips
Changing the SSD in your Acer laptop can be a daunting task, but with some simple steps, you can do it yourself. First, shut down the laptop and unplug it from the power source. Locate the access panel on the bottom of your laptop and unscrew it with a Phillips head screwdriver.
Carefully remove the panel by sliding it out, ensuring that you don’t damage any wires or components. Locate the SSD and remove it by sliding it out of its slot. Insert the new SSD by sliding it into the slot and securing it in place.
Reinstall the access panel and screw it back in place. Finally, reconnect the power source and turn on your laptop to check if the new SSD is working correctly. With these simple steps, you can upgrade your Acer laptop’s storage capacity and speed up its performance.
Steps to transfer data to new SSD
If you want to upgrade your Acer laptop’s storage space, one way to do so is by changing the SSD. Here are the basic steps to transfer data to a new SSD in your Acer laptop. First, you will need to download a cloning software program and install it on your laptop.
Then, connect the new SSD using a USB adapter or enclosure. Launch the cloning software and select the source disk, which is your old SSD. Next, select the target disk, which is the new SSD.
Finally, click on the clone button to start the cloning process. Depending on the amount of data to be transferred, this process may take some time. Once the cloning is complete, shut down your laptop and remove the old SSD.
Install the new SSD and reboot your laptop. Your Acer laptop should now boot up using the new SSD, and all your data should be intact. With these simple steps, changing your Acer laptop’s SSD has never been easier or more straightforward!
Backup options
When you’re upgrading to a new SSD, backing up your data is a crucial first step. One option for backing up your data is to use a cloud storage service like Google Drive or Dropbox. This allows you to easily access your files from any device with an internet connection.
Another option is to use an external hard drive to copy your files onto. This can be a bit more time-consuming, but it gives you the added security of physically storing your data in a separate location. Once you’ve backed up your data, it’s time to transfer it to your new SSD.
One efficient way to do this is to use cloning software, which creates a copy of your existing drive on your new SSD. You can then boot up your computer from the new SSD and everything should be just as it was before the upgrade. Overall, by taking the necessary steps to back up your data and transfer it properly, you can make your SSD upgrade a smooth and stress-free process.
Transfer using cloning software
When transferring data to a new SSD, one of the quickest and most efficient methods is to use cloning software. This software is designed to create an exact replica of your current operating system, applications, files, and settings, and transfer them to your new SSD. This means that you don’t have to reinstall all your applications or manually transfer your files one by one.
Instead, you can complete the transfer process in just a few clicks. To use cloning software, you must first download and install it on your current system. Once installed, connect your new SSD and follow the software’s instructions to start the cloning process.
It’s important to note that cloning software may differ depending on the brand or manufacturer. Therefore, it’s crucial to read the software’s instructions carefully to avoid any data loss or other technical issues. With this method, your data will be transferred to your new SSD quickly and efficiently, making the transition process much smoother.
Conclusion: Enjoy your new SSD
In conclusion, swapping out your laptop’s SSD for a faster and more spacious option is a great way to boost performance and increase storage capacity. And with the easy-to-follow steps outlined in this guide, even the most tech-challenged among us can do it with confidence. So go ahead, become an “acer” of all things SSD and take your computing experience to the next level!”
FAQs
What is an SSD?
An SSD, or solid-state drive, is a type of storage device that uses flash memory to store data.
Can I upgrade the SSD on my Acer laptop?
Yes, in most cases it is possible to upgrade the SSD on an Acer laptop. However, it is important to check the specific model of your laptop to ensure that it is compatible with the SSD you want to install.
How do I find out what SSD is compatible with my Acer laptop?
To find out what SSD is compatible with your Acer laptop, you can check the specifications of your laptop or contact Acer customer support. You should also consider factors such as capacity and performance when choosing an SSD.
How do I replace the SSD on my Acer laptop?
To replace the SSD on your Acer laptop, you will need to open up the laptop and locate the SSD. You should then carefully remove the old SSD and replace it with the new one, making sure to properly secure it in place. It is recommended that you seek professional assistance or follow a guide to ensure that the replacement is done correctly.