Congratulations, you’ve decided to upgrade your old hard drive and replace it with a new SSD. However, before you start enjoying the speed boost that comes with an SSD, you need to transfer all your data, including the operating system, to your new drive. In this blog post, we’ll guide you through the process of mounting a Windows 7 image to a new SSD, making sure that all your apps, personal files, and settings are preserved.
We know this process can be daunting, but don’t worry, we’ve got your back. By following our step-by-step instructions, you’ll be able to successfully transfer your Windows 7 image to your new SSD without losing any data. So, let’s get started!
Check System Requirements
When preparing to mount a Windows 7 image to a new SSD, it’s important to ensure that your system meets the necessary requirements. To begin with, you’ll need to have at least 16GB of available hard drive space to store the image, as well as a compatible SSD with enough storage capacity to hold the image once it’s been transferred. You’ll also need to confirm that your computer’s BIOS settings are configured to boot from the DVD or USB drive that contains the Windows 7 installation files.
Generally, modern computers should be compatible with these requirements, but it’s always a good idea to double-check to prevent any potential issues. Once you’ve confirmed that your system meets the necessary requirements, you can proceed with the process of mounting your Windows 7 image to your new SSD.
Ensure SSD capacity is sufficient
If you’re planning on buying a new computer or upgrading your current one, it’s essential to check the system requirements before purchasing an SSD. When it comes to storage capacity, you’ll want to ensure that the SSD has enough space to accommodate all your files and software. A lack of storage can lead to slow boot times and a sluggish computer overall.
The amount of storage you need will depend on your usage habits, but a good rule of thumb is to have at least 250GB to 500GB of space. However, if you’re someone who deals with large files such as videos or graphics, you may want to consider getting a larger SSD. Additionally, it’s important to note that some software programs require a specific amount of free space to function correctly.
Be sure to double-check the system requirements for any programs you regularly use to ensure that the SSD’s capacity will meet your needs. Overall, checking the system requirements beforehand can save you the headache of running out of storage and having to purchase additional drives or constantly deleting files to make space.
Check if computer supports SSD installation
If you’re considering investing in an SSD (Solid-State Drive) for your computer, it’s crucial to first ensure that your system meets the requirements for installation. The good news is that most modern computers are compatible with SSDs, but it’s essential to check your hardware specifications to confirm this. Generally, if your computer has a SATA interface and an available drive bay, it should be ready for SSD installation.
However, before making any purchases, it’s necessary to check your system’s motherboard and ensure that it supports the SSD’s form factor, which can typically be either 5 inches or 5 inches.
To be sure, you can always consult your manufacturer’s website or user manual for specifications and compatibility information. By taking the necessary steps to confirm compatibility, you can save yourself both time and money, ensuring that your new SSD will work seamlessly with your computer for years to come.
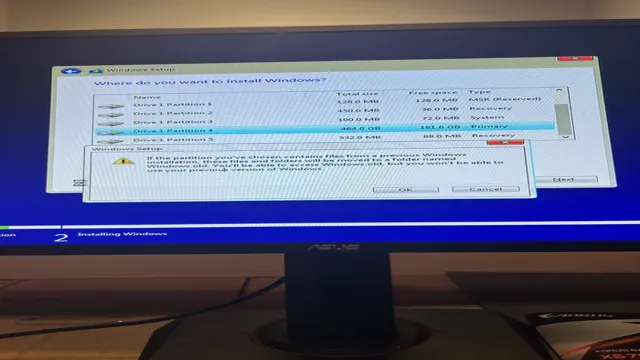
Clone Windows 7 Image to SSD
If you’re planning to upgrade your computer’s hard drive to an SSD, it’s important to clone your existing Windows 7 image to the new drive. This way, you won’t lose any of your valuable data or programs and can start using the new drive right away. To do this, you can use a software like EaseUS Todo Backup, which will help you clone your image in just a few simple steps.
First, connect your SSD to your computer and open up the software. Choose “Clone” and then “Disk clone” and select your current hard drive as the source and the SSD as the destination. The software will do the rest, and once it’s done, you can disconnect your old drive and start using your new SSD.
By cloning your Windows 7 image to your new SSD, you’ll save yourself the hassle of reinstalling everything from scratch and be able to enjoy the benefits of a faster, more efficient hard drive.
Download disk cloning software
If you’re looking for a reliable way to clone your Windows 7 image to your SSD, you’ll need disk cloning software to get the job done. There are plenty of options out there, but be sure to choose a trustworthy and well-reviewed program. With the right software, you can quickly and easily make an exact copy of your Windows 7 installation and transfer it to your SSD without losing any data or settings.
This can be a great way to speed up your computer and improve overall performance, and it’s especially handy if you’re upgrading to a newer SSD or simply looking to migrate your OS to a new drive. With a few clicks of the mouse, you can create a perfect clone of your Windows 7 installation and start enjoying faster speeds and improved stability. So why wait? Download disk cloning software today and start cloning your Windows 7 image to your SSD!
Connect SSD to computer
If you want to speed up your Windows 7 computer, one of the best ways to do so is by upgrading to a solid-state drive (SSD). However, you can’t just connect the SSD and start using it. You’ll need to clone your Windows 7 image to the SSD first.
To do this, you’ll need to first connect the SSD to your computer. You can do this by opening up your computer’s case and finding an available SATA port. You’ll want to connect the power and data cables to the SSD so that it is properly connected.
Once your SSD is connected, you can use cloning software to clone your Windows 7 image to the SSD. This will copy all of your files, settings, and programs to the new drive, allowing you to enjoy faster startup times and improved overall performance. By following these simple steps, you can quickly and easily upgrade your computer to an SSD and start enjoying faster speeds today.
Clone Windows 7 Image to SSD using software
If you’re looking to upgrade your computer’s hard drive, one way to do so is by cloning your Windows 7 image to an SSD. This process is simple, and you can use various cloning software to get it done. One popular option is Macrium Reflect, which you can download for free.
Once you have the software, connect your SSD to your computer, and run the program. Select the option to clone your hard drive and choose the SSD as your destination. The software will then copy your Windows 7 image to the SSD.
This process might take some time, depending on the size of your hard drive. Once it’s done, shut down your computer, disconnect the old hard drive, and boot up with your new SSD. You should now have cloned your Windows 7 image to your new SSD successfully.
Not only will this upgrade your computer’s performance, but it will also help reduce the risk of data loss.
Install SSD and Boot from it
If you’re wondering how to mount a Windows 7 image onto a new SSD, you’ve come to the right place. First, make sure that your new SSD is properly installed. Then, download the Windows 7 disc image and create a bootable USB drive using software like Rufus.
Insert the USB drive and reboot your computer, making sure it boots from the USB drive. Follow the prompts to install Windows 7 onto your new SSD. Once installation is complete, your computer should automatically boot from the SSD.
If it doesn’t, go into your computer’s BIOS settings and change the boot order so that the SSD is prioritized. Congratulations, you’ve successfully mounted Windows 7 onto your new SSD and are now ready to enjoy faster boot times and improved overall performance!
Turn off computer and unplug power source
If you’re looking to upgrade your computer’s performance, installing a solid-state drive (SSD) is a great place to start. Before getting started, it’s important to fully power off your computer and unplug the power source to ensure your safety. Once that’s done, you’ll need to open up your computer tower and find an empty drive bay to install the SSD.
You’ll need to connect a data cable and power cable to the SSD, and then secure it in place using screws or brackets. Once the physical installation is complete, you’ll need to boot from the SSD instead of your current hard drive. This can typically be done in your computer’s BIOS settings.
After selecting the SSD as the boot device, save your changes and restart your computer. You’ll now be able to enjoy faster boot times, faster application launches, and an overall smoother computing experience. So, if you’re looking to take your computer to the next level, consider installing an SSD to give it the speed and power you need to get things done.
Remove old hard drive and insert SSD
If you feel like your computer is chugging along slowly or taking forever to complete even the simplest tasks, it might be time to upgrade your hard drive to a solid-state drive (SSD). The process might seem daunting, but it’s actually straightforward. First, remove your old hard drive from your computer and install your new SSD.
You’ll need to connect the cables and secure the SSD in the same place as your old hard drive. Then, you’ll need to boot up your computer from the SSD. This will involve changing your computer’s BIOS settings to prioritize the SSD as the primary boot drive.
Once you’ve done this, your computer should boot up much faster and run much smoother. Don’t forget, though, that you’ll need to transfer your data from your old hard drive to your new SSD before you can start using it. So, take some time to back up your files and migrate your data over.
With a little patience and the right tools, you’ll enjoy a snappier, more responsive computer.
Restart computer and boot from SSD
If you’ve recently purchased a solid-state drive (SSD) and want to not only install it into your computer but also boot from it, there are a few steps you need to follow. First, shut down your computer completely and then open up your computer’s case. Locate your existing hard drive and disconnect it from your motherboard and power supply.
Next, install your new SSD into the same spot where your old hard drive was located and connect it to the motherboard and power supply. Make sure everything is secure and then close up your computer’s case. Now it’s time to boot up your computer! Turn your computer on and immediately enter your computer’s BIOS settings.
Navigate to the Boot section and change the boot priority so that your SSD is listed as the first option. Save your changes and exit the BIOS. Finally, restart your computer and it should now boot from your new SSD! Remember to transfer your important files from your old hard drive to your new SSD before disconnecting it completely.
Following these steps, you can enjoy fast boot and loading times with your new SSD.
Configure BIOS settings
If you’re looking to mount a Windows 7 image onto a new SSD, it’s important to configure your BIOS settings first. This will ensure that your computer recognizes the new SSD as your primary boot drive. To start, access your computer’s BIOS by pressing the key combination shown on startup (usually F2, F10, or Del).
Once in the BIOS, navigate to the Boot menu and choose the new SSD as your first boot option. Save the changes and exit the BIOS. From there, you can proceed with installing the Windows 7 image onto your new SSD.
Remember to double-check that the BIOS settings have been saved before attempting the installation. Following these steps should have your newly mounted SSD up and running with your desired operating system in no time!
Access BIOS settings during startup
Accessing BIOS settings during startup can be a crucial aspect of configuring your computer. To enter the BIOS settings, you need to press a specific key or combination of keys during startup, which varies depending on your computer’s manufacturer and model. The most common keys are Delete, F1, F2, F10, and Esc.
Once you have accessed the BIOS settings, you can configure various aspects of your computer’s hardware and software, including boot order, hard drive settings, and security options. For instance, you can set the primary boot device, which determines the order in which your computer searches for bootable devices. This can be important if you want your computer to boot from a specific device.
Additionally, you can adjust hardware settings, such as the CPU clock speed, RAM frequency, and fan speeds, as well as enable or disable hardware features. Overall, accessing and configuring BIOS settings can help optimize your computer’s performance while ensuring that it functions as intended.
Change boot order to prioritize SSD
To optimize your computer’s performance, it’s essential to configure your BIOS settings and change the boot order to prioritize SSD. SSDs are faster, quieter, and more reliable than traditional hard drives. By making SSD the primary boot device, you’ll significantly reduce boot times and improve overall system responsiveness.
Moreover, you’ll prevent unnecessary wear on your hard disk and extend its lifespan. To configure your BIOS settings, you’ll need to restart your computer and enter the BIOS menu by pressing a specific key (usually Esc, F2 or Del) during boot-up. Once you’re in the BIOS, look for the Boot Order or Boot Priority section and select SSD as the first boot device.
Save the changes and restart your computer again. Voila! You’ve successfully made SSD your primary boot device, and you should notice a significant improvement in your computer’s performance.
Verify Windows 7 Image on SSD
If you’re planning to upgrade your computer’s hard drive to a new SSD and want to transfer your existing Windows 7 image to it, you may face some issues. One of the common problems is verifying the transferred image on the new SSD to ensure that it works correctly. The good news is that Windows 7 has some built-in features that can help you check the verification of the image.
Simply check the device manager to verify if all the drivers are installed correctly or not. Additionally, you can try booting the computer from the new SSD to make sure that everything is working fine. If the image doesn’t work correctly, you may need to backup the data from the new SSD and reinstall Windows
Overall, transferring a Windows 7 image to a new SSD may take some time and effort, but it’s worth it in the end for a smoother and faster system.
Check that all files and settings were successfully transferred
When transferring an operating system onto a new hard drive, it’s essential to ensure that all files and settings have been successfully transferred. Verifying your Windows 7 image on an SSD can help to check for any missed files or errors. Firstly, ensure that your SSD is empty and formatted correctly.
Then, use cloning software such as Acronis TrueImage or Macrium Reflect to transfer the image from your old hard drive onto the SSD. Once complete, inspect the SSD to ensure that all files and settings have been successfully transferred. Double-check that your BIOS settings are correct, as these can often be the cause of boot-up errors.
It’s worth also checking that all drivers are installed, and all software applications are functioning correctly. By doing so, you can be confident that your new SSD is functioning optimally, and you won’t encounter any issues down the line.
Ensure system is functioning properly
To ensure that your Windows 7 image is functioning properly on your SSD, there are a few steps you should take. First and foremost, make sure that your SSD is compatible with Windows Once you’ve verified that, you can proceed with creating an image of your Windows 7 system and transferring it to the SSD.
This can be done using tools such as Windows Backup and Restore or a third-party imaging software. Once your image is on the SSD, check to make sure all of your applications and files are functioning properly. Test your system’s performance and make any necessary updates or optimizations.
With a properly functioning Windows 7 image on an SSD, you’ll have a speedy and reliable system that can handle all of your computing needs.
Conclusion
In conclusion, mounting a Windows 7 image to a new SSD is like giving a fresh makeover to your computer. Just like how a new outfit can bring out the best in you, a SSD can enhance the performance of your computer and make it run smoother and faster. So, gear up your tech skills and mount that image like a pro, because a speedy computer is just a mount away!”
FAQs
What tools do I need to mount a Windows 7 image to a new SSD?
You will need a disk cloner like Clonezilla or a disk imaging software like Macrium Reflect.
Can I use the Windows built-in disk imaging tool to mount an image to a new SSD?
Yes, you can use the built-in tool, but it may not be as reliable or robust as third-party tools.
Do I need to activate Windows after mounting a new SSD with a Windows 7 image?
It depends on the type of license you have. If you have a retail license, you should be able to reactivate your Windows 7 after mounting the new SSD. If you have an OEM license, you may run into issues with activation.
How do I ensure that my new SSD is properly aligned when mounting a Windows 7 image?
You can use a partition alignment tool like AOMEI Partition Assistant to ensure that your new SSD is properly aligned. This will help optimize performance and prevent issues with data corruption.