Are you tired of slow boot-up times, lagging programs, and constant system crashes? Thankfully, upgrading your old hard drive to a solid-state drive (SSD) is a relatively simple solution that can breathe new life into your computer. But if you’re not sure where to start, don’t worry! This step-by-step guide will walk you through the process of migrating to an SSD, from choosing the right model to transferring your data. Think of it as giving your computer a brand new engine – it may take a bit of work, but once you’ve made the switch, you’ll be amazed at how much faster and smoother everything runs.
So, grab your toolkit and let’s get started!
Preparation
If you’re looking to migrate to an SSD, it’s important to properly prepare for the process. Firstly, you’ll need to determine the size of the SSD you’ll need to purchase. This can be done by checking the amount of storage you currently have on your device and making sure the SSD you select has at least that amount of storage capacity.
Next, you should back up all of your important files and data onto an external hard drive or cloud storage platform, as the migration process will erase all data on your current hard drive. Once you have your new SSD and your data is safely backed up, you can begin the migration process by physically installing the SSD into your device and following the manufacturer’s instructions for transferring data from your old hard drive to the new SSD. By properly preparing for the migration process, you can ensure a smooth and successful transition to an SSD and enjoy the many benefits of faster data transfer speeds and improved device performance.
Check if your computer supports SSD
If you’re looking to upgrade your computer’s storage speed, an SSD is a great option to consider. But before you go out and buy one, you’ll want to make sure that your system is actually capable of supporting it. Thankfully, checking this is a fairly easy process.
Firstly, you’ll want to check your computer’s manual or specifications online to see if it supports SSDs. You can also check your device manager to see if it has a SATA or PCIe slot, which are required for most SSDs. It’s worth noting that some older systems may not support newer PCIe SSDs, so it’s important to double-check.
If you’re unsure, you can also consult with a professional to help you determine whether or not your computer is compatible. With the right preparation, you’ll be able to enjoy the benefits of an SSD in no time.

Acquire the necessary tools
To properly prepare for any task, it is crucial to acquire the necessary tools. This is true for virtually any task that you might undertake in life, whether it is cooking a meal, assembling furniture, or starting a business. In order to achieve success and complete the task efficiently, you must have the necessary resources at your disposal.
For example, if you are a DIY enthusiast hoping to build a birdhouse, you will need a hammer, nails, saw, measuring tape, and other basic tools. Similarly, if you want to start a new business, you will need a computer, internet access, relevant software, and office space. It is important to assess your needs and determine what tools are necessary to achieve your desired outcome.
By understanding what tools are required, you can carefully plan and budget for the resources you need to successfully complete the task. Through proper preparation, you are setting yourself up for success and increasing the likelihood of achieving your goals.
Back up your data
Backing up your data is crucial in today’s digital age, where we store and share a lot of sensitive information. Before starting the backup process, it’s essential to prepare the devices you’ll be using and to ensure that you are utilizing a reliable backup solution. Ensure that there is enough storage space available on the device, and you have the right backup software installed to save your files.
It’s also a good idea to investigate the different backup options available. For example, you could go for an external hard drive for local backups, a cloud-based solution, or even a combination of the two. This preparation phase sets up the foundation for a successful backup strategy that can protect you from losing sensitive data due to hardware failure, data corruption, or cybersecurity incidents.
By investing in data backup, you’ll be able to restore your devices quickly and maintain business continuity in the event of a catastrophe.
Installation
So, you’re ready to make the switch to a faster, more efficient SSD? Congratulations! The first thing you’ll need to do is physically install the SSD into your computer. Depending on the specific model of your computer, this might be a quick and easy process, or it might require a bit of time and effort. If you’re not comfortable doing the installation yourself, it’s a good idea to seek out the help of a professional to ensure that it’s done correctly.
Once the SSD is installed, you’ll need to transfer your files over from your old hard drive. The easiest way to do this is to use a cloning tool, which will essentially create an exact copy of your old drive and transfer it onto your new SSD. There are a variety of different cloning tools available, so it’s important to do your research and choose one that is specifically designed for SSD migration.
Once the cloning process is complete, you can boot up your computer and start enjoying the increased speed and performance that your new SSD provides!
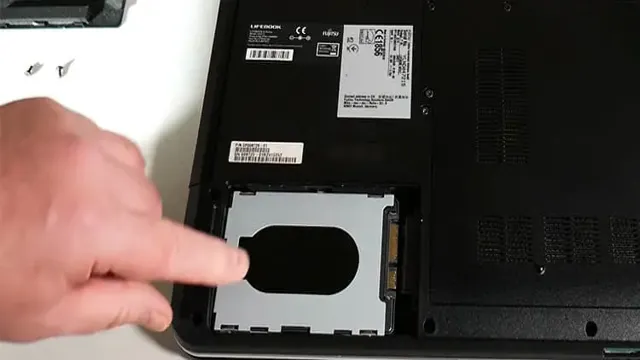
Open your computer and locate the hard drive
When it comes to installing a new hard drive on your computer, the first step is to locate it. This may seem like a daunting task, especially if you’re not particularly tech-savvy, but don’t worry – it’s easier than you might think. The hard drive is typically located inside your computer tower, where it’s attached to the motherboard.
To access it, you’ll need to open up your computer and locate the hard drive using your eyes or with easily available tools. It’s important to be careful when doing this and to avoid touching any other components to avoid any damage. Once you’ve located the hard drive, you can then begin the process of installing your new one.
Remember to backup your important data before doing anything else just in case. Ultimately, locating and installing a new hard drive is a relatively straightforward process if you take the time to do it properly.
Remove the hard drive and install the SSD
If you want to improve your computer’s performance and make it run faster, you should consider installing an SSD instead of a traditional hard drive. The process is relatively straightforward, but it does require some technical know-how. First, you need to remove the hard drive from your computer and replace it with the new SSD.
It’s important to make sure that the SSD is compatible with your computer and that it’s the right size. You’ll also need to make sure that you have all the necessary tools and cables to make the swap. Once you’ve removed the old hard drive, you can install the SSD in its place and connect it to your computer’s motherboard.
Then, you can turn on your computer and ensure that the new SSD is recognized in your system settings. With an SSD, you’ll be able to boot up your computer faster, run programs more quickly, and enjoy a more responsive computing experience overall.
Connect the SSD to your computer and boot up
Once you have chosen the SSD that fits your needs, the next step is to connect it to your computer and boot up. Make sure your computer is turned off and all cables are disconnected before proceeding with the installation. Locate the SATA port on your motherboard and connect one end of the SATA cable to it.
The other end should be connected to the SATA port on the SSD. Once this is done, secure the SSD properly to avoid any movement during operation. Now you can turn on your computer and enter BIOS settings to see if the SSD is detected.
If it is not detected, make sure the connections are secure, and try again. You may also need to change the boot order to prioritize the SSD over other drives. After making any necessary changes, save and exit BIOS settings and allow the computer to boot up.
Congratulations, you have successfully installed your new SSD!
Post Installation
If you’ve decided to upgrade your computer’s hard drive to a faster SSD, you may be wondering how to migrate your data over to the new drive. The easiest way to do this is through cloning your existing hard drive onto the SSD. There are several software options available such as Acronis True Image, EaseUS Todo Backup, or Macrium Reflect.
First, connect your SSD to your computer and ensure it’s visible in your system. Then, install your chosen cloning software, and follow the instructions to select your current hard drive as the source and the SSD as the destination. Once the cloning process is complete, you’ll need to change your computer’s boot order to ensure it’s starting up from the SSD.
By following these steps, you’ll be able to make a seamless transition to a faster and more efficient drive.
Set the SSD as your default drive
If you have recently installed an SSD in your computer, it is a good idea to set it as your default drive. Doing so will ensure that your operating system and important software programs run faster. To set your SSD as your default drive, you need to go to the BIOS settings of your computer.
Once in the BIOS settings, look for the boot order option and change it so that your SSD is listed as the first boot device. This will ensure that your computer boots up from the SSD every time it is turned on. If you are unsure about how to do this, it is best to consult your computer manual or seek assistance from a professional.
By setting your SSD as your default drive, you can enjoy faster computing speeds and performance, as well as better reliability and stability. So, don’t wait any longer and make the change today!
Copy your data from the backup to the new SSD
Now that you have successfully installed your new SSD, it’s time to transfer your data from the backup to your new drive. It’s essential to ensure that you have copied all your crucial files and folders so that you don’t lose any of your necessary data. To start copying your data to the new SSD, go to the backup file and select the files you want to transfer.
Once selected, right-click on them and choose the ‘Copy’ option. Then, go to your new SSD and create a folder there with the name of your choice. Next, right-click and choose ‘Paste’ to transfer the files.
It’s essential to be patient during the copying process, as it may take several minutes or even hours, depending on the size of your data. After the copying process is complete, double-check that all your data has been successfully transferred to avoid any errors or omissions. In short, copying your data post-installation is a crucial step.
Ensure you have backed up your files and patiently transfer them to your new SSD to avoid losing vital data.
Conclusion
So there you have it folks, upgrading to an SSD is like leveling up in your favorite video game. It’s a simple yet strategic move that can greatly enhance your overall computing experience. By following these steps, you can seamlessly migrate your data to your new SSD and enjoy faster boot times, quicker file transfers, and enhanced performance.
So don’t be afraid to take that leap and join the SSD club, your computer will thank you for it!”
FAQs
What is an SSD and why should I migrate to one?
An SSD, or solid-state drive, is a storage device that uses flash memory to store data instead of a traditional spinning disk drive. SSDs offer faster read and write speeds and are more durable than HDDs. Migrating to an SSD can significantly improve the speed and performance of your computer.
Can I migrate my operating system to an SSD?
Yes, you can migrate your operating system to an SSD using a disk cloning software or a fresh installation of your operating system on the SSD. It is recommended to perform a clean installation for optimal performance.
How do I clone my existing hard drive onto an SSD?
You can use disk cloning software like Acronis True Image, EaseUS Todo Backup, or clonezilla to clone your existing hard drive onto an SSD. Follow the software instructions and make sure to select the correct source and destination drives.
What size SSD should I choose for migration?
The size of the SSD you choose for migration depends on your current storage usage. It is recommended to choose an SSD that is at least double the size of your current hard drive. This will ensure that you have enough space for your operating system, applications, and personal files.