
Have you recently upgraded to a new SSD but are unable to find it on your computer? Don’t worry, you’re not alone. Getting your new SSD to show up can be a bit tricky, but with a few simple steps, you can easily get it up and running. Think of your computer as a house with different rooms.
Just like you need to furnish and decorate each room, you also need to configure your computer to recognize your new SSD. This involves going into your computer’s system settings and making sure that your SSD is properly installed and recognized by your system. But before you do that, consider checking the basics.
Are all your cables plugged in correctly? Is your SSD properly seated in its slot? These may seem like simple questions, but they are often the root cause of many issues. Once you have checked the basics, it’s time to dive into your computer’s system settings. This may seem daunting, but don’t worry.
There are plenty of online tutorials and guides that can walk you through this process step by step. Remember, Rome wasn’t built in a day, and configuring your computer to recognize your new SSD may take some time and patience. But don’t give up! The rewards of faster loading times and increased storage capacity are well worth the effort.
So roll up your sleeves and get to work. With a little diligence, you’ll have your new SSD up and running in no time.
Check Physical Connection
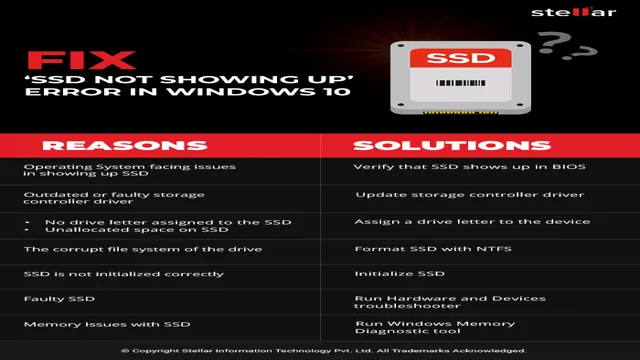
When you install a new SSD and it doesn’t show up in your computer, the first thing to check is the physical connection. Sometimes, SSDs don’t get connected properly to the motherboard or might be loose due to a poor connection. Thus, make sure that the SSD is properly inserted and sits firmly in the socket where it’s supposed to be installed.
Besides, double-check the SATA cable connection between your motherboard and SSD. Try to disconnect and then reconnect it again, making sure it is firmly attached. If your SSD still doesn’t show up in the computer, then it might be an issue with the SATA cable or the power supply.
Use a SATA-to-USB converter to connect it to another computer to see if it’s recognized or not. In cases like these, testing one component at a time can help you to identify the issue.
Make Sure the Drive is Properly Installed
When installing a new drive, it’s crucial to make sure that the physical connection is secure. Before installing the drive, make sure that the power is off and unplugged from the computer. Once you’ve opened up your computer case, locate an empty drive bay and slide the drive into place, making sure that the screw holes line up with the case.
Next, connect the drive to the power supply using a SATA power cable and attach a SATA data cable to the drive and the motherboard. Ensuring a secure physical connection is vital for the proper functioning of the drive. Loose connections can lead to data loss or system errors that are hard to diagnose.
In summary, be sure to double-check that your new drive is securely and properly installed before turning on your system.
Initialize and Format the Drive
Congratulations! You just got a new SSD and now you’re wondering how to get it to show up. The first thing you need to do is initialize and format the drive. This may sound daunting, but it’s actually a straightforward process.
First, you’ll need to connect your SSD to your computer. If this is a new drive, it may require a cable or adapter that came with it. Once connected, you’ll need to go to Disk Management on Windows (or Disk Utility on macOS) to initialize the drive.
This will allow your computer to recognize it. From there, you’ll need to format the drive to a file system that your operating system can read, like NTFS or exFAT. This will prepare the drive for use and is essential for storing files and applications.
Once the drive is initialized and formatted, it should show up in File Explorer or Finder, and you’ll be ready to start using it. Don’t forget to back up any important files before transferring them to your new SSD. Happy computing!
Use Disk Management in Windows
Disk Management in Windows When you purchase a new hard drive or SSD, you will need to initialize and format it before you can use it. Windows has a built-in tool called Disk Management that you can use for this purpose. To initialize the drive, right-click on the unallocated space and select Initialize Disk.
Choose the disk you want to initialize and select either MBR or GPT partition style. Once the disk is initialized, you can format it so that Windows can recognize it. Right-click on the unallocated space and select New Simple Volume.
Follow the prompts to assign a drive letter, choose a file system, and format the drive. It’s important to note that formatting a drive will erase all data on it, so make sure you have backed up any important files before proceeding. With Disk Management, initializing and formatting your new drive is easy and straightforward, allowing you to start using it in no time.
Use Disk Utility on Mac
When it comes to setting up a new hard drive on your Mac, Disk Utility is an essential tool to get the job done. One of the first steps in using Disk Utility is to initialize and format your new drive. Initializing the drive prepares it for use and sets it up to receive data.
Formatting, on the other hand, determines how your data is written to the drive. This includes the file system type, which affects how the drive can be used and accessed. To initialize and format a drive in Disk Utility, simply select the drive and go to the Erase tab.
From there, choose the desired format and partition scheme, then give your new drive a name and click Erase. Keep in mind that initializing and formatting will wipe any existing data on the drive, so make sure you’ve backed up anything important before getting started. With just a few clicks in Disk Utility, you’ll be able to set up your new drive and get back to work.
Update Your PC or Mac’s Drivers
If you’ve just installed a new SSD on your PC or Mac, but it’s not showing up as a storage option, then chances are, you need to update your device drivers. A device driver is a software program that facilitates communication between your computer’s hardware and its operating system. Without an updated driver, your computer may not recognize your SSD or any other devices you’ve added.
You can get driver updates from your device manufacturer’s website, or you can use a driver update program that automatically installs the most recent drivers for you. By updating your drivers regularly, you can ensure that your computer runs smoothly and efficiently and that all your devices are fully functional. So, if you’re wondering how to get your new SSD to show up, start by checking your device drivers!
Try a Different SATA Port or Cable
If you’re having trouble getting your new SSD to show up on your computer, one potential solution is to try a different SATA port or cable. Sometimes, a faulty or incompatible cable or port can cause issues with the detection of your new solid-state drive. First, make sure that the port you’re connecting to is compatible with the type of drive you have (e.
g. SATA III). Then, try using a different cable to connect the drive to your computer.
If this doesn’t work, try connecting the drive to a different port on your motherboard. This can help to narrow down whether the issue is with the cable or the port itself. If you’ve tried these steps and your drive still isn’t showing up, there may be other issues at play – so it’s always a good idea to consult with technical support or a professional technician for further troubleshooting.
By trying different cables or ports, however, you can often get to the bottom of the issue and get your new SSD up and running in no time.
Seek Professional Help if All Else Fails
If you’re still struggling to get your new SSD to show up, don’t hesitate to seek professional help. It’s possible that there may be underlying hardware or firmware issues that you’re not equipped to handle yourself. In addition to troubleshooting and diagnosis, professionals can also provide recommendations on how to optimize your system for maximum performance.
Many SSD manufacturers even offer support and assistance online or over the phone, free of charge. So, if all else fails, don’t hesitate to reach out for professional guidance – it could save you a lot of time and frustration in the long run. Remember, the main keyword here is “how do I get my new SSD to show up”, so don’t be afraid to search for additional resources that can help you tackle this common issue.
Conclusion
In conclusion, getting your new SSD to show up is like playing a game of hide-and-seek with your computer. You may need to explore a few different avenues before you stumble upon the solution, but don’t give up! Whether it’s checking your BIOS settings, updating your drivers, or simply double-checking your physical connections, persistence pays off when it comes to getting your new SSD up and running. So roll up your sleeves, grab a cup of coffee, and enjoy the challenge of unraveling this technical mystery.
Your speedy new SSD will be waiting for you on the other side!”
FAQs
What are the steps to get my new SSD to show up on my computer?
First, make sure the SSD is properly connected to your computer. Next, open the Disk Management tool and initialize the SSD. Finally, allocate and format the SSD to make it usable.
Why isn’t my new SSD showing up on my computer?
There could be several reasons why your new SSD isn’t showing up, including improper installation, a faulty connection, or compatibility issues with your computer. Make sure to check all of these factors before trying to troubleshoot further.
Can I transfer data from my old hard drive to my new SSD?
Yes, you can transfer data from your old hard drive to your new SSD using a data migration software or by manually transferring files. Make sure to backup your data before transferring it.
Do I need to update my computer’s BIOS to use a new SSD?
It depends on the specific SSD and computer model you have. Some newer SSDs may require a BIOS update, while others may work without any updates. Check with the manufacturer for specific requirements.
Can I use my new SSD as my boot drive?
Yes, you can use your new SSD as your boot drive by cloning your current boot drive or performing a fresh install of your operating system onto the SSD. Make sure to set your SSD as the primary boot device in your BIOS settings.