Congratulations on your new purchase – an SSD (Solid State Drive)! These drives are a significant upgrade to traditional hard disk drives because they offer faster reading and writing speeds, making them ideal for gaming and heavy workloads. However, after installing your SSD, you might be wondering why it’s not showing up. Don’t worry; we’ve got you covered! In this article, we’ll walk you through the steps to get your new SSD to show up and provide some tips to make sure it runs smoothly.
Whether you’re a PC enthusiast or a beginner, keep reading to get your new SSD up and running in no time.
Checking SSD Connection
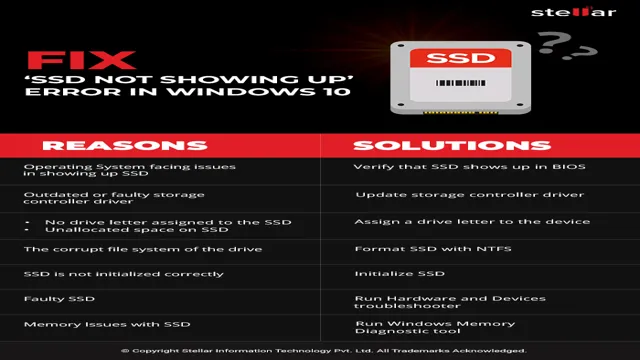
So you’ve added a new SSD to your PC, but it’s not showing up? Don’t worry, it’s not uncommon for this to happen. The first step is to check the connections between the SSD and the motherboard. You should ensure that the SATA cable is plugged in correctly and securely on both ends.
Additionally, ensure that the power cable is properly secured at the motherboard and the SSD. Another thing to check is the BIOS/UEFI settings. Go to the BIOS/UEFI settings and check if the SSD is listed under the storage devices.
If not, you should try changing the SATA port. Finally, if none of these options work, you may want to try using a different SATA cable. By taking these simple steps, you should be able to get your new SSD to show up on your computer in no time.
Ensure SSD is Connected Properly
When it comes to ensuring top-notch performance from your computer, it’s essential to make sure that your SSD is connected properly. To do this, start by checking the cables, making sure that they are securely attached and not damaged in any way. It is also recommended that you check the BIOS settings to ensure that the SSD is detected and configured correctly.
Additionally, it’s important to update the drivers, firmware, and BIOS regularly to keep your system functioning optimally. By taking these steps, you can rest assured that your SSD is connected properly and that your computer is running at its best. Remember, a well-connected SSD can make all the difference in terms of speed and performance, so don’t overlook this critical aspect of your computer.
Check Drive Manager for SSD
If you want to make sure that your Solid State Drive (SSD) is properly connected, then you should check it using Drive Manager. This powerful tool not only displays information about your drive but can also help diagnose any issues that may arise. To check your SSD, go to your Control Panel and select Device Manager.
From there, expand the Disk drives section, and you should see your SSD listed. If you don’t see it, then it’s not connected properly, and you should check the cables, connectors, and power supply. Once you’ve located your SSD, right-click on it and select Properties.
From there, you can see information such as the device status, driver information, and disk space. If everything looks good, then your SSD is connected correctly and ready for use. In conclusion, checking your SSD connection using Drive Manager is an easy way to ensure that your drive is functioning properly.
By taking a few minutes to check it, you can avoid potential issues down the line and ensure that your data is safe and secure. So, next time you’re experiencing any problems with your SSD, make sure to check it using Drive Manager!
Updating Drivers and BIOS
If you’ve recently installed a new SSD, but are having trouble getting it to show up on your computer, the solution might be as simple as updating your drivers and BIOS. Drivers are software programs that allow your operating system to communicate with your hardware, and outdated or missing drivers can prevent your computer from recognizing new hardware that you add. Similarly, your BIOS (Basic Input/Output System) is essentially the firmware that controls your computer’s hardware, and updating it can help ensure that your new SSD is properly detected.
To update your drivers and BIOS, start by looking up your computer or motherboard manufacturer’s website and downloading the latest versions of both. Be sure to follow the installation instructions carefully, and remember to back up your data before making any changes to your system. With a little bit of patience and know-how, you can get your new SSD up and running in no time.
Find the Latest Drivers and BIOS Updates
Keeping your computer running smoothly requires regular updates. One critical aspect of maintenance is updating your drivers and BIOS. Drivers help your computer interact with hardware devices such as printers, sound cards, and graphics cards.
Updating your drivers can improve performance, fix bugs, and increase compatibility with new software and hardware. BIOS, on the other hand, is firmware that controls your computer’s basic functions, such as booting up and shutting down. BIOS updates can improve stability, fix security issues and add new features.
Fortunately, finding the latest drivers and BIOS updates is straightforward. Most manufacturers provide download links for their latest firmware upgrades or even include their own update software. Remember to check if your system is compatible with the new updates and follow the manufacturer’s instructions carefully.
With the right driver and BIOS updates, your computer will run more efficiently and securely, and you’ll be able to take advantage of the latest features.
Install the Drivers and BIOS Updates
When you buy a new computer or laptop, it’s important to keep the drivers and BIOS updated. Drivers are software that control the hardware of your computer, such as the graphics card and sound card. Keeping these drivers updated ensures that everything runs smoothly and efficiently.
Meanwhile, BIOS is the firmware that runs when you start up your computer. It’s important to keep this updated because it can fix any bugs or security issues that may arise. If you don’t keep these up to date, your computer may start having performance issues, or could even be vulnerable to security breaches.
Thankfully, updating drivers and BIOS is a fairly simple process. You can usually go directly to the manufacturer’s website and download the latest versions. Once downloaded, you simply run the installation file and restart your computer.
It’s important to note that drivers and BIOS updates should only be downloaded from reputable sources, and you should always read any release notes or warnings before updating. By keeping your drivers and BIOS up to date, you can ensure that your computer runs smoothly and securely.
Formatting the SSD
So you’ve just installed your new SSD into your computer, but it’s not showing up? Don’t worry, there’s a simple solution. Before you can start using your SSD, it needs to be formatted. This process is essentially preparing the drive to be used and making it compatible with your operating system.
To format your SSD, you’ll first need to open your Disk Management tool, which can be found by searching for “Disk Management” in the Start menu. Once you’ve located the tool, you’ll be able to select your new SSD and initialize it, which will allow you to format the drive. From there, you’ll be able to select the file system you want to use (NTFS is the most common), and then format your SSD.
Once the process is complete, your new SSD should appear in your file explorer and be ready to use. So, if you’re wondering how to get your new SSD to show up, formatting it is the key!
Format the SSD to NTFS/File System
Now that you’ve installed your brand-new SSD, it’s time to format it to NTFS file system. Formatting the SSD is crucial to optimize its performance and ensure smooth operation. This process will erase all the data on the drive, so make sure to back up any important files before proceeding.
To format the SSD, right-click on the drive and select Format. From the File System drop-down menu, choose NTFS, and select the Allocation Unit Size that fits your needs. You can also customize the drive’s name and choose Quick Format if you want the process to be quicker, although it may affect the drive’s longevity.
Once you’ve selected all the preferences, click Start and wait for the process to complete. After formatting, your SSD is ready to perform at its best, whether you use it for gaming, work, or any other purpose.
Assign a Drive Letter to the SSD
If you’ve just installed an SSD into your computer, you’ll need to format it before you can use it. One important step in the formatting process is assigning a drive letter to your SSD. A drive letter is a unique identifier that your computer uses to access the SSD.
Without a drive letter, your computer won’t know where to find the SSD. To assign a letter, you’ll need to open the Disk Management tool in Windows. Once you’re in Disk Management, right-click on your SSD and select “Change Drive Letters and Paths.
” From there, you can choose an available drive letter for your SSD. It’s important to choose a letter that’s not already in use by another drive, as this can cause conflicts and make it difficult for your computer to access both drives. With a drive letter assigned to your SSD, you should be all set to start using it!
Final Thoughts
So, you’ve just bought yourself a new SSD and excitedly installed it in your computer, only to find that it’s not showing up. This can certainly be frustrating, but fear not – there are a few things you can try to get your new SSD to show up. First, check your BIOS settings to make sure your computer is recognizing the new drive.
You may need to enable the SATA port associated with the SSD. If this doesn’t work, try opening up Disk Management in Windows to see if the drive is listed there. You may need to initialize and format the drive before it will show up.
If none of these solutions work, it’s possible there’s a hardware issue with your SSD or computer, and you may need to consult a professional for help. Remember to be patient and thorough in your troubleshooting – with some persistence, you should be able to get your new SSD up and running in no time!
Conclusion
In order to make your new SSD show up, you must first become one with the SSD. Form a deep and meaningful connection with it. Whisper sweet nothings to it at night.
Take it on long walks in the park. And finally, perform the ancient and sacred ritual of plugging it into your computer and initializing it. Only then will your new SSD reveal itself to you in all its glory.
“
FAQs
What should I check if my new SSD is not showing up?
You should check if the SSD is properly connected to the motherboard and power supply. Also, make sure that it is recognized in the BIOS settings.
How do I check if my new SSD is detected by the system?
You can check if your SSD is detected by opening the Disk Management tool in Windows and looking for your new SSD in the list of drives.
Why is my new SSD not showing up in Windows Explorer?
This can be due to the drive not being formatted or assigned a drive letter. You can do this by opening Disk Management and formatting the drive or assigning it a drive letter.
What should I do if my new SSD is still not showing up after checking all connections?
If the SSD is still not showing up even after checking all connections, you can try updating the BIOS or firmware of your computer’s motherboard. Alternatively, you can try connecting the SSD to a different computer to see if it is recognized there.