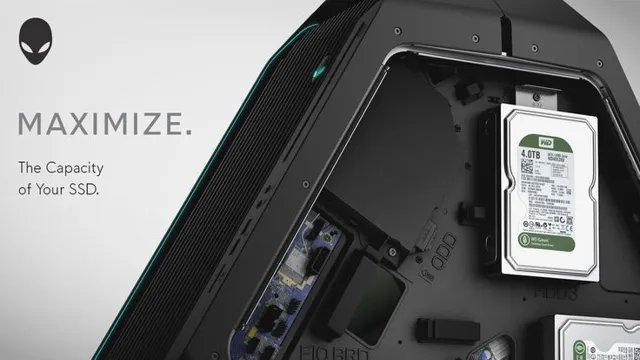
Ready to expand your storage options? As the demand for larger storage space continues to soar, SSDs have become the go-to solution for users seeking faster and more reliable storage. Accessing new SSD space can unlock a world of possibilities, from running more intensive applications to storing your favorite media files. The good news? It’s easier than ever to expand your SSD storage.
In this article, we’ll give you the rundown on how to access new SSD space, so you can get more out of your computer. Whether you’re upgrading your current hardware or purchasing a new computer, keep reading for some essential tips and tricks.
Check SSD Installation
If you’ve recently installed a new SSD on your computer, you might be wondering how to access your new space. The good news is that gaining access shouldn’t be too difficult. First, you’ll want to make sure that your computer recognizes the new drive.
You can check this by going to your computer’s settings and clicking on “Storage.” If your new drive is recognized, you should see it listed there. Once you’ve confirmed that your new drive is recognized, you can start moving files over.
One thing to keep in mind is that your operating system and any programs you have installed will still be on your old drive. To make the most of your new space, you’ll want to make sure you’re moving files that take up a lot of space, like photos, videos, and large documents. With a little bit of setup, you’ll be able to take advantage of your new SSD’s speed and storage capacity to make your computer run faster and more efficiently.
Verify SSD Is Detected
If you have just installed a new SSD into your computer, it’s essential to ensure that it’s detected by the system. First, turn on the computer and enter the BIOS settings by pressing a key specified on the screen (usually F2 or Del). Then, navigate to the “Advanced” or “Storage” tab and check if the SSD is listed among the connected devices.
If it isn’t, double-check that the SATA power and data cables are securely plugged in. Additionally, you can try switching the SATA port that the SSD is connected to. Once the SSD is detected, make sure it’s set as the primary boot device in the BIOS.
This will enable the operating system to load from the SSD for faster boot times. So, take a few minutes to check if your computer has detected the newly installed SSD to ensure everything is running smoothly.
Allocate SSD Space
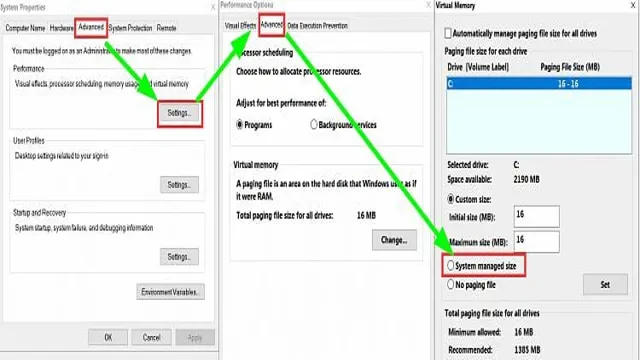
Allocate SSD Space When it comes to checking your SSD installation, one important task is to allocate the available space to suit your needs. Allocating space on your SSD may require some maneuvering, depending on your usage requirements. The first step is to open up your disk management tool and check if your SSD is listed there.
Once you’ve located your SSD, you can create a new partition for it and then allocate the desired amount of space. This process allows you to manage the space usage on your SSD and optimize it for your system needs. It also allows you to use your SSD as a primary drive and install apps and software that require faster access speeds.
Allocating space on your SSD is an essential measure to ensure optimal performance and long-term durability of your storage drive.
Format SSD for Use
If you’ve recently upgraded your computer’s storage with a new SSD, you’re probably wondering how to gain access to the new space. The first step is to format the SSD so that it’s compatible with your system. To do this, you’ll need to open your computer’s Disk Management tool.
From here, you can locate your new SSD and format it with the NTFS file system. This will allow your computer to recognize the drive and use it effectively. Before formatting, be sure to back up any important data that’s currently on the drive, as formatting will erase everything.
Once the formatting is complete, you can begin using your new SSD for storage, installing programs, and running your operating system. With the extra speed and storage capacity of your new SSD, you’ll be able to work more efficiently and enjoy a smoother overall computing experience.
Back Up Important Data
If you’re looking to format your SSD for use, it’s important to back up your important data first. Formatting an SSD erases all of the data on it, so you won’t be able to retrieve your files if you haven’t made a backup. A backup helps ensure that you don’t lose any crucial data if something goes wrong during the formatting process.
There are different methods of backing up data, from using an external hard drive to cloud-based solutions. It’s crucial to choose a backup method that works best for your needs and preferences. Once you have backed up all of your important data, you can proceed to format your SSD for use, which involves preparing the drive to store information and allocating space for the operating system and other software programs.
Formatting an SSD can help improve its performance and extend its lifespan.
Format SSD
Formatting an SSD is an essential step when setting up a new drive or preparing it for reuse. It involves wiping all the data stored on it and resetting it to its original state. This process is particularly important for those who plan on using the drive as their primary storage device for their operating system.
The first step in formatting an SSD is to back up any critical data stored on it. Once the backup is complete, you can connect the drive to your computer and use the built-in formatting tool found in the Disk Management utility in Windows or Disk Utility on Mac. Select the drive, choose the appropriate file system, and hit format.
Depending on the size of the drive, the process may take some time to complete. Once the format is complete, you’re left with a fresh, clean drive ready for use. Remember to always handle SSDs with care and follow the manufacturer’s instructions for optimal performance.
Using the SSD
So you’ve just upgraded your computer by adding a new SSD (Solid State Drive) and you’re probably wondering how to access the extra space. Don’t worry, it’s pretty simple. First, you’ll need to make sure that your SSD is recognized by your computer.
You can do this by opening your device manager and checking if it’s listed under “Disk Drives”. Once you’ve confirmed that your SSD is recognized, you can partition the drive and format it to make it usable. You can do this by right-clicking on your computer icon and selecting “Manage”.
From there, navigate to “Disk Management”. You should see your new SSD listed there. Right-click on it and select “New Simple Volume”.
Follow the prompts to partition and format the drive. And voila! You now have access to your new SSD space.
Set Up Storage Options
If you want lightning-fast boot times and snappy performance, using an SSD (Solid State Drive) as your primary storage is an excellent choice. Compared to traditional HDDs (Hard Disk Drives), SSDs have no moving parts, so they’re incredibly fast, quiet, and reliable. Plus, SSDs consume less power, so they’re perfect for laptops if you’re looking to extend your battery life.
To set up your SSD, you’ll first need to check if your PC or laptop has an SSD slot available. If it does, then you can install the SSD by connecting it to your motherboard using a SATA cable and a power cable. Once you’ve installed the SSD, you’ll need to migrate your operating system and programs to the new drive.
This step can be a bit tricky, but there are many software tools available for free on the internet that can help you with the migration. Finally, once all your data has been transferred to the new drive, you’ll need to update your BIOS settings to set the SSD as your primary boot option. With these steps completed, you’ll be ready to enjoy the blazing-fast performance and reliability of your SSD!
Optimize Performance
If you’re looking to optimize your computer’s performance, upgrading to an SSD (Solid State Drive) is a great place to start. Unlike traditional hard drives, SSDs use flash memory to store data, which allows for faster read and write speeds. This means that your computer will load programs and files much quicker than it would with a traditional hard drive.
Additionally, SSDs tend to be more reliable than HDDs, as they don’t have any moving parts that can wear out over time. Upgrading to an SSD is a relatively simple process, and it can make a noticeable difference in your computer’s performance. So if you’re tired of waiting for your computer to boot up or load programs, consider upgrading to an SSD.
Troubleshooting
So, you’ve just installed a new SSD and you’re ready to start utilizing all that extra space. The first thing you need to do is make sure your computer recognizes it. To gain access to your new SSD, you’ll need to go into your computer’s Disk Management tool.
You can do this by right-clicking on your Start menu and selecting “Disk Management” from the list of options. From there, you should see your new SSD listed as a drive that has not yet been initialized. Right-click on the drive and select “Initialize Disk,” then choose the partition style you’d like to use.
Once you’ve done this, you’ll need to create a new volume by right-clicking on the unallocated space on the SSD and selecting “New Simple Volume.” Follow the prompts to set up the volume, and once you’re done, you should have full access to your new SSD and all the space it provides. It’s that easy!
Common Issues
When it comes to troubleshooting common issues, it can be frustrating not knowing where to start. Luckily, there are some simple steps you can take to identify and fix the issue. Firstly, check for any error messages or warning signs that may give you a clue as to what the problem is.
It’s also worth checking if any updates need to be installed or if there are any conflicting programs running. If the issue persists, try restarting your device or even resetting it to its default settings. Another useful tip is to seek help from online forums or support pages, as there may be others who have experienced the same problem and found a solution.
By taking these simple steps, you can save yourself a lot of time and stress in the long run.
Solutions
When it comes to troubleshooting, it’s important to first identify the problem before finding a solution. This can involve asking questions and gathering information about the issue at hand. Once you have a clear understanding of what’s going on, you can then start exploring possible solutions.
It’s important to approach troubleshooting in a methodical and systematic way, so that you can eliminate potential causes and narrow down the problem. In some cases, the solution may be simple, such as restarting a device or updating software. Other times, it may require more advanced troubleshooting techniques, like digging into a system log or running diagnostic tests.
Whatever the case may be, staying calm and focused is key when it comes to troubleshooting. By taking the time to identify and address the issue, you can help prevent further problems down the line.
Conclusion
In conclusion, gaining access to your new SSD space is as easy as making a cup of coffee. You just need to follow a few steps, pour in the right ingredients and voila – you have a freshly brewed cup of Joe. Similarly, all you need to do is connect your new SSD, format it, and transfer your files to enjoy the benefits of faster storage and more space.
So, don’t let your SSD sit there unused – go ahead and brew up some more space today!”
FAQs
What is the process to install my new SSD?
To install your new SSD, follow these steps:
1. Shut down your computer.
2. Open your computer case.
3. Locate the existing hard drive.
4. Disconnect the cables from the hard drive.
5. Remove the hard drive from the computer.
6. Insert the new SSD into the same slot.
7. Connect the cables to the SSD.
8. Close the computer case.
9. Start your computer and check that your new SSD is recognized.
How do I transfer files to my new SSD?
To transfer files to your new SSD, follow these steps:
1. Connect your new SSD to your computer.
2. Open your file explorer.
3. Locate the files you want to transfer.
4. Right-click on the files and select “Copy.”
5. Navigate to your new SSD folder.
6. Right-click in the new SSD folder and select “Paste.”
7. Wait for the files to transfer.
Do I need to format my new SSD before using it?
Yes, you need to format your new SSD before using it. To format your new SSD, follow these steps:
1. Connect your new SSD to your computer.
2. Open Disk Management.
3. Locate your new SSD.
4. Right-click on your SSD and select “Format.”
5. Choose the file system and allocation unit size.
6. Name your new SSD drive.
7. Click “OK” to format your new SSD.
Why is my new SSD not showing up on my computer?
Your new SSD may not be showing up due to various reasons, such as:
1. The SSD is not connected correctly.
2. The SSD needs to be initialized.
3. The SSD needs to be formatted.
4. The SSD driver needs to be updated.
To troubleshoot this issue, check the connection and try initializing or formatting the SSD. If the issue persists, try updating the driver.