Have you recently upgraded your hardware and need to connect your SSD to your motherboard? Are you unsure of how to proceed with the installation process? Well, fear not! In this step-by-step guide, we will walk you through the process of connecting your SSD to your motherboard. With just a few simple steps, you can have your SSD up and running in no time, taking advantage of faster boot times and improved application loading speeds. Think of connecting your SSD to your motherboard like building a puzzle – once all the pieces are in place, everything will run smoothly.
The process itself is relatively straightforward, but it’s important to take the necessary precautions and follow the steps correctly. We’ll be discussing everything from the tools you’ll need to how to ensure that your SSD is properly mounted and connected to the motherboard. Whether you’re a gaming enthusiast looking to maximize your machine’s potential or a creative professional in need of speedy editing, connecting your SSD to your motherboard is an essential step in ensuring that your computer is running at its full potential.
With our guide, you’ll be able to navigate the installation process with ease, leaving you more time to enjoy the benefits of your newly installed SSD. So grab your screwdriver, and let’s get started!
Check Compatibility
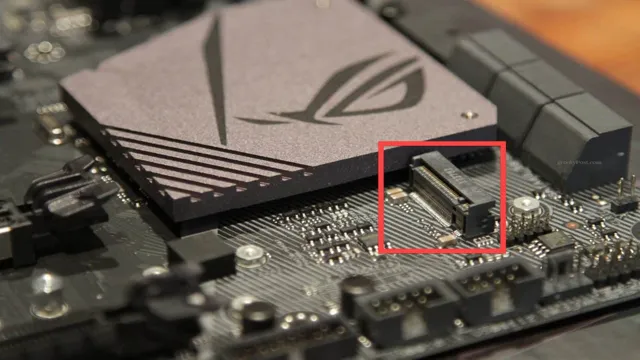
If you’re looking to upgrade your computer’s storage and wondering how to connect your SSD to your motherboard, it’s important to first check compatibility. Make sure your motherboard has an available M.2 slot or SATA port that your SSD can fit into.
Depending on the type of SSD you have, you may need to also check the interface type. SATA SSDs use a SATA interface while NVMe SSDs use an M.2 interface.
Once you’ve confirmed compatibility, it’s a matter of attaching the SSD to the slot and securing it with screws. Remember to consult your motherboard’s manual for specific instructions and to handle all components with care to avoid any damage. With a successful installation, you’ll enjoy faster boot times and smoother operation with your new SSD.
Make Sure Motherboard Has Suitable Slot
When selecting a motherboard, one of the most important things to consider is the compatibility with your system components, particularly your CPU and graphics card. However, it’s also important to ensure that the motherboard has a suitable expansion slot for any additional hardware you may want to add in the future. For example, if you’re looking to include a dedicated sound card, you’ll need to ensure that the motherboard has an available PCI or PCIe slot.
On the other hand, if you’re planning to install multiple graphics cards for gaming or video rendering, you’ll need to check if the motherboard supports SLI or Crossfire technology. Failing to check the compatibility of expansion slots on your motherboard can result in a waste of time and money, so make sure to do your research beforehand to avoid any complications.
Verify SSD Connection Type
SSD Connection Type When upgrading your computer’s storage system, it’s essential to ensure that your new SSD is compatible with your computer’s connection type. A solid-state drive (SSD) can either use a SATA or an NVMe connection. SATA is an older, slower interface common in older computers, while NVMe is a faster, more modern interface that newer computers use.
Before purchasing an SSD, check your computer’s manual or specifications to determine which connection type it uses. If your computer uses SATA, you can still upgrade to an SSD, but you may not receive the full speeds the SSD is capable of. On the other hand, if your computer uses NVMe, you’ll want to purchase an NVMe-compatible SSD to take full advantage of the faster interface.
It’s crucial to verify the SSD connection type to ensure that your investment will work correctly with your computer and provide optimum performance.
Prepare Your SSD
If you’re looking to install an SSD into your computer, the first step is to make sure it’s properly connected to your motherboard. The most common method of connection is through SATA cables, which will need to be plugged into both the SSD and the motherboard. Make sure your motherboard has an available SATA port and power cable that you can use.
If not, you may need to purchase additional hardware such as a SATA expansion card. Once the SSD is connected, you’ll need to format it to prepare it for use. This can typically be done through your computer’s operating system.
Don’t forget to set your SSD as the primary boot drive in your computer’s BIOS settings to ensure it’s being properly utilized. With proper preparation, your SSD will bring a significant boost to your computer’s performance.
Disconnect Power and Open Casing
When it comes to upgrading your computer’s storage, it’s important to properly prepare your SSD before installing it. The first step is to disconnect all power sources and open up your computer’s casing. This will allow you to access the internal components of your computer and safely install your new SSD.
Before handling any components, it’s important to ground yourself to prevent any static discharge that could damage your new drive. This can be done by touching a metal object in your computer’s casing, such as the power supply unit. Once you’ve safely grounded yourself, you can proceed with the rest of the installation process.
By taking these simple precautions, you can ensure that your new SSD is properly installed and ready to use for years to come.
Insert SSD into Mounting Bracket
If you’re planning to upgrade your computer to an SSD, you’ll need to know how to insert it into a mounting bracket. First, make sure you have everything you need, including the SSD, the mounting bracket, and the necessary tools. Then, carefully attach the SSD to the bracket, making sure it’s secure.
It’s important to be gentle when handling the SSD, as it’s a delicate piece of technology. Once the SSD is securely attached to the bracket, you can proceed with installing it in your computer. This will greatly improve your computer’s performance, as SSDs are faster and more efficient than traditional hard drives.
With a little patience and care, you can easily install an SSD and enjoy all the benefits it has to offer.
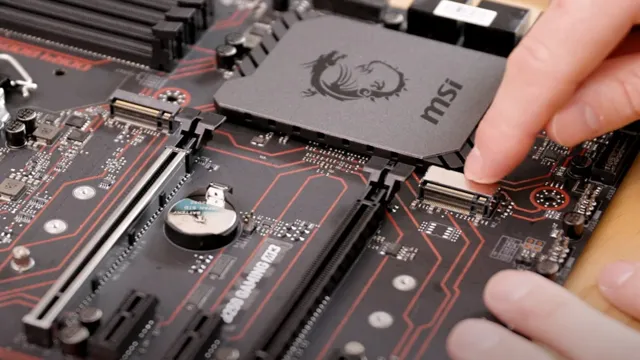
Connect SSD to Motherboard
Connecting your SSD to your motherboard is a straightforward process that can be accomplished in just a few simple steps. The first thing you’ll need to do is locate the SATA ports on your motherboard. Typically these ports are located near the bottom of the board and are labeled accordingly.
Once you’ve found the SATA ports, you’ll need to plug your SSD into one of them. Make sure to align the SATA connector on the SSD with the port on the motherboard. After you’ve connected the SSD to the motherboard, you’ll need to attach the power cable.
Most SSDs require a standard SATA power cable, which can be found in your power supply bundle. Simply plug one end of the cable into the SSD and the other end into the power supply. Once you’ve connected both the SATA data cable and the power cable, your SSD is ready to go! Now you can enjoy faster boot times and lightning-fast application load times.
Identify SATA Connections
When connecting a solid-state drive (SSD) to your motherboard, it’s important to know which cable to use. SATA connections are the way to go for SSDs, specifically SATA III for the best speed. These connections can be found on your motherboard and are usually labeled.
To connect your SSD, simply attach one end of the SATA cable to the SSD and the other end to one of the SATA ports on the motherboard. Then, connect the power cable to the SSD. It’s as easy as that! Now your SSD is ready to be recognized by your system and used to its full potential.
Plug SATA Cable into Motherboard
Connecting your SSD to your motherboard is a critical step in building your computer. To connect your SSD, you’ll need to plug in the SATA cable into the motherboard. The SATA cable, short for Serial ATA, transmits data between the motherboard and the SSD.
The SATA cable is easy to identify as it has two L-shaped connectors on either end. One end plugs into the SSD while the other plugs into the motherboard. Before plugging the SATA cable into your motherboard, make sure to identify the correct SATA port.
The SATA ports are usually located near the bottom of the motherboard and are labeled SATA0, SATA1, SATA2, and so on. Once you find the right port, plug in the SATA cable and fasten both connectors securely. Remember to handle the SATA cable gently to avoid damaging the pins or ports.
With the SSD connected to the motherboard, you’re ready to power up your computer and start installing your operating system!
Attach SATA Power Cable to PSU
After connecting the SATA power cable to your PSU, the next step in installing your SSD is to connect it to your motherboard. To do this, first locate the SATA port on your motherboard. It is usually located near the center of the board and marked with the word “SATA” or a symbol that looks like an “L” or a “7”.
Once you have identified it, use the included SATA data cable to connect your SSD to the motherboard. The SATA data cable has two flat connectors on either end: one for the motherboard and the other for the SSD. Carefully align the connectors and push them into place until they click.
Make sure not to force them or bend any of the pins. Once your SSD is connected, you may need to enable it in your BIOS settings to ensure that it is recognized by your system and that you can begin using it. Overall, connecting your SSD to your motherboard is a straightforward process that plays a crucial role in ensuring that your system operates at peak performance.
Conclusion
In the world of technology, connecting your SSD to your motherboard may seem like a daunting task, but fear not! With the right tools and a little bit of know-how, it’s as easy as fitting a square peg into a square hole – which is to say, very easy indeed. So grab your screwdriver and get ready to show that SSD who’s boss, because with this newfound knowledge, you’ll have it up and running in no time!”
FAQs
What type of cable is needed to connect an SSD to a motherboard?
To connect an SSD to a motherboard, you will typically need a SATA cable.
Where do I plug in the SATA cable on the motherboard for my SSD?
Look for a SATA port on the motherboard and connect the cable to it. The specific location may vary depending on the motherboard model.
Can I connect my SSD to any SATA port on the motherboard?
In most cases, you can connect your SSD to any available SATA port on the motherboard. However, it is recommended to refer to the motherboard manual to ensure optimal performance.
How do I check if my SSD is properly connected to the motherboard?
You can check if your SSD is properly connected by checking the BIOS settings or through the disk management tool in your operating system. Make sure the drive is recognized and visible in the system.