Have you recently upgraded your MacBook Pro SSD and are now looking to format it to Journal? You have come to the right place! Journal is a default file system that Apple uses for their operating systems, to help maintain data integrity and prevent data loss in the event of power failures or system crashes. By formatting your SSD to Journal, you can reap the benefits of this advanced file system! However, the process can seem daunting, especially if you are not tech-savvy. This blog will guide you through the process step-by-step, making it simple for anyone to do.
So, grab your MacBook Pro and let’s get started!
What is Journal Format?
If you’re wondering how to format your MacBook Pro SSD to journal, it’s important to first understand what journal format means. Journal format refers to a type of file system that logs changes made to the disk in a journal, allowing for easy and efficient recovery of data in case of a system crash. To format your MacBook Pro SSD to journal, you can follow these steps: First, go to Disk Utility and select the drive you want to format.
Then, click on Erase followed by selecting the “Mac OS Extended (Journaled)” option under the Format section. Finally, give your drive a new name, and click “Erase” to begin the formatting process. Once complete, your MacBook Pro SSD will be formatted to journal, ensuring enhanced data protection and recovery.
Definition and Benefits
Journal format refers to the structured way in which one records and organizes their thoughts and experiences in a journal. It includes sections such as dates, headings, bullet points, and paragraphs that help to break down and organize one’s thoughts in a clear and concise manner. The benefits of using a journal format include improved self-awareness, enhanced creativity, and greater productivity.
By organizing thoughts into specific sections, individuals can more easily identify patterns and trends in their thinking and behavior, leading to greater self-awareness and understanding. This can then lead to increased creativity, as individuals are better able to identify and build upon their own unique perspectives and ideas. Additionally, journaling in a structured format can help individuals to stay focused and prioritize tasks, leading to greater productivity and goal achievement.
Overall, the journal format provides individuals with a powerful tool for personal growth and development, enhancing both mental and emotional well-being.

Check your MacBook Pro Specifications
Are you thinking of formatting your MacBook Pro SSD to journal? Before doing so, it is important to check your MacBook Pro specifications as not all models support journal formatting. To check your specifications, head over to the Apple menu and select “About This Mac.” This will open a window displaying your Mac’s model name, processor, memory, and other relevant information.
Once you have confirmed that your MacBook Pro supports journal formatting, you can proceed with the process. First, you need to back up all your important data as formatting your SSD will erase all the data on it. Then, open the Disk Utility by going to Applications > Utilities > Disk Utility.
From there, select your SSD and click on the “Erase” button. In the Format drop-down list, select “Mac OS Extended (Journaled)” and give your SSD a name. Finally, click on the “Erase” button to begin the formatting process.
With these steps, you can successfully format your MacBook Pro SSD to journal.
Compatibility and Requirements
If you’re planning on upgrading your MacBook Pro, it’s important to check its specifications to ensure compatibility with the new hardware. You can find your Mac’s specifications by clicking the Apple logo on the top left corner of the screen and selecting “About This Mac”. This will show you everything from the model and year of your MacBook Pro to its processor, memory, and storage.
Once you know your current specifications, you can compare them to the system requirements of the new hardware you’re considering. This includes factors like the operating system version required and any additional hardware or software needed for the upgrade. By doing your research beforehand, you can make sure your MacBook Pro is fully compatible and ready for the upgrade, ensuring a smooth and efficient transition.
Backup Your MacBook Pro
If you’re looking to format your MacBook Pro SSD to journal, there are a few things you need to know before going ahead with the process. First and foremost, it’s important to backup any data you want to keep before formatting your SSD. This can be done through the Time Machine feature on your MacBook Pro, which automatically creates regular backups of your system.
Once you’ve backed up your data, you can proceed with formatting your SSD to journal. To do so, you’ll need to access the Disk Utility tool on your MacBook Pro, select your SSD, and then choose the journal file system format. It’s worth noting that once you format your SSD, all data previously stored on it will be erased, so make sure you have a backup in place before proceeding.
Overall, formatting your MacBook Pro SSD to journal can help improve data organization and overall performance.
Importance of Backing Up Data
Backing up your data regularly is crucial for any MacBook Pro user. You never know when your device may malfunction or get stolen, and with it, all the important documents, photos, and videos you have stored. Imagine losing all your family pictures that you’ve compiled over the years or the project you were working on for weeks.
That’s why it’s important to back up your MacBook Pro regularly. You can do it through Time Machine, which automatically backs up your entire system, including documents, photos, music, and emails, to an external hard drive. This way, you can easily restore your data in case of any mishap.
You can also use cloud storage services like iCloud or Dropbox, which offer secure and convenient storage, accessible from any device. With the increasing amount of sensitive information we store on our machines, taking steps to secure and protect it through backups is a no-brainer. So back up your MacBook Pro regularly and don’t let an unfortunate event leave you empty-handed.
Format your MacBook Pro SSD to Journal
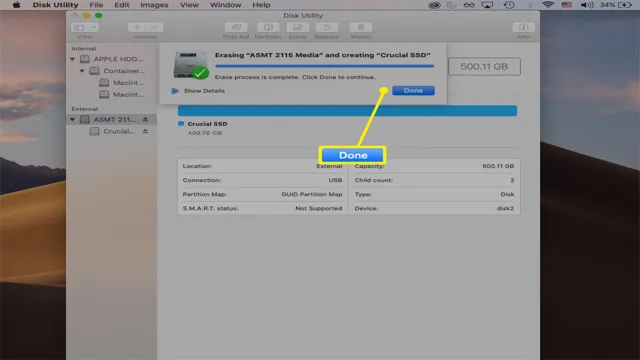
If you’re looking to format your MacBook Pro SSD to journal, the process is pretty straightforward. First, you’ll need to boot up your Mac in recovery mode by holding down Command+R while restarting it. Once you’ve entered recovery mode, select the Disk Utility option and choose the SSD you want to format.
From there, you’ll need to select the Erase tab and choose Mac OS Extended (Journaled) as the format type. Finally, hit the Erase button to initiate the formatting process. It’s important to keep in mind that formatting your SSD will erase all existing data on the drive, so make sure to back up any important files before proceeding.
Overall, formatting your MacBook Pro SSD to journal should only take a few minutes and will help improve performance and durability.
Step-by-Step Instructions
If you’ve recently upgraded your MacBook Pro’s SSD, you’ll need to format it to make the most of its storage capacity. In this blog post, we’ll walk you through the steps to properly format your MacBook Pro SSD to the journal file system. Firstly, make sure to back up all your data because the formatting process will erase all the files on your SSD.
Next, restart your MacBook Pro, and as soon as it powers on, press and hold the Option key until the Startup Manager appears. From there, select the macOS installer from the list of available bootable drives. Once the installation process starts, select Disk Utility from the Utilities menu.
In Disk Utility, select your SSD from the list of available drives, and then click the Erase button. In the format field, select APFS (macOS Extended Journaled), and then click the Erase button. The formatting process should take a few seconds to complete, and once it’s done, you can exit Disk Utility and proceed with the macOS installation.
By following these simple steps, you’ll have a formatted SSD that’s ready to be used with your MacBook Pro.
Restore Data to your MacBook Pro SSD
If you’ve replaced the SSD on your MacBook Pro and need to restore data, formatting it to journal is necessary. To do so, you’ll need to boot the computer from a macOS installation disk or a recovery partition. From there, open the Disk Utility tool and select the SSD.
Choose the “Erase” option and then select “Mac OS Extended (Journaled)” as the format type. Once the formatting is complete, you can reinstall macOS and begin restoring data from a backup. It’s important to note that formatting the SSD will erase all existing data, so make sure you have a backup before proceeding.
By formatting your MacBook Pro SSD to journal, you can ensure that your data remains safe and secure on your newly replaced drive.
Importance and Instructions
If you’ve recently swapped out your MacBook Pro SSD and need to restore your data, you’re in luck! Restoring data to your MacBook Pro SSD is a crucial step in getting your device up and running again. It’s essential to have a backup of your data beforehand, as this will ensure that all of your important files make it onto the new SSD. To begin, you’ll need to connect your device to an external hard drive or cloud service and transfer all of your files onto it.
Then, once you’ve installed the new SSD, you can use Time Machine to restore your data back onto your MacBook Pro. It’s a straightforward process and one that should be done with care to ensure that no data is lost. With a few simple steps and some patience, you can have your MacBook Pro back to its full operational capacity in no time!
Conclusion and Final Thoughts
In short, formatting your MacBook Pro SSD to the Journal file system is just like giving your computer a fancy new cocktail dress – it’s the perfect fit for its operating system and ensures smoother performance. So grab your virtual sewing kit and get ready to dress up your machine for success!”
FAQs
What is the process of formatting a MacBook Pro SSD to journal?
To format a MacBook Pro SSD to journal, go to the Disk Utility, select the SSD, choose Erase, and then select Mac OS Extended (Journaled) from the Format dropdown.
Is it necessary to format the SSD to journal on a MacBook Pro?
It is not necessary, but it is recommended as it provides reliability and better error correction capabilities.
How do I access Disk Utility on a MacBook Pro?
You can access Disk Utility on a MacBook Pro by going to Applications > Utilities > Disk Utility.
Will formatting the SSD to journal erase all the data on my MacBook Pro?
Yes, formatting the SSD to journal will erase all the data on your MacBook Pro. It’s important to backup all your data before proceeding with the formatting process.