
If you’re someone who works with computers, you’ll know how important it is to have quick access to your data. So, if you’ve recently upgraded your SSD to an M.2 SSD, you’re probably wondering how to clone your files while keeping the speed and performance of your new device.
Fear not! We have a quick guide that will help you take the hassle out of the cloning process. Cloning an SSD to an M.2 SSD can be daunting, but it needn’t be.
With the right tools and a little know-how, you can transfer your files in no time. In this blog post, we’ll walk you through the process step by step, making sure you’re left with a fully functioning M.2 SSD.
Before we dive in, let’s take a moment to consider why upgrading to an M.2 SSD might be beneficial. Simply put, M.
2 SSDs are faster and offer more storage space than traditional SSDs. They’re also smaller and use less power, making them the ideal choice for laptops and other portable devices. So, if you’re looking to boost your computer’s speed and performance, upgrading to an M.
2 SSD is a great choice. And with our quick guide to cloning your files, it’s never been easier. So, let’s get started!
Check Compatibility
If you are upgrading your laptop or PC’s storage by cloning your current SSD to an M.2 SSD, one of the crucial things you need to do first is checking for compatibility. Not all laptops or PCs support M.
2 SSDs, and not all M.2 SSDs are compatible with all laptops or PCs. Some laptops or PCs may require specific M.
2 SSD sizes, like 2280 or 2260, to fit properly. Moreover, some laptops or PCs may not support NVMe M.2 SSDs and would only accept SATA-based M.
2 SSDs. So, it’s best to check for your laptop’s or PC’s user manual or the manufacturer’s website to know the compatible M.2 SSDs.
Once you are sure about the compatibility, you can clone your current SSD to the M.2 SSD using cloning software like EaseUS Todo Backup, Macrium Reflect, or Samsung Data Migration Software. Remember to backup your data and keep it safe before starting the cloning process.
With the proper cloning tools and procedures, upgrading your laptop or PC’s storage to an M.2 SSD can be a breeze.
Make sure your motherboard supports M.2 SSD and check size compatibility
When it comes to upgrading your computer’s storage with an M.2 SSD, it’s crucial to ensure that your motherboard is compatible with this type of storage. Many newer motherboards support M.
2 SSDs, but it’s always a good idea to double-check before purchasing one. Additionally, you’ll want to make sure that the size of the M.2 SSD you’re considering is compatible with your motherboard.
Most motherboards support multiple sizes, such as 2242, 2260, and 2280, but it’s important to confirm this before making a purchase. If your motherboard doesn’t support M.2 SSDs or the size you’re considering, you may need to consider a different type of storage upgrade.
Don’t worry though, as there are plenty of other options available that will still improve your computer’s performance. Taking the time to check compatibility before purchasing will save you from potentially costly and frustrating mistakes down the line.
Backup Data
If you are looking to upgrade your computer’s storage system, then cloning your existing SSD to a new M.2 SSD can be a great option. With this method, you can transfer all your data from the old SSD to the new one without losing anything or reinstalling applications and games.
But the question is, how do you clone your SSD to an M.2 SSD? Well, the process is quite simple. Firstly, insert the new M.
2 SSD into your computer’s M.2 slot. Then, download and install a cloning software such as Acronis True Image or Macrium Reflect.
Once installed, run the software and choose the option to clone your existing SSD to the new M.2 SSD. Follow the prompts and let the software do its job.
It may take some time depending on the amount of data, but once the cloning process is complete, you can eject the old SSD and enjoy lightning-fast speeds with your new M.2 SSD. In conclusion, cloning your SSD to an M.
2 SSD is an easy and effective way of upgrading your storage system.
Backup all important data on your current SSD to an external drive
If you’re planning to upgrade your SSD, it’s essential to backup all your critical data on the current SSD to an external drive. This step is crucial to ensure that your important files, documents, and media are safe and secure throughout the upgrading process. Creating a backup of your data helps you retrieve everything you need after the installation.
It’s always better to take precautionary measures and secure your data in case something goes wrong during the upgrading process. Once you’ve created a backup of your data, you will have peace of mind knowing that you haven’t lost any essential files and media. Don’t risk losing your valuable data by skipping this critical step – backup everything to an external drive and upgrade your SSDwith confidence!
Create Bootable USB
If you’re looking to clone your SSD to an M.2 SSD, the first step is to create a bootable USB drive. This will allow you to boot your computer from the USB and access the cloning software.
Begin by downloading a reputable cloning software, such as Clonezilla or Macrium Reflect. Next, insert a USB drive and format it to FAT3 Then, using the cloning software, create a bootable USB drive.
Once the drive is created, restart your computer, access the BIOS settings, and select the USB drive as the primary boot device. Finally, follow the on-screen instructions provided by the cloning software to clone your SSD to the M.2 SSD.
With just a few simple steps, you can quickly and easily clone your SSD to an M.2 SSD, providing faster performance and increased storage capacity for your computer.
Download cloning software and create bootable USB with it
Creating a bootable USB is a crucial step when it comes to cloning software. The bootable USB will allow you to access the cloning software and enable you to clone your hard drive effectively. Creating a bootable USB is easy and can be done in just a few simple steps.
Firstly, download the cloning software of your choice and save it on your computer. Next, insert the USB drive into your computer and make sure it is recognized. Then, open the cloning software and choose the option to create a bootable USB.
Follow the prompts on the screen to complete the process, which should take around 10 to 15 minutes. Once the process is complete, safely remove the USB drive from your computer, and it is now ready to use as your bootable drive. Using a bootable USB with your cloning software will save you time and make the entire cloning process more efficient.
So, don’t skip this critical step!
Install M.2 SSD
If you’re looking to upgrade your computer’s storage system, you might be wondering how to clone your SSD to an M.2 SSD. Don’t worry, it’s not as complicated as it sounds! First, you’ll need to make sure your computer has an M.
2 slot for the new SSD. Most new motherboards come equipped with at least one M.2 slot, but older models might not have one.
Once you’ve checked that your computer can support the new drive, you’ll need to purchase the M.2 SSD and a cloning software. There are many free cloning software options available, such as Macrium Reflect and Clonezilla.
Once you have your cloning software ready, simply follow the instructions provided by the program. The process should take anywhere from a few minutes to a few hours, depending on the amount of data being transferred. Once the cloning is complete, shut down your computer and install the new M.
2 SSD. Make sure to set it as your primary boot drive in the BIOS, and you’re all set! With your new M.2 SSD, you’ll be able to enjoy lightning-fast data transfer speeds and significantly reduced boot times.
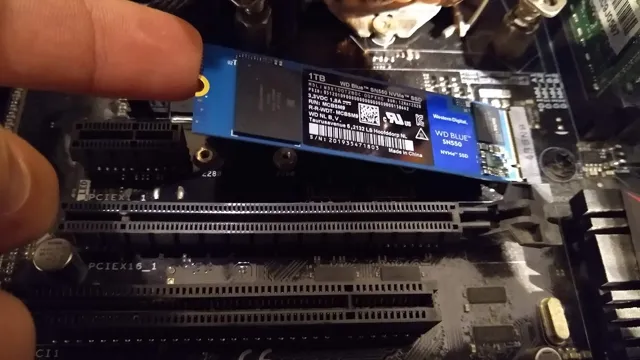
Open up your computer and install M.2 SSD on the motherboard slot
Installing an M.2 SSD can be the perfect way to boost your computer’s performance. First, you need to identify the M.
2 slot on your motherboard. It’s usually near the CPU socket or around the PCIe slots. Once you locate it, carefully unbox the M.
2 SSD and line up the notches on the SSD with the socket on the motherboard. Hold it firmly and gently push it down until it clicks into place. After that, fix the SSD in place with the screw that came with the motherboard.
Once you’ve completed the process, you may need to update your BIOS settings to make sure your computer recognizes the new M.2 SSD. With your new M.
2 SSD installed, you’ll enjoy faster boot times and more significant storage capacities. Installing an M.2 SSD is a simple process that can help enhance your computer’s capability significantly.
Boot from USB
If you want to clone your SSD to an M.2 SSD, one option is to use a bootable USB drive. First, you’ll need to create a bootable USB drive with cloning software such as Clonezilla or Macrium Reflect.
Once you have the bootable USB drive, you’ll need to insert it into your computer and restart the computer. Next, you’ll need to change the boot order in the BIOS settings to prioritize the USB drive. This will allow the computer to boot from the USB drive and launch the cloning software.
From there, follow the instructions provided by the software to clone your SSD to the M.2 SSD. Once the cloning process is complete, you can remove the USB drive and restart your computer.
Your computer should now boot from the M.2 SSD, which should have an exact copy of your old SSD. This process can save you a lot of time and effort when upgrading your storage drive.
Restart your computer and boot from the bootable USB you created earlier
To boot from a USB drive, you’ll need to restart your computer and enter the boot menu. This means that once you start back up, you’ll need to tap a specific key before the system loads up, usually F12, F10, or ESC. This will bring up a menu that displays the different boot options available.
Select the USB drive and press enter. The system will then load up the USB as if it were the primary boot device. Once the USB has booted up, you’re ready to install or run software from the drive.
It’s important to note that not all computers have the same boot menu or key combinations, so you may need to refer to your computer’s manual or manufacturer’s website for instructions. By booting from a USB drive, you can easily run diagnostic tools, recover lost data, or even install a new operating system. So the next time you need to troubleshoot a computer issue or install new software, try creating a bootable USB and give booting from it a try.
Clone SSD to M.2 SSD
If you’re looking to upgrade your computer’s storage system, moving from an SSD to an M.2 SSD can be an excellent option. But how do you go about cloning your current SSD to the new one? The process isn’t too difficult, but it does require a bit of technical knowledge.
First, you’ll need to purchase an M.2 SSD that matches or exceeds the size of your current SSD. Then, you’ll need to use cloning software to transfer all of your data from the old SSD to the new one.
There are many cloning programs available, both paid and free, so make sure to research and choose the one that’s right for you. Once you have the software installed, simply follow the instructions to clone your SSD. After the transfer is complete, you should be able to boot up your computer as usual, now with the faster M.
2 SSD installed. Overall, while the process may seem intimidating, cloning your SSD to an M.2 SSD can provide a noticeable improvement in speed and performance that’s well worth the effort.
Open up cloning software and follow the on-screen instructions to clone your SSD to M.2 SSD
If you’re looking to upgrade your PC’s SSD storage, cloning your current SSD to an M.2 SSD is a great option. Thankfully, the process is straightforward when you open up cloning software and follow the on-screen instructions.
The first step is to ensure that your M.2 SSD is compatible with your PC’s motherboard. Next, connect your M.
2 SSD to your PC and launch the cloning software. Make sure to select the SSD you want to clone as your source drive and the M.2 SSD as your target drive.
Follow the prompts to clone your SSD to the M.2 SSD. Depending on the size of your SSD and the amount of data on it, the process may take several hours to complete.
Once it’s finished, you can set the M.2 SSD as your boot drive and enjoy faster data transfer speeds and improved system performance. Overall, cloning your SSD to an M.
2 SSD is a simple and effective way to upgrade your PC’s storage capacity.
Restart and Test
If you’re looking to upgrade your computer’s storage by cloning your SSD to an M.2 SSD, there are a few steps you’ll need to follow. First, make sure you have the necessary equipment, including an M.
2 SSD and a cloning software. Connect the M.2 SSD to your computer, and use the cloning software to clone the data from your current SSD to the M.
2 SSD. This can take some time, so be patient. Once the cloning process is complete, restart your computer and test the M.
2 SSD to ensure that everything is working properly. You should notice faster speeds and improved performance with your new M.2 SSD.
Overall, cloning your SSD to an M.2 SSD is a great way to breathe new life into your computer’s performance.
Restart your computer and check if everything works properly on the M.2 SSD
After successfully installing the M.2 SSD, it’s time to restart your computer and see if everything is working properly. Restarting your computer can allow the system to recognize the new hardware and ensure that it is properly configured.
Since the M.2 SSD is a fast storage device, you should notice a significant improvement in overall system performance. Once the computer has restarted, you can run some tests to check the SSD’s functionality.
You can use various benchmark tools to measure the SSD’s read and write speeds. Also, you can launch some applications that you commonly use and see if they load quickly. If everything is working as expected, you can start enjoying the benefits of the faster storage solution.
Remember to backup your data periodically to prevent data loss in case of hardware failure. In conclusion, restarting and testing the M.2 SSD is essential to ensure that it is functioning correctly and optimized for your system’s performance.
Conclusion
Cloning your SSD to an M.2 SSD is not rocket science, but it does require a bit of tech-savviness. The process involves using cloning software and having knowledge of your computer’s hardware.
However, once you master the art of cloning, the rewards are undeniable: faster boot times, increased storage capacity, and a sense of tech mastery. So don’t be a copycat and go with the flow, clone your SSD like a boss!”
FAQs
Can I clone my SSD to an M.2 SSD?
Yes, you can clone your SSD to an M.2 SSD using cloning software such as Macrium Reflect, EaseUS Todo Backup, or Acronis True Image.
What is the benefit of cloning my SSD to an M.2 SSD?
Cloning your SSD to an M.2 SSD can result in faster boot and load times, as M.2 SSDs are known for their speedy performance.
Do I need any additional equipment to clone my SSD to an M.2 SSD?
You may need an M.2 to USB adapter if your computer does not have an M.2 slot. However, some cloning software allows you to clone via a USB connection.
Can I clone my entire operating system to an M.2 SSD?
Yes, you can clone your entire operating system to an M.2 SSD, including settings, applications, and files. However, it is important to ensure that the M.2 SSD has enough space to accommodate all your data.