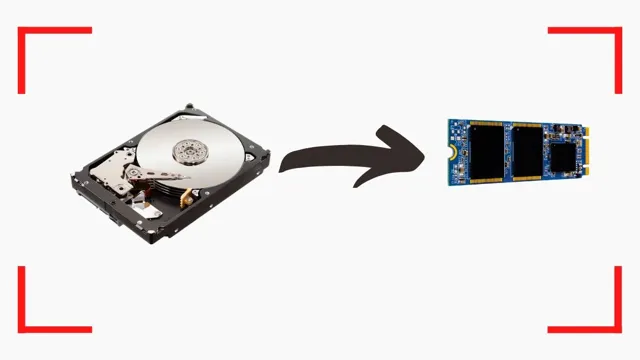
Are you looking to upgrade your computer’s performance with a faster and more reliable hard drive? One of the best upgrades you can make is a solid-state drive (SSD), but what happens to all your data on your old hard drive? Don’t worry, you can easily clone your hard drive to SSD, and it’s not as complicated as it may seem. In this step-by-step guide, we will show you how to clone your hard drive to SSD with ease, so you can enjoy the benefits of faster boot times and improved performance. Get ready to transform your computer into a powerhouse with a few simple steps!
Pick the Right Cloning Software
If you’re looking to clone a hard drive to an SSD, picking the right cloning software is crucial. Some of the most popular options include Clonezilla, EaseUS Todo Backup, and Acronis True Image. However, it’s important to choose a software that’s compatible with your specific hardware and operating system.
Additionally, consider the features offered by each software and decide which ones are most important for your needs. Some software may offer additional features like partition resizing or real-time data transfer monitoring. It’s also a good idea to look for user reviews and check the software’s reputation for reliability and ease of use.
Overall, take the time to research and compare cloning software options to ensure a smooth and successful transfer to your new SSD.
Research Cloning Software Options
When it comes to research cloning software, it’s essential to choose the right option. With so many choices available, it can be overwhelming to decide which one to go with. However, selecting the right cloning software is crucial to ensure successful and accurate cloning.
Some popular cloning software options to consider include ClonExpress, CloneZilla, and Geneious. ClonExpress is ideal for high-throughput cloning and can handle several sequence alignments in one go, making it an excellent option for labs with a high volume of cloning projects. CloneZilla, on the other hand, is a free open-source option, making it a budget-friendly choice for smaller labs.
Geneious is more comprehensive and provides a range of features for multiple cloning procedures, making it an excellent option for advanced research projects. Ultimately, when selecting cloning software, consider your budget, laboratory size, and research needs to choose the perfect option for your specific needs.
Choose a Software Based on Your Requirements
When it comes to choosing cloning software, the most important factor to consider is your specific requirements. There are a variety of different cloning tools available on the market, each with its own set of features and capabilities. Some popular options include EaseUS Todo Backup, Acronis True Image, and Clonezilla.
It’s important to research the particular needs of your business or personal use case, and choose a tool that can meet those needs effectively. For example, if you need to clone large amounts of data quickly, you may want to look for software with advanced compression and encryption features. On the other hand, if you only need to clone a single drive or partition, a simpler, more streamlined tool may be sufficient.
In short, think carefully about your requirements before making a decision on cloning software, and choose a tool that is tailored to your needs.
Prepare Your Hardware
If you’re wondering “how do I clone a hard drive to SSD?”, then the first step is to prepare your hardware. Make sure your computer has enough space for both drives to be connected simultaneously. You’ll need a SATA cable or a USB dock to connect the SSD to your computer.
It’s also a good idea to have an external backup drive to store your data in case anything goes wrong during the cloning process. Once you have your hardware ready, you can begin with the software installation and cloning process. Just remember to take your time and follow the instructions carefully to ensure a successful transfer of your data from the old hard drive to the new SSD.
With a bit of patience and preparation, you’ll be enjoying faster speeds and improved performance on your computer in no time.
Clean and Connect Your SSD
When it comes to setting up your SSD, there are a few things you need to keep in mind to ensure the best performance possible. First and foremost, it’s important to clean and connect your SSD properly. This means removing any dust or debris from the connectors and ensuring a secure connection with your motherboard.
You also want to make sure you have the necessary cables and mounting screws to properly install your SSD in your computer case. It may seem like a nuisance, but taking the time to properly prepare your hardware before installation can save you a lot of headaches down the road. So, grab some compressed air, check your cables and screws, and get ready for a seamless SSD installation experience.
Remove Unnecessary Files from Your Hard Drive
If you’re looking to optimize your computer’s performance, it’s essential to prepare your hardware properly. One of the most crucial steps you can take is to remove unnecessary files from your hard drive. Over time, your computer might accumulate a lot of files and data it no longer needs.
These files take up valuable space on your hard drive, which can slow down your computer’s overall performance. By removing these files, you can free up space and run your computer more efficiently. You can use disk cleanup tools or third-party software to identify and remove unnecessary files quickly.
With a little bit of effort, you can prepare your hardware and make your computer run faster and smoother.
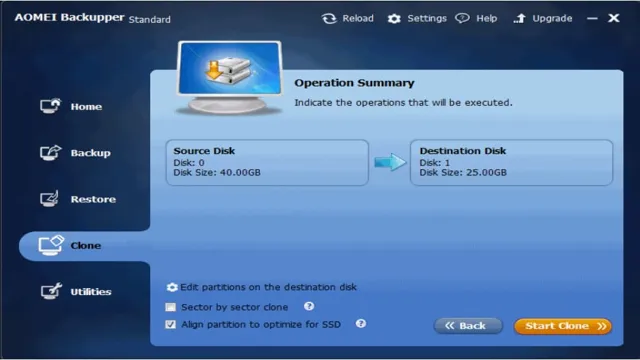
Cloning Your Hard Drive
If you’re looking to upgrade your hard drive to an SSD, cloning is a great option to keep all of your files and settings intact. The process of cloning essentially creates an exact copy of your hard drive onto the SSD. There are a variety of cloning software options available, but the most popular and user-friendly program is Acronis True Image.
After connecting your new SSD to your computer, you can use the software to easily transfer all of your data over. This process usually takes a few hours, but once it’s complete, your computer will boot up and run just like it did before, but with the added speed and efficiency of an SSD. It’s important to note that before beginning the cloning process, make sure to back up important files and free up space on your original hard drive to ensure everything transfers over correctly.
With this simple method, upgrading to an SSD has never been easier.
Start the Cloning Process
If you’re running low on space or looking to upgrade to a faster hard drive, cloning your current hard drive is a great option. The process of cloning involves copying everything from your old hard drive onto a new one. This will give you a new hard drive that is an exact replica of your old one, with all your files, settings, and programs intact.
Cloning your hard drive can save you a lot of time and hassle compared to reinstalling everything from scratch. It can even save you money if you don’t want to buy new licenses for all your software. The best part is that you can do this all yourself with a few simple tools.
All you need is a cloning software like Acronis True Image, a new hard drive, and a bit of patience. With these tools in hand, you’re ready to start the cloning process and have a brand new hard drive in no time. So whether you’re looking to upgrade or just need more space, cloning your hard drive is a great option to consider.
Monitor Progress and Confirm Completion
When it comes to cloning your hard drive, keeping track of progress and ensuring completion is key. You don’t want to end up with a partial clone, as that can lead to some serious problems down the line. Fortunately, most cloning software out there will give you a progress bar or percentage indicator to keep an eye on, so you can see how far along the process is.
Make sure to keep an eye on this throughout the cloning process, and don’t be afraid to take some extra time to confirm that everything has been properly copied over. It may seem like a tedious step, but it’s absolutely necessary for ensuring that your cloned drive is a faithful replica of the original. So keep calm, monitor progress, and take the time to confirm completion- your data will thank you for it!
Configure Your SSD
If you’re looking to upgrade your computer’s hard drive to a faster and more efficient SSD, the process of cloning your hard drive over to the SSD is a great way to ensure that all of your data and settings remain intact. First, you’ll need to connect your SSD to your computer and install any necessary software. Once that’s done, you can use a cloning software such as Clonezilla or Macrium Reflect to transfer everything over to the SSD.
This process can take some time, depending on how much data you have, but it’s worth the wait to have all of your files and preferences in one place. Once the cloning is complete, you’ll want to double-check that everything transferred over correctly before wiping your old hard drive and enjoying the benefits of your new SSD. Overall, cloning your hard drive to an SSD is a great way to speed up your computer and ensure that your data is safe and secure.
Set Your SSD as Your Primary Drive
If you’re looking to boost the speed and performance of your computer, configuring your SSD as your primary drive is a great place to start. By doing so, you can significantly reduce your system’s boot and load times, as well as improve the overall responsiveness of your computer. To set your SSD as your primary drive, you’ll need to first ensure that it’s properly installed and recognized by your system.
Once that’s done, you can configure your computer’s BIOS settings to prioritize your SSD over any other storage devices connected to your machine. This will ensure that your system always boots from your SSD first, allowing you to enjoy the benefits of lightning-fast performance right from the moment your computer starts up. So if you’re ready to take the leap and make the most of your SSD, be sure to follow these steps and get your system set up for success!
Test Your Cloned SSD
If you’ve just cloned your old hard drive onto a new SSD, it’s essential to test your new storage device to ensure everything’s running smoothly. To do this, you’ll need to configure your SSD. First, check if your PC’s BIOS settings are set to use the new SSD as the primary boot device.
If not, update the settings to boot from the SSD. Then, check if the device has the latest firmware installed. You may need to download and install firmware updates from the manufacturer’s website.
Finally, check your SSD’s alignment settings to ensure it’s correctly aligned with your PC’s system. Doing these steps ensures that your SSD is set up optimally and improves its overall performance. You can use benchmarking software like CrystalDiskMark to evaluate the SSD’s read and write speeds and compare them to the manufacturer’s specifications.
By testing your cloned SSD, you can be sure you’ve made the most out of your new investment.
Conclusion
Cloning a hard drive to an SSD is like giving your computer a new lease on life. It’s like it hit the gym, ate a healthy diet, and got a fresh haircut. Not only will your computer run faster and smoother, but it will also have more storage space.
So, if you want to give your computer a makeover, cloning your hard drive to an SSD is the way to go.”
FAQs
What tools do I need to clone a hard drive to SSD?
You’ll need a cloning software, an external USB adapter or enclosure for the SSD, and a screwdriver to open your computer case.
Can I clone my hard drive to a smaller SSD?
Yes, as long as the used space on your hard drive is smaller than the capacity of the SSD.
Do I have to format my hard drive before cloning it to an SSD?
No, you don’t have to format your hard drive before cloning it to an SSD. The cloning process will overwrite the data on the target SSD.
How long does it take to clone a hard drive to an SSD?
The time depends on the size of your hard drive and the transfer speed of your computer and SSD. It can take from a few minutes to several hours.