Have you ever wondered how to unallocate an SSD drive? Whether you’re upgrading your system or simply freeing up space, unallocating an SSD drive can be a useful tool. In this blog post, we’ll explore what it means to unallocate a drive and how it differs from formatting. We’ll also provide a step-by-step guide on how to unallocate an SSD drive on both Windows and Mac systems.
So let’s dive in and explore the world of unallocating SSD drives!
Check Drive Allocation
If you’re wondering how to unallocate a SSD, the first step is to check your drive allocation. This process will help you identify how your storage space is currently being used and whether there are any unallocated spaces. To do this, you can access the Disk Management tool in Windows.
Here, you will see a list of all the drives on your computer and their corresponding partitions. Look for any partitions that are labeled as unallocated or unused. If you find any unallocated spaces, you can create a new partition and assign it to your preferred drive letter.
Keep in mind that unallocating a SSD may also require you to backup and move your data to another drive before making any changes. It’s important to handle data carefully and ensure you have the necessary tools and resources to execute this task properly.
Use Command Prompt
Command Prompt When it comes to organizing your computer files, it’s essential to know how drive allocation works. With the use of Command Prompt, you can easily check the drive allocation on your computer. Simply open Command Prompt and type in “diskpart.
” Then, type in “list volume” to display all the volumes on your computer. From there, you can see the drive letter, label, file system, and size of each volume. By knowing how your drives are organized, you can prevent data loss and efficiently manage your files.
Plus, understanding how drive allocation works can also help you troubleshoot any issues that may arise in the future. Take control of your computer and check your drive allocation today!

Type Diskmgmt.msc
If you’re experiencing issues with your computer’s storage capacity, it might be worth checking the drive allocation. To do so, you can use the disk management utility by typing “diskmgmt.msc” in the search bar or the run prompt.
This will open a window that displays all the drives connected to your computer, along with their partitions and available space. It’s essential to keep track of your drive allocation as it can affect the overall performance of your system. If you notice that one drive is almost full while another has plenty of available space, you can shift some files to balance out the load and optimize your storage.
Additionally, if you have an external drive that’s not showing up, you can use the disk management utility to assign a letter and format the drive. Overall, understanding your drive allocation is crucial for maintaining a healthy and efficient computer system.
Find and Select SSD
When searching for and selecting an SSD, one key aspect to check is the drive allocation. Drive allocation refers to how the computer organizes and divides data between physical storage locations, or sectors, on the SSD. This can affect the drive’s speed and overall performance.
It’s important to ensure that the drive is properly allocated to avoid any potential issues with storage or performance. One way to check the allocation is to access the Disk Management tool on Windows, which allows you to view and manage the allocation of your drives. By doing so, you can ensure that your SSD is properly allocated and functioning at its best, giving you a faster and smoother computing experience.
Remember, a properly allocated SSD can make a big difference in the overall performance of your system, so it’s important to take the time to check it.
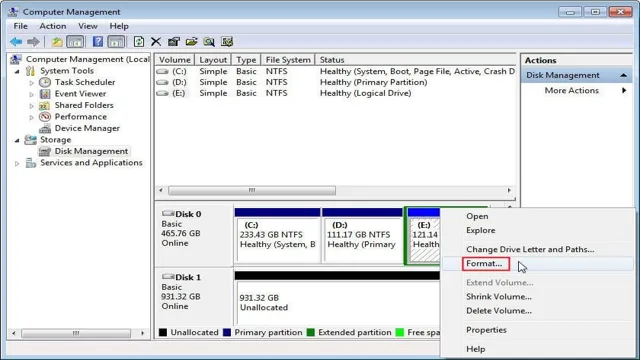
Right-Click and Select Unallocate
When managing storage on your computer, it’s essential to check the drive allocation regularly. To do this, you need to right-click on the drive and select unallocate. This step ensures that you free up space on the hard drive that is no longer needed, helping your computer run more efficiently.
The process might seem straightforward, but many people overlook it, leading to storage issues and slow performance. So, make a habit of checking your drive allocation periodically, especially if you download large files or use resources-heavy apps. By doing so, you’ll avoid wasted resources and unwanted stress on your computer’s hardware, keeping it running at peak performance.
Overall, unallocating is a simple but often overlooked step that can make a significant difference in your computer’s storage and performance, so don’t skip it!
Use Third-Party Programs
If you’re wondering how to unallocate a SSD, the good news is that it can be done quite easily with the help of third-party programs. One such program is EaseUS Partition Master, which allows you to resize, move, merge, and unallocate partitions with just a few clicks. To begin, launch the program and select the SSD you want to work with.
Next, right-click on the partition you want to unallocate and choose “Delete Partition.” Once you confirm the action, the partition will be unallocated and available for future use. While there are other programs out there that can also do this, EaseUS is a user-friendly and reliable option that is great for beginners and experts alike.
With just a few simple steps, you can quickly and easily unallocate your SSD and free up some valuable space for other applications and files.
Download and Install Program
When it comes to downloading and installing programs, using third-party programs can be a quick and easy option. These programs can help you find and install software easily, without requiring any technical knowledge. However, it’s important to exercise caution when using them, as they may sometimes come bundled with spam or malware.
To ensure that you’re downloading a safe third-party program, always make sure to do your research and read reviews before downloading. Additionally, consider using trusted sources like the official websites of the software you’re looking to download. With a bit of precaution, third-party programs can be a great way to streamline the process of downloading and installing new software on your computer.
Open Program and Select SSD Drive
If you want to optimize your SSD’s performance, third-party software is often the way to go. One popular program that can help with this is Samsung Magician. After opening the program and selecting your SSD drive, you’ll have access to a variety of performance optimization tools.
One of the most helpful features is the ability to enable RAPID mode, which uses unused system memory to boost read/write speeds. You can also check the health of your drive, update its firmware, and more. Another great option is CrystalDiskMark, which benchmarks your drive to measure its read/write speeds.
This can help you identify any areas where your SSD might be struggling and make the necessary tweaks for better performance. Ultimately, using third-party programs can take your SSD’s speed and performance to the next level.
Click Unallocate Drive Option
If you’re looking to unallocate a drive on your computer, there are a few different methods you can use. One option is to click the “Unallocate Drive” option within your computer’s settings. However, another effective method is to use third-party programs.
These programs can help you quickly and easily manage your computer’s storage, including unallocating drives. When looking for a third-party program to use, be sure to read reviews and do your research to ensure that you find a safe and reliable option. With the right program, you’ll be able to easily unallocate drives and manage your computer’s storage more efficiently.
So, if you’re running low on space or simply want to clean up your computer, consider using a third-party program to help you unallocate drives.
Conclusion
So there you have it, folks! Unallocating an SSD may sound intimidating, but with a few simple steps and a bit of know-how, it’s really not so complicated. Just remember to back up your important files before diving in, and always double-check your work before hitting that “delete” button. With these tips and tricks in mind, you’ll be unallocating your SSD like a pro in no time!”
FAQs
What steps do I need to take to unallocate my SSD?
To unallocate your SSD, you’ll need to open Disk Management, locate your SSD, right-click it, select “Delete Volume,” and confirm the deletion.
Will unallocating my SSD erase all data on it?
Yes, unallocating your SSD means you’re deleting the volume on it, which will erase all data stored on it.
Can I unallocate only a portion of my SSD?
Yes, you can unallocate only a portion of your SSD by selecting the volume you want to delete and leaving the others intact.
Can I allocate the space that I unallocated from my SSD to another drive?
Yes, after unallocating the space from your SSD, you can allocate it to another drive by right-clicking the unallocated space, selecting “New Simple Volume,” and following the prompts.
Is it safe to unallocate an SSD while it’s in use?
No, it’s not safe to unallocate an SSD while it’s in use as it may cause data corruption or loss. It’s advisable to unallocate an SSD only when it’s not in use.