
Welcome to the ultimate beginner’s guide to connecting an SSD to your motherboard. Whether you’re building your own computer or simply upgrading your storage capabilities, you probably have some questions about how to successfully connect an SSD to your motherboard. Luckily, we’ve got you covered.
In this guide, we’ll break down everything you need to know about connecting an SSD to your motherboard in simple, easy-to-understand terms. From the basics of SSDs to the different types of connections, we’ll answer all your burning questions and give you the confidence to tackle this task on your own. So, let’s dive in and get started.
What you’ll need
If you’re looking to improve your computer’s performance, you may be considering adding a solid-state drive, or SSD. But before you can start enjoying the benefits of faster boot times and application load speeds, you’ll need to connect your new SSD to your motherboard. To do this, you’ll need a few things: an SSD, a screwdriver, and a SATA cable.
Firstly, locate the SATA ports on your motherboard and plug one end of the SATA cable into the port labeled “SATA.” Next, plug the other end of the cable into your SSD. Be sure to align the cable’s L-shaped notch with the SSD’s matching notch to avoid any damage.
Finally, use your screwdriver to secure the SSD to your case with the provided screws. With a properly connected SSD, you’ll be able to quickly and efficiently access the storage you need for your work and entertainment needs.
SSD and motherboard specifications
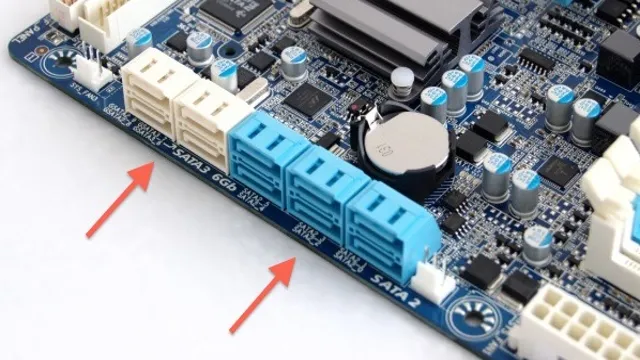
When it comes to setting up your computer with an SSD, it’s important to make sure that your motherboard is compatible with the drive. You’ll need to check the specifications of your motherboard to ensure that it has the appropriate SATA ports to support an SSD. Most modern motherboards have SATA III ports, which are necessary for optimal performance with an SSD.
Additionally, you’ll want to consider the form factor of your SSD. Many motherboards have M.2 slots for modern NVMe SSDs, but some models may require an adapter if you’re using a traditional SATA SSD.
By ensuring that your motherboard has the necessary specifications to support your SSD, you can enjoy the faster boot times and application launch speeds that solid-state storage can provide.
Locating the SSD and motherboard ports
Connecting an SSD to a motherboard can be a bit intimidating if you’re not familiar with the inside of a computer. Before you start, you’ll need to locate the SSD and motherboard ports. The SSD is a small rectangular device that fits into a specific slot on your motherboard.
These slots are sometimes labeled as “SATA” or “M.2” ports, so look for those labels to ensure you’re plugging your SSD into the right place. You’ll want to consult your motherboard’s manual for specific instructions on how to install your SSD, but usually, you’ll need to gently slide the SSD into the port until it clicks into place.
Once your SSD is firmly in place, you’ll need to connect it to your power supply and data cables to ensure it can communicate with your computer’s processor. With all the cables connected, you’re ready to power up your computer and start using your new SSD. It’s that simple!
Internal and external SSD connections
When it comes to using a solid-state drive (SSD), it’s important to know where to locate both the SSD and motherboard ports. Internal SSDs are located inside your computer tower and often connect directly to the motherboard via SATA cables. You’ll need to open up your tower, locate an empty drive bay, mount the SSD and connect it to the motherboard.
External SSDs, on the other hand, connect to your computer via USB, Thunderbolt or other ports. These are useful if you want to carry your data with you or need to share it between multiple computers. Understanding the differences and knowing where to look will help you get started with using an SSD efficiently.
Connecting the SSD
Connecting an SSD to your motherboard is a simple task that can greatly enhance your computer’s performance. To get started, you’ll need to locate the SATA ports on your motherboard, which are typically labeled as SATA0, SATA1, etc. Next, you’ll want to connect one end of a SATA cable to the SSD and the other end to one of the SATA ports on the motherboard.
It’s important to note that if you have more than one SSD or hard drive, you’ll need to use a separate SATA cable for each device. Once you’ve connected the cable, you’ll need to find a spare power cable from your power supply unit and connect it to the SSD. This will supply power to the SSD and allow it to function properly.
Once everything is connected, you can start up your computer and ensure that the SSD is recognized by your operating system. With a little bit of effort and know-how, you can easily connect an SSD to your motherboard and enjoy faster boot and load times.
Step-by-step guide for SATA connection
If you’re adding a new SSD to your computer, the first step is to physically connect it to your system. To do this, you’ll need to open your computer case and locate the SATA ports on your motherboard. Once you’ve found these, you can connect your SSD by attaching one end of a SATA data cable to the port on your motherboard and the other end to the SATA connector on your SSD.
Additionally, you’ll need to connect your SSD to a power source by attaching a SATA power cable to the corresponding connector on your motherboard. Once you’ve done this, you can close up your computer case, turn it back on, and begin setting up your new SSD. By following these steps, you’ll be able to easily connect your SSD to your computer and start enjoying faster load times and better performance.
Step-by-step guide for M.2 connection
M.2 SSD, connection, step-by-step guide If you’re looking to upgrade your computer’s storage, an M.2 SSD is an excellent choice.
Not only do they offer faster read and write speeds than traditional hard drives, but they also take up less space on your motherboard. Here’s a step-by-step guide on how to connect your new M.2 SSD.
First, ensure that your motherboard has an M.2 slot. Next, gently insert the M.
2 SSD into the slot, being careful not to touch the gold connectors on the bottom. Use the provided screw to secure the SSD in place, tightening it until it’s snug. Finally, in your BIOS settings, set your M.
2 slot to boot up first, which will allow your computer to recognize the new SSD. With these simple steps, you’ll be able to enjoy faster speeds and more storage space on your computer.
BIOS and driver configuration
If you want to upgrade your computer’s storage system, connecting a solid state drive (SSD) to your motherboard is a smart move. But before you do that, make sure to check if your motherboard has the necessary connections to support a SSD. You can use either a SATA III or an M.
2 slot, so determine which one your SSD is compatible with. Once you know that, it’s time to physically connect the SSD to the motherboard. After installation, the next step is to configure your BIOS and drivers to recognize the new drive.
Your BIOS settings will vary depending on your motherboard manufacturer, but the general steps usually involve selecting the boot order to prioritize your SSD and enabling AHCI mode for faster performance. Finally, download and install the necessary drivers for your new drive to ensure that it operates smoothly without any issues. Overall, connecting a SSD to your motherboard might seem intimidating, but with a bit of research and the right connections, it’s a fairly straightforward process.
Setting up the BIOS for SSD boot
Setting up the BIOS for SSD boot is a crucial step in maximizing the performance of your computer. The BIOS, or basic input/output system, controls the hardware components of your computer and is responsible for configuring them to work together. To set up the BIOS for SSD boot, you need to make sure that the SATA controller mode is set to AHCI (Advanced Host Controller Interface).
This mode allows the SSD to perform at its maximum speed and enables features such as NCQ (Native Command Queuing) and TRIM (used for cleaning up blocks of data that are no longer needed). You may also need to update your BIOS version to the latest one to ensure compatibility with the SSD. Additionally, it’s essential to install the latest drivers for your SSD to ensure it runs smoothly and efficiently.
With the correct BIOS and driver configuration, your SSD will deliver fast boot times, improved system responsiveness, and faster application load times, making your computing experience a lot more enjoyable.
Installing SSD drivers on your computer
When installing an SSD on your computer, it’s essential to ensure both the BIOS and drivers are correctly configured. In the BIOS settings, you’ll need to enable AHCI (Advanced Host Controller Interface) mode, which allows the SSD to operate at maximum speeds. Afterward, you can proceed to install the drivers for your SSD.
It’s important to choose the right driver version that suits your operating system. These drivers help your computer to recognize and take full advantage of the SSD’s capabilities for better performance. Installing the right drivers means that you’ll be able to avoid any issues such as slow booting, poor performance, and even system errors.
Taking the necessary time to properly install both the BIOS and drivers for your SSD ensures its smooth operation and longevity.
Final checks and troubleshooting
Connecting an SSD to a motherboard is a relatively straightforward process but requires some careful steps to ensure that everything is set up correctly. Firstly, before doing anything, make sure that you have grounded yourself to prevent any static electricity from damaging the parts. Once grounded, locate the SATA port on your motherboard that you wish to use for your SSD and plug in the SATA cable.
Also, plug in the power cable from your power supply to the SSD. Finally, turn on your computer and check whether the SSD is detected in the BIOS. If it isn’t, ensure that the SATA port is enabled in the BIOS settings.
Troubleshooting issues can be daunting but is essential to ensure that everything is functioning correctly. If you are experiencing issues, double-check the cable connections and check that your SSD is compatible with your motherboard. With these quick steps, you should be able to connect your SSD to your motherboard and start enjoying the fast boot times and program load speeds that come with it.
Verifying the SSD connection and storage capacity
When you’re installing a new SSD drive into your computer, it’s essential to check that everything is functioning correctly. One of the first steps is to verify that you’ve connected your SSD to the correct SATA port on your motherboard. This is an easy mistake to make, especially if you’ve previously had another storage device installed.
Double-checking your connection can save you a lot of time and effort in the long run, and it’s the best way to eliminate any potential connectivity problems. Once you’ve confirmed that your SSD is connected correctly, it’s time to verify the storage capacity. You can do this by checking your computer’s BIOS or system information.
If your SSD isn’t showing up as expected, it could mean that it’s not compatible with your motherboard or that it’s been damaged in transit. In either case, troubleshooting the issue and seeking expert advice is the next step. By thoroughly checking everything is connected and working as it should, you can be sure that your new SSD is ready to go.
Troubleshooting common connection issues
When troubleshooting common connection issues, it’s important to make sure you’ve checked everything before giving up. First and foremost, ensure that your device is connected to the WiFi network and that you’ve entered the correct password. If that’s not the issue, you can try restarting your router and/or modem.
Sometimes, a simple reset can fix the problem. If that doesn’t work, it’s always worth checking to see if other devices on the network are having the same issue. If they are, then it’s likely a problem with the router itself, and you may need to contact your internet service provider for assistance.
Finally, if none of these steps work, you may need to consider resetting your device to its factory settings, although this should only be done as a last resort. By following these steps, you can hopefully solve most common connection issues and ensure that you’re never left without internet access.
Optimizing SSD performance for your system
When it comes to optimizing SSD performance for your system, it’s important to perform some final checks and troubleshooting before calling it a job well done. Start by checking your system’s BIOS settings to ensure that the SSD is running in AHCI mode and that the boot priority is set to the SSD. Next, ensure that your operating system is properly installed and updated with the latest drivers and firmware.
Finally, run benchmark tests to ensure that your SSD is performing at its best. If you are experiencing any issues, such as slow boot times or system crashes, make sure to troubleshoot the issue before assuming it’s a problem with your SSD. Consider consulting your system’s manufacturer or a professional technician if the problem persists.
By following these simple steps, you can ensure that your SSD is performing optimally and providing you with the speed and performance you need to get the job done!
Conclusion
In conclusion, connecting an SSD to a motherboard can seem intimidating at first, like trying to fit a square peg into a round hole. But with the right tools and a bit of know-how, it’s actually quite simple. Think of it like connecting two puzzle pieces together – once you know where everything goes, it all falls into place.
So don’t be scared to give it a go, because with an SSD and a motherboard, you and your computer will be coasting on the fast lane!”
FAQs
What type of slot do I need to connect my SSD to the motherboard?
You will need an M.2 slot or a SATA port on your motherboard to connect your SSD.
Can I connect my SSD to any motherboard?
No, the type of connector on your SSD must match the type of slot or port on your motherboard. Check your motherboard’s manual to confirm compatibility.
Do I need to install drivers for my SSD to work with my motherboard?
In most cases, no. Your motherboard’s BIOS should be able to recognize your SSD and allow you to use it as a storage device without additional drivers.
What should I do if my SSD is not being detected by my motherboard?
First, make sure that the connections are securely in place. If that doesn’t work, try updating your motherboard’s BIOS. If the problem persists, your SSD or motherboard may be defective and require replacement or repair.
Can I connect multiple SSDs to my motherboard?
Yes, most motherboards have multiple M.2 slots or SATA ports to allow you to connect multiple SSDs for increased storage capacity or faster access speeds.