Have you ever felt like your laptop is running slower than usual? Or maybe you’re running low on storage space, and you need to upgrade your laptop’s hard drive? Whatever the reason may be, upgrading to an SSD can be a game-changer. But how do you connect an SSD to your laptop? Don’t worry; we’ve got you covered. As the name suggests, SSDs (Solid State Drives) have no moving parts, making them faster and more reliable than traditional hard drives.
They’re also smaller and lighter, making them a popular choice for laptop upgrades. Connecting an SSD to your laptop is a relatively straightforward process, but it can vary depending on your laptop’s make and model. You’ll need to install the SSD into your laptop’s available drive bay, which may require opening the bottom panel of your laptop and removing screws.
Once you’ve installed the SSD, you’ll need to transfer your data from your old hard drive to the new SSD. You can do this by cloning your old hard drive to your new SSD using software like Acronis True Image or Macrium Reflect. In conclusion, upgrading to an SSD can significantly improve your laptop’s performance, but it can take some time and effort to install and transfer your data properly.
However, the benefits of an SSD are well worth it, and your laptop will thank you for it.
Check Laptop Compatibility
Connecting an SSD to your laptop is a great way to boost your device’s storage capacity and speed. Before getting started, it’s important to ensure that your laptop is compatible with an SSD. Most modern laptops should be compatible, but it’s always best to double-check before making a purchase.
One way to do this is to look for the specifications of your laptop’s hard drive. If it uses a SATA or M.2 interface, then it should be compatible with most SSDs.
Another thing to keep in mind is the size of the SSD. Make sure that the physical size and shape of the SSD you’re considering match the specifications of your laptop. If you’re unsure, it’s always a good idea to consult with a professional or do some more research to avoid any potential compatibility issues.
Overall, with the right preparation and careful consideration, connecting an SSD to your laptop can be a simple and effective way to enhance your device’s capabilities.
Confirm SATA or M.2 Interface
When upgrading your laptop’s storage, it’s important to confirm whether your device uses a SATA or M.2 interface. This will determine the type of SSD you can install.
To check your laptop’s compatibility, you can usually find this information in the manual or specifications sheet. You can also check by opening up your laptop and inspecting the SSD slot. A SATA interface will have two notches, while an M.
2 interface will have one notch. It’s essential to ensure compatibility as installing the wrong type of SSD can cause damage to both the device and the SSD. So, before embarking on an upgrade, take the time to confirm which interface your laptop uses for a smooth and successful installation process.
Check Availability of SSD Slot
If you’re thinking of upgrading your laptop’s storage by adding an SSD, the first thing you need to check is whether your laptop has an available SSD slot. Not all laptops have this slot, so it’s essential to ensure compatibility before making any purchases. To check whether your laptop is compatible with an SSD, you should research the model to find out if it has an M.
2 or NVMe slot available. It’s essential to note that some laptops only have one slot, so if you’re replacing your existing hard drive with an SSD, you’ll need to transfer all your data onto the new drive before installation. Additionally, if your laptop doesn’t have an available SSD slot, there are alternatives such as using an external USB SSD or replacing your current hard drive with an SSHD.
With all these options, check your laptop’s compatibility before investing in an SSD to avoid any issues or headaches in the future.
Install SSD into Laptop
If you’re looking to boost your laptop’s performance, one solution is to install an SSD. But how do you connect SSD to laptop? It’s actually pretty simple, and the first step is to identify whether your laptop has an internal drive bay. If it does, you can pop open the bay by removing screws and slide in the SSD.
If not, you may need to purchase an external enclosure that connects via USB and insert the SSD into it. From there, you can connect the enclosure to your laptop and use it as an external drive. Alternatively, you can replace your laptop’s current hard drive with the SSD by cloning the data and swapping them out.
Regardless of which method you choose, connecting an SSD to your laptop can significantly improve speed and performance.
Purchase Necessary Hardware
If you’re looking for a way to give your laptop a quick speed boost, installing an SSD is a great option. First, you’ll need to purchase an SSD that’s compatible with your laptop. It’s important to note that not all laptops have a hard drive bay, so make sure to check your laptop’s manual or do some research to see if one can be added.
Once you have your SSD, it’s time to install it into your laptop. This can be a bit tricky, so it’s recommended to follow a detailed guide or video tutorial specific to your laptop model. Once you’ve successfully installed the SSD, you should immediately notice a significant improvement in boot times and overall performance.
It’s a worthwhile investment for anyone looking to breathe new life into their laptop!
Open Laptop Casing
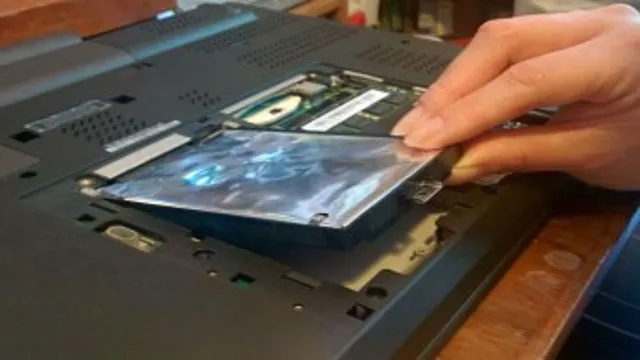
If you feel like your laptop is slowing down, upgrading to an SSD may be the solution you need. Before you begin, make sure to turn off and unplug your laptop. Then, open the casing by removing the screws on the back panel.
Take out your laptop’s hard drive and gently insert the SSD into its place. Make sure it’s securely fastened and screw it into place. Finally, put the back panel back on and turn your laptop on to make sure everything’s working properly.
With its faster read and write speeds, your SSD will help improve your laptop’s overall performance, giving you the speed and efficiency you need. Don’t let a sluggish laptop slow you down, upgrade to an SSD today.
Install SSD into Available Slot
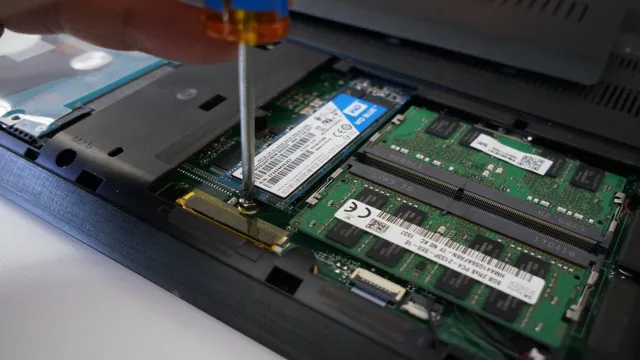
Installing an SSD into your laptop can be a great way to boost its speed and performance. First, assess if your laptop has an available slot for an SSD. If it does, you’ll need to purchase an SSD that fits the specifications of your laptop.
Ensure you have the necessary tools on hand, such as a screwdriver and an anti-static wrist strap. Once you’re ready, locate the slot for the SSD and carefully insert the drive into the slot at a slight angle. Gently push the SSD down until it is fully inserted, and then secure it in place with the screws provided.
Remember to reconnect any cables or brackets you may have removed earlier, and then power your laptop back on to ensure the SSD is functioning correctly. With a new SSD installed, you should notice faster boot times, shorter program load times, and overall improved performance. So, why not give it a go and see the difference for yourself?
Configure SSD for Use
If you’re wondering how to connect an SSD to your laptop, don’t worry, it’s a relatively simple process. First, you need to make sure that your laptop has an available SATA port or an M.2 slot, which are the two standard connectors for SSDs.
Once you have confirmed that your laptop has one of these ports, you can then open up your laptop and insert the SSD. Be sure to follow the manufacturer’s instructions carefully and make sure you’re not damaging any components in the process. After you’ve connected the SSD, you’ll need to configure it for use.
This involves formatting the drive, which will erase any pre-existing data. However, once you’ve completed this step, you’ll be ready to enjoy the many benefits of an SSD, such as faster boot times and improved performance. So if you’re looking to give your laptop a speed boost, consider adding an SSD to your setup today!
Initialize SSD in BIOS
When setting up a new SSD, it’s important to initialize it in the BIOS to ensure it’s configured for use. To do this, you’ll first need to enter the BIOS setup utility. The steps to do this can vary depending on your computer’s manufacturer, but typically involve pressing a specific key (such as F2 or Delete) during the boot process.
Once in the BIOS, navigate to the “Boot” or “Storage” menu to find the option to initialize your SSD. Make sure to select the correct drive as some systems may have multiple drives installed. Initializing the SSD will ensure it’s properly recognized by your computer and ready for use.
Format SSD for Use in Windows
When it comes to setting up an SSD for use in Windows, formatting the drive is a necessary step. The process involves wiping the disk clean and creating a new file system that is compatible with the operating system. To begin, you’ll need to connect your SSD to the computer and ensure it’s recognized by the system.
You can then open the Disk Management tool in Windows and locate your SSD. From there, you can right-click on the drive and select the “Format” option. This will bring up a dialog box where you can choose the file system, allocation unit size, and volume label.
For optimal performance, it’s recommended to select NTFS as the file system and align the partition to the recommended size. Once you’ve made your selections, click on “OK” to format the drive. Keep in mind that formatting will erase all data on the SSD, so be sure to backup any important files beforehand.
With these steps, your SSD will be ready to use in Windows, providing fast and reliable storage for your needs.
Conclusion
In conclusion, connecting an SSD to a laptop is as easy as pie. It’s like giving your laptop a turbo boost, making it run faster and smoother than ever before. Just make sure to check the compatibility of your laptop with the SSD and follow the instructions carefully.
With an SSD, you’ll be able to tackle even the most demanding tasks with ease, leaving your old hard drive in the dust. So, swap out your old clunker for a new SSD and watch your laptop take flight!”
FAQs
What type of SSD is compatible with my laptop?
There are many types of SSDs available in the market, but the most common ones are SATA, PCIe, and NVMe. You need to check the specifications of your laptop to see which type of SSD is compatible.
How do I physically connect the SSD to my laptop?
To physically connect the SSD to your laptop, you need to locate the SSD slot on your laptop and remove the cover. Then, insert the SSD into the slot and secure it with screws.
Do I need to transfer my operating system to the SSD?
Yes, it is recommended that you transfer your operating system to the SSD to enjoy faster boot times and improved performance. You can use a cloning software such as Macrium Reflect or Acronis True Image to transfer your OS.
What are the benefits of using an SSD in my laptop?
Using an SSD in your laptop has many benefits, such as faster boot times, improved performance, and increased battery life. It also reduces the risk of data loss due to the absence of moving parts in an SSD.
Can I use an external SSD with my laptop?
Yes, you can use an external SSD with your laptop using either a USB 3.0 or Thunderbolt port. However, the transfer speeds may not be as fast as an internal SSD.