Have you noticed that your Crucial SSD is running slower than usual? If you’re using an older model, it may not be optimized for the TRIM function, which can result in slower performance over time. But the good news is that enabling TRIM on your Crucial SSD is a relatively simple process. By allowing the drive to communicate with your operating system and optimize its storage space, TRIM can help improve the speed and longevity of your SSD.
In this blog post, we’ll dive into the world of TRIM and guide you through the process of enabling it on your Crucial SSD. So, buckle up and get ready to give your computer a boost!
What is TRIM?
If you’re using a Crucial SSD, you may want to know how to turn TRIM on for optimal performance. But what exactly is TRIM? In short, it’s a command that helps maintain the speed and longevity of SSDs. When you delete a file on a traditional hard drive, the operating system simply marks the space as available, but the data is still physically there until something overwrites it.
This can lead to slower read/write speeds over time. TRIM, on the other hand, informs the SSD which blocks of data are no longer in use and can be wiped, making space for new data. Enabling TRIM can improve your Crucial SSD’s performance and lifespan, so it’s recommended that you enable it.
The process for turning TRIM on is simple, but will vary depending on your operating system. For example, on Windows, you can open the Command Prompt and enter “fsutil behavior set disabledeletenotify 0” to turn TRIM on.
Definition and Importance
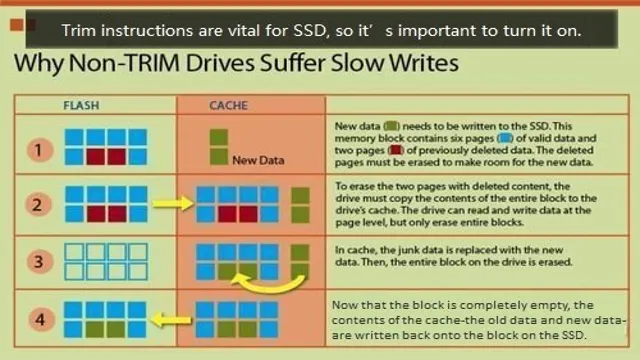
TRIM is a term used to refer to the process of managing and optimizing storage performance in solid-state drives (SSDs). It helps to improve the speed and longevity of SSDs by making it easier for the drive to find and use data. Without TRIM, SSDs can become quite slow over time as they struggle to locate and organize all the data stored within them.
This can lead to decreased performance and a shorter lifespan for the SSD. With TRIM, however, the SSD is able to run much more efficiently, allowing it to maintain its speed and responsiveness over time. Overall, TRIM is an essential tool for anyone looking to get the most out of their SSD and ensure that it lasts for as long as possible.

Checking for TRIM Support on Your Crucial SSD
If you have a Crucial SSD, you may be wondering how to turn on TRIM support. TRIM is important for keeping your SSD running smoothly and avoiding performance degradation over time. The good news is that most modern Crucial SSDs come with TRIM support already enabled by default.
However, it’s still a good idea to double-check and make sure it’s turned on. To do so, you’ll need to access your computer’s device manager and locate the SSD under the “Disk drives” category. From there, right-click on the drive and select “Properties.
” Next, click on the “Policies” tab and make sure that “Enable write caching on the device” and “Turn off Windows write-cache buffer flushing” are both unchecked. This will ensure that TRIM is enabled and doing its job to keep your Crucial SSD running at its best.
Step-by-Step Guide
If you’ve recently installed a Crucial SSD, you might be wondering whether it supports TRIM. TRIM is a command that helps an SSD maintain its performance over time by allowing the drive to clean up and organize unused data blocks. Checking for TRIM support on your Crucial SSD is quite easy.
The first step is to open the Windows Device Manager and locate your SSD. Then, right-click on the SSD and select “Properties.” Next, go to the “Details” tab and select “Device instance path” from the drop-down menu.
You should see the letters “TRIM” somewhere in the string of characters that appear in the value box. If you can see “TRIM” in the value box, it means that TRIM is supported on your Crucial SSD, and you can optimize it for better performance.
Enabling TRIM on Your Crucial SSD
If you’re using a Crucial SSD, you might want to enable TRIM to ensure optimal performance. TRIM is an essential maintenance command that helps prolong the lifespan of your SSD. By default, Crucial SSDs have TRIM support, but you might need to enable it manually if it’s not activated on your computer.
The process of enabling TRIM on your Crucial SSD is pretty straightforward. The first step is to make sure that your operating system supports TRIM. If you’re using Windows 10, 8, or 7, TRIM is already supported.
However, if you have an older version of Windows or a different operating system, you might need to check for compatibility. Once you’ve confirmed that your operating system supports TRIM, the next step is to enable it on your SSD. One way to do this is to use an application provided by Crucial called the Storage Executive.
This software has a user-friendly interface that allows you to check your SSD’s health, temperature, and capacity. You can also enable TRIM from the Storage Executive by selecting the SSD and clicking on the “Momentum Cache” option. From there, you can toggle the TRIM option on and off.
Another way to enable TRIM on your Crucial SSD is through the command prompt. This method is more technical and requires some basic knowledge of command-line interfaces. To enable TRIM through Command Prompt, you need to open the command prompt as an administrator, type “fsutil behavior set disabledeletenotify 0,” and hit enter.
This command enables TRIM on your SSD. In conclusion, enabling TRIM on your Crucial SSD is essential for ensuring optimal performance and longevity. With the Storage Executive or Command Prompt, you can enable TRIM easily and effectively.
Step-by-Step Guide
Enabling TRIM on an SSD can significantly improve its overall performance, as it effectively helps free up unused memory blocks. This is especially important for Crucial SSDs, which are reliable and efficient storage devices that can last for years. Enabling TRIM is a simple process that can be done in a few easy steps.
First, you will need to ensure that your operating system supports TRIM. Most modern operating systems do, but you can check by opening up the command prompt and typing “fsutil behavior query disabledeletenotify”. Then, you will need to enable TRIM on your SSD by opening up the Command Prompt as an administrator and typing “fsutil behavior set disabledeletenotify 0”.
With TRIM enabled, your Crucial SSD will be able to clean up unused memory blocks more efficiently, resulting in a faster and smoother user experience.
Using Windows Command Prompt
Enabling TRIM on your Crucial SSD is essential to ensure the longevity and performance of your solid-state drive. TRIM is a command that allows the operating system to inform the SSD which blocks of data are no longer in use, thus allowing the SSD to erase them and free up space for new data. By enabling TRIM, you can prevent the SSD from slowing down over time and increase its lifespan.
To enable TRIM on your Crucial SSD, you can use the Windows Command Prompt. First, open the Command Prompt by pressing the Windows key + R and typing “cmd” in the Run box. Then, type “fsutil behavior query DisableDeleteNotify” and press Enter.
If the result is “DisableDeleteNotify = 0”, TRIM is already enabled on your SSD. If the result is “DisableDeleteNotify = 1”, TRIM is disabled on your SSD. To enable it, type “fsutil behavior set DisableDeleteNotify 0” and press Enter.
You should receive a message stating: “The operation completed successfully.” It’s important to note that not all SSDs support TRIM, so it’s best to check with the manufacturer first. Additionally, enabling TRIM may reduce the lifespan of some older SSDs, so it’s recommended to only enable it on newer models.
With TRIM enabled, you can ensure the optimal performance and longevity of your Crucial SSD.
Using Third-Party Software
If you’re looking to extend the lifespan of your SSD and improve its overall performance, enabling TRIM is a must. This feature helps your drive maintain its speed by efficiently managing unused data blocks. While some operating systems from Microsoft and Apple enable TRIM by default, others do not, which is where third-party software comes in.
One such software is Crucial’s Storage Executive, which allows you to easily enable and schedule TRIM commands. Plus, it comes with other features like firmware updates and drive health monitoring. By activating TRIM, you’ll notice faster boot times, quicker app launches, and improved file transfer speeds.
So, if you haven’t enabled TRIM on your Crucial SSD yet, give it a try and see the difference for yourself.
Conclusion and Final Thoughts
And with that, we come to the end of our journey on how to turn TRIM on to maximize the performance and longevity of your crucial SSD. Remember, TRIM is like a personal trainer for your SSD, helping it stay lean and efficient even with constant use. So, don’t forget to turn it on and give your SSD the love and care it deserves – After all, a happy SSD means a happy user!
FAQs
What is a crucial SSD and how does it differ from a regular hard drive?
A crucial SSD is a solid-state drive that uses flash memory instead of traditional spinning disks to store data. This results in faster read/write times and higher reliability compared to regular hard drives.
How do I turn on TRIM for my crucial SSD?
To enable TRIM on a crucial SSD, you need to ensure that your operating system and motherboard support it. Once confirmed, you can turn on TRIM in your operating system settings or use a third-party tool to do so.
Why is TRIM important for my crucial SSD?
TRIM is important for a crucial SSD because it helps to maintain the drive’s performance and prolong its lifespan. Without TRIM, the drive can suffer from performance degradation and reduced longevity over time.
Can I upgrade my existing hard drive to a crucial SSD?
Yes, you can upgrade your existing hard drive to a crucial SSD as long as your computer supports it. You will need to clone your existing hard drive onto the SSD using a cloning tool or perform a fresh installation of your operating system onto the new drive.