If you’re looking to upgrade the storage capacity of your ACEPC, swapping the SSD could be a great option. By doing this, you’ll also be able to improve the overall performance of your device. However, you might be wondering about the process involved in swapping an SSD in ACEPC.
Don’t worry – we’ve got you covered! In this article, we’ll take a look at the steps involved in swapping an SSD in ACEPC. We’ll provide you with all the information you need to make the process as smooth and hassle-free as possible. So, let’s get started and dive into the world of SSD swapping for ACEPC!
Prepare for the Swap
If you’re looking to upgrade your Acepc mini PC’s storage, you’ll need to swap out the existing SSD. The first thing you should do is ensure you have the correct replacement SSD that’s compatible with your Acepc model. Once you have the new SSD, you’ll need to turn off your mini PC and unplug any cables attached to it.
Then, unscrew the back panel and locate the existing SSD. Carefully remove it from its slot and replace it with the new SSD, making sure it’s securely in place. After reattaching the back panel and plugging in all the cables, you can turn on your mini PC and enjoy the increased storage capacity.
Remember to back up your important data before making any hardware changes, just to be safe. With these simple steps, you’ll be able to upgrade your Acepc mini PC’s storage in no time!
Backup Data
Backing up your data is crucial before initiating a swap. This critical step ensures that all your valuable information will not be lost during the process. There are a variety of ways to backup your data, from using an external hard drive, online cloud storage, or even USB drives.
Take the time to assess which method will work best for your needs. It is essential to back up data regularly to ensure that you have the most up-to-date information, ensuring that what you’ll be swapping will be the most accurate version. Don’t risk losing vital information, take the precautionary step to safeguard your data and ensure a seamless transition.
Remember, it only takes one missed step to lose everything, so invest in backing up your data to avoid any significant problems and enjoy peace of mind.
Power Off and Disconnect Cables
Preparing for a hardware swap requires a few steps to ensure everything goes smoothly. First and foremost, it’s crucial to power off your device and disconnect all cables to avoid any risk of electric shock or damage. If you’re swapping a desktop computer or laptop, unplug the power cord from the outlet and remove the battery if possible.
For servers or network equipment, turn off the power supply and detach all cables, including Ethernet, power, and peripherals. Once you’ve taken these steps, you can safely proceed with the hardware swap. Remember to handle all components with care and keep them free from static electricity.
Taking these precautions will minimize the chances of technical issues and ensure a seamless transition to the new hardware.
Get Replacement SSD
If you’re looking to upgrade your computer’s storage capabilities, then getting a replacement SSD is a great option. However, before you make the swap, it’s important to prepare yourself and your system to ensure a smooth transition. First, make sure you have all the necessary tools and equipment, such as screwdrivers and SATA cables.
Then, back up all of your important files and data in case there are any unforeseen issues during the process. Additionally, it’s a good idea to check the manufacturer’s website for any firmware updates or compatibility issues with your current system. By taking these steps, you can ensure a safe and successful SSD replacement that will boost your system’s performance and capabilities.
Swap SSD
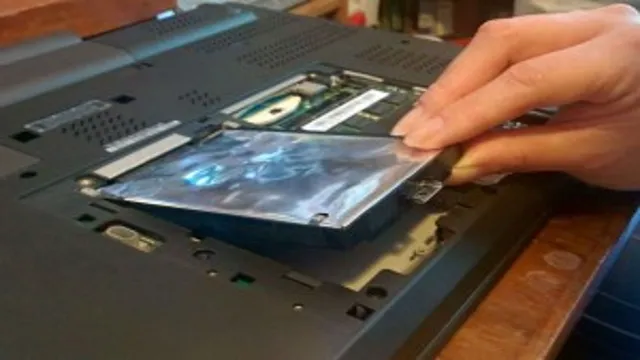
If you’re looking to customize your ACEPC computer, swapping out the SSD is a great option. It provides more space for your files and can improve overall performance. The first step is to remove the cover on the bottom of the device.
This can usually be done by removing a few screws. Once the cover is removed, locate the SSD and disconnect it from the device. You may need to unscrew it from its mount first.
Once the old SSD is removed, you can insert the new one and fasten it in place. Finally, connect the new SSD to the device and replace the cover. It’s important to note that you should back up your data before attempting any hardware changes.
With a little bit of technical know-how, swapping out the SSD on your ACEPC can be a great way to customize your computer.
Remove Old SSD
If you want to upgrade your computer’s hard drive storage, one option is to swap out your old SSD for a new one. However, before you can install your new SSD, you need to remove the old one safely. First, shut down your computer and unplug it from the power source.
Then, locate the existing SSD inside your computer and disconnect all the cables attached to it. Depending on your computer’s design, you may need to remove screws or fasteners to get to the SSD. Carefully remove the old SSD and set it aside.
Keep in mind that SSDs are delicate and sensitive to static electricity, so handle them with care. Once you’ve removed the old SSD, you’re ready to install your new one and enjoy increased storage capacity and faster speeds.
Install Replacement SSD
If you’re looking to upgrade your computer’s storage space and speed, swapping out your old SSD for a new one can provide a significant boost to your system’s performance. Installing a replacement SSD may seem daunting, but with some basic knowledge and the right tools, it’s a relatively straightforward process. First, make sure to back up all of your important data to an external drive or cloud storage.
Then, shut down your computer and unplug all cables. Next, remove the back panel or casing to access the internal components of your computer. Locate the old SSD and carefully detach it from the motherboard.
Insert your new SSD and securely fasten any screws or brackets. Finally, reattach the back panel or casing and reconnect all cables. Power up your computer and make sure the new SSD is recognized.
With a few simple steps, you can enjoy the benefits of a faster and more spacious system.
Reassemble ACEPC
If you’re looking to swap out the SSD in your ACEPC, it’s actually a pretty straightforward process. First, you’ll need to gather your tools – a screwdriver and an external caddy for the old SSD. After shutting down and unplugging your ACEPC, remove the bottom panel and locate the existing SSD.
Carefully unscrew and disconnect the old SSD, being mindful of any clips or cables. Once it’s completely removed, you can install the new SSD in its place and reattach any screws clips or cables. Place the old SSD into the external caddy for safekeeping or disposal.
Finally, replace the bottom panel and power on your ACEPC to make sure it’s working properly. With a little bit of patience and the right tools, you can easily swap out an old SSD for a new one in your ACEPC.
Reconnect Cables and Power On
After completing any necessary upgrades or repairs to your ACEPC, it’s time to reassemble it. First, make sure all cables are correctly plugged back in, including any peripherals, such as a keyboard or mouse. Once everything is connected, it’s time to power on your ACEPC again.
Don’t forget to turn on your monitor and any other devices that may need to be powered on. The process of reassembling your ACEPC can feel daunting, but with a little patience and attention to detail, it will be up and running again in no time. Remember to be gentle with your device and take your time to avoid any mistakes.
By following these steps, you’ll have a fully operational ACEPC in no time.
Restore Data from Backup
To reassemble ACEPC after a malfunction, it’s important to restore data from your backup. This will make sure that all of your files and settings are the way they were before the issue occurred. Start by locating your backup and following the instructions for restoring the data.
Once the data is restored, you can begin reassembling ACEPC. Begin by checking all of the cables and connections to ensure they’re secure and in the proper place. Verify that all of the components are in working order and not damaged.
If any parts need to be replaced, do so before continuing. Finally, power on the device and test it thoroughly to make sure all of the components are working correctly. By following these steps, you can easily reassemble ACEPC and get it running like-new once again.
Final Thoughts
In conclusion, swapping the SSD on an ACEPC mini PC is a relatively easy process if you follow the necessary steps. Make sure to back up all your important data before you begin. Acquire the appropriate tools and use caution when opening up the device and removing the old SSD.
Once you have installed the new SSD, remember to reattach all cables and screws properly. Finally, power on the device and reinstall your operating system and all necessary files. With a little bit of patience and attention to detail, you can seamlessly upgrade your ACEPC mini PC’s storage and enjoy a faster, more efficient computing experience.
And don’t forget, if you have any issues or concerns during the process, you can always consult the manufacturer’s support resources or seek advice from the online ACEPC community.
Conclusion
In conclusion, swapping out the SSD in your AcePC is as easy as swapping out a lightbulb! With a few simple steps, you can upgrade your system’s performance and storage capacity in no time. So why settle for a dimly lit computer when you can shine bright like a diamond with a shiny new SSD? Don’t wait, swap it out and join the SSD revolution today!”
FAQs
How do I swap the SSD on my ACEPC computer?
To swap the SSD on your ACEPC computer, first shut down and unplug the device. Remove the screws on the bottom panel and carefully lift it up to access the current SSD. Unscrew the SSD and gently remove it from its slot. Insert your new SSD and screw it into place before reattaching the bottom panel.
What size SSD should I use for my ACEPC computer?
The size of the SSD you can use for your ACEPC computer will depend on the specific model you have. Some may have an M.2 slot that supports different sizes of SSDs, while others may require a specific size. Check your computer’s specifications or manual to ensure compatibility.
Is it easy to upgrade the SSD on an ACEPC computer?
Depending on the model of your ACEPC computer, upgrading the SSD can range from easy to moderately difficult. If your computer has a removable bottom panel and easily accessible SSD slot, it should be a simple process. However, if the SSD is built-in or hidden under other components, it may require more technical skills and tools.
Can I clone my current SSD to a new one for my ACEPC computer?
Yes, you can clone your current SSD to a new one for your ACEPC computer using a data migration software such as EaseUS Todo Backup, Macrium Reflect, or AOMEI Backupper. These tools can make an identical copy of the contents of your existing SSD, including your operating system, files, and settings, to the new SSD.