Upgrading your computer’s storage devices can improve the overall performance of your system. One of the most common upgrades people make is to switch to a solid-state drive (SSD) from the traditional hard disk drive (HDD). SSDs offer faster read and write speeds, making your computer boot up quicker and applications run smoother.
But what if you’re not sure how to change your SSD? Don’t worry, we’ve got you covered! In this step-by-step guide, we’ll walk you through the process of changing your SSD, giving you the confidence to upgrade your system’s storage on your own. So, grab your screwdriver and let’s get started!
Backup Your Data
If you’re changing your SSD, it’s important to backup your data before making any changes. Backing up your data ensures that you have a saved copy of important files, documents, or photos in case something goes wrong or gets lost during the SSD swap. There are a few different ways to backup your data, including using an external hard drive, cloud storage services, or specialized backup software.
An external hard drive is a good choice if you have a large amount of data to backup and don’t have reliable internet access. Cloud storage services like Google Drive or Dropbox are a great choice if you want to access your data from multiple devices or share files with others. Specialized backup software like Time Machine or Acronis True Image can automate the backup process, making it easier to ensure your data is always safe and secure.
No matter what option you choose, taking the time to backup your data before replacing your SSD is an important step to ensure the safety and security of your important files.
Copy important data to an external drive or cloud storage
Backing up your important data is crucial in today’s digital age. Imagine losing all of your precious memories, important documents, and work-related files due to a computer malfunction or hardware failure. That’s why it’s essential to copy your data to an external drive or cloud storage regularly.
This simple step acts as a safeguard against unexpected data loss. External drives provide the flexibility to store large amounts of data, which can come in handy when you need to transfer files between devices or keep a backup of your computer’s hard drive. Cloud storage services like Google Drive, Dropbox, and OneDrive offer even greater convenience and accessibility, allowing you to access your data from anywhere and on any device.
Plus, with automatic backups, you won’t have to worry about manually copying files to an external drive. So, take the time to backup your data and rest easy knowing that your important information is safe and secure.
Verify that your backup is complete and accessible
Backing up your data is an essential practice that can save you from headaches and financial losses if something goes wrong with your tech devices. However, just creating a backup copy of your files is not enough. You need to ensure that the backup is complete, reliable and accessible in case of an emergency.
Regularly verify the backup files to ensure they contain all the necessary data, and consider using different mediums to store copies in case your primary backup media fails. Additionally, test the backup files periodically to make sure you can easily retrieve the data when needed. Remember, the purpose of a backup is to provide a safety net, but that safety net is only useful if it can do its job when needed.
Therefore, be diligent in your backup practices, and you will always have peace of mind knowing that your data is safe and accessible.
Select and Purchase a New SSD
If you’re looking to change your SSD, the first thing you need to do is select and purchase a new one. Start by determining what size and type of SSD is compatible with your computer. You can check your computer’s manual or manufacturer’s website for this information.
Once you know what specifications you need, you can start comparing different SSDs to find one that fits your budget and performance needs. Look for reputable brands and read reviews from other users to get an idea of how the SSD performs in real-world use. Don’t forget to consider the warranty and any additional software or features that come with the SSD.
Once you’ve made your decision, you can order the SSD online or purchase it from a local retailer. Just be sure to follow the manufacturer’s instructions for installing the new SSD and transferring your data over. In no time, you’ll have a faster and more reliable computer with your new SSD.
Determine the size, type, and brand of SSD you need
When it comes to shopping for a new SSD, there are a few key factors to consider: size, type, and brand. Size-wise, you’ll want to determine how much storage space you need based on your usage habits. Do you use your computer primarily for surfing the web and checking email? Or do you store lots of large files, such as photos and videos? Type-wise, you’ll need to decide between a SATA or NVMe SSD.
SATA tends to be more affordable, but NVMe is faster and more expensive. Finally, there’s the question of brand. While there are cheaper no-name brands available, it’s often worth investing in a reputable name-brand to ensure quality and longevity.
So before making a purchase, take stock of your needs and do some research to find the SSD that’s right for you.
Purchase from a reputable seller
When selecting and purchasing a new SSD, it’s crucial to purchase from a reputable seller. This not only ensures the quality of the product but also the protection of your personal information and financial data. A reputable seller is one that has a track record of providing genuine products, excellent customer service, and reliable shipping.
Checking the seller’s rating and reviews from previous customers can provide insight into their credibility. Additionally, it’s important to check if the seller offers a warranty or return policy to further protect your investment. By purchasing from a reputable seller, you can confidently make your SSD purchase knowing that you are getting a high-quality product and excellent customer support.
Prepare Your Computer
Changing your SSD may seem daunting, but with a little preparation, it can be a breeze. Before you start the process, it’s important to back up your important files to an external hard drive or cloud storage. Once you’ve backed up your files and shut down your computer, you’ll need to locate your computer’s SSD and remove it from the slot.
Depending on your computer’s model, this may involve removing the battery and freeing up the SSD from its current location. Be sure to consult your computer’s manual or online resources to ensure you’re following the correct removal process. Once you’ve removed the SSD, you’ll need to attach the new SSD to your computer in the same slot and reverse the removal process.
Finally, you’ll need to reinstall your operating system and transfer your files back onto your computer. With these simple steps, you can change your SSD without too much trouble.
Shut down your computer and unplug it
Preparing your computer for maintenance or repair is crucial to ensure that you avoid any potential damage or problems that could occur during the process. The first step to take is shutting down your computer and unplugging it from the power source. This will prevent any electrical shock or short-circuiting that may happen while you’re working on it.
Once you’ve unplugged your computer, make sure to also disconnect any other peripherals such as printers, scanners, or external hard drives. It’s important to do this even if you aren’t planning on working on them specifically because they can still draw power and cause interference or damage to other components of your computer. Taking the time to properly prepare your computer can save you from future headaches and expenses.
So, don’t skip this step and make sure to always disconnect and unplug before doing any maintenance or repairs.
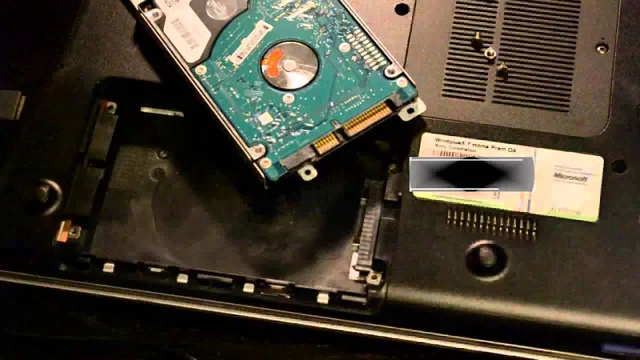
Open the case and locate the old SSD
When it comes to upgrading your computer’s SSD, the first step is to prepare your computer for the task. Make sure to shut down your computer properly and unplug it from any power source. Once you’ve done that, you can proceed with opening the case and locating the old SSD.
This task requires some level of technical know-how, so if you’re not confident in doing it, seek the help of a professional. When you open the case, you’ll see the motherboard and all the components that are attached to it. Look for the old SSD, which should have a rectangular shape and is connected to the motherboard with a cable.
If you’re unsure which component is the SSD, consult your computer’s manual or do some research online. Once you have located the SSD, you can proceed with removing it from the motherboard, which typically involves unscrewing some brackets or clips that hold it in place. Remember to handle the old SSD with care, as it contains sensitive data that you might need to transfer to the new SSD later on.
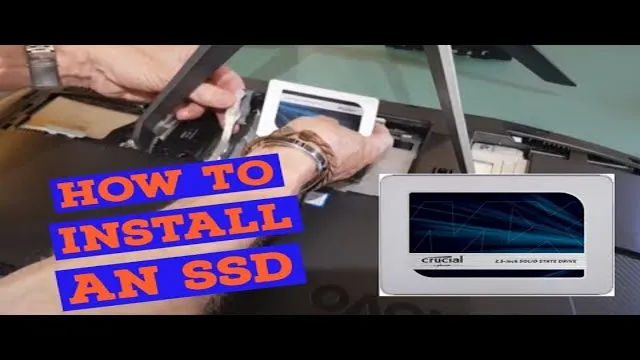
Install the New SSD
If you’re looking to upgrade your computer’s performance, changing your SSD is a great way to start. Before we get started, make sure you have all the necessary tools and software to complete the installation. Once you have everything you need, shut down your computer and remove the old SSD.
Open the new SSD package and carefully insert it into the open slot of your computer. Make sure the connection is secure and fasten the screws to keep the SSD in place. Once it’s installed, turn on your computer and check to see if it’s recognized by your system.
You’ll need to format the new SSD before you can start using it. This process may take a while, so be patient. After the formatting is complete, you can start transferring your files and documents to the new SSD.
Don’t forget to enjoy the improved speed and performance of your computer once the process is complete! With these simple steps, changing your SSD is easier than you think.
Connect the new SSD to your computer’s power and data cables
When it comes to installing a new SSD, connecting it properly is an essential step towards success. First, shut down your computer and unplug all power cords to avoid any risk of electrical shock. Then, locate the power and data cables inside your computer’s case.
Locate an empty 5-inch slot and insert the new SSD into it. Next, use the power and data cables to connect the new SSD to your computer.
Make sure the cables are firmly connected, and there are no loose connections. Once all cables are secure, turn on your computer to ensure the SSD is properly recognized. Don’t forget to format your new SSD to ensure optimal performance and increased storage capacity.
By following these steps properly, you’ll have not only a new and efficient SSD but also increased speed and storage capacity for your computer.
Secure the new SSD in its mounting bracket
When installing a new SSD, it is important to secure it in its mounting bracket to ensure that it is firmly in place. This will prevent the SSD from shifting or moving during operation and potentially causing damage. To secure the SSD in the mounting bracket, first check the bracket to ensure that it is compatible with your new SSD.
Once you have confirmed this, slide the SSD into the bracket and align it with the screw holes. Then, use the screws provided with your mounting bracket to attach the SSD firmly in place. Make sure that the screws are tight but not overtightened, as this can damage the SSD.
With your SSD securely fastened in the mounting bracket, you can proceed with the rest of the installation process knowing that your SSD is safely in place.
Replace the computer’s case and plug it back in
If you’ve just installed a new SSD in your computer, you’ll need to replace the computer’s case and plug it back in. First, power down your computer and unplug all cables. Carefully remove the old case and set it aside.
Then, take your new SSD and slide it into the slot in the motherboard, making sure it’s secure. Once it’s in place, affix any screws or brackets that came with the SSD to keep it in place. Finally, plug in any cables that were disconnected during the installation process, including power and data cables.
You’re now ready to turn your computer back on and begin enjoying the benefits of a faster, more efficient system. Overall, installing a new SSD may seem daunting, but with a few simple steps, you can upgrade your computer and improve its performance.
Restore Your Data
Changing your SSD can be a daunting task, especially if you have important data on your current drive. The good news is that there are a few steps you can take to ensure that your data is safely transferred to your new SSD. The first step is to create a backup of all your important files, either on an external hard drive or on the cloud.
This way, even if something goes wrong during the transfer process, you’ll still have a copy of your data. Once you’ve created a backup, it’s time to proceed with the SSD swap. You’ll need to remove your old SSD and replace it with the new one, making sure it’s properly inserted and secured.
Once you’ve done that, you can start the process of transferring your data to the new drive. This can be done using a data migration tool or by manually transferring your files. Whatever method you choose, make sure to double-check that all your data has been successfully transferred before wiping your old SSD clean.
With a little bit of preparation and patience, you can successfully change your SSD without losing any of your important data.
Boot up your computer and enter the BIOS/UEFI setup
If you’re having trouble accessing your data due to a faulty computer or software, don’t panic – there are ways to restore it. One of the first steps you can take is to enter the BIOS/UEFI setup on your computer. This can be done by turning on your computer and pressing a specific key (usually F2 or Del) during the boot-up process.
Once you’re in the setup, you’ll be able to navigate through different options to try and fix your data issue. This could include changing boot order or resetting the system to default settings. However, if you’re unsure of what to do, it’s always best to seek professional help or advice from someone with experience in computer repair.
Restoring your data can be a tricky process, but with the right knowledge and tools, you’ll be able to get your data back in no time.
Verify that the new SSD is detected and set as the boot drive
After successfully detecting and setting up your new SSD as the boot drive, you can now restore your data. This might seem like a daunting task, but it can be done easily. The first step is to connect your old hard drive and copy all the files and data you need onto an external storage device.
Once this is done, disconnect the old hard drive and connect the external storage device to your new SSD. Next, you can begin to transfer all the files and data onto your new SSD. This can be done manually or by using various software available.
It is essential to ensure that all your data is properly backed up before making any changes. This will help you avoid any potential data loss. With a successfully restored system, you can now enjoy the benefits of a faster and more reliable system.
So sit back, relax and enjoy all that your new SSD has to offer!
Running the backup data transfer
Restoring your data can be a lifesaver in case of an unexpected data loss. One important step in the process of restoring your data is running the backup data transfer. This essentially involves moving your backed-up data from the storage device onto your computer’s hard drive.
To begin with, ensure that you have a stable and reliable internet connection to initiate the transfer process. Next, check that you have enough space on your hard drive to accommodate the transferred data. Depending on the size of your backup, this process can take some time, so be sure to keep an eye on your computer during this stage.
If you encounter any issues or error messages during the transfer, it’s advisable to contact your service provider or IT specialist for assistance. Overall, once the backup data transfer is complete, you can breathe a sigh of relief knowing that your important files and documents have been successfully restored.
Conclusion
And there you have it! From selecting the best SSD for your needs, to backing up your data, and finally installing and migrating to your new drive, you are now ready to take on the world at lightning-fast speeds. So go on and embrace this upgrade with open arms, and as the saying goes, may your load times be low and your frame rates high!”
FAQs
What do I need to change my SSD?
To change your SSD, you’ll need a new SSD, a screwdriver, and a cloning tool.
Can I change my SSD myself?
Yes, you can change your SSD yourself. Just make sure to follow proper electrostatic discharge precautions and use a cloning tool to transfer your data to the new drive.
Is there anything I should do before changing my SSD?
Yes, it’s always a good idea to back up your data before upgrading your hardware, especially when it comes to storage devices.
How do I clone my SSD to the new one?
To clone your SSD, you can use a cloning tool like Macrium Reflect, Acronis True Image, or Clonezilla. These tools will create an exact copy of your old SSD on the new one.
How do I know if my new SSD is compatible with my computer?
To ensure compatibility, check your computer’s documentation or manufacturer’s website for information on the type of SSDs that are compatible with your system. You can also use a system information tool like CPU-Z to check your motherboard’s chipset and determine what type of SSD interface it supports.